

If your DB9 has developed a Lumpy Idle (see my in depth post on this) you’ll be faced with either taking it to the Dealership (and a $1,800+ labor bill plus parts) or undertaking the task yourself over a weekend. There is a considerable level of skill and determination required to accomplish this feat. Easily the most complicated service event I’ve done yet on my 9. If you have the gumption, tools and the time it can be a rewarding and cost saving experience. I think anyone can do it if you properly prepare.
I did a LOT of research on this prior to starting. I Googled, checked the Official Aston Martin Workshop Manual, read many forum articles of like-minded do it yourselfers, and even had a few readers of this blog send in their tips and suggestions. What you’ll be reading (and watching in the accompanying videos) is a compilation of all that advice and my own hands on experience added to it.
Forum Posts I got some background from
Credit where credit is due, I gathered background from a few others worth noting here:
- Aston Martin Owners Club post by Herb
- PistonHeads post by Old Phart
Keep in mind that I don’t agree with all the things going on in all the posts, so read on to learn more.
How Aston says to do it
It would seem like Aston Martin’s official Workshop Manual would be the ultimate authority on the process, but it’s not. My opinion is that it was created by a Technical Writer (not a mechanic) who was sitting with a designer and asking “Hey, what do you have to do to change the Coils and Spark Plugs?” and the designer rattled off an answer, but didn’t actually try and do it on a real car with the engine in situ.
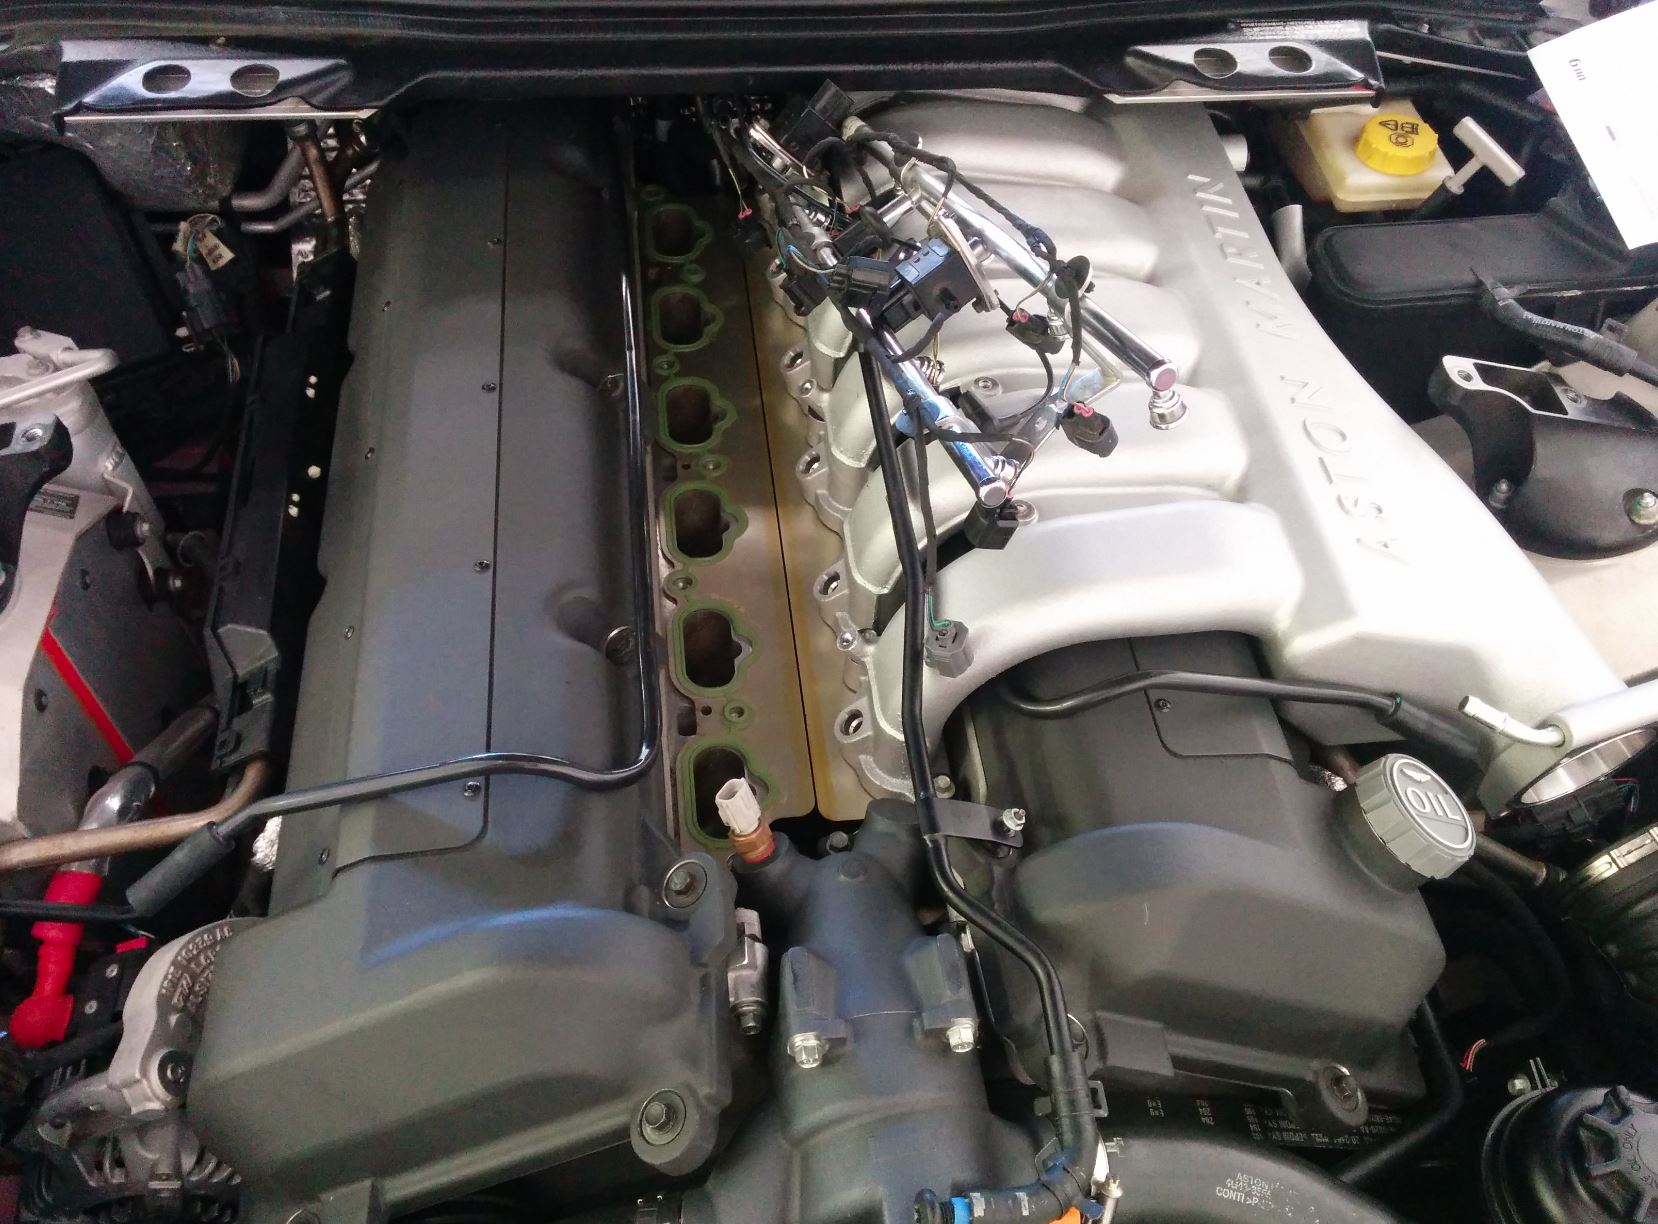
Regardless, here is the link to the relevant sections of the workshop manual. It’s mostly correct, but you can entirely skip the section about removing the fuel rails. I bought the special tools, and was determined to follow their guide, but it is nigh impossible to access the fuel rail connectors with the engine in the car. Even after removing the entire intake system, they are buried 8” deep under the cowl, and you’d be hard pressed to get even the smallest hands into the space, see anything, and even then manage to use the special tools to disconnect them [the photo in their manual is taken with the engine removed from the car]. Even if you got the rails decoupled, you would have to cut a series of special plastic tie-wraps to separate the electrical harness that is strapped to the fuel rails, and even then you’d still have the harness lying around. As others have documented before me, you can do it leaving the fuel rails attached, and carefully moving them aside as you complete the work. My videos will show how.
Dealer Cost to Fix
What does it cost to get this fixed at an Aston Martin Dealership? Good piece of data to know if you are weighing if its worth the bother to fix it yourself. Recently there was a 2007 DB9 sold over on www.BringATrailer.com, and the owner posted his last Dealer Service Invoice from a visit in 2020 when he had all the niggles fixed on his car. The dealership was located in Northern California (one that I’ve visited before).

They charged $2,514 USD for parts, and $1,880 USD to install them, for a total of $4,394 USD. As you’ll see below, you can do it yourself over a long weekend for less than $2,000 in parts saving yourself about $2,400.
How long will it take?
I tackled it over a long weekend. I had already ordered and received all my parts, and dedicated 4-6 hours per day to it. Having never done it before and taking the time to shoot the videos and photos definitely added to the effort. If I was asked to do it again with all the knowledge, I could knock it out in a single day (8 hours or less). A Dealer is supposed to be able to do it in 5.5 hours.
I paced myself, and broke the effort into the 3 days, tackling it in blocks:
 Day One – All the disassembly to the point I had the plugs removed. I didn’t want to be tired and grumpy when I started the reassembly. My back was killing me at the end of the day having been leaning in over the vast and low engine compartment all day.
 Day Two – Preparing and installing the new parts. I wanted ample time to get all the parts cleaned up, serviced, and installed – taking the time to do it and not pushing myself to put it all back together in one day. I got to the point where the Intake Manifolds were reinstalled.
 Day Three – Finishing up the steps and firing the engine back up. The easy home stretch since the manifolds were already installed (that’s the hardest part).
Steve’s Guide to the Process
So here is MY summary guide to the steps you’ll want to follow. In order to make the upcoming blogs and video’s a manageable size, I have it broken down into easy to absorb smaller steps. Each post will include photos, video and all the relevant torque specs and service tips I can come up with. As I complete each blog/video I will link it here:
- Inspect your Coil Packs to find out if they are 2-pin or 3-pin
- Purchase your parts
- Gather the necessary tools
- Access the Cabin Fusebox
- Depressurize the fuel system
- Disconnect the battery
- Install Fender covers
- Remove the engine bay cross braces
- Remove the intake manifold center brace
- Disconnect the fuel rails and remove the fuel injectors
- Disconnect the ancillaries connected to the Intake Manifolds
- Remove the Intake Manifolds (including the dreaded rear bolts)
- Remove the Spark Plug Covers
- Remove the Coil Packs
- Remove the Spark Plugs
- Prepare and Install the new Spark Plugs
- Prepare and Install the new Coil Packs
- Prepare and install the Spark Plug Covers
- Remove and Replace the PCV Valves and assemblies (if you are servicing this too – recommended)
- Prepare and Install the Intake Manifolds (including gaskets)
- Prepare and Install the Fuel Injectors and Connect the Fuel Rails
- Reconnect the ancillaries to the Intake Manifolds
- Prepare and Install the Intake Manifold Center Brace
- Prepare and Install the Engine Bay Cross Braces
- Reconnect the Battery
- Restarting the Engine for the first time
And because you had the battery disconnected you will need to:
- Recalibrate the Door Window Glass Auto Drop Positioning
- Calibrate the Seat Modules
- Set the Clock
- Relearn the Misfire Correction Factors. This is the final and important step necessary since the old calibration would be lost with the battery disconnect, and needed to be redone anyways since you’ve changed the Coils and Plugs and the correction factors need updated. If you skipped my advice and left the battery connected, you will need to head to the dealer to ask (a.k.a pay) them to use their AMDS system to tell the system to relearn the correction factors, and hence I think you should just disconnect the battery and let the system dump the old ones when the memory is lost.
I hope you enjoy the series of blogs and videos that follow next. To aid in this I have created a YouTube Playlist that links all the related videos together into a single channel, and they will play in order of how to do the entire project. Enjoy!

Hi Steve, thanks for another post on this job, I have a question, do the ignition coils have a bumper on top? if so what is it made of ? and do you remember the thickness? Thanks.
LikeLike
Not sure what you mean by a ‘bump on top’. You can actually see the coils in the first photo of this article. I have much closer photos too I can send you. There was nothing attached to the coil other than the wiring harness and the bolt that mounts it.
LikeLike
First class Steve, keep up the good work, some of us rely on your instructions.
Thanks again, fantastic work.
Lez UK
LikeLike
Thanks Les. Enjoying doing it as a hobby. Spread the word ….
LikeLike
I’m already doing just that Steve your blog is a marvellous source of information.
Lez UK
LikeLike
I just finished the same project yesterday in addition I had removed cam cover to replace spark plug hole gasket as I had noticed some oil in my last 2 spark plug well.
Aston has designed a plastic tab which is rigid, it comes in at 90 degree angle and it’s also attached to cam cover though a stud /screw which is projecting too high above this plastic tab so it’s impossible to lift the plastic tab and remove it.
I used a small hacksaw blade covered with tape , to cut off part of the over projecting screw.
When reinstalling I just installed the screw which I shortened so next time it’s not very difficult. AM says to remove rear suspension to get access to 2 bolts which will allow you to move plastic piece. After I did above I had removed belly pan and I think it’s possible to loosen those bolts from under the car which might allow one to wiggle the plastic harness bit.
LikeLike
Wow, that certainly sounds like it was a huge challenge. Congrats on figuring out a way to get it done. All that to change the cam cover seal around the plugs?
LikeLike
I can use help on another topic.
My 2009 DB9 volante Roof will open about 2 inch and then stop. If I manually lift tension bow (rear most part of roof which houses rear window) then try to open the roof it opens fine.
If I close it it works fine.
Any iideas on how to trouble shoot it.
CRM IS RELATIVELY NEW, SO ITS NOT CONVERTIBLE roof module.
Thanks.
LikeLike
Pingback: Installing the Spark Plug Covers on an Aston Martin DB9 – Aston 1936
Pingback: Installing the Intake Manifolds into an Aston Martin DB9 – Aston 1936
Hi
I’ve just purchased my first 2005 DB9, the previous owner bought it new from HWM (I live a few miles from Walton On Thames, and used to work near the dealers).
Your videos and advise are something that I will use again and again, as I have always done my own maintenance for 40+ years.
Many thanks for making the effort, it is such a help, even though I do have the AM repair manual. Finding the cabin fuse box for one!
Best
Peter
LikeLike
Thank Peter, nice to hear. Glad the articles and videos help. I’m always interested to know what niggles are breaking on the DB9’s so I can line up new ideas for videos, so share what’s going on with your car from time to time.
LikeLike
Pingback: Installing the Engine Bay Cross Braces in an Aston Martin DB9 – Aston 1936
Pingback: Reconnecting the Battery in an Aston Martin DB9 – Aston 1936
Pingback: Restarting your Engine for the First Time after Changing the Spark Plugs and Coil Packs in an Aston Martin DB9 – Aston 1936
Hi Steve
Thank you for the excellent write up. I have now ordered all the parts to change my spark plugs and coils, £1,350 including VAT (before discount). I intend to change the PCV valves at the same time. Any chance of an early draft copy of your instructions for this?
Patrick
LikeLike
Let me see if I can get the Blog portions published this weekend…..
LikeLike
Thank you Steve. I’ve now taken the inlet manifolds off with no issues (it took about 4 hours). I’ve followed your instructions word for word, they’ve been spot on so far. Like you, my alarm didn’t go off when I disconnected the battery after about 30 minutes (I have an early 2005 DB9). At the time I did think I shouldn’t have replaced the fuel pump relay before disconnecting the battery but got away with it. My car only ran for 3 seconds before cutting out but there was a lot of fuel leaking out when I removed the rails. I was lucky to get the rear right manifold bolt off quickly but took a lot longer to get the socket onto the left one. There’s a big connector under my scuttle player which stopped me taking the plate out completely but there was enough room to get the socket extension through. I’ve no idea what the connector is for but it seems to go to the wiper motor. I’m right hand drive so the wipers work opposite to yours maybe my wiring is longer? I want to complete the job tomorrow but my new parts haven’t arrived yet so I may have a day off!
LikeLike
Hi Steve (Aston 1936),
Just thought I would drop you a message to advise that the link on your website isn’t correct.
Quote:
If you check out the NGK website directly you can use their plug finder tool and look up your car it returns two options, a $11 Laser Platinum Plug that is supposed to match the OEM requirements, and a $7 Iridium Plug that supposedly exceeds it (which is what I would try if I was that adventurous). Vastly less expensive than the bespoke dealer supplied plugs, but I am a little nervous about swapping out such an important part that’s so difficult to get to. Unquote:
I followed the link to the Iridium Plug and you arrive here ….. tried to add a photo but won’t let me, I’ll e-mail a Word doc to you !
I took the fitment tab and for sure they say/verify the plugs are suitable for a DB9 ……..
So not wanting to wait for delivery from the USA I decided to buy in the UK and bought NGK 3764 BKR6EIX-11 IX Iridium Plugs (12-off) that duly arrived 2 days later.
I have bought the coil packs and gaskets etc. from HWM Aston Martin (Rob) and have been busy over the last week undertaking the stripping down. All has gone swimmingly with the use of your video, credit where credit is due, until I come to fit the plugs. I open all the plugs and re-gap them all as they are a tad tight straight out of the box (used 1.2mm) and then I remove the first plug from the engine. Oh taper fit plugs and the new one’s are gasket type with the compressible gasket/washer that requires a flat shoulder to seat against.
After much head scratching and looking down plug holes and feeling for a square/flat ledge with a long screwdriver that this plug might seat against the conclusion was ….. inconclusive !!!!
I decided to try one of the plugs in the engine and I did manage to torque it up without too much trouble … but then I would be able to wouldn’t I … but would it be a seal? What would the effects of temperature and pressure be? No, decided I was not happy so out it came. There was no evidence of irregular compression of the gasket on the plug and looking down the plug hole no sign of any damage to the head (biggest concern) so I decided to take further advice and ring NGK but being Sunday had to wait until today. I’ve now spoken to NGK-UK who say that plug is not what they recommend for the DB9 and when I said it was from their website they drew my attention to the fact that it says “We are not NGK Spark Plugs USA”
The recommended Iridium plug by NGK – UK office is NGK ITR6F-13
I thought I would check with Aston as well so I rang HWM and spoke to the Service Department. They couldn’t tell me if the plug seat effectively had dual seating machined surfaces, they have always fitted taper plugs.
Enough said the answer is clear NGK ITR6F-13 that has a taper fitting is the correct Iridium plug for anyone wanting to try them. Complete new set arriving with me on Wednesday.
Just checked and the Laser Platinum Plug link from your Blog, it is also confirmed as suitable but the pictures show gasket fitting.
Incidentally I am now “Aston 2209” (2005MY) having found my build number whilst disconnecting the battery at the start of the job.
I have a couple of bits of info on the removable access cover plate to get at the back bolts of the intake manifolds to share as well but will send you that later. Where you only have a unconnected socket under the cover plate I have both the socket and plug and with some heavy wires going from it that I will try to trace. I also had a couple of other issues to overcome.
Best regards,
Mike (Aston 2209)
LikeLike
Hi Mike. Thanks for the feedback. Sorry you had such and adventure with the plugs. Sounds like you are making headway through the project though even with the turmoil. If you have some pictures of the various plugs, I’d be happy to update the article to steer people clear of the wrong stuff and on to the right stuff. Reply when you have a chance and we’ll find a way for you to send me some pictures or write up. Would love to know what that big connector was for.
LikeLike
Hi Steve,
Please see the attached pdf that includes the photos that I tried to upload to your Blog but it didn’t accept the photos. Also for your information are the photos as jpgs.
You could check what I am saying by following your own link to the spark plug outlet/shop from your Blog.
I have a video made of changing the PCV valves that could be of interest but it is quite a large file so could do with sending you it via “We Transfer” or “Drop Box” or similar but I need an e-mail address to send it to.
I appreciate you might not wish to give me your personal e-mail address (promise not to bombard you with e-mails, I’m a 63 year old shortly to retire Mechanical Engineer not a teenage groupie !!!) but do you have a second e-mail address I could send to. I will try to send it by another reply to your response to me from Aston 1936 but suspect it might be blocked due to the file size.
My personal e-mail address is [removed for your benefit] if you wish to send me an e-mail address so I can send you the video by “We Transfer”. When you get the video you are welcome to upload it to Aston 1936 if you wish for the benefit of others if you think the quality is good enough. If you don’t use it I totally understand I certainly have no wish or intention to muscle in on your Website after all it’s your personal experiences and projects that you kindly share for the benefit of us other BD9 owners who like to get their fingers dirty.
Best regards, Mike (Aston 2209)
________________________________
LikeLike
Hi Mike,
Thanks for that. Didn’t get the PDF or otherwise, but I have sent you an email separately. Looking forward to seeing what you got. BTW – I was checking out the pictures of the Aston Martin supplied plugs, they sure have a built in taper.
LikeLike
For anyone ordering parts for the coil pack project from HWM, here’s what it cost me in mid-August 2017:
Intake manifold gaskets: 2 for $198.88
Spark plugs: 12 for $240.47
Three-pin coils: 12 for $930.04
Injector-Manifold seals: 12 for $33.85
Injector O-rings: 12 for $35.69
Vacuum Harness: $138.99
Vacuum Harness – Engine: $43.16
Shipping to USA: $78.32
From the time I gave Mike Field my credit card, it took 11 days for the parts to arrive. One hiccup was that when they arrived in the US (POE Memphis) FedEx wouldn’t send them onward until I gave them a specific breakdown of what the specific parts are and what the gaskets are made of! The total cost of $1699 isn’t quite as low as Steve’s was (the 3-pin coils are a big part of that) but my local independent wanted $2400 just for the coils!
-Mike
LikeLike
Btw…Mike at HWM discounted everything 17% across the board upon referencing Steve and Aston1936.
LikeLike
Thanks very much HWM for looking after him!
LikeLike
Hi Mike and Steve,
I sent a parts list req and Rob from HWM sent me the following response;
From: Rob Sims [mailto:Rob.Sims@hwm.co.uk]
Sent: Tuesday, January 02, 2018 1:45 AM
To: tech_setter@yahoo.com
Subject: RE: 2005 Aston Martin service parts
Dear Theron,
Thank you for your enquiry. Unfortunately AML pulled the plug on UK dealers supplying parts outside of the EU. I think we’re ok with models up to original Vanquish, but no later.
Apologies,
Rob.
LikeLike
All,
However I did find another location that gave me around same price for parts
Mick and Sarah @ Specialist Motors. They didn’t charge for shipping and Im expecting my order by Tuesday here in Texas, which put me at 5 business days to receive from the time of order. I would post the PDF however I don’t see way to post image so here is txt version of my order and price.
SPECIALIST MOTORS
‘LTD
THERON SMITH
TEXAS
USA
Printed
21 Boston Parade
Hanwell
London W7 2DG TEL: 0044(0)2085685153
FAX: 0044(0)2088404118
E-MAIL: info@isp-gutmann.co.uk
VAT NO: 872283410
£ UK POUNDS STERLING
Quote 11351
09/01/1
09/01/18
1 of 1
VAT Reg No 872 2834 10
12 4G4E-12A366-AA PLUG COIL 2 PIN 47.46 569.52
2 1R12-08-10317 0 RING 1.02 2.04
12 6G43-08-10474 SEAL 2.27 27.24
12 6G43-08-11260 SEAL GREEN 2.40 28.80
1 1R12-08-10077PK GASKET SET (PR) 165.34 165.34
1 4G43-9030-AH CAP 142.26 142.26
935.20
0.00
Registered Office: 14 Boston Garden, Brentford, Middlesex TWB 9LW
Registered Number 5638657
935.20
LikeLike
The Spark Plugs I purchased locally and I too bought the Iridium’s NGK 4477 ITR6F-13 Summit Racing stocked them at 9.45 each USD.
https://www.summitracing.com/oh/parts/ngk-4477
LikeLike
Thanks for all the information. Yep, I had heard that AM was making a fuss with the UK dealers shipping to the US. Specialist Motors has been stepping in to fill the gap since they aren’t a dealer, they aren’t bound by any contract to AM.
I’ve heard there might be a difference in the plugs. Check the ‘shoulder’ above the threads, compare the factory plug you remove to the new plug you are installing. I’ve heard that one might be tapered and the other might be squared off. Not sure if this is an issue, just curious.
LikeLike
Glad you got what you needed from them. Too bad about FedEx, as noted I was amazed when the parts were here in 3 days.
LikeLike
Steve-
While my dismantling time was pretty fast, reassembly didn’t go so well. My biggest issue was wrestling the fuel rails into position without knocking the injectors out of the ports…which I did a couple of times. It took me an hour to find one of them (including removing the belly pan, which actually didn’t help)…it somehow ended up in that little tunnel formed in the midline under the intake manifold gaskets. Of course, I had to remove one of the manifolds again and remove the gasket to find the injector. I was pretty frustrated with myself.
But…I’m nervous about how the injectors fit into the “bells” of the fuel rails. Did you get a sense that they insert firmly and securely, snapping home and into place? To me it seems like some of them are kind of “pushing” against the bells, if you know what I mean…
Thanks.
-Mike
LikeLike
Hi Mike. Glad you are being cautious. Yes, the injectors don’t have a satisfying ‘click’. The cups merely slide down over the O-Ring. I noted that I added a little engine oil lubricant to the O-ring to help the process. As you tighten down the fuel rail (tightening the mounting bolts each a bit at a time to it goes down evenly), wiggle-jiggle and double check the alignment of the injectors to make sure they are all properly fitting into the cups. Honestly it went pretty smoothly. Good luck, take it slow and easy.
LikeLike
All done. A neighborhood guy who’s a mechanic at a local (non-Aston) dealership “helped” me and actually bent one of the fuel rails by bolting it back down when it wasn’t seated properly over one of the injectors. It was terrifying, as one of the cups that mates with the injector was out of alignment and the rearmost cup didn’t cover the o-ring.
I weighed ordering a replacement rail, but decided that I’d first try to straighten it. I just used my hands (which required me carefully lying across the manifold to get enough leverage), and when I reconnected the battery and turned on the key there was no leaking gas. I revved the engine and still no problem, so I reinstalled the braces.
I’ve only driven a mile or so since reassembly, but everything appears to be holding and I’m amazed by how smooth it’s running and I haven’t done the misfire correction yet!
I’ll probably be paranoid for the next 10,000 miles, though…
My big takeaway is that these cars require patience and caution and care. Following Steve’s instructions will result in success, but blazing away at full speed like it’s a Hyundai will lead to disaster.
LikeLike
Yikes!! Those rear injectors and components are hard to see, even more reason to go slower and make whatever effort is needed to be sure you know whats going on so you don’t break anything expensive. Glad you were able to ‘ease’ it back into position and your baby is back on the road!
LikeLike
Final comment (I hope!) on this: my wife has a broken foot, so I did the shopping rounds solo in my DB9 today. I was out for three hours in 87-degree weather and all was fine. Multiple starts and stops, and a foot-to-the-floor pass of a Miata that was doing 35mph on a 55 limit 2-lane road.
Looks like I dodged a bullet here!
LikeLike
Dodged a bullet and having some fun!
LikeLike
Thanks for sharing this informative article on changing the coil packs and spark plugs in the Aston Martin.
LikeLike
Mike you and the other contributors are legends ! Just completed this procedure over 2.5 days. Very nerve wracking but also very rewarding, and I learnt a lot about the car. Thanks very much.
LikeLike
Mike,
I have the Foxwell obd2/reader like you. Cannot for the life of me find the misfire correction learned in the live data. Do you know Which menu structure it is in?
LikeLike
Hi mike.Found it ! FYI and others with the Foxwell – it is listed as “36-1 correction factors learned” in the Foxwell live data parameters. I was able to watch it change after attempt 3 on the coast down procedure. You were right about needing a long stretch of straight road.
LikeLike
Glad the series helped you out!
LikeLike
Hi Steve,
first of all thank you for what you did here so far, helped a lot.
I have a DB9 2006 and the coils have to be done. Right now i am struggling with the parts shopping. Aston Martin Ft Lauderdale is quoting $ 7,793 for the parts you listed. Yes its not a typo! Any suggestions where i can get them from for a decent price. I have a scuderia.com quote $1,778.38 including delivery tax and insurance but i heard about concerns that they are not reliable.
Thank you
Michael
LikeLike
Hi Michael. Scuderia is just fine, run with them. I’ve used them before. Other readers have also told me they’ve done well. Unreal that the Dealer gouges sooo bad.
LikeLike
Hi steve, thanks for your videos and instructions, i also bought the parts at the same webshop as you did.The lose cable between the wipers is connected in my car to the windshield heating. But i have a problem: I installed the new sparkplugs coils etc etc. Yust like you dit but my car wont start anymore??!! it cranks but wont start. do you know a solution? I’m from holland and i drive my db9 for 5 years now but had lumpy idle yust like you dit.
hoping to hear from you
best regards Ronald Robben
breda the Netherlands
LikeLike
Hi Ronald. Sorry to hear about the no-start. It will be some detail that was missed. If its cranking but not starting at all (not even a few of the cylinders catching), then I suspect the fuel system. If you did as I did and pulled the fuse and ran the engine out of fuel to remove the fuel pressure, did you reinstall that fuse properly so the fuel pump is working again? Anyways, that’s my guess at this point. Hooking your OBDII up and clearing any codes might help. Hope you solve it, let me know what it turns out to be.
LikeLike
Hi Steve, found it. there was no fuel in the fuelrail after searching it was a blown 15amp fuse nr 74 in the fusebox where also the relais of the fuelpump is located. It runs good and no misfire.
thanks and regards Ronald
LikeLike
Excellent! Sounded like a fuel issue. Glad you got it resolved and back in action.
LikeLike
Hi Steve:
I bought these. I will try to fit them soon.
https://fr.aliexpress.com/item/33037043327.html?spm=a2g0o.productlist.0.0.12102203L6yXwq&algo_pvid=47daa2a6-cdda-427e-829d-8dae8ab5f731&algo_expid=47daa2a6-cdda-427e-829d-8dae8ab5f731-10&btsid=17f7f223-6cbc-4a3c-bf0d-feead7cf7749&ws_ab_test=searchweb0_0,searchweb201602_3,searchweb201603_52
Best regards and many thanks.
JJH
LikeLike
Is that a quantity of 12 coil packs for a total of 123 euros? 10 euro’s each???
LikeLike
Hello Steve,
It is 162.02 US $ franco. I am waiting for the parts. I will test them on bench before mounting.
Thanks for your blog and all.
With my best regards.
JJ
LikeLike
Hi Jean Jacques,
I took a look at these and if you can get them for this price its incredibly cheap but I don’t recognise Sergey manufacturer, I hope the quality is good. Euro 124.00 for 12 units + delivery is almost too good to be true, when I replaced mine I paid £70 (Euro 82.00) each from Aston.
I’ll watch out for your feed back, if you post it, when you have finished its quite a big job to do, not difficult but worth taking your time to get it right. Did you get the two inlet manifold gaskets from the same place it would be interesting to see what they cost as I paid £230 (Euro 270.00) from Aston for the two gaskets.
I take it you will be replacing the spark plugs as well, as its worth doing it whilst you are there, its a lot of work to go back in again to change the spark plugs later.
Good luck with the project.
Mike [Aston 2209]
LikeLike
Hello Mike,
The coils have been purchased. I hope to receive them soon. I bought two PCV from Amazon for 37 US$ franco and 12 NGK plugs for 40 € on Ebay. I plan to do the job within few weeks. May be I will keep the manifold gaskets and injectors O ring if they are corrects, it is possible. I have been restoring many classic cars as a hobby during 25 years so I think I can do a correct job.
With my best regards.
Jean-Jacques from Toulouse France.
DB9 00079
LikeLike
Hi Jean-Jacques,
I’m sure you will do a good job particularly if you’re used to working on engines like me, but I and other DB9 drivers would be interested to hear how it works out.
I can understand you using the gaskets again if possible (they are expensive) and this is quite often possible but having been compressed once there is always the possibility of not getting a 100% seal unless you use a spray sealant with them. My gaskets came off cleanly once the manifolds were off so hopefully yours will be the same however I did use new gaskets from Aston.
The injector “O rings” are for nothing though, a few cents each, I’d be replacing them whilst you’re there.
Good luck and be sure to let us all know how it works out.
Best regards,
Mike (Aston 2209)
LikeLike
Hi Mike,
Thanks for your interest. If any doubt, I will change all gaskets. I will give all information about my experience for the community.
What about the brexit. It’s an interesting subject in France. I hope GB will stay with us in EU. Where is your location in UK.
I look forward for another contact from you, it’s a pleasure. Sorry for my “s” at correct.
Best regards
JJH 0079
LikeLike
Hi Jean-Jacques,
I live in a village called Culcheth in Cheshire located between Manchester and Liverpool. As for Brexit I am what is known in the UK as a “Remainer” i.e. I wish that we could stay in the EU but at the moment its just a total mess.
Good luck with the DB9 project. I have contributed to Steve’s website with a few articles/videos that you can see ……..
Removing the PCV Valve Vacuum Harness Assembly
Aston Martin DB9 Dashcam – Keeping an eye on things!
Interior Lighting – Let there be light !
I have some other projects coming up and will be sending them to Steve when I get round to them.
Best regards,
Mike
LikeLike
Hi Jean Jacques
I have to buy a full set of coils for a V12 Aston Rapide and those coils are very expensive. Even more since few weeks since cannot find them under 100e each. Any feedback that you can give us about the set that you have purchased on Aliexpress?
Thank you
LikeLike
Cherif,
You can try these from Amazon. I used them and they seem to be fine.
LikeLike
It did not let the link go through. Here is the description. 2 Pins High Output Voltage And Energy Ignition Coil For Aston Martin DB7 DB9 V6 V8 V12 3.2L 4.2L 6.0L OEM 4G4E12A366AA (12)
LikeLike
Hi Cheriff,
The parts has been tested with a 12 v AC/DC supply and new ignition spark plugs. They work fine. Not already fit due to other hobbies and house work. I plan to fit the parts next month, my engine has too misfires, due to his 62000 miles. I will send a report after the job done.
Happy new year to all of ou and good luck to America during this tough period.
JJH
LikeLike
Steve, just finished my coil pack swap and I cannot thank you enough for your help here. It went pretty smooth and all because of your help. I truly could not have done that without your guide.
I did end up ordering the spark plugs from NGK that they said would fit and they were not correct at all. I searched for hours to try to get a generic replacement to no avail I ended up having to order the Aston Martin parts
I did however find the coil packs for a smoking deal on Amazon. $330 for all 12. They are working perfect now. We will see if they last the test of time though. If you want the link let me know.
Again thank you so much. If you are ever in Paso Robles, CA I owe you and your dinner for sure. Thanks again.
LikeLike
Steve, THANK YOU THANK YOU THANK YOU! I successfully changed my plugs and coil packs, it took me about 8 hours over 2 days. I could not have done it without your excellent videos you took the time to do. It was a very rewarding experience, the most stressful part was the back bolts on the intakes, both getting them out and then back in later, challenging! My 2009 has clips on the top of the injectors to hold them into the fuel rails, I ended up installing them first into the rails so I could get to the clips, then lowered them down. I owe you and yours a dinner if you are ever in the New England area!
LikeLike
Hi Jerry. Glad the articles helped. Makes sense that they would add the clips, I always thought it was a bit wishful thinking to just have them held by pressure of the rail alone.
LikeLike
Any aftermarket 3-pin coils one can recommend? I have already bought the NGK SITR7A11G for a 470bhp car after 4 months’ waiting list.
LikeLike