
 The intake manifolds in a DB9 are big and beautiful, blanketing most of the engine bay, so access to anything underneath usually requires removing them. Some of the reasons you’d need to remove them include changing your Coil Packs and Spark Plugs (as I am doing at the moment). In this post I am covering the actual final steps of unbolting the manifolds (which is a bitch of a challenge), sharing some tips on how to finagle them out of the tight spaces without breaking off the sensors, and unhooking the unseen vacuum hoses.
I’ve done a lot of work already getting to this point, including the steps detailed in these other posts and videos:
- Depressurizing your fuel system (so you don’t start a fire)
- Disconnecting your Battery (also so you don’t start a fire)
- Covering your fenders (so you don’t screw up your paint)
- Removing the Engine Bay Cross Braces (because it’s in the way)
- Removing the Intake Manifold Brace (because it’s in the way)
- Disconnecting the Fuel Rails and removing the Fuel Injectors (because they are attached)
- Disconnecting all the other ancillary components attached to the manifolds (also in the way)
Tools Required
 You only require a few things for these steps:
- 8mm 6-point 3/8” drive socket and ratchet
- 6” 3/8” drive extension
- 3” 3/8” drive extension
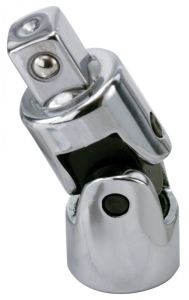
- 3/8” universal joint (essential!)
- T30 Torx Socket
- Roll of 1.5” or 2” wide blue masking tape
- Inspection light
Process
These step will probably take you about an hour if all goes well.
- Access to the rear most manifold screws on both the left and right is done blind. If you read the forums, these are the two screws that are a bitch to get access to. To be honest, if you have followed all my steps leading up to here, and the process below, it’s not too big a deal. Just fiddly.
-

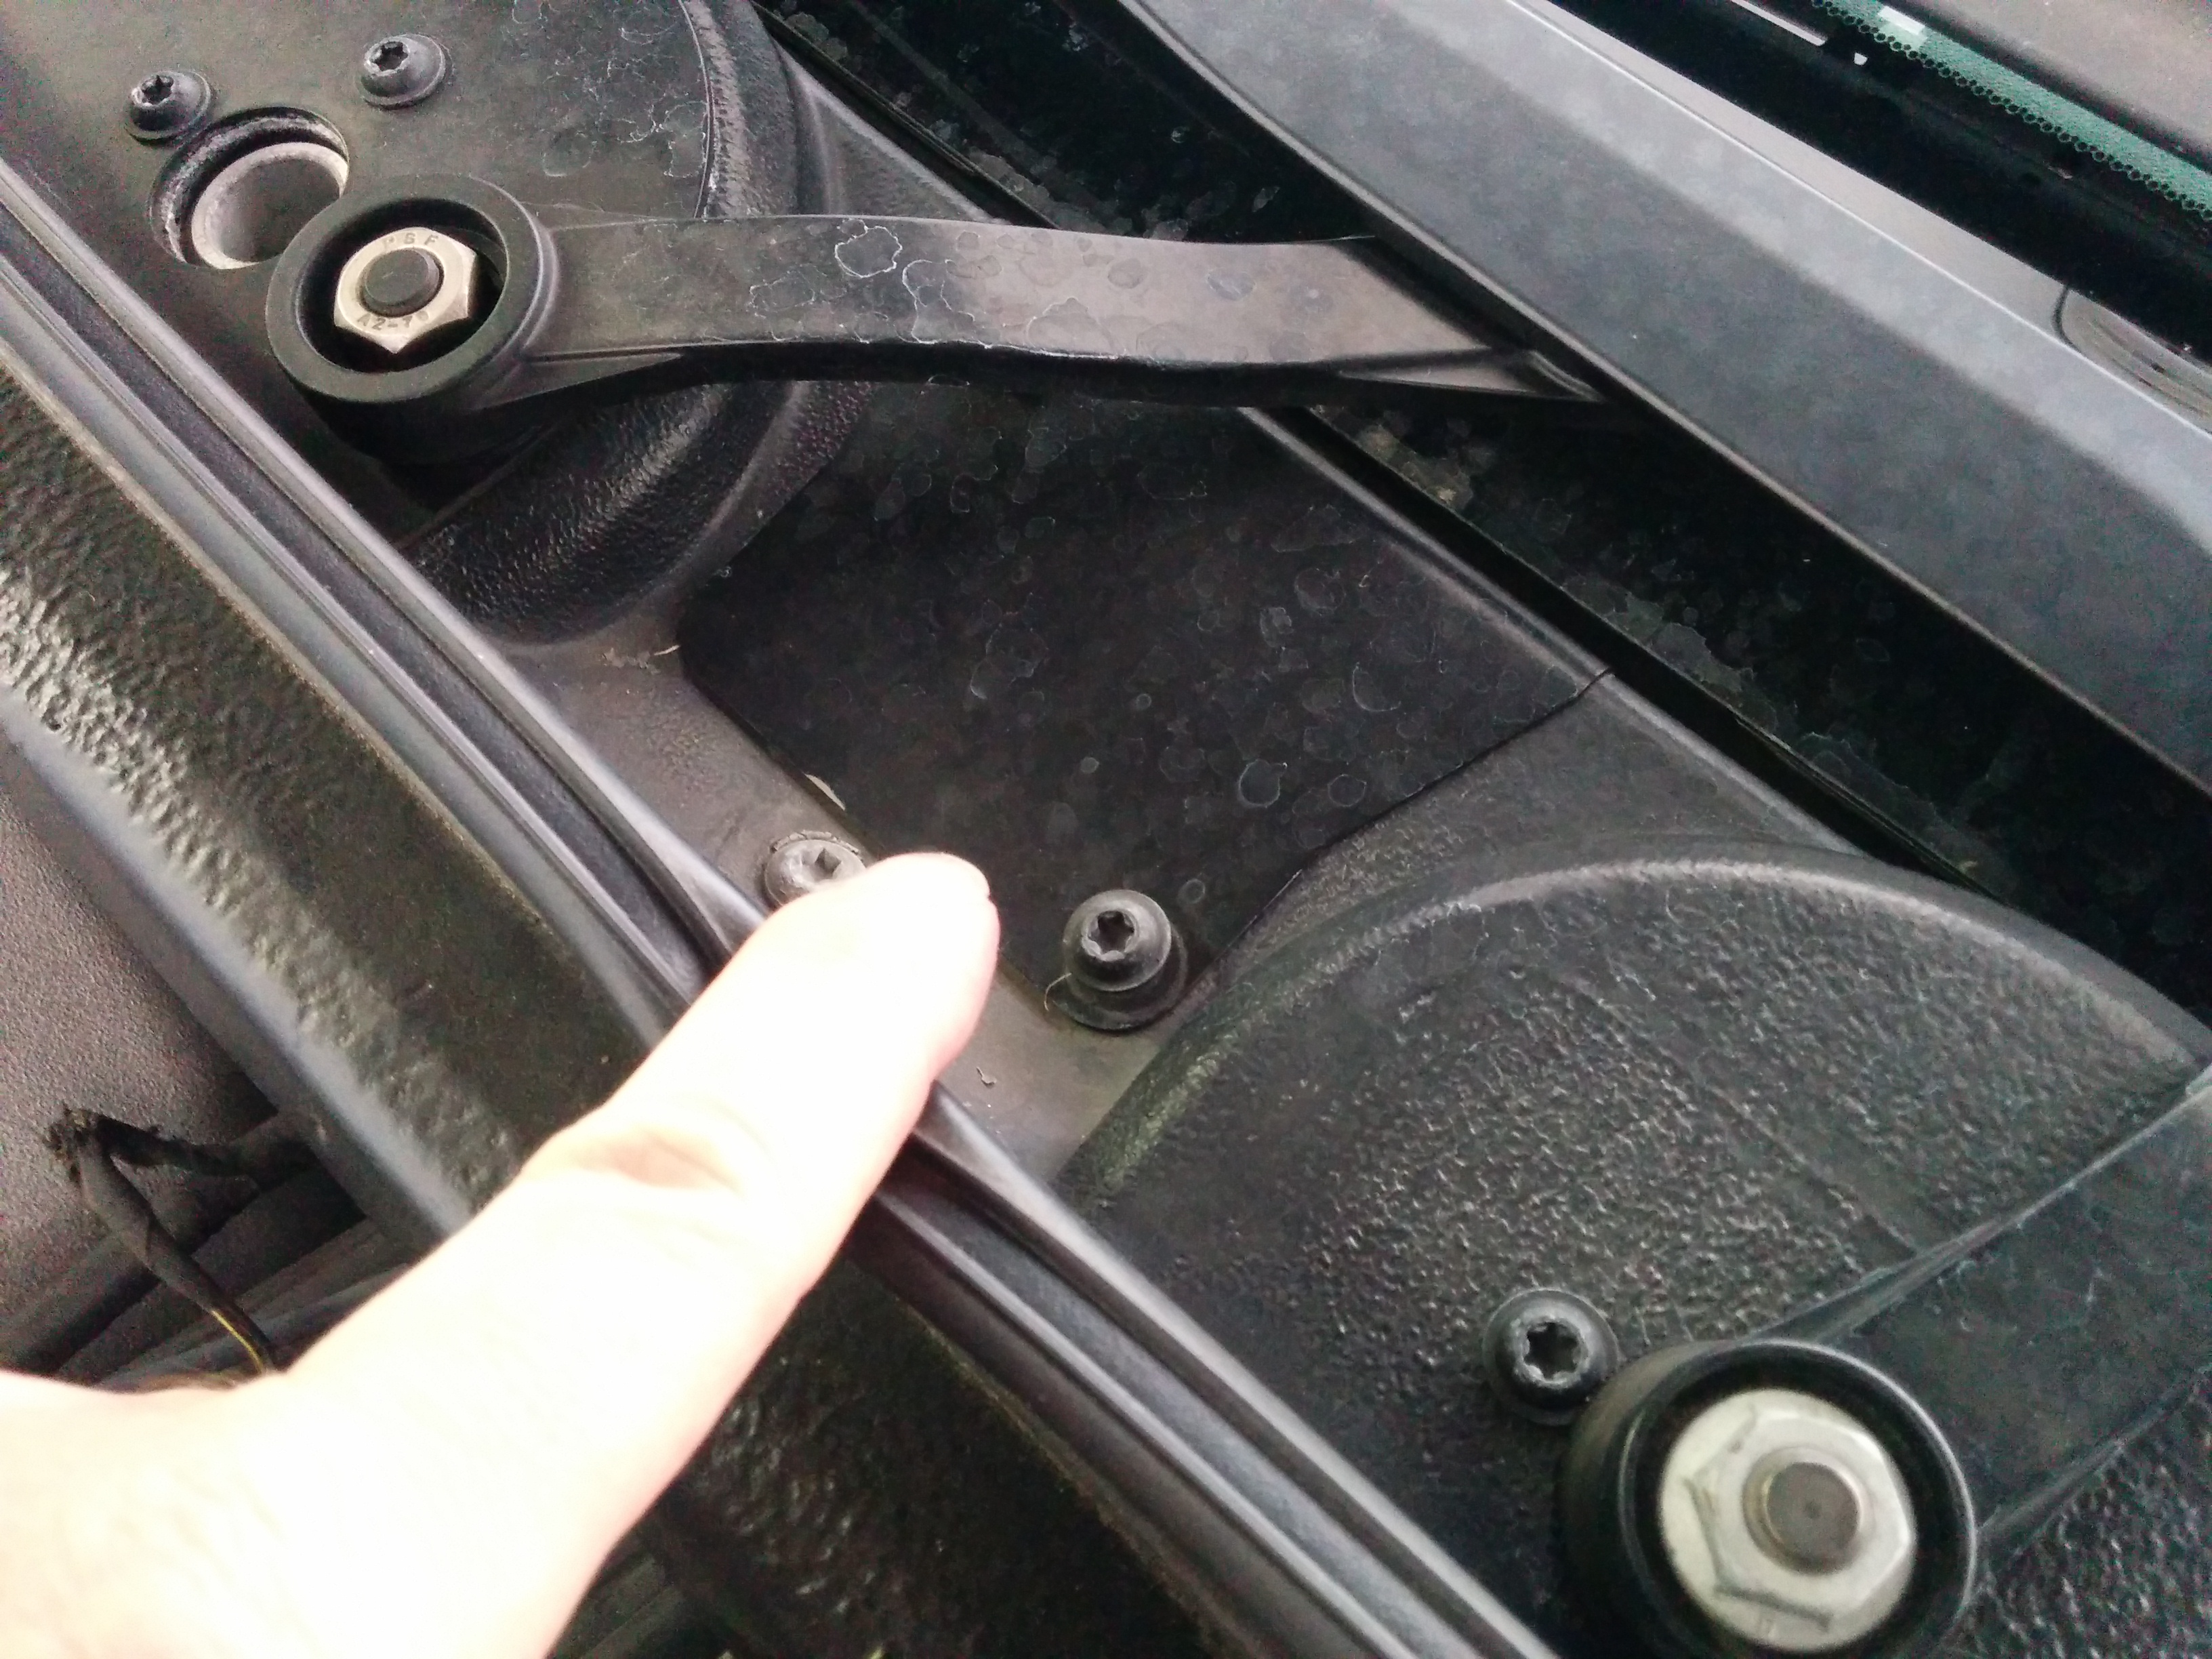
Scuttle Plate to Access Rearmost Manifold Bolts Start by removing the scuttle plate in the cowl between the two windshield wipers. There are two T30 Torx screws, just carefully remove them and set them aside.
- Pull the scuttle plate out being mindfull of the electrical connection attached to its underside. On my car, this wasn’t connected to anything, just a big old electrical connector with some heavy duty wires connecting to nothing. Please leave a comment below in the comment section if you know what these are for, I am curious.
-
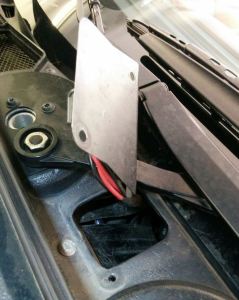
Skuttle Plate Removed Once the scuttle plate is removed, all you will be able to see is a piece of insulating black foam. This is attached at the front edge. Just reach under the cowl and work to fold the flap under and forward getting it out of the way for the time being.
- Time to work on removing the rearmost bolt on the Right Side Inlet Manifold first. We are going to start on the right side because it will give us the clearance we need to get to the Left afterwards.
- WARNING: Through all the previous steps you’ve probably been leaning in and leaning on the intake manifolds with part of your body weight. Once you start removing screws, STOP doing this as the manifolds are a giant cantilever, and if you do this with only a bolt or two left installed, I can imagine snapping off the ear of the manifold is easy (cast aluminum can crack).
- It was hard to get a good camera angle in my video below to show you exactly how to get the rearmost bolt out, but I will describe in text here as best as I can.
- Swing the two fuel rails and coolant bypass line out of the way as best as possible over the left side inlet manifold that we’ll be leaving alone for now.
- Use the 8mm socket attached to the Universal joint, and then attach this to the 6” extension, and this attached finally to the 3” extension.
- Leaning in with your body from the right side of the car, use your right hand and feel your way under the remaining bits of fuel rail until your fingertips can touch the top of the rearmost bolt.
- Using your left hand, pass the socket assembly down on an angle towards your fingertips. Don’t bother trying to look through the scuttle opening to see the bolt, you can’t. This is done by braille.
 Use your right hand fingertips to get the socket seated squarely on top of the bolt, again all done blind without seeing it. Honestly, it’s not that hard. The universal joint is essential, and I think having a 6-point socket is also critical.
- With the socket firmly on top of the bolt, you can use your left hand to attach the ratchet carefully to the extension sticking out of the scuttle opening. Keep your right hand in place on the bolt top helping to keep the socket seated in place.
- Crack the bolt loose and start to ratchet it out. BUT, before you’ve undone it all the way I’d suggest that once the unthreading is going easily, remove the ratchet and just use your left hand to turn the extension by hand. Keep your right hand ready to ‘catch’ it when its fully removed.
- Remove the bolt CAREFULLY with your right hand finger tips. Consider this – if you drop it, I have no flipp’in idea where it will go, let’s just agree that it’s a really bad and inaccessible place and would be a major mistake to do this. It’s not like you can get your hand around the bolt either, it will be between two of your fingertips barely gripped. Just be careful.
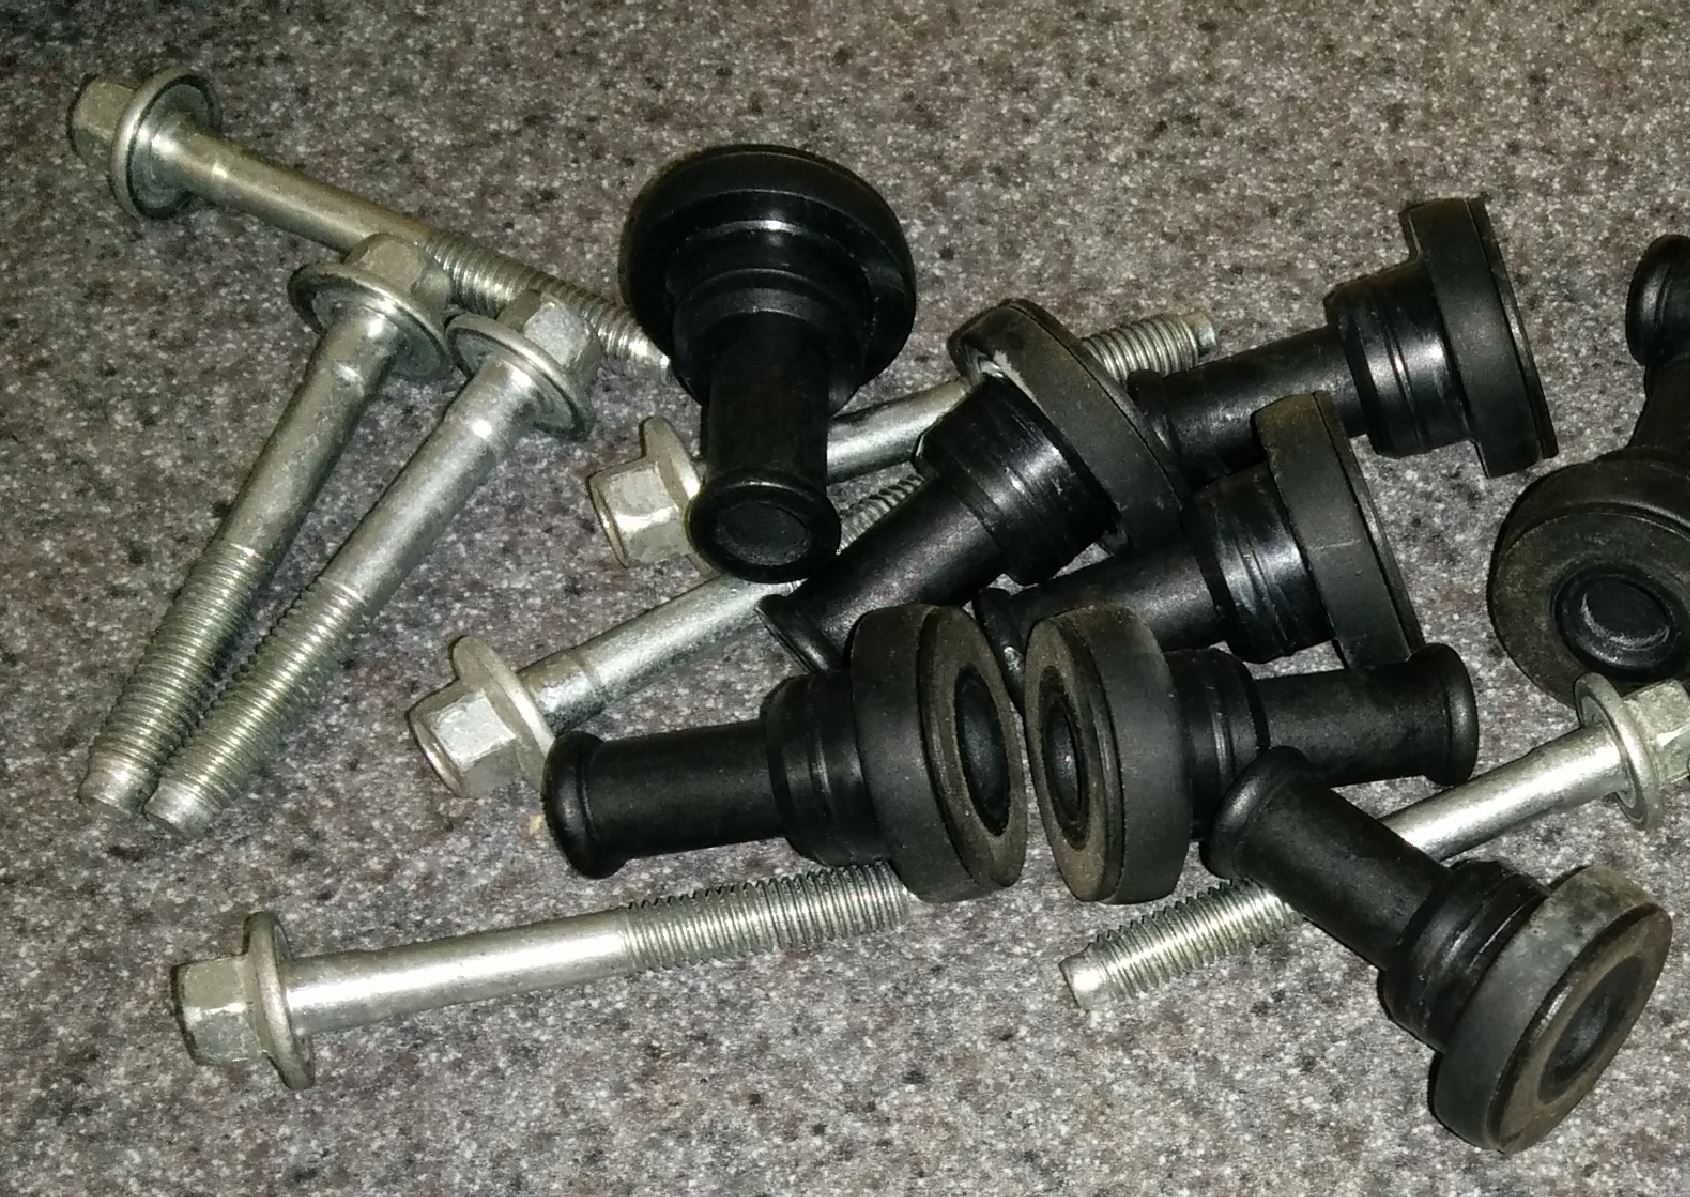
 NOTE: Each bolt actually passes through a black rubber isolating insert. This rubber insert may OR may not come free with the bolt (in my video below you’ll see it come out). Eventually you will want to remove these before they fall out into unreachable recesses of the engine. I’d suggest leaving the rearmost in place initially, and then once you’ve removed a few of the other easier ones and have a feel for them, go back in with your right hand to retrieve the rearmost one.
- With the rearmost bolt removed (whew, easier sailing now), loosen then remove the remaining six (6) bolts. I’d suggest cracking them all loose first, then going back and removing each bolt and rubber isolating insert. I couldn’t find any recommended order, but as a mechanic on a large row of bolts like this it’s an engrained habit to loosen them in a pattern alternating back and forth to release the stresses evenly. If the bolts were numbered 1 through 7 from front to back (and we’ve already removed 7), I would loosen the rest in order 1, 6, 2, 5, 3, and finally 4.
 With all seven (7) bolts and rubber isolating inserts now removed (and set aside on a workbench, not laying about in the engine compartment where they may fall into someplace bad) the inlet manifold should be free to move. Give it a gentle shift to make sure its loose.
- You’re next challenge you didn’t even know you had is working out how to actually remove the right intake manifold without breaking off the Thermostat housing temperature sensor (which I have read in the forums several people have). I definitely suggest you watch my video below. Took me 5 minutes of wiggling and bumping (which I edited out) to figure out the magic path to doing this. I can easily see someone getting frustrated and trying to force it a bit, and bad consequences following. Here’s a summary:
- Make sure the air inlet pipe to the throttle body is pulled well forward and clear so that it doesn’t bind up that corner of the manifold.
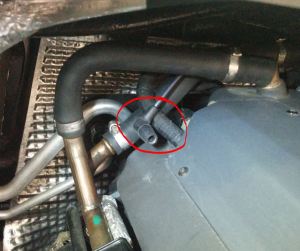
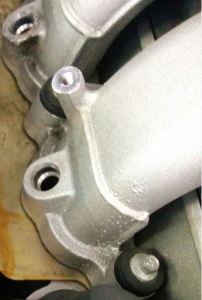
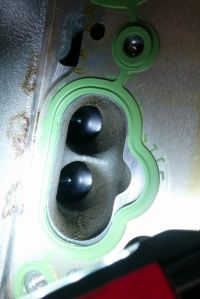
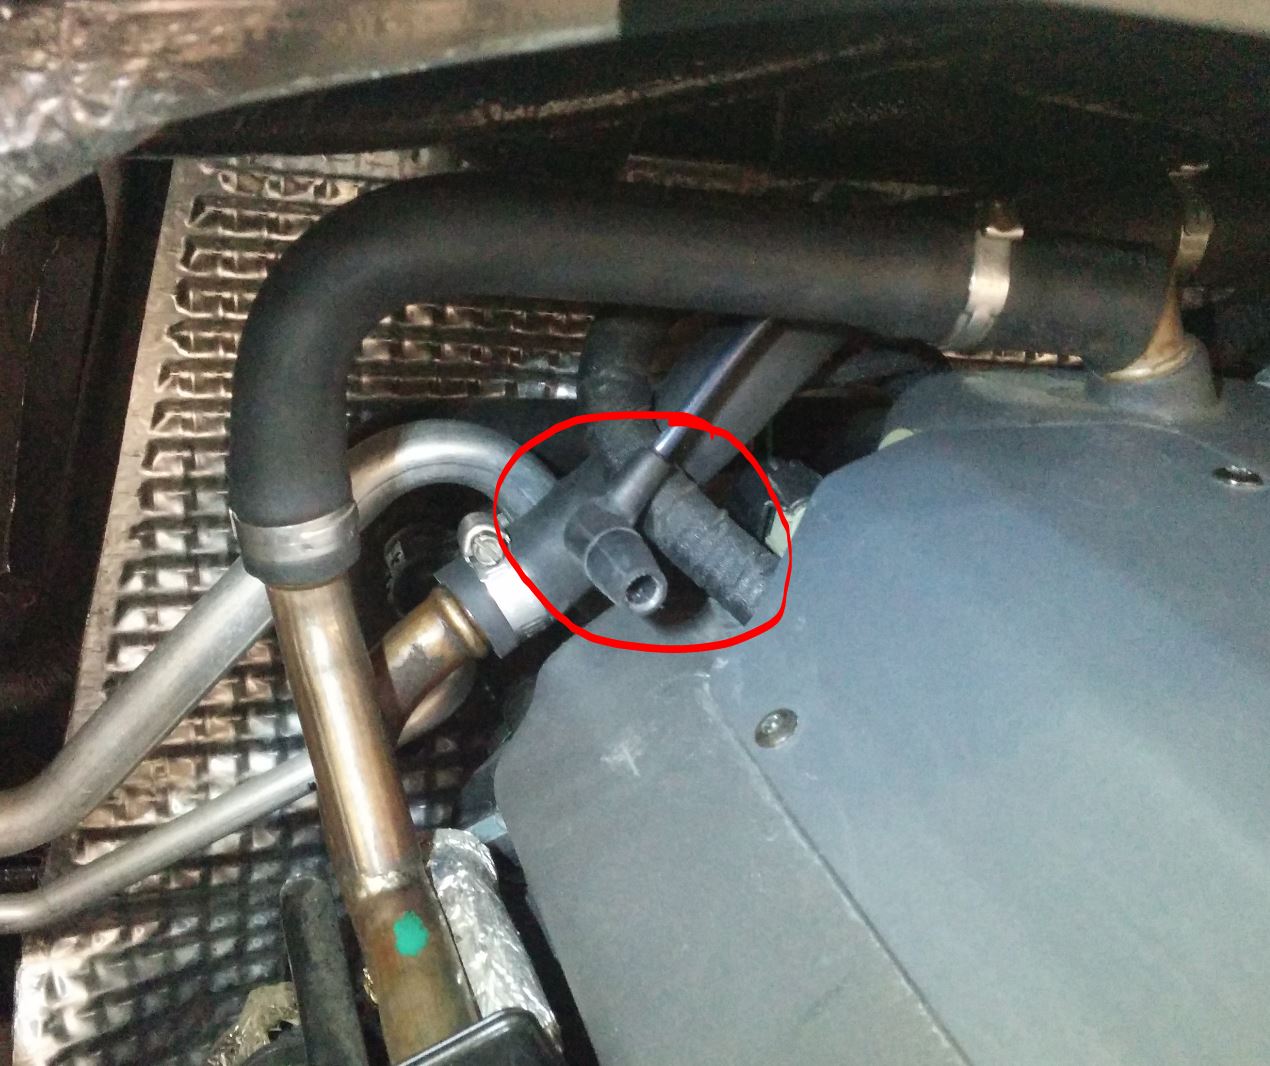
View of Vacuum Line that connects to Intake Manifold WARNING – there is a vacuum line attached to the back of the inlet manifold you won’t be able to reach/touch until you’ve partway pulled the manifold forward about 6 – 8 inches.
-

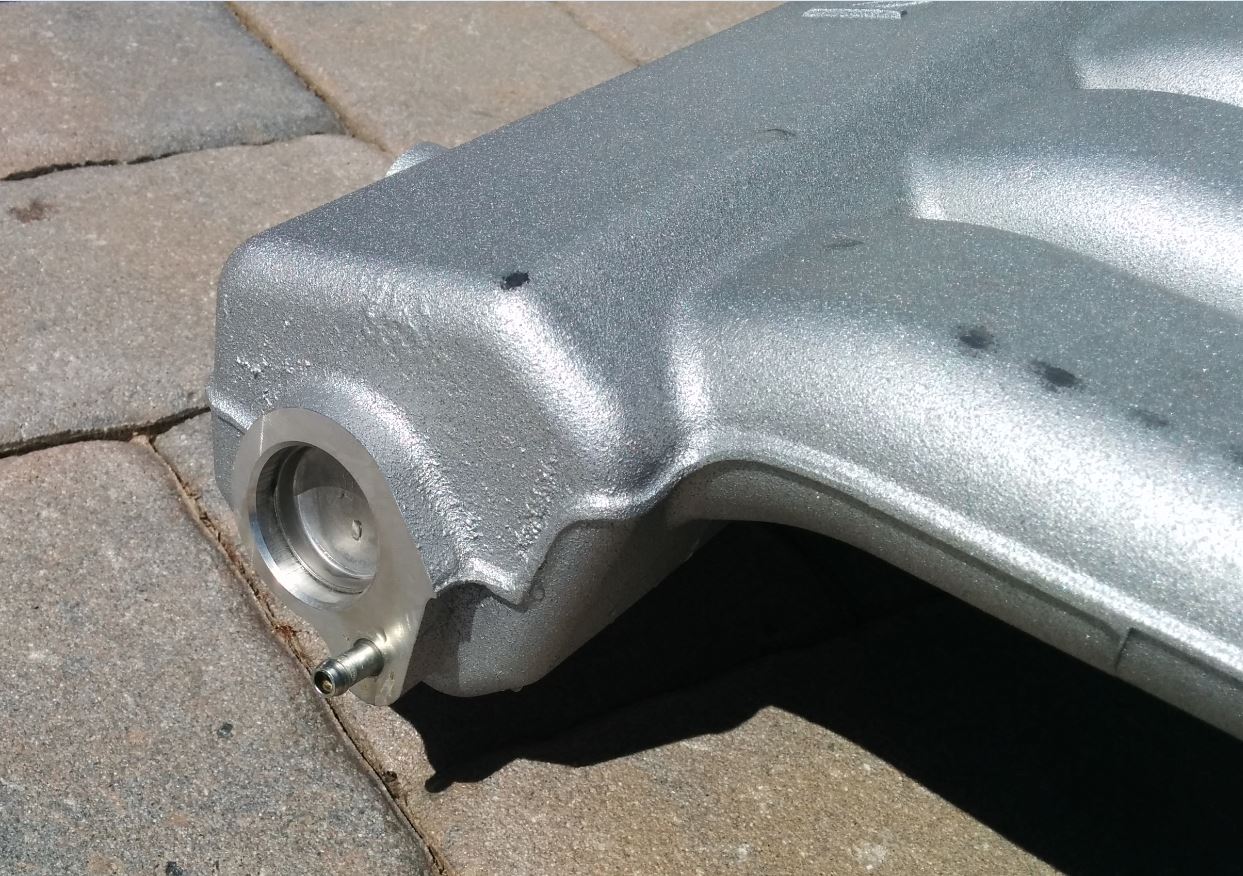
Vacuum Port on back of Intake Manifold Maneuver the manifold up and forward about 6-8”, being careful to not bust off the Thermostat Housing Temperature sensor. Again, see my video on the trick to this step.
- Reach your left hand in from the side and feel around the back left for the vacuum line connector. It’s just a push fit rubber connection. Wiggle the connection off the manifold.
- Lift the manifold out the rest of the way! Bask in the glory of this major accomplishment!
- Make sure the air inlet pipe to the throttle body is pulled well forward and clear so that it doesn’t bind up that corner of the manifold.
- With the manifold removed, the intake manifold gasket is probably laying there askew (it’s possible it remained stuck to the manifold). Remove the gasket being careful to try and not drop debris down the intake chambers.
-
Looking down at the Intake Valves! WARNING: At this point you can actually peer into the six (6) gaping openings to each of your intake valves (which I suggest you take your flashlight and do for the fun of it). BUT, keep in mind you can now drop crap accidentally directly into your cylinders that you can’t ever get back out, trashing a $30,000 engine. So don’t. Any bit of grit or grime from around the openings can now fall in. You need to take great caution with this.
-
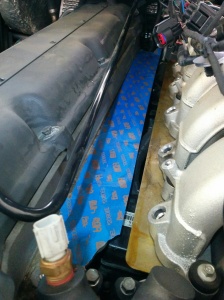
Use masking tape to cover the intake ports To help prevent crap getting into the cylinders, immediately use long strips of the 1.5” blue masking tape to cover over the entire length of the inlet openings. I recommend tape over covering it up with a rag since the debris will stick to the tape rather than falling in. See my video.
- With the inlet openings for the right hand side now fully taped up and seal in, it’s time to repeat the process for the Left hand inlet manifold. Use the exact same steps as we did for the right, except you’ll have an easier time of it now since you have better access with the other manifold removed.


Once you have both manifolds removed and the intake openings on the cylinder heads taped over for safety, I’d say it’s time for a well-deserved celebratory drink of your choice before moving onto the next tasks like removing the coil packs. This was the hardest part of the process; the next bits get much easier.
Here is my video on how to tackle these steps:

Pingback: Removing the Coil Packs from an Aston Martin DB9 – Aston 1936
Pingback: Removing the Spark Plugs from an Aston Martin DB9 – Aston 1936
Hi Steve, I’m new to your blog, I think its GREAT. I also have 05 DB9. It now has 11,500 miles and “cylinders are misfiring ” started about 6 moths ago. I had a mechanic I know replace all the spark plugs and coil #5. The car ran great for about 200-300 miles and the same problem came back, took it back, he replaced coil #2, Drove the car home about 10 miles and check engine light came back on.
One of the things I noticed you said in the video, you recommend to change all the coils basically because the gaskets need to be replaced very time the manifolds are removed. I don’t think he changed the gaskets. Currently I’m getting error codes: 316, 300, 302, and 305.
Any advice? After watching your video, I think I want to get my hands dirty and do it my self, do you think changing all the spark plugs and all the cols and new gaskets, should solve the problem? Also someone mentioned possibly getting the valves resurfaced?
Thanks,
Michael,
LikeLike
Hi Michael. P0300 is “general misfiring warning”, and P0302, 0305 and 0316 are misfires on specific cylinders. Time for a full set of plugs and coils I’d suspect. All the effort to get to them deserves replacing them all. Check out my post on what each P code means. Good luck with your project!
LikeLike
Hi Steve, thanks for the fast reply.
Since I already changed all the spark plugs and the two coils that are misfiring, do you think the problem could be something else? Like valves or even the fact that I reused the manafold gasket? Or it possible that the torque on the plugs and cools wasn’t set right?
Thanks,
Michael Gerts
LikeLike
I’d double check the P codes to make sure they are the same cylinders for sure. If they are the same ones (you had three listed), then you may be facing a dreaded dealer visit. Also, keep in mind that maybe the wrong cylinders we serviced? I still don’t know definitively which cylinders are which. Also, misfires can come from fuel injector issues, electrical wiring issues, etc. Could be a valve (albeit most unlikely), but you’d test for that doing a compression test when you have the plugs out to confirm or eliminate that worry.
LikeLike
Hi Steve,
I think I will try to replace all the spark plugs and coils. You right, I gues it is possible with my mechanic not being very familiar with AM, he might have changed the wrong ones.
BTW, I noticed you have California plates, are you in LA area, if so do you ever come to Super Car Sunday in Woodland Hills?
Michael
LikeLike
NorCal – Sacramento. Would be nice to visit sometime. Sometimes make the EuroSunday event up here, but haven’t made the trek south with her yet. The upcoming AMOC track day is always fun (January usually).
LikeLike
Hi Steve,
Just finished replacing all the coils and spark plugs on 2005 DB9. Your blog and the vedios were super helpful. THANKS!!! Started the engine, all the service code are gone, no more shaking while stoped in drive. Haven’t driven the car yet, keeping my fingers crossed, the misfire codes don’t come back.
The seats didn’t loose the memory while the battery was unplugged for about a week. But the motor in the driver side mirror is running non stop, have you heard of that, do you know if there is a reset or calibration proses for it? Had to unplug the battery for now.
Thanks ,
Michael Gerts.
LikeLike
I had the non stop side mirror motor. Check out my recent post on restarting the car after the coil pack change. I have a side bar about what happened. Sounds very similar.
LikeLike
Hi Steve, I wonder if you have any experience with the following: After replacing the the coils and spark plug, I started the car and the mirror motor was running, just like you, my first intuition was to disconnect the battery. Checked the battery, ( actually called AAA) the battery is fine, now the car doesn’t start. I get a lot of wired message on the dashboard, somethings like: the key is not recognized, check the battery disconnect switch, brake failure, something about rolle over protection, and few others. I tried to connect my MaxiDiag reader, which worked before, now the car doesn’t recognize it. I spoke with my Independant mechanic, he thinks the computer “lost memory” and only the dealer can reprogram it.
Any ideas?
Thanks,
Michael Gerts.
LikeLike
Wow, sorry to hear about the gremlins. If the MaxiDiag can’t talk to the car (maybe verify by connecting it to another car to be sure its working), then I’d say you are in a tough spot. Start there. I’d disconnect the battery again for about an hour (and turn on the headlights to ensure any residual voltage in the system is eliminated). While disconnected, I would use a regular old voltmeter to measure the battery voltage. It should be 12.9 volts or higher (if not, charge some more ). Check that the trunk batter disconnect switch is not accidentally depressed (something leaning on it) Turn off the light switch. Reconnect the battery. Press the Battery Reset button (yellow button right near battery cables) to be sure this wasn’t accidentally tripped. If your MaxiDiag passed its test, then reconnect it again to the correct port (OBDII port, not the body port). You should do this with the car NOT running. If it is working now, then go in and clear out any OBDII error codes, reset them all. After that, I’d say try and start it. Fingers crossed. IF the MaxiDiag still won’t talk, something is messed up in the communication bus (wiring) for sure, and its off to the dealer (ugh).
LikeLike
Steve, did the first two steps, disconnected the battery and turned on the lights. Checked the voltage, it’s reading 12.1-12.2v Do you think this is the problem? And if so, what kind of charger would you recommend I get?
Michael Gerts First Choice Heating & Air Conditioning
>
LikeLike
Steve, did the first two steps, disconnected the battery and turned on the lights.
Checked the voltage, it’s reading 12.1-12.2v
Do you think this is the problem?
And if so, what kind of charger would you recommend I get?
Michael Gerts
LikeLike
Hi. I went and measured my car just now to be sure, and got 12.4V at the boost point under the hood (and my battery is a brand new AGM) so the 12.9 was a red herring (apologies – I think that’s the alternator charge voltage). Yours is a little lower, but not enough to matter for the OBDII reader to be sure. I use the Odyssey OBC-6A charger described in my latest article on choosing a replacement battery, but you could use any charger if you have a regular lead acid battery. Since your voltage isn’t too bad, I’d do the rest of the process testing the OBDII on another car, reconnecting, and seeing if you can get the OBDII talking. If you can, I bet the codes can be cleared and it will restart fine.
LikeLike
Steve, SUCCESS, you would not believe, the yellow rest button next to the battery was tripped.
(I wonder why). Followed your advice, all is working, OBD II reader is now communicating with the car.
I checked the live data, and misfires are at 0, the Misfire profile correction has not been learned. Will wait until next weekend to get on an open stretch of highway.
THANK YOU FOR THE ADVICE.
Michael Gerts
LikeLike
I can feel your sense or relief – and even I was puckered up a bit. Glad this resolved it for you and now you can enjoy your baby again!
LikeLike
Hey Steve I am doing coils on my aston martin v12 engine as well this weekend but i was wondering if you could tell me what the cylinder numbers are? I’ve searched high and low for a picture or answer but to no avail. The previous owner replaced a few a coils but not all and now i need to replace the last few he did not but i don’t know what cylinder is which for me to do that. Like is it cylinders 1 thru 6 on the driver side starting from the firewall or radiator or vice versa is it the passenger side? Any help would be greatly greatly appreciated as I have ordered all of the parts from ROB this is my only hold up. Thanks in advance
LikeLike
Hi Tim. I recently asked this question on the AMOC forum and I believe the consensus was Cyl 1-6 on the Right Hand Side front to back, and 7-12 on the left hand side, front to back.
LikeLike
Pingback: Installing the Intake Manifolds into an Aston Martin DB9 – Aston 1936
Hey Tim. I was Wondering If there is any way to remove and install the vacuum harness pipes which go to the vacuum port behind the inlet manifold, without having to remove the inlet manifold..
LikeLike
That’s an interesting question that I don’t have the answer to. You don’t need any tools (they push on), but you’ll have to experiment on your own to see if you can get a hand back there. Off will be easier than on.
LikeLike
I suspect you’ll be able to reach the vacuum connection of the non-drivers side. On my car, that’s the right hand side, and it may be possible to snake a hand back, up and under to the connection. Let me know how it goes for you if you try for it.
LikeLike
Steve,
Not sure if you have received the answer on the connector beneath the scuttle plate? I have removed mine as mine DB9 has the heated windshield, So, i assume it’s that is what the connector is for.
LikeLike