
Eventually you have to service the battery in your DB9. They just don’t last forever – and the typical lifespan of a traditional flooded lead acid battery (like the ones originally fitted) is about 5 years. The good news is that when the time comes to replace your battery you’ll be well equipped to know how and avoid a potentially costly trip to the dealership.
Parts Required
 If you are wondering about what battery to get I’ve already completed a detailed article you should check out – Replacement Battery Options for an Aston Martin DB9. You’ll see how I gravitated to purchasing a Bosch 49-850BAGM Absorbed Glass Matt (AGM) battery. Now I’ll share the details of how to install it.
Tools Required
You will only need a few simple tools:
 8 mm socket
- 8 mm wrench
- 13 mm socket
- 13 mm wrench
- Ratchet for sockets
- Nut driver for sockets
- Torque wrench (suitable for 9 Nm or 7 ft lbs)
- 4 mm Allen wrench
- Pliers
- 12″ of stiff wire like bailing wire, pipe cleaner, coat hanger, etc.
- Micro fiber towels to protect center console, carpets, etc.
Procedure
You should be able to tackle this easily in under an hour, probably 30 minutes if things go well.
The first steps of accessing the battery compartment and removing the battery cover are well described in my other article and video – Disconnecting the Battery in an Aston Martin DB9. You need the 8mm socket and wrench in that article. Please follow those steps entirely and then carry on with the steps below.
- Use the 13 mm wrench and loosen the top nut on the Negative battery terminal. Wiggle the terminal loose and lift up and away.
- Note: It’s important to do the Negative terminal first to reduce the risk of an accidental short with your tools. If you did the positive terminal first and accidentally touched the wrench to the battery box and positive terminal, you’d have a 900 amp arc welder and likely do very serious damage to the car (like setting it on fire). By disconnecting the negative first, the car is no longer grounded and the risk is removed.
- Use the 13 mm wrench and loosen the top nut on the Positive battery terminal. Wiggle the terminal loose and lift up and away.
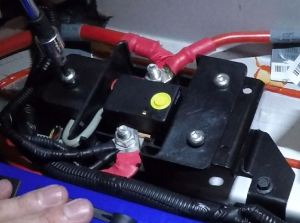
- Dismount the electrical octopus from the top of the battery mount by:
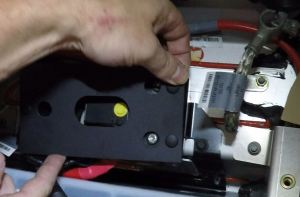 Using your fingers, gently pryse and lift the black plastic safety cover off the assembly. It’s held in place by 3 plastic press in snaps. Check out the video below to see what I mean.
- Use your 4 mm Allen wrench and remove the three bolts that mount the electric bracket to the battery bracket. They are right on top.
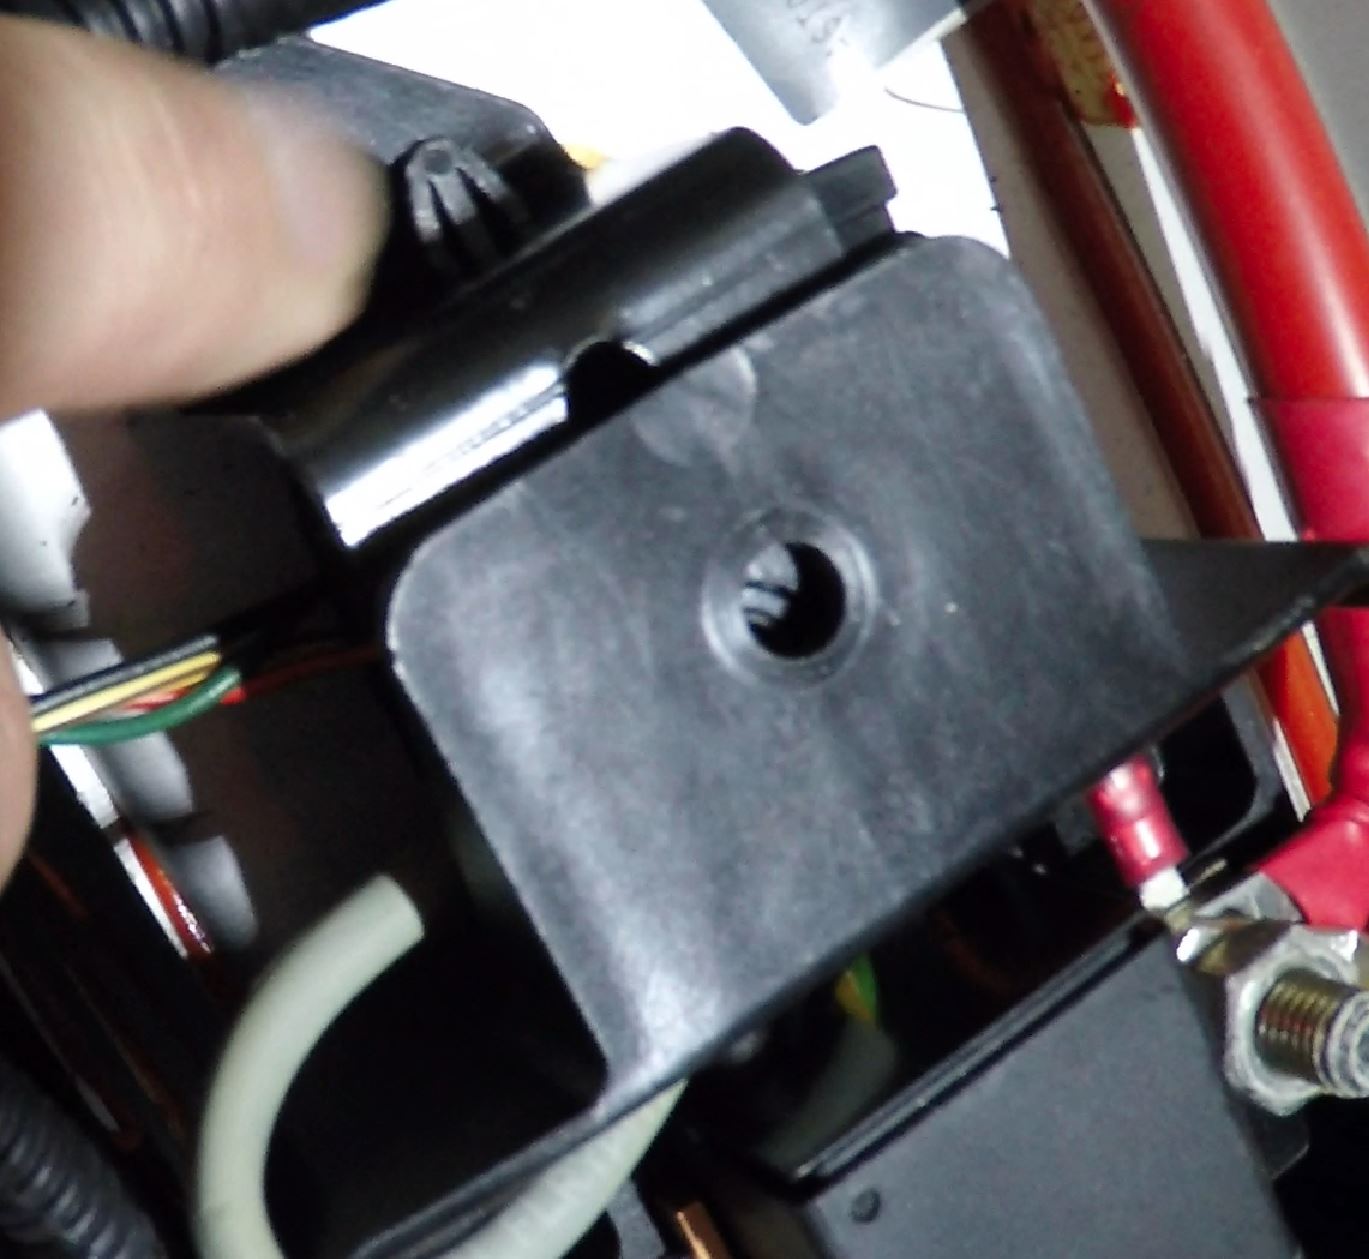
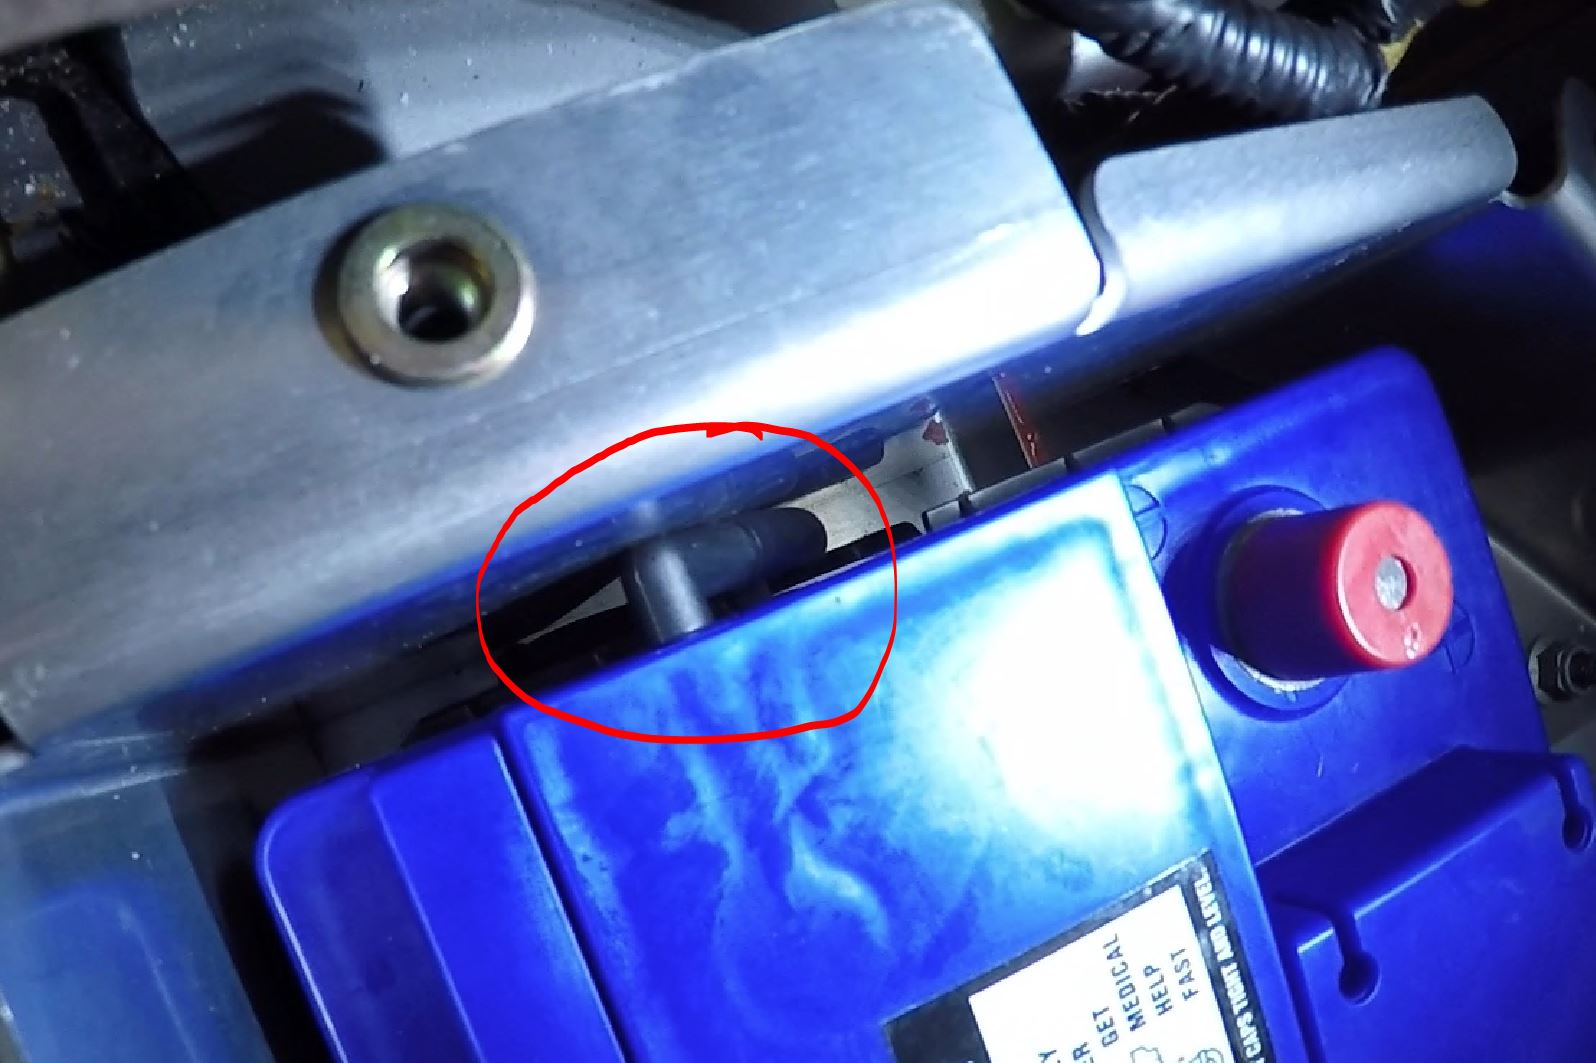
 On my car, there was one grey cable that had an electrical connector that was mounted to the battery bracket, but hidden under the octopus on the left side. You can see the black plastic teet from the connector protruding through the mounting hole. Using your pliers, squeeze the teet so that you can ease it back though the mounting hole and dismount the electrical connector. It’s easier than it sounds.
- You should now be able to lift the electrical octopus up and rotate it towards the back of the car to get clear access to the battery bracket and its bolts.
- Remove the battery bracket by:
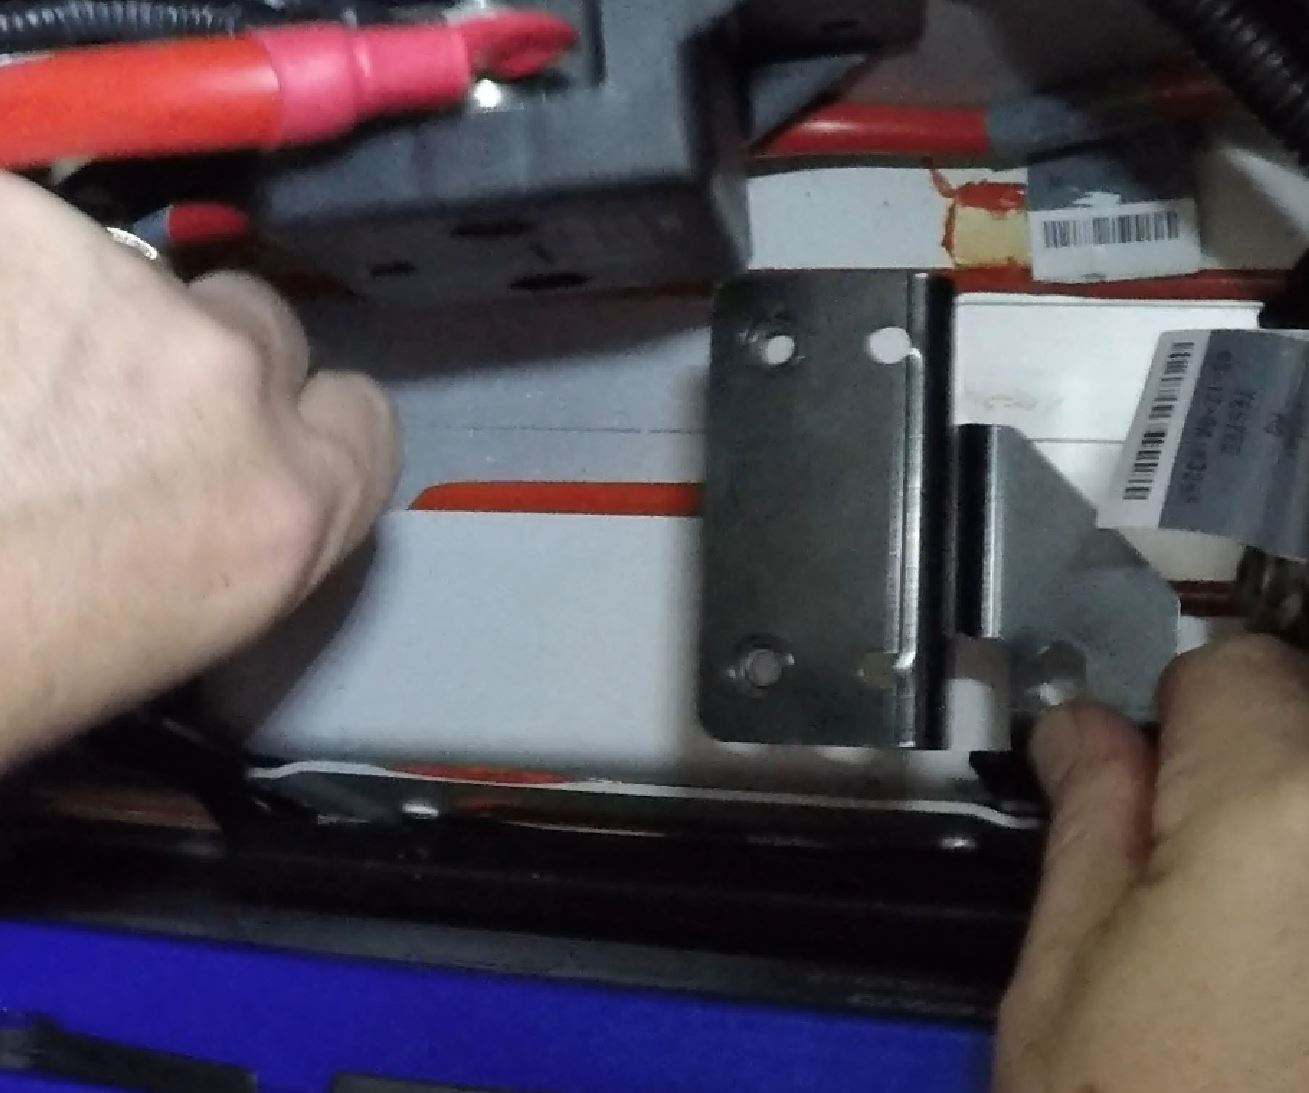
 Use your 8mm socket and ratchet/nut driver to remove the two 8mm bolts holding the battery bracket down. There is one bolt on either side of the bracket.
- Grab and wiggle the bracket straight up. On my car this was difficult. The bracket slides along a track, and it’s not designed well. Just be patient and wiggle it up and out.
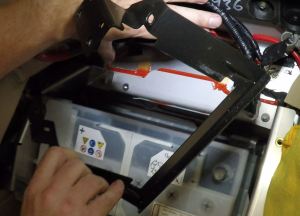
- Lift the battery out by:
- Keep in mind the battery weighs about 53 lbs (24 kgs), and you are leaning in from the doorway with poor access. This is a PITA.
- There is still a vent tube connected to the battery on the door side. There is little access to it, but you should be able to see it. If you can partially lift the battery (just tipping it to get your fingers in) you might try and disconnect the vent tube and leave in place. Me, I went gung ho and pulled it out with the battery.
 Lift the battery up and out of the battery compartment. You should be able to just rest it on the lip of the battery compartment to get a rest.
- Disconnect the vent tube from the battery if you haven’t already.
- Lift the battery up and the rest of the way out of the car (watch your back!)
- Remember to take your old battery to a proper battery recycler to dispose of it. It is hazardous waste and shouldn’t end up in a landfill. My local Pepboys (where I purchased my replacement battery) took the old battery back to recycle.
- Prepare the vent tube to be reconnected
-

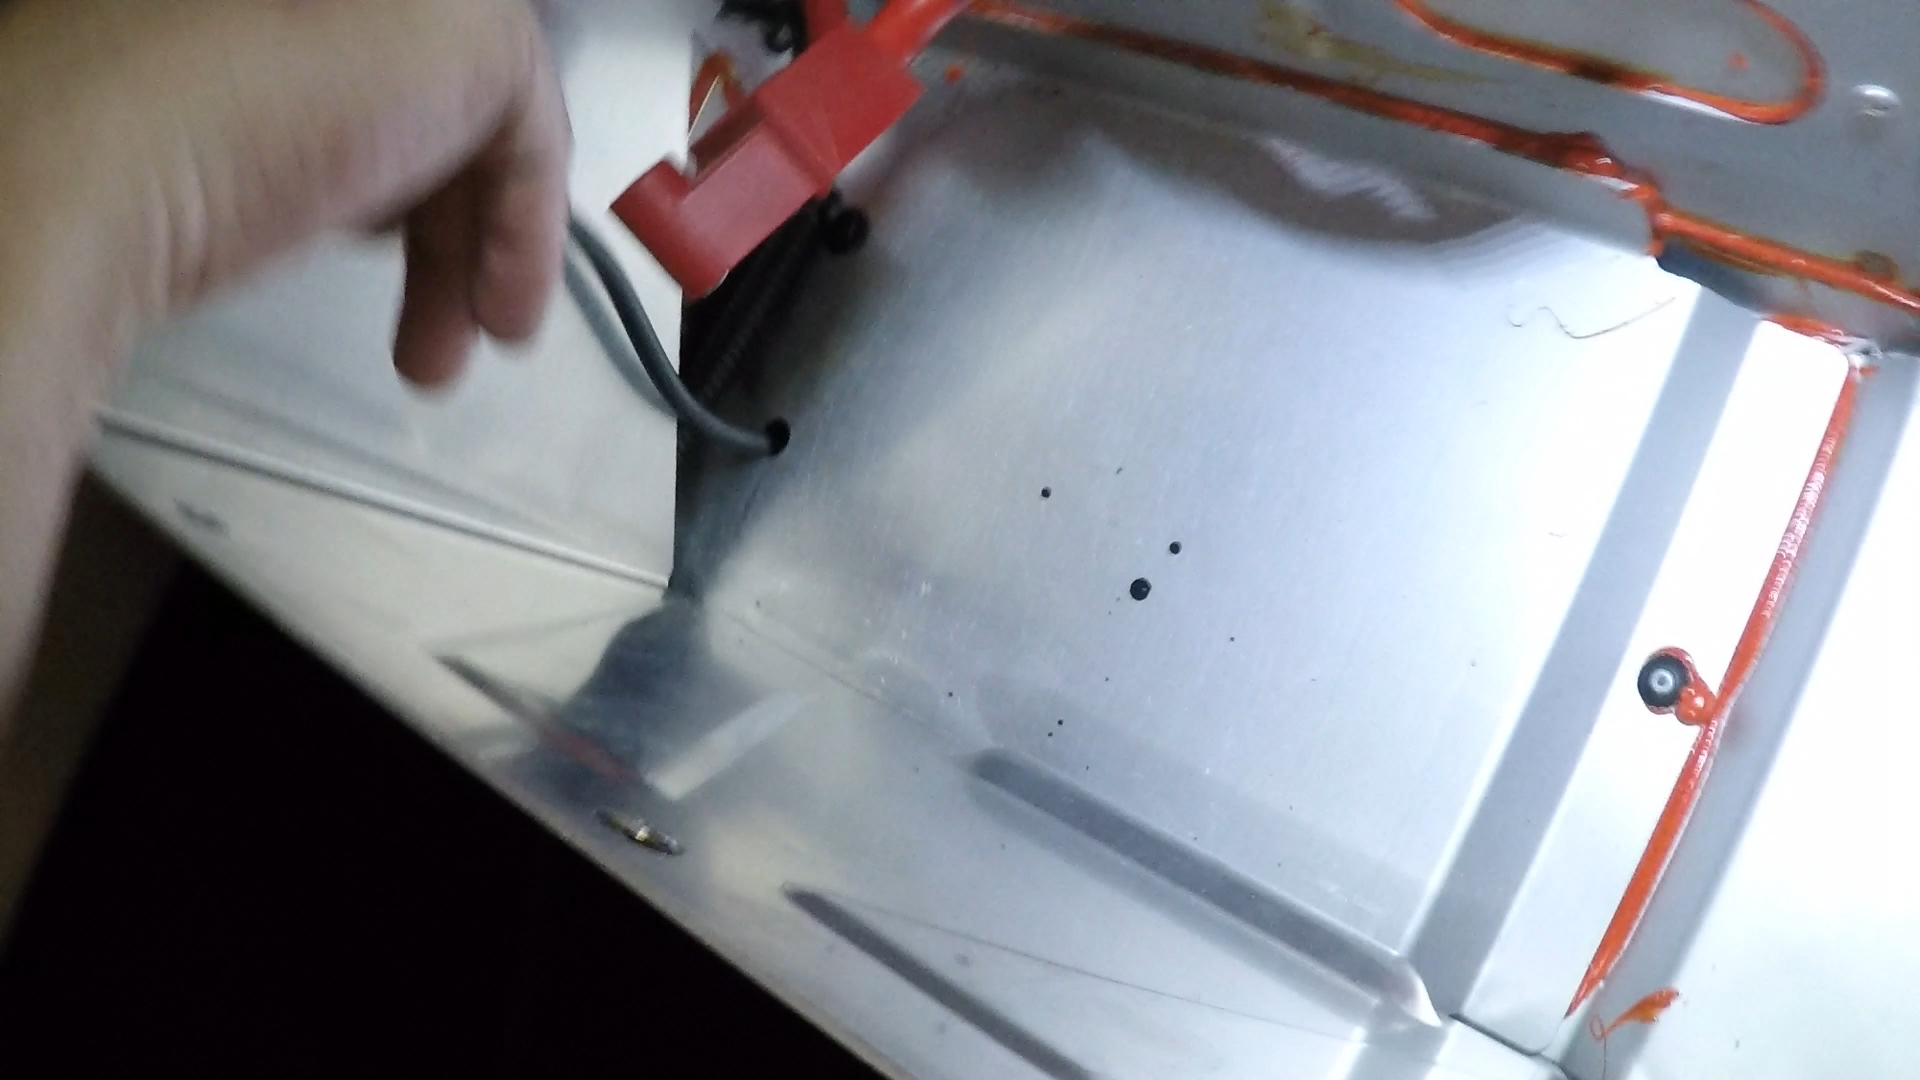
Vent Tube passage in bottom of Battery compartment So I ran into a little challenge here. The vent tube is designed to connect to the top of the battery, go through a hole in the bottom of the battery compartment, and then through a 2-3 inch space before it goes through a small hole in a rubber grommet in the bottom of the car. The original vent tube was trimmed to length after install at the factory. Since I pulled it out during the removal, how exactly can I get it connected to the battery, through the hole, and down and through the grommet while I have zero access to it?
-

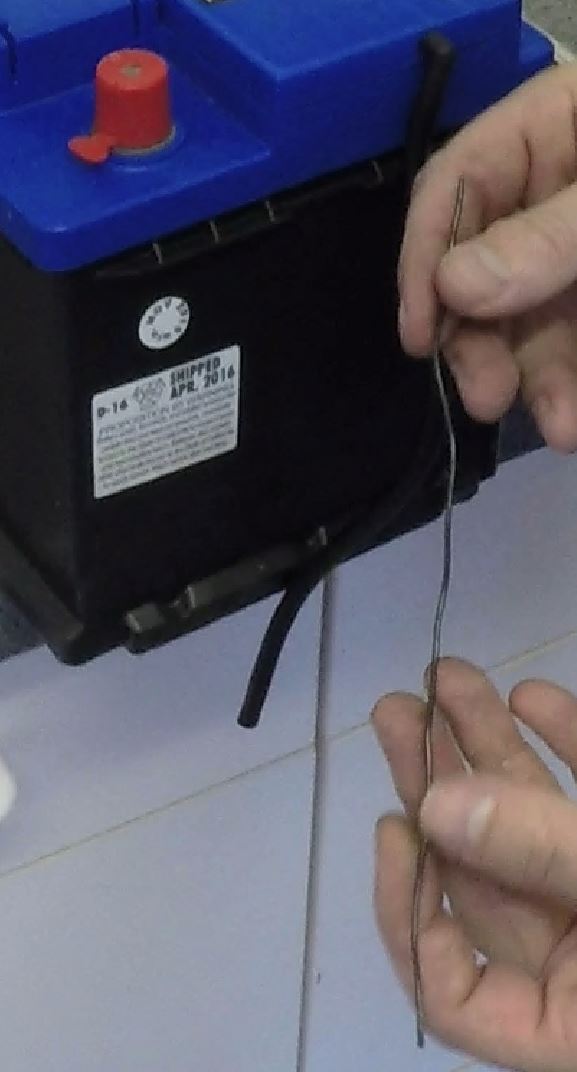
Using a 12″ piece of wire to extend the vent tube for reinstallation What I did was take a 12 inch piece of bendy wire and stick it in the end of the existing hose, essentially extending the hose length for the purpose of the fitment. Afterwards, I will just pull the wire out the bottom of the car.
- I put some gentle wavy kinks in the wire so it stuck itself into the hose better and wouldn’t fall out.
-
-
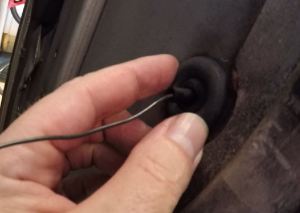
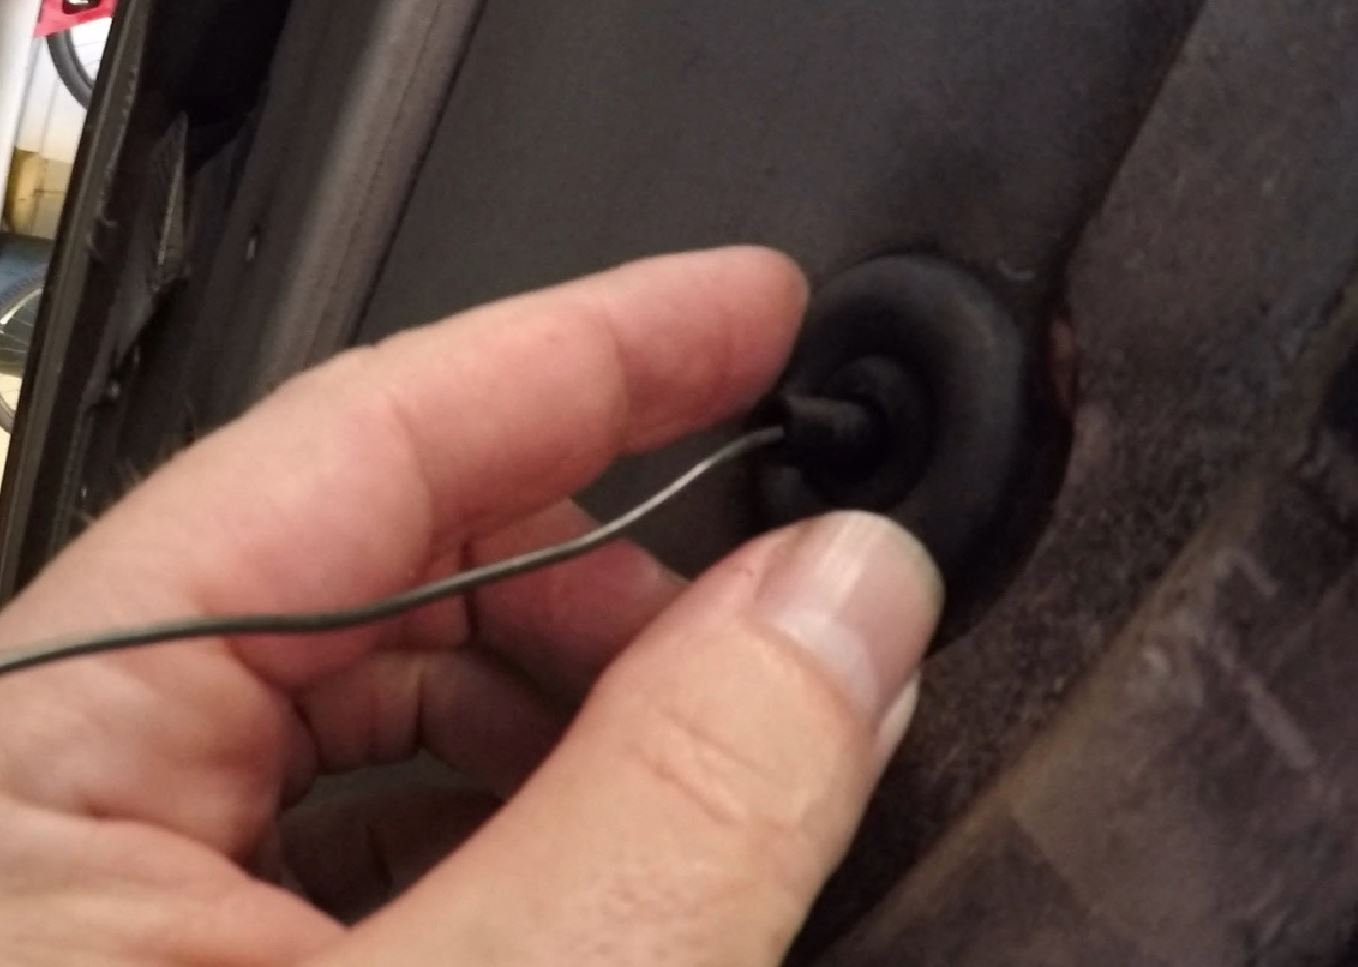
Vent tube properly exiting the bottom of the car through the rubber grommet Place the vent tube into position in the battery compartment, fishing the bottom through the hole and down and out of the grommet beneath the car. Even if you didn’t fully remove the vent tube, you might have tugged it out of the grommet and its no longer exiting the bottom of the car, but rather in the gap between the battery box and car floor. Check out the video so see what I mean.
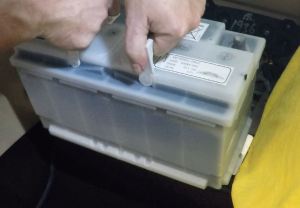
- Place the new replacement battery in the car:
- The replacement also weighs 52 lbs (24 kgs) , so watch your back and be careful of banging up your leather upholstery
- Lift the battery through the door opening and rest it on the battery compartment lip just as we did while removing it. This will give you time to reposition your body to lower it the rest of the way.
- Lower the battery into the compartment. Keep the vent tube out of the way to the side.
 Once at the bottom, tip the battery over a bit to be able to get your fingers into the gap and connect the vent tube to the vent port on the top of the battery. See my video below on how I did it. Remove the alignment wire out of the tube underneath the car.
- With the vent tube connected make sure the battery is seated flat on the bottom of the compartment (wiggle it around to be sure) and skooch the battery as far forward as possible so the bottom beveled portion of the battery frame wedged under the mount in the compartment.
- Replace the battery bracket by:
 Align the edges of the bracket over the slots, and start to lower the bracket.
- This doesn’t slide smoothly, and you will need to wiggle it down (a.k.a. bang on it with your fist) and keep it going down level on both sides.
- As it bottoms out, wiggle the battery to make sure the bracket and battery are mating up and wedging the battery into place.
- NOTE: I didn’t realize when I was removing the bracket it actually doesn’t sit flush on the surface of the compartment. By design there will be some amount of space beneath the bracket under the bolts. The bracket is a ‘wedge style’ so you don’t actually want it to bottom out.
- Install the battery bracket bolts by:
- Replace the two 8 mm battery bracket hold down bolts.
- Use your 8mm socket and ratchet to tighten down the bolts. I couldn’t find a torque spec, and I would just suggest ‘Snug’. Don’t over tighten since you could bend the bracket flanges over since they don’t sit flush on the compartment underneath.
- Try and move the battery around. It should be unmovable at this point, solidly mounted to the car. If it moves at all, stop and work out why the bracket doesn’t have it pinned in place.
- Remount the electrical octopus
- Lower the electrical octopus loosely into place
- Align the grey cable’s electrical connector and push the plastic teet though the hole in the mounting bracket until it click solidly into place.
 Ensure the grey cable is seated in its slot (see the video)
- Loosely start the three 4 mm screws to mount the bracket and snug them up using the Allen wrench.
- Reinstall the black plastic safety cover by aligning and pressing the three snaps into place.
- Reconnect the positive battery terminal by:
- Remove the disposable plastic safety cover from the battery post if so equipped.
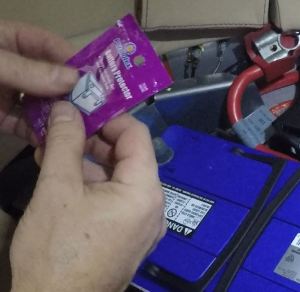 I applied some Permatex Battery Protector (grease) to the battery post to aide in corrosion protection and lubrication
- Wiggle the positive battery cable down over the post making sure its fully seated.
- Using the 13 mm wrench tighten the battery terminal.
- Set your Torque wrench to 9 Nm (7 ft lbs) as published by Aston Martin in the official workshop manual.
- Use the 13 mm socket to Torque the nut to spec.
- Lower the red rubber safety shroud around the terminal to protect it.
- Reconnect the negative battery terminal by:
- Follow the same procedure as the positive terminal.
- Note: I had to loosen my terminal a bit to get it to fit over the new battery post, I guess the new battery’s post was slightly larger in diameter. I had to use a hammer and tap the terminal down over the post.
- Note: You will start to hear your car come to life as soon as the negative cable touches the post. The CD Changer will index, and you may hear some clicking for a few moments around the car. Not to worry.


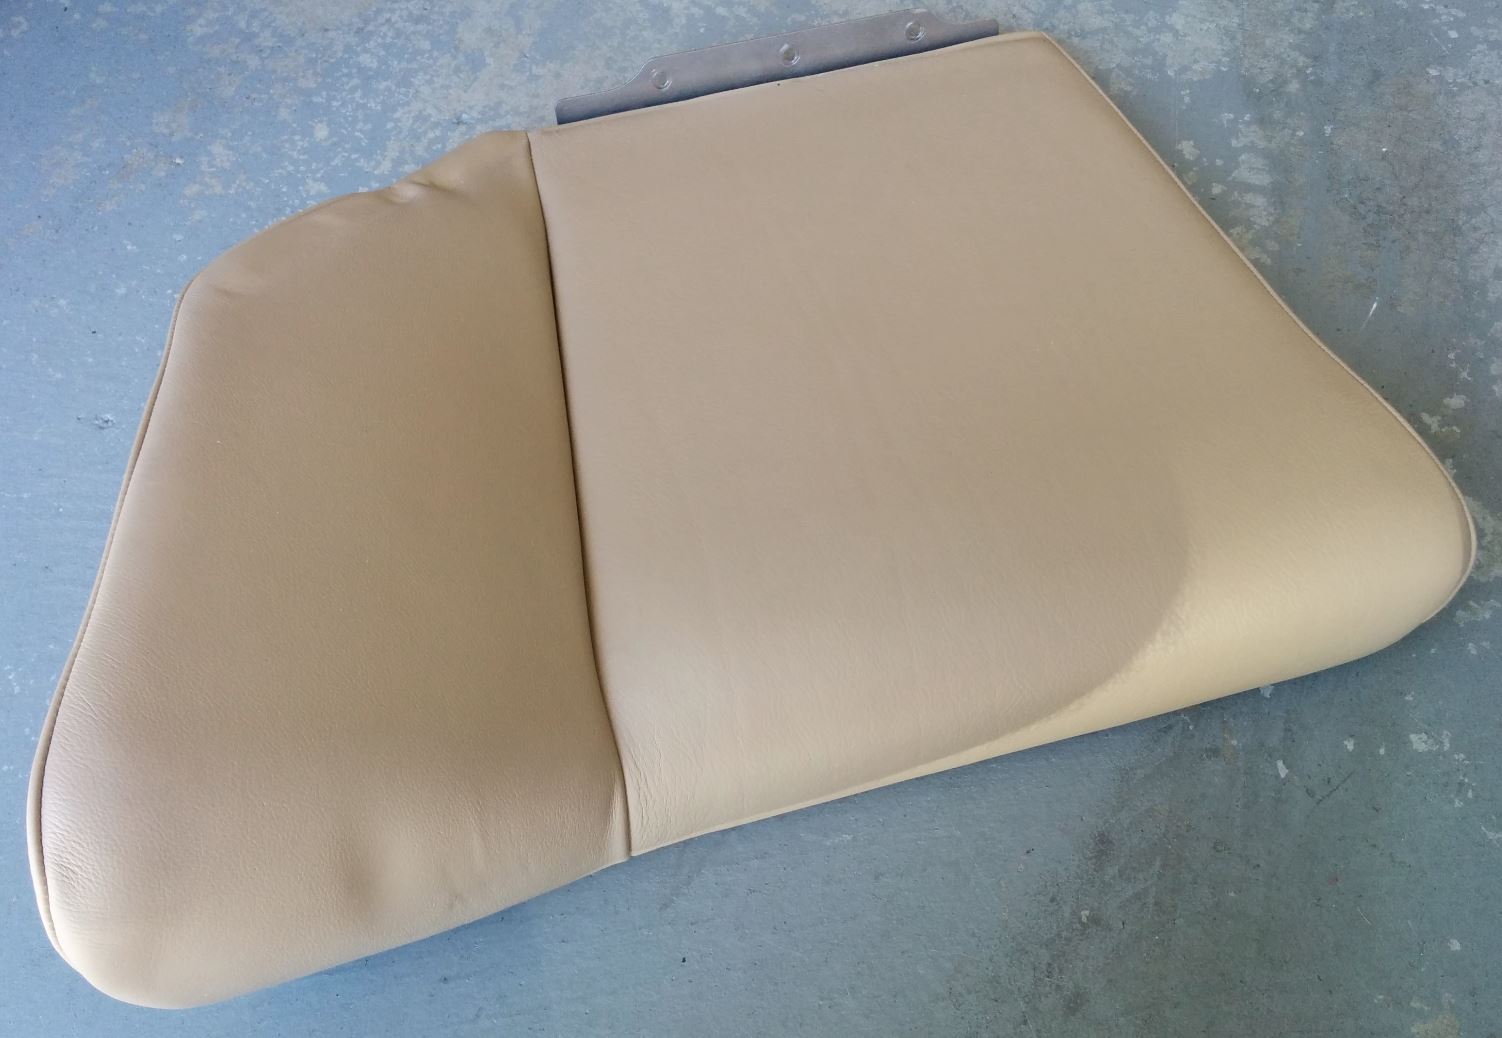 The final steps will be to replace the battery cover and seat squab, well described in my other article and video – Reconnecting the Battery in an Aston Martin DB9. Follow those steps to complete the project.
That article also ends with reminding you about the five steps you need to do anytime you’ve disconnected the battery as defined by Aston Martin Service Bulletin SB153. Namely:
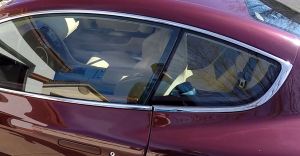 Reset the Window Autodrop Calibration – your windows automatically open a tiny amount as you open your door handle, and this will be forgotten by the Door Modules until you recalibrate them. Check out the article here.
 Reset your Seat Calibration – your power seats need to learn the extent of their adjustment ranges (up/down and front/back), and this will be forgotten by the Seat Modules until you recalibrate them. Sure symptom they are forgotten is you can’t move your seat any direction but forward. Check out the article here.
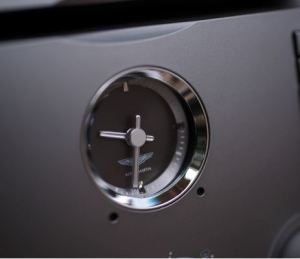 Reset your Clock – the beautiful clock in the dash will need to be properly set to the current time again. Check out the article here.
Reset your Radio Presets – I don’t have a video on this, but all the memorized radio channels on buttons 1, 2, 3, etc. will be forgotten. Good luck remembering them all. Simple to reset, but I don’t have a video on this yet.
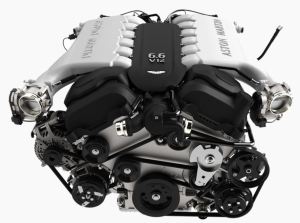 Relearn the Engine Misfire Correction Factors – this is the biggest PITA to redo, but also the most essential since your engine will be running in a ‘default guess’ mode until completed. The Powertrain Control Modules (PCMs) that monitor and continually adjust the engine to prevent misfires needs to calibrate itself following a specific coast down procedure that has to be done at highway speeds. Check out the article here.
OK, here is my video showing the process above. My apologies in advance that it’s about 20 minutes long but I wanted to make sure I showed all the steps so you’d be successful in your project.
And here is the video on Disconnecting the Battery that shows you how to access it behind the rear seat and remove the cover.
And here is the video on Reconnecting the Battery that shows you how to replace the battery cover and replace the seat.

I just ran across you blog and can’t thank you enough! I have been needing something like this for awhile now. I own a 2005 DB9, #2366, and I picked it up in 2014 after 4 months of searching for just the right one at a great price. I fell in love with this car when it was introduced at the Chicago Auto show, it just took me 10 years to acquire it!
I have a friendly mechanic that works on this with me along with several other older collector cars I own, but finding accurate information on these procedures has been a challenge. I refuse to pay a dealer to work on the car and have fun doing much of this myself. Your blog is and will continue to be EXTREMELY helpful!
I performed a battery replacement today and it went pretty much just as you described, it was nice knowing exactly what to expect. Keep up the good work and the useful blog! British cars are quite quirky and amusing if nothing else. THANKS!
LikeLike
Hi Greene – you welcome. I’m glad you are finding the information useful. What other cars do you have. My second British car is a ’61 MG Midget Mark I, number 981 (the 880’the Midget ever produced). Now that one should be called princess piddles!
LikeLike
Hi Steve,
I have a 1952 MG TD MKII, in British Racing Green of course! It’s a very fun car to drive although it’s pretty small. Then we have a 1955 Buick Special that was restored as a frame off restoration and a 1930 Model A Roadster that we use in parades and such. Each one has a different story to tell and enjoyable for totally different reasons. Old cars can be addictive… 🙂
LikeLike
Very nice, and wide ranging group!
LikeLike
Hi Steve….
I bought my DB9 at possibly the lowest price an undamaged one has ever changed hands in the UK. It has completed 109000 miles and I’ve just popped in a ‘lifetime warranty’ battery, having used your guidance. I also carried out FOUR 70 – 20mph runs, none of which had a press of the brake pedal at any point. The car runs beautifully…. super smooth. I know that the procedure has helped it’s running. So, a pending full Aston Martin service, full respray, new tyres, new battery, a rebuilt sat nav opening system and various small jobs have made this DB9 worth a hell of a lot more!!
I will go through your blogs and will definitely be using them for my own maintenance.
Best regards
Steve Keeler
LikeLike
Hi Steve! Nice name and car choice. 109K miles, wow! Means I have about 80K to go at least on mine. The paint work is really wimpy, a feather can chip it (sucks). I hope you enjoy the material on the Blog, and feel free to contribute your comments.
What did you pay for yours? Curious, but you don’t have to tell….
LikeLike
Well… I bought it at auction. It’s a lovely story!! BCA (Our UK car auction main body) misrepresented the car. They said it had no service history, however, in the photos, I saw the book in the boot. Therefore, I travelled 200 miles just to look in the boot and if it was there, I was going to buy it!! I found the car in the auction room and it needed bits of bodywork, however, not too bad. All four wheels were kerbed and it needed new tyres asap. The guys came to start it up and I asked them to pop the boot. Upon start up, I checked the exhausts for smoke and the engine note. I then found the service history bok, fully stamped with 100% Aston Martin Main Dealer service history!! I then noted how it moved off and it was fine. So the gamble was on!!
The Auction guys took the service history and handed it to the auctioneer on the rostrum. This was hugely disappointing as it would affect the sale price. That being said, there were no internet bidders as they had all been put off a 107000 mile DB9 with no record of it’s history. Bidding started at £20000 and ended with me at £21500.
Since then, I drove it home with no hitch whatsoever. I have had a very high standard respray of most panels apart from the centre part roof panel and the rear bumper. That was an amazing £1200. Four new Falken tyres at trade price (I work in an auto store) at £528. New lifetime warranty battery at £135 (trade price). I also bought the Volvo cog repair kit for the sat nav as it didn’t rise. Lastly, I have carbon fibre wrapped the wood centre console at £19.99 and made a superb job of it. Much better than that wood!!
Full Aston Service at Sevenoaks Aston on 31/08/2017 at an agreed cost of £1100 inc the auxiliary belt and both air filters plus oil and filter and brake fluid change.
Happiness is a DB9!!
Keep doing what you’re doing Steve. People like me who love a fettle will seriously appreciate it!!
LikeLike
Well done! Sounds like you’ve got it all together for about 25,000 pounds. I envy you folks in the UK, much better access to skilled trades, parts and dealer services. I hope you get to enjoy her for another 109K miles!
LikeLike
Hi Steve,
Just got to the battery compartment for a change out with the Odyssey AGM. The AGM battery doesn’t seem to have a vent tube?.
LikeLike
I just checked the Odyssey site and apparently with their AGM battery no venting is required.
LikeLike
Good to know. As you saw in the article I went for the Bosch AGM, it did have a tube. I think Odyssey would know, so no worries. I may update the article with that tip.
LikeLike
I completed the battery installation and am off to set the clock and calibrate seat and window modules. Just a note on installing the Odyssey AGM battery. It appears to be a bit wider than the stock battery so it was difficult to get the battery bracket all the way down. I noticed that the base of the battery was recessed a bit. Using a long motorcycle tire iron and a rubber mallet I was able to seat it properly. Again, there is no vent tube on the AGM battery.
Under “Timing is Everything”: After a first try on the battery bracket, my cell phone rang. As I answered it, I noticed I had just got a small cut by the base of my thumb. I was literally saved by the bell from smearing blood all over my off white leather (appears to be the same color as AM 1936 thought the car is dark Ghili green, with dark green carpets and green leather on the dash and door sills and console 🙂
I put on some cotton gloves when working with the battery terminals and then covered the terminals with a bit of duct tape while working on removal. Moral of the story: Gloves are a good idea when fiddling with the battery bracket.
LikeLike
Ouch! Good suggestion on the gloves. The brackets edges are rough to be sure. I will include the fitment note on the odyssey too. I know my Bosch was a bit of a challenge too based on the shape of the base as well.
LikeLike
Enjoying your blog Steve. Keep up the good work.
Kind regards – Roy Youens Ramsgate UK.
LikeLike
Thank Roy, I appreciate the encouragement!
LikeLike
Steve, I have just replaced my battery and found out my Aston is 1946!
I also discovered the vent pipe had not been fitted. I found it easier to buy a longer piece of pipe and push it up from underneath, then trim to length when finished.
LikeLike
Congratulations on 1946! It’s like our kids played together and we never knew.
Glad you sorted out your vent tube. Probably not the best to have been driving around with the vapors in the car before. Pushing it up from below works, you just have to be a good shot spanning the gap between the floor pan and bottom of the battery box!
LikeLike
Hi Steve,
As a UK DB9 owner with one of the very early examples and the inevitable bubbling paint issues, i was astounded to hear Steve Keeler’s tale of his getting such a low cost respray. I’ve tried everywhere in my area and the responses have been everything from “Sure, that’ll cost about 8 grand (£!)” to “Sorry, we can’t take on an Aston”. I have tried to find a contact for him without success – is there any chance you could put the two of us in touch?
Cheers, Mark
LikeLike
Hi Mark. I’d be happy to if I knew how. Is Steve a commenter on the Blog?
LikeLike
Yup, a little bit higher on this specific thread.
LikeLike
Hi Steve,
Just found a safety recall on 2005 to 2009 DB9 and DBS vehicles. The NHTSA website won’t give me the status of my car and I haven’t had anything mailed to me yet. Beginning Feb1 Aston Martin will be issuing notifications of Safety recall RA-18-0026. It refers to a particular circumstance were the front right seat can be moved all the way back to its rear most position causing damage to the battery cables resulting in a short and a possible fire risk. I’m going to call my local Aston dealer on Monday to confirm if my car is part of the recall.
LikeLike
Hello Steve,
I just used your U-tube video to assist me in replacing my 2006 DB9 battery. Thank you very much for the excellent presentation.
I was able to replace the battery without de-energizing the car. I used a portable battery charging device connected to the jump start post in the engine compartment. I also used a leather work glove to cover and protect the positive battery cable during the battery exchange. Proceeding cautiously with your other instructions I made the change out and did not have to go through the re-calibration steps.
LikeLike
Hi Ken. Glad the article helped and it worked out for you!
LikeLike
Hello,
I congratulate you on the great website about Aston Martin – it’s great!
I have been reading your website for several months. Your work is helpful for every AM owner. And especially for me because I bought the DB9 Volante. I have a question for you:
I replaced the battery and I can not open the roof. I made programming of windows and armchairs. Please, write to me, how to deal with this problem?
Thx
LikeLike
Hi Derek. Thanks for the kind words. I don’t have a Volante, so I’m not sure what the solution might be. You might check the forums at PistonHeads and 6SpeedOnline. Let me know what the fix is so I can share with others. Good luck!
LikeLike
Hi Steve, when I solve the problem I will describe it. However, at the moment I am repairing the coolant level sensor – Sensor 1R12-37-10166 (AM) is the same as PCJ500030 (Range Rover and Jagura XF ie).
LikeLike
Hah! I have the EXACT same issue going on right now, and my new sensor just arrived last week. Dash message about low coolant level, but the tank is full. Warning light was on for about 3 weeks, then went back to normal again. Changing it anyways.. Forum threads are dumb, talk about a stuck float. There is no float. Shooting a video on the swap. Thanks for the rover part, figured it was a generic like most of the sensors. Saved me a bunch of time. Where did you find the cross reference?
LikeLike
I searched a lot for WWW … and now I do not remember. But it sure fits. Today it turned out that the sensor is OK. For me, the problem is the magnet, which is in the form of a ring and is in the tank. The magnet floats on the fluid and indicates the level. The magnet blocked. I dismantled the tank and washed it with dishwashing liquid and rice. Now the ring is moving well. Tomorrow I put everything together. Maybe it will not be an error anymore?
🙂
…
The engine air filter for Aston is the same as for the Mazda RX.
Maybe someone will benefit – the RX filter is much cheaper!
The keys to Aston are like the old Ford and the pilot from Volvo.
LikeLike
Hi Steve,
I have just completed a very big PITA battery change on my rag top DB9, with the top still up. I have no idea how this can be done in 30 minutes but kudos to those who have. Started yesterday but got to point that I left it for a coller day this morning and went back at it. So, the car was disconnected from power for around 16 hours yet once all done and reconnected, the settings for the radio, seats and windows were still OK! This was on a 2006 model.
LikeLike
Way to go! Glad you managed to get it done, but I am glad you felt like you could tackle it. Hopefully the info on this site helped. You still might want to hookup the OBDII reader and check if your Misfire Correction Factors Learned is ‘set’. If not, you won’t know any other way and the transmission will be just a little ‘off’ until it is set.
LikeLike
Steve,
Your blog and video certainly helped, as do all the posts.
I did the 70-20 reprogram drill early yesterday but without the ODI have no idea if it is set or not. Car certainly seems to be driving and idle very well.
I did read your blog on the ODI and think it is time to take the plunge to buy one.
Thanks again for all your fantastic information.
LikeLike
Hey Steve,
My Customer has a 2005 DB9 with only 19K miles on it.he had problems with the LINN Amplifier so he found a replacement one in the UK. He plugged it in and the radio system came back to life.
Problem is it died ten miles later, it just stopped running. He pushed the Reset Button by the battery and got it to crank over for a second. So he held it down until it got too hot to work.he had it towed to my shop and left it outside because it was my day off. I checked the circuit breaker and its shorted out. my problem is even if I bypass it with a 175 Amp Fuse the vehicle will no come out of park, so I can push it inside. My Question-Is there a way to get it into Neutral without the engine running. Dash Lights, A/C, Windows all work. any tips would be a Help! Thank You. DR. Brown
LikeLike
Sorry to hear about the issues. If your DB9 is an automatic, there is an emergency neutral release lever. Remove the Rear Left Hand seat cover (just like you remove the seat cover on the right hand side to get to battery). Lift it up, its held down with Velcro. Under there you’ll see the release lever and some label. Sliding the lever releases the parking lock.
LikeLike
Thank You Steve. I found that lever and got the car in the shop. Because the Battery Rest Switch is Fried I couldn’t get to the owners manual in the glove box. once I put a 175 Amp Super fuse in there I got to the manual under the seat. When I tried to crank the engine over it turned a couple of times then blew that big fuse. Once I get it on the lift I’m going to pull the lower body pan and look for a short. Ordered a new Battery Reset Switch from the dealer. Lists for $610.82 just for other readers and your information. It will be here next week, when I get it fixed I’ll tell you what I found. Thanks for the website! I’m used to Ferraris and Lambos but the Aston seems to be even more limited production. Nice to have someone with experience to Chat with that understands the situation. I’ll keep you updated as I go. Gary “DR” Brown
LikeLike
Just wanted to say a big thank you for the battery replacement guidance. In short it saved me time, difficulty and cost in what could have been a difficult situation. Found your website when looking for help on it and, as a result, found a goldmine of information. Many thanks again. Steve
LikeLike
Terrific, glad it helped you out!
LikeLike
Steve,
I have just replaced the battery on my 2011 DB9 with the Odyssey (yes damn heavy) the part number listed above has been replaced, new Odyssey #ODP-AMG49 H8 L5 $372 inc prompt shipping. No vent tube is required with this battery, apparently the gases are recycled within the battery itself.
I am not sure what year the battery setup changed in the DB9 I’m guessing 2010, the procedure is slightly different, the electrical (octopus’) harness does not need to be disconnected, the only way to remove the battery is by loosening and or removing the aluminum battery box itself, a simple task lift the carpet unscrew the black floor trim locate and remove the bolts holding the battery box (easy to identify) slide out the box and you are good to go. The reason the battery box needs to be removed is the that the bracket that secures the battery now has a welded retaining plate only allowing it to be lifted a few mm but not enough to pull the battery out.
After following your instructions and realizing my setup was slightly different, I found only a Fague mention on another Forum.
One last thing, I followed your procedures for recalibrating after reconnecting the battery (the driver’s seat was fully operational on its own for some reason) however the passenger seat was all the way forward and wouldn’t move (no up and down buttons for passenger side) however the back rest of the seat, which was working, needed the button to be held until it reclines backwards all the way hold for 4 seconds then recline it forward all the way and hold for 4 seconds, miracle of miracles it works.
Thanks for all your amazing effort and enthusiasm!!
LikeLike
Thanks Steve for an informative article. I have discovered a little cheat that I used today in replacing my battery. The cheat is how to keep power to the “hot battery bus” live whilst disconnecting the battery and thus keeping all the modules powered whilst the new one is installed.
I have a CTEK MXS 7 and one of the options on this is Supply, where it supplies a voltage of just over 12V. Before disconnecting the old battery I connected the CTEK to the Cigar port in the boot and selected supply mode. Then disconnected the battery wrapping the positive terminal in a microfibre cloth and plastic bag around it. After battery replacement completed then selected normal mode (charging) and reassembled.
Once all done checked windows and connected OBD II to check presence of misfire and they were still there! as no power was lost to system it appears that all the adaptive learning was retained. Just a heads up for anyone wishing to do this.
LikeLike
Any issues with using AM battery tender with Bosch AGM battery for a 2008 DB9. Many thanks in advance for your insights
LikeLike
Hey Steve, how are you? It’s been a long time since I first wrote you, but I do check your website often to see what’s the latest. Since then though, I moved from SoCal to central Oregon. Beautiful summers but dreary winters.
Anyway, just now needed your info on replacing the battery. I bought my 2005 DB9 #2700 exactly 6 years ago. The dealer in San Diego where I bought it had just installed a new 6 year Interstate battery. Guess what, it lasted exactly 6 years. Imagine that!!
I’ve been hot rodding, working on cars, boat racing, building engines since the late 60s as a kid and on in to the 70s 80s and now with my dream car. So I have actually done a lot to my Midnight Blue Metallic baby. Including replace the struts.
Well, I have some info that might help others during the battery swap. To keep the system alive while changing the battery, just connect a 12 volt source to the jumper connection under the hood. I have a 2013 Mustang GT and just ran jumper cables to the jumper post. Of course be very very careful (12 volts is everywhere) when changing out the battery so as not to arc things with tools etc., when removing the behemoth from the rear seat. All settings and computers were not lost during the swap.
Also, you can remove the aluminum “battery box” surround and the job will be much much easier, with no sweat installing the vent tube. The entire job takes a little longer, but a piece of cake when you can get your hand in beside the battery to install the tube! Reposition the battery and surround and wiggle the retainer around until you can install the bolts. The battery and surround will have to be wiggled as well.
I chose the Odyssey AGM battery. Wow! Never had the car crank and start that quickly before. Went from 730 CCA with the Interstate to 950 CCA with the Odyssey. Awesome! I hope this info helps for those willing to take on this project. Thanks for all your great technical articles and real world experience with these cars. I really appreciate and look forward to seeing what you have on the burner for future projects. Maybe I will take a cruise south next spring or summer and come for a visit if your up for that. Would be nice to compare notes in person.
Best regards,
Gerry
LikeLike
Gerry,
Greetings from So Cal😎 and my 2011 DB9.
Like you I recently installed an Odyssey AGM
#AGM49 H8L5 direct from Odyssey like you I removed the battery housing etc …I did not see any where for a venting tube???? According to Odyssey the ” internal valve regulated design eliminates the need for an acid vent tube ”
Any thoughts….
William.
LikeLike
Hi William,
Thanks for reaching out! Hmm, that’s interesting. I got mine from a NAPA store in Salem, OR. The parts guy did mention that the battery for rear seat install usually comes with a vent tube. But this one did not. However, there are two holes, one on each side of the top of the battery and he recommended taking the tube off my old battery, which I did. The tube fit perfectly into the hole on the Odyssey, and I installed. I couldn’t find any notations that the Odyssey did not require a vent tube, but I did not talk to Odyssey directly. I just read the standard tech sheet. That’s great if it doesn’t need a vent, would be much easier to install.
Gerry
LikeLike