
 What the heck is an “A Pillar Interior Trim Cover”? Aston Martin actually calls it the “Cant Rail”. It’s that long sweeping Alcantara covered trim piece that stretches up from the dash panel along the side of the windshield (the A pillar) and runs along above the door opening all the way to the rear window. It covers all the fixings that hold the headliner in place. This article covers how to remove this trim piece. I am trying to remove it so I can get to some clips hidden underneath in order to remove my sagging headliner panel. You can read all about my Sagging Headliner is the main article here.
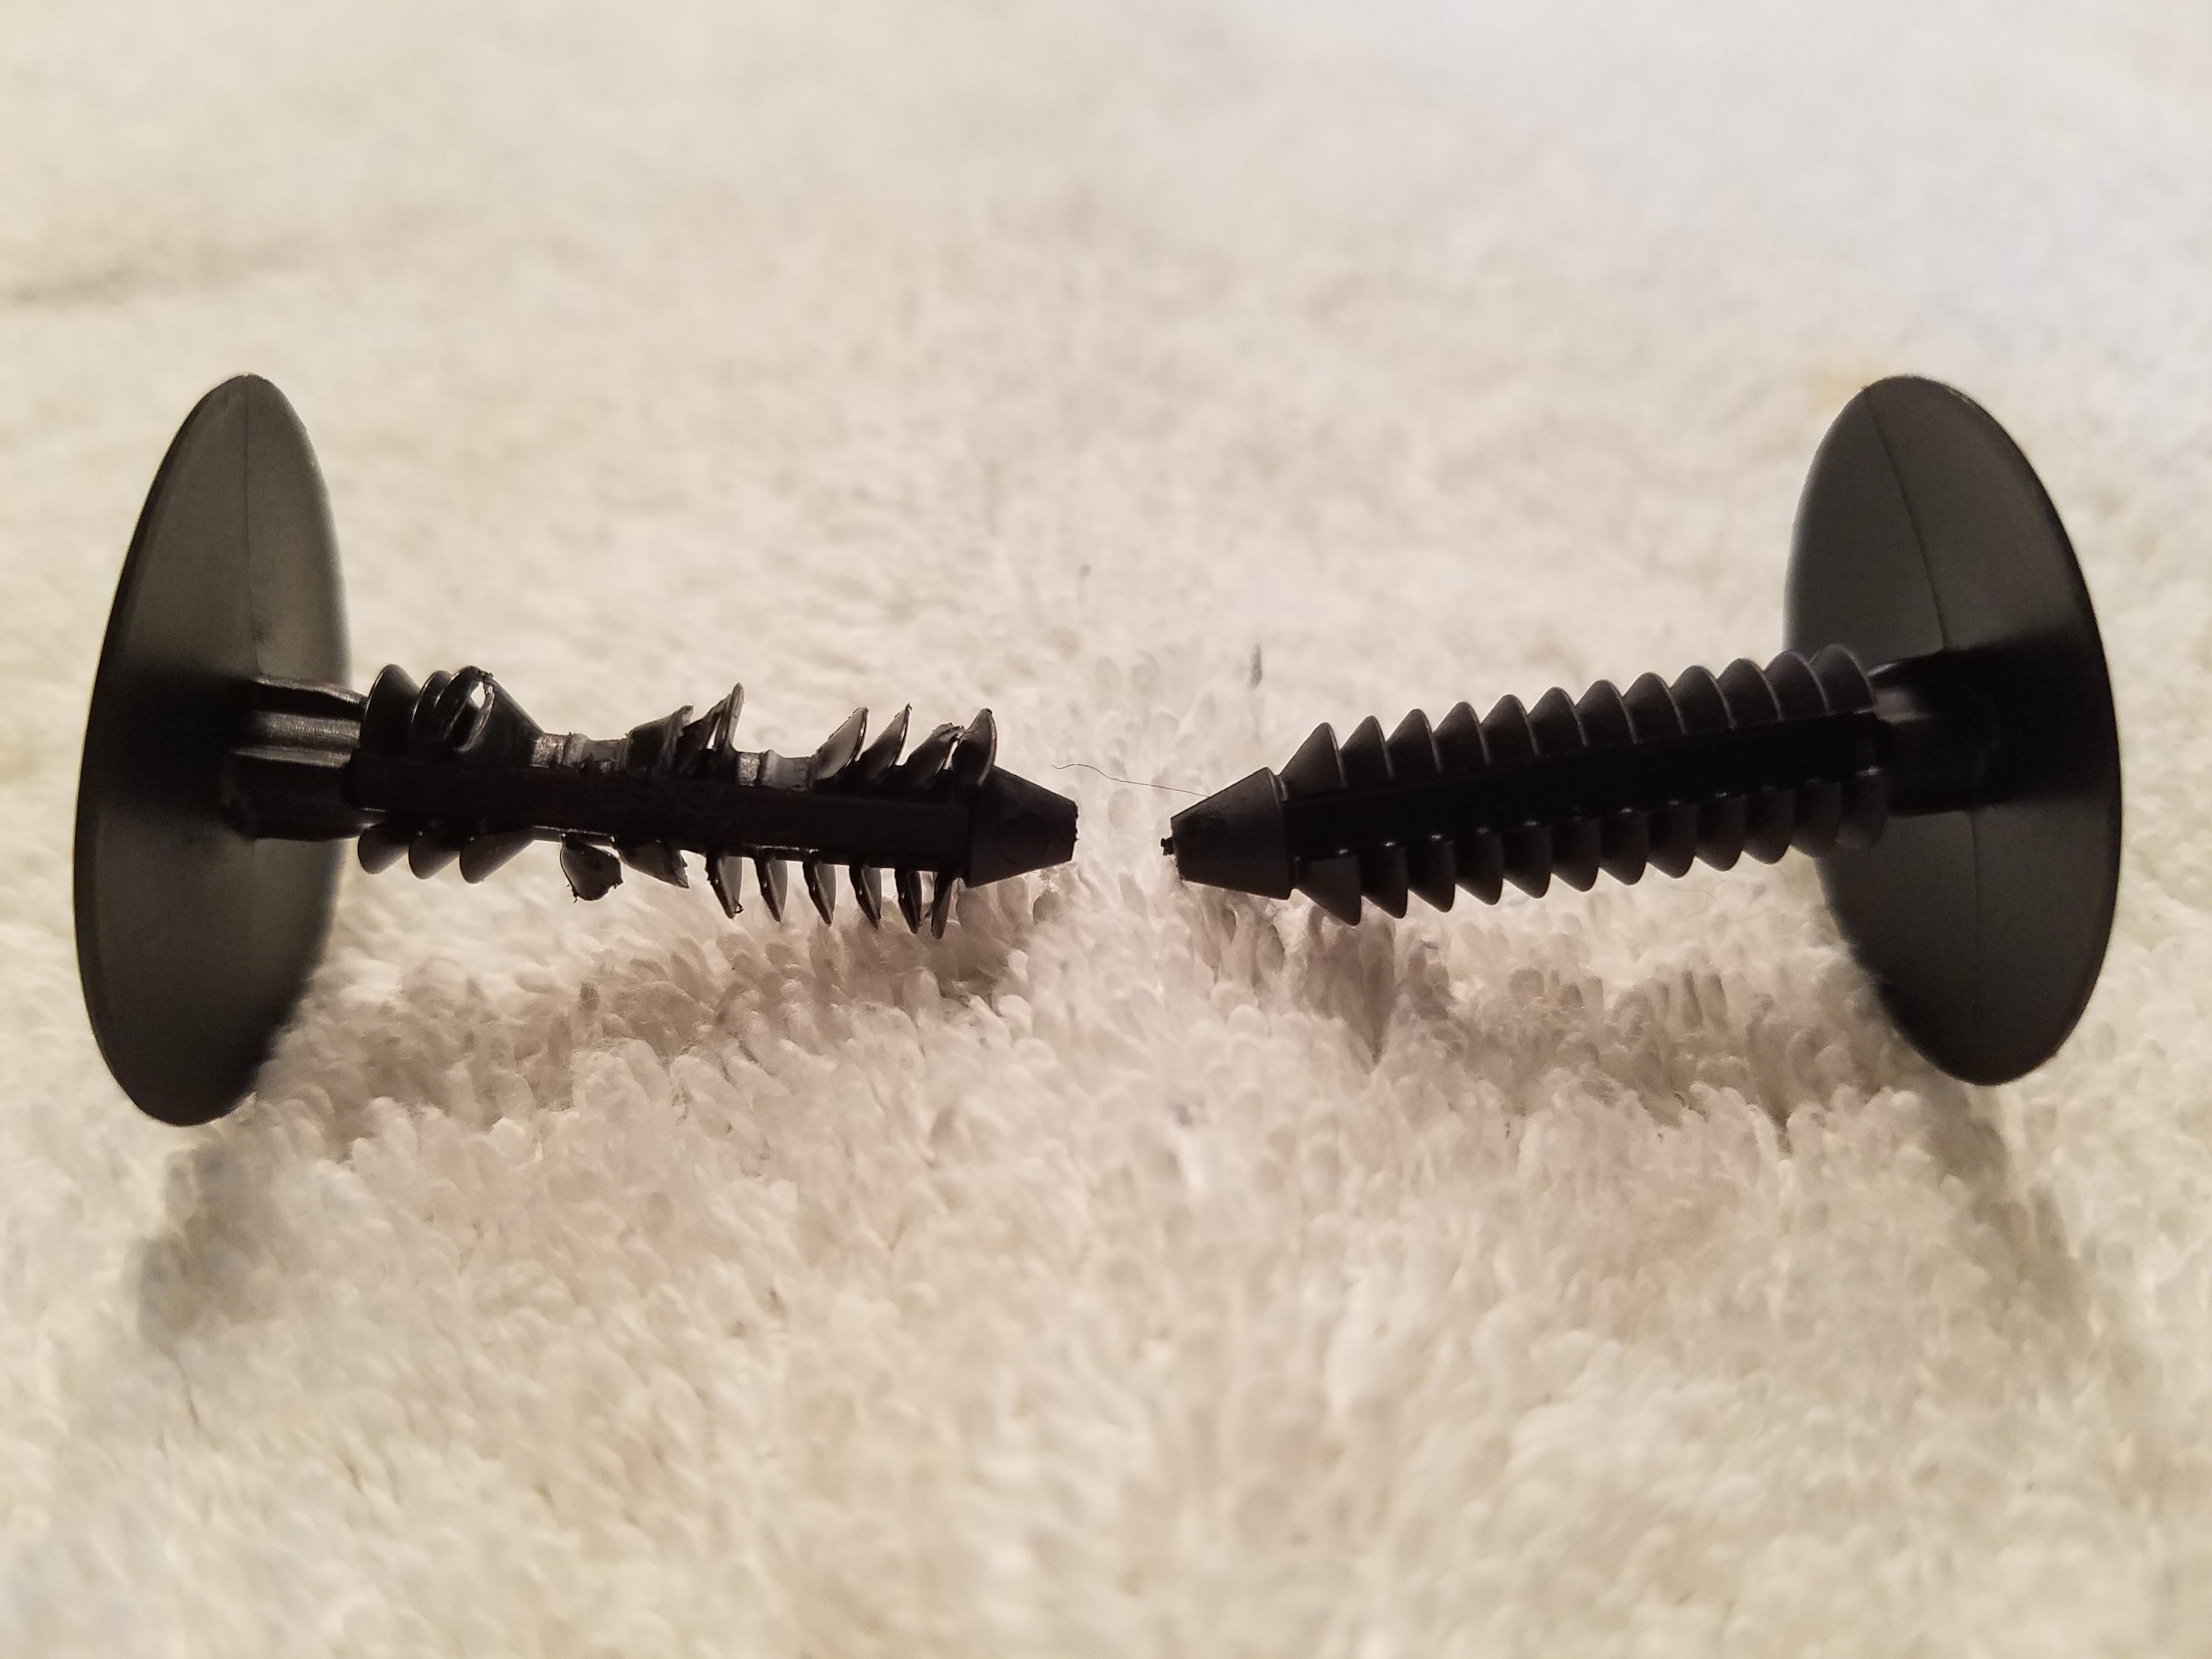
A quick mention about parts you’ll need to put it back together. We’ll be pulling out five (5) plastic ‘Fir Tree’ clips as part of the process (per side). These are essentially one time use clips. You might be able to try and reuse them, but since they deform on the first use, my guess is that you will never get the trim snapped back in as tight as it was originally, and this might lead to rattles. Spend the few bucks and order some new clips and have them on hand when you start. You can check out what parts you need here in my other article Parts Needed to Reinstall the Headliner.
 I’ve done some work in advance to get prepared for this step. I’ve removed the dash panels (for which ever side you are working on). I’ve discovered that if you ONLY want to remove your headliner, you can skip this step and leave the dash panels in place, and just let the A pillar cover sag out of the way (see what I mean below in this article and video). If you plan to completely remove the A pillar cover from the car, perhaps to have it re-upholstered, then you may need to remove the dash panels.
Tools Required
 The only tools you will need for this are two clean hands. Make sure they are clean and not sweaty. You will be pawing around grabbing and pulling on the beautiful Alcantara covered pieces and you don’t want to mess them up.
Procedure
The process will only take about 5 minutes and is fairly straightforward, just a little butt puckering as you have to pull pretty hard on the trim along the way.
 The official Aston Martin Workshop Manual Section 1.05 describes the process in Step 1 succinctly as “Remove (pull away) the cant rail” and doesn’t actually say how. I will explain further.
I really suggest you watch the video below, it shows it pretty well.
- Pick a side. Its the same procedure for either the drivers or passenger side.
- You’ll need to twist your body into the seat so you can reach up and grab the trim panel. Adjust it forward/back and seat angle to give yourself some access.
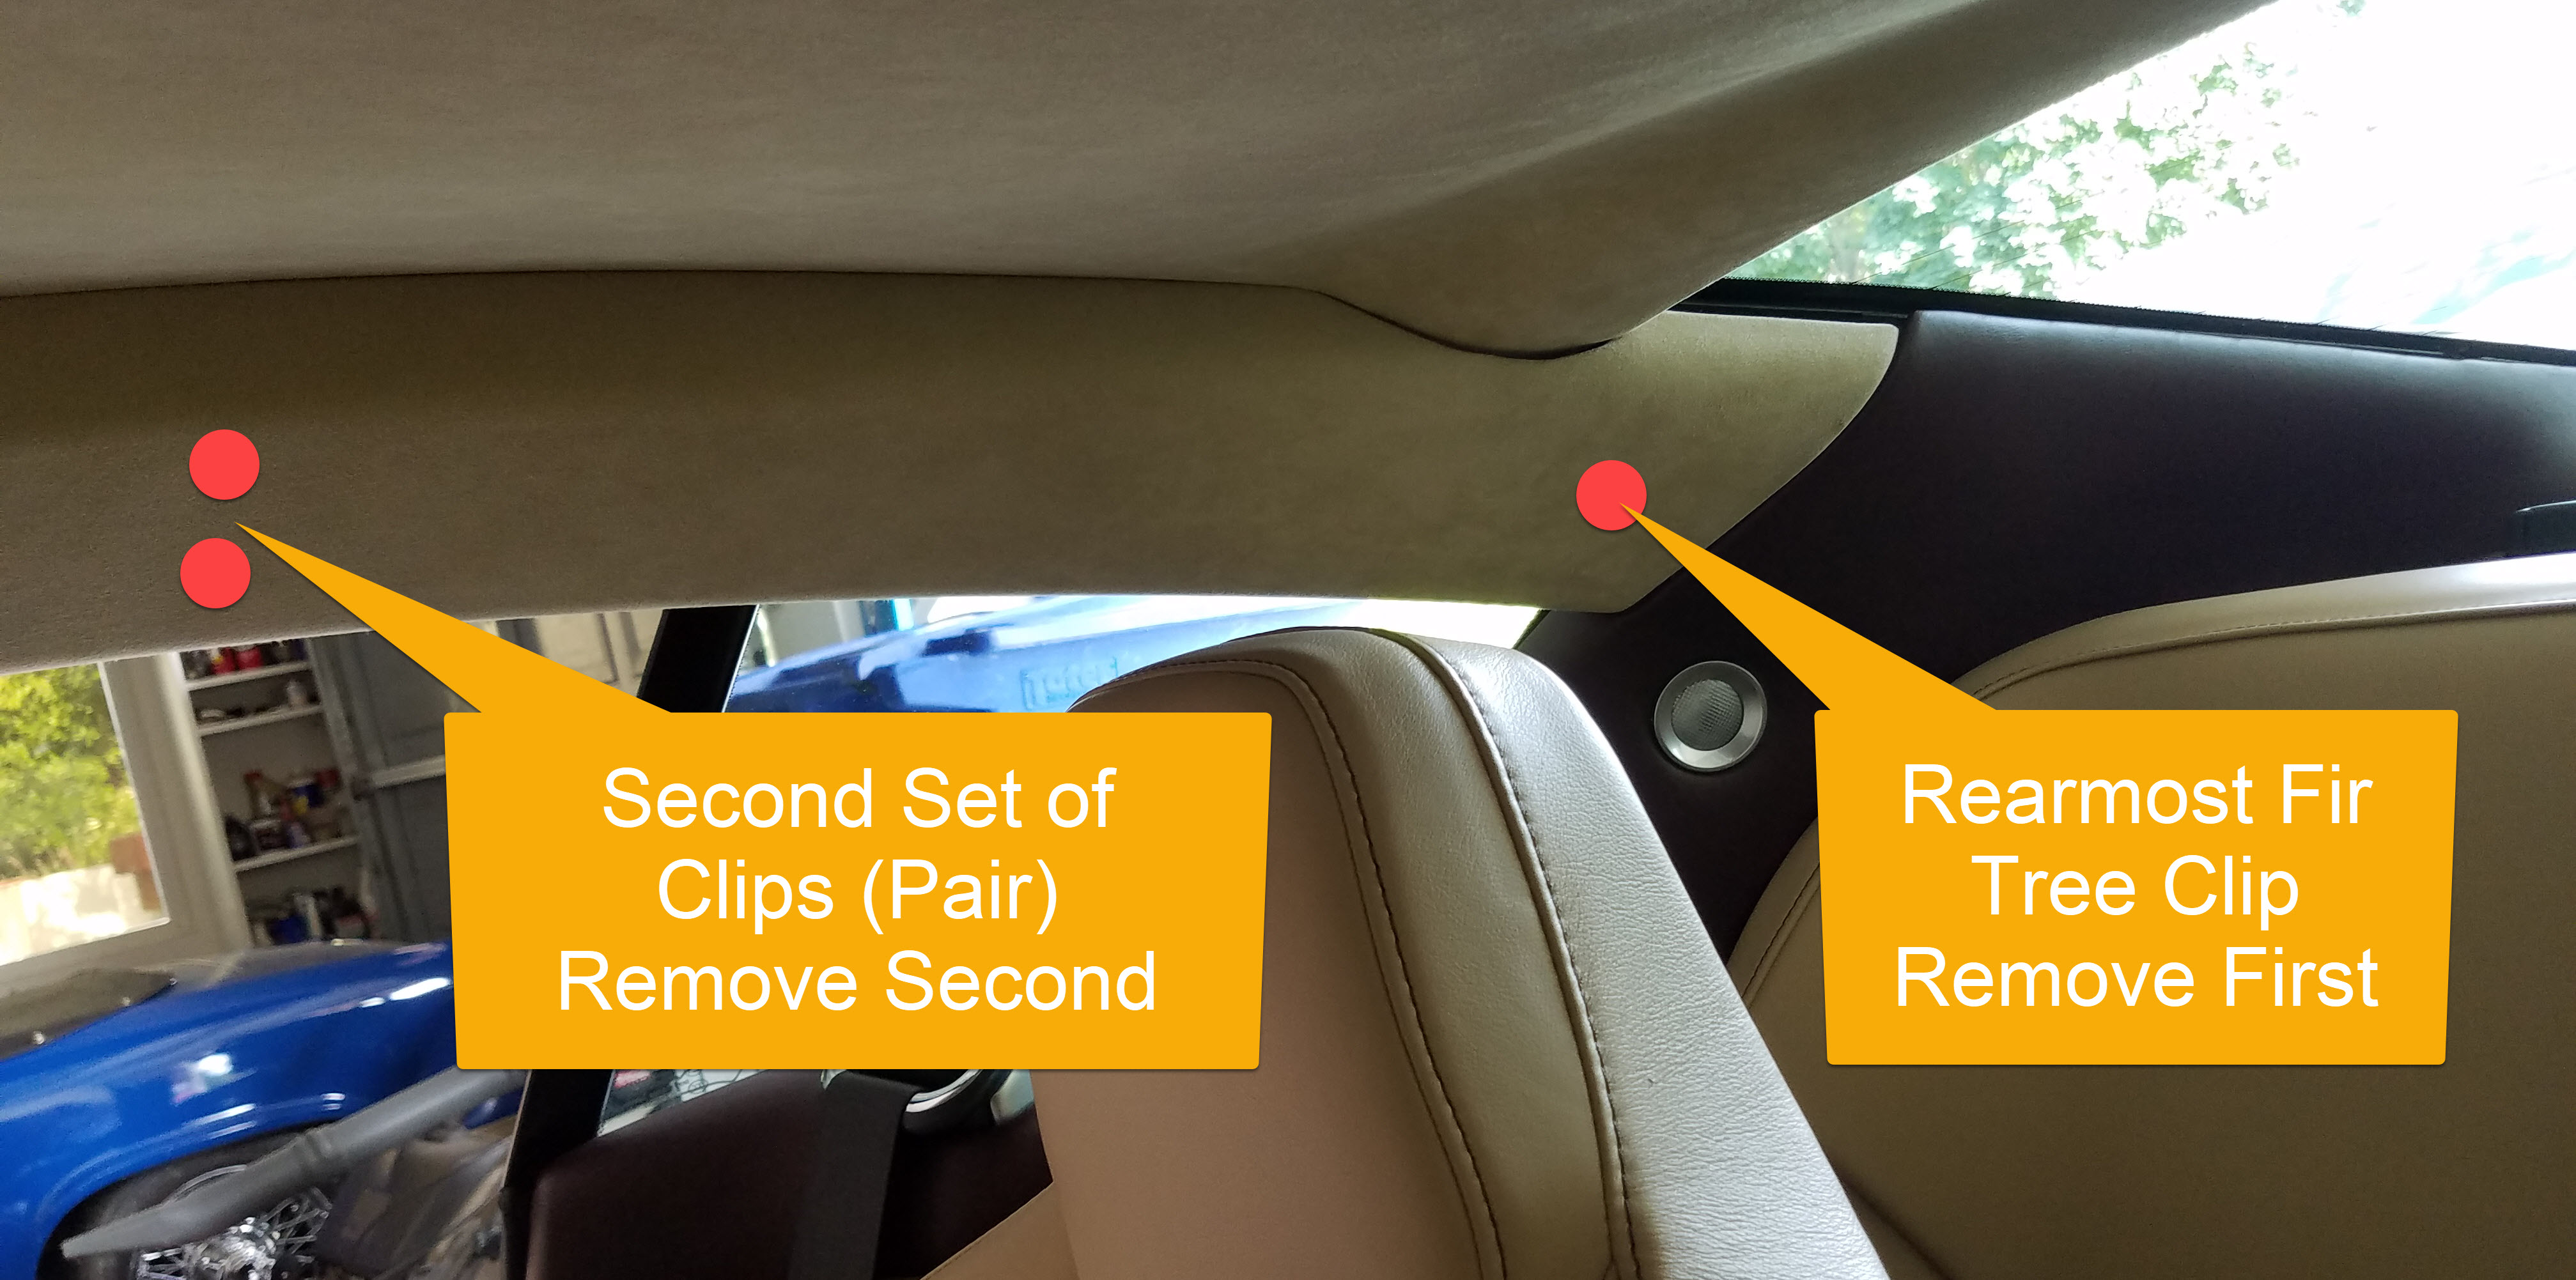
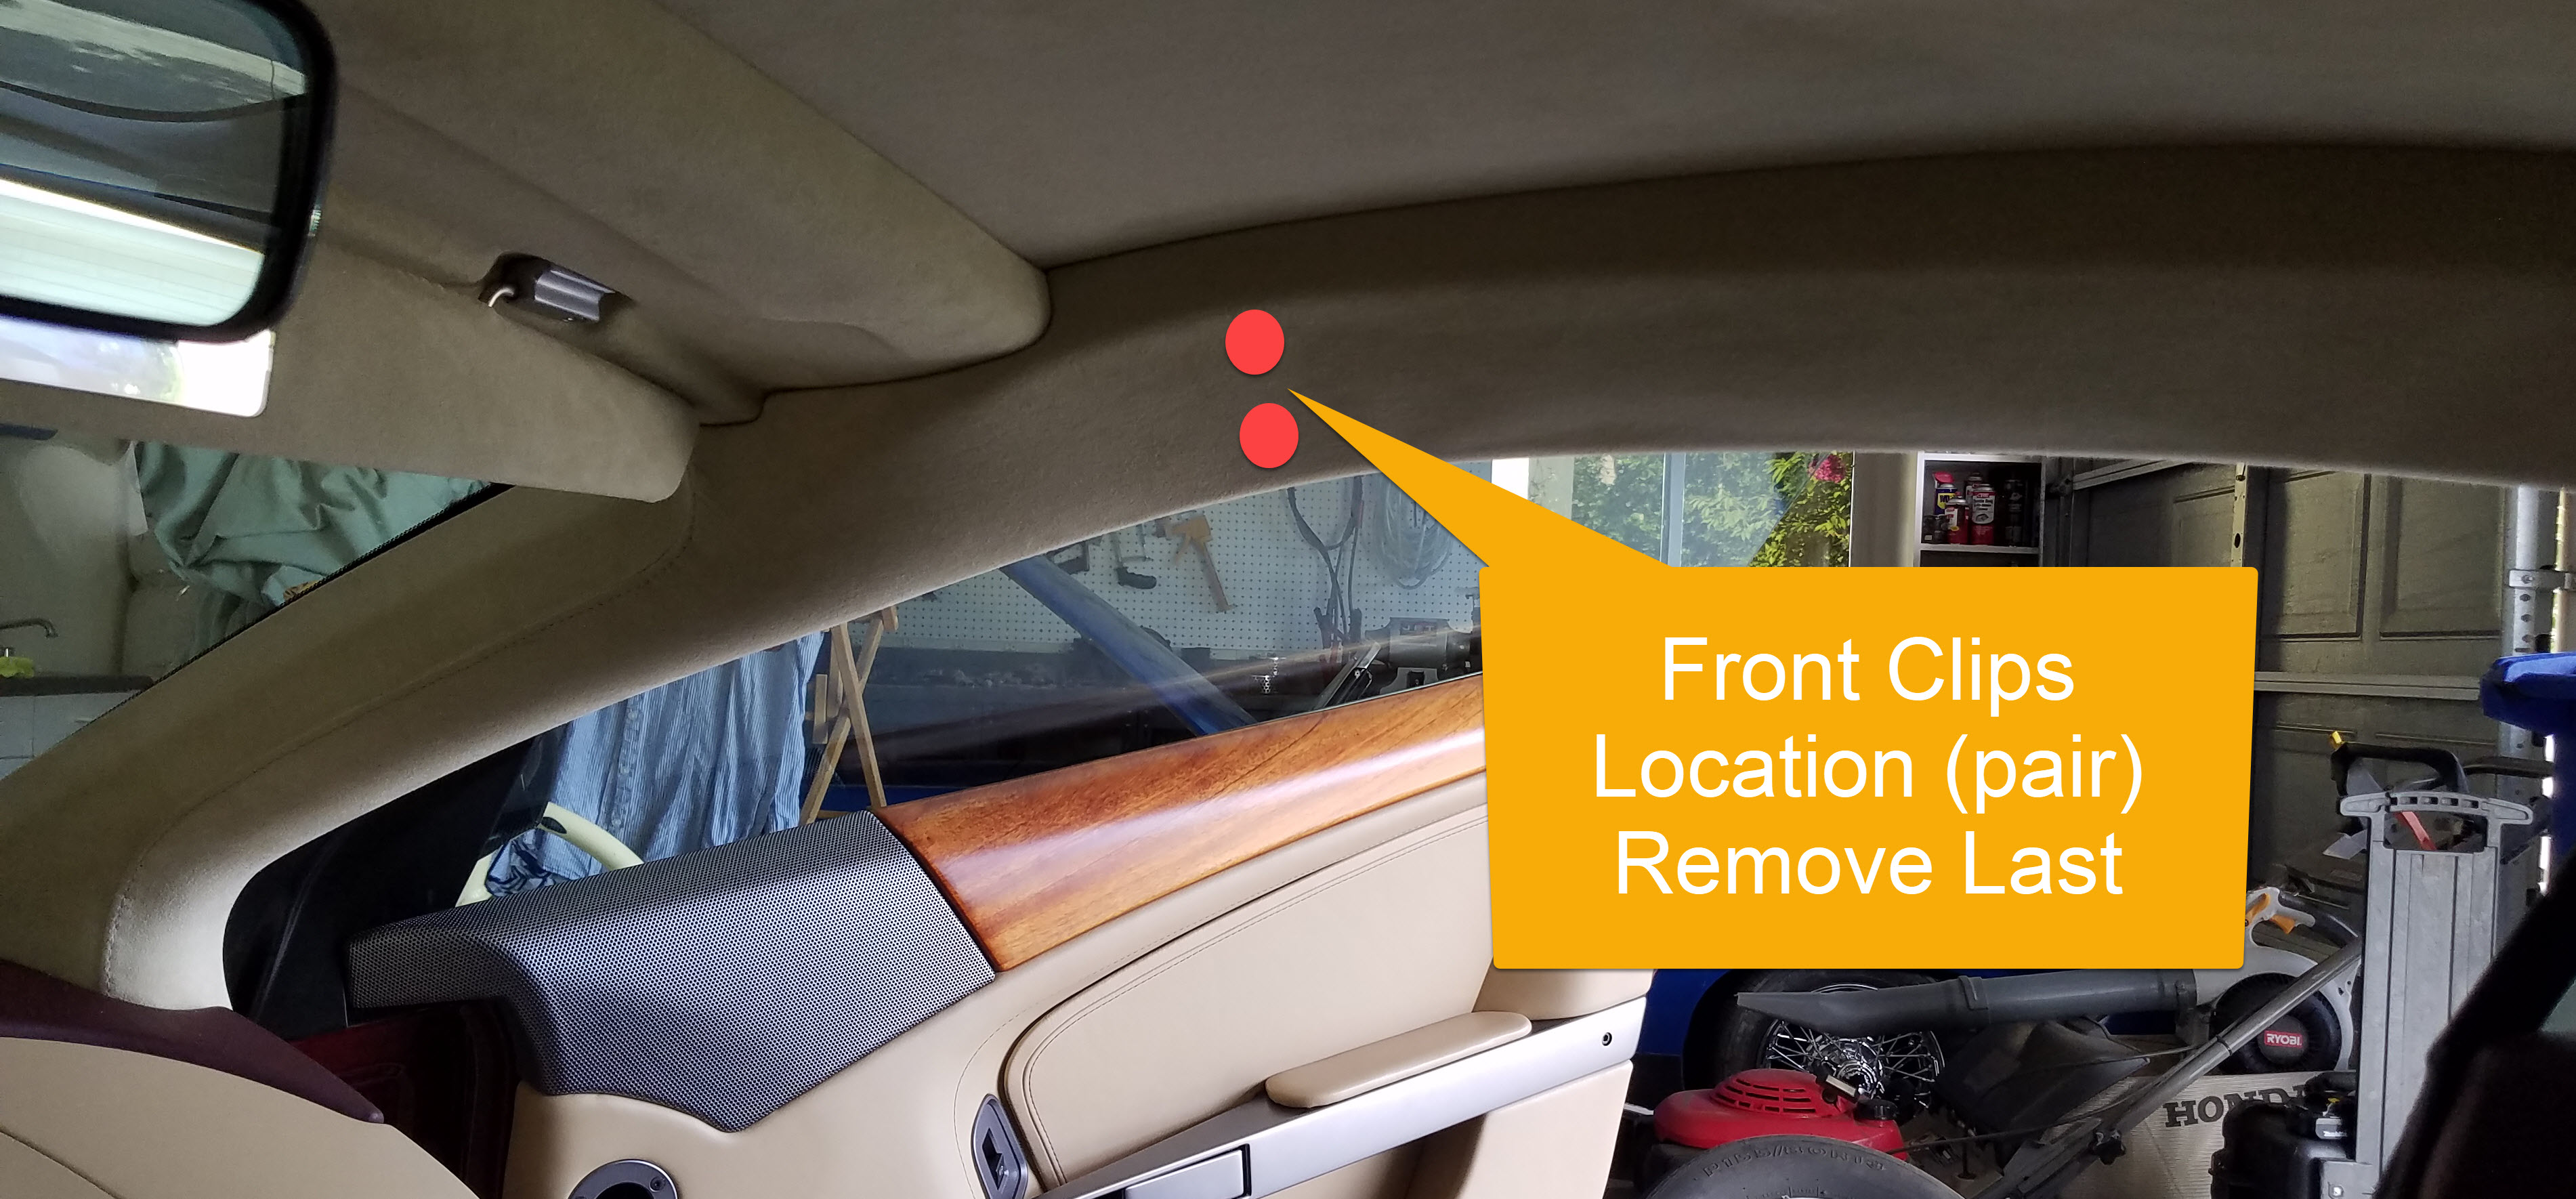
- The first clip we will remove is the rearmost, close to the rear window end. Slip your fingers in between the headliner and the trim piece, and sweep them along until you can feel the clip. Carefully pull the trim down right near the clip until it released (you’ll hear and feel it as it pops loose).

- Don’t pry in a way that will bend the trim piece. Its actually just a formed cardboard material and you can damage it if not careful. Watch the video below to see how I pull the trim down.
- Once its release, it will still be supported by the rear window trim, and this is fine.

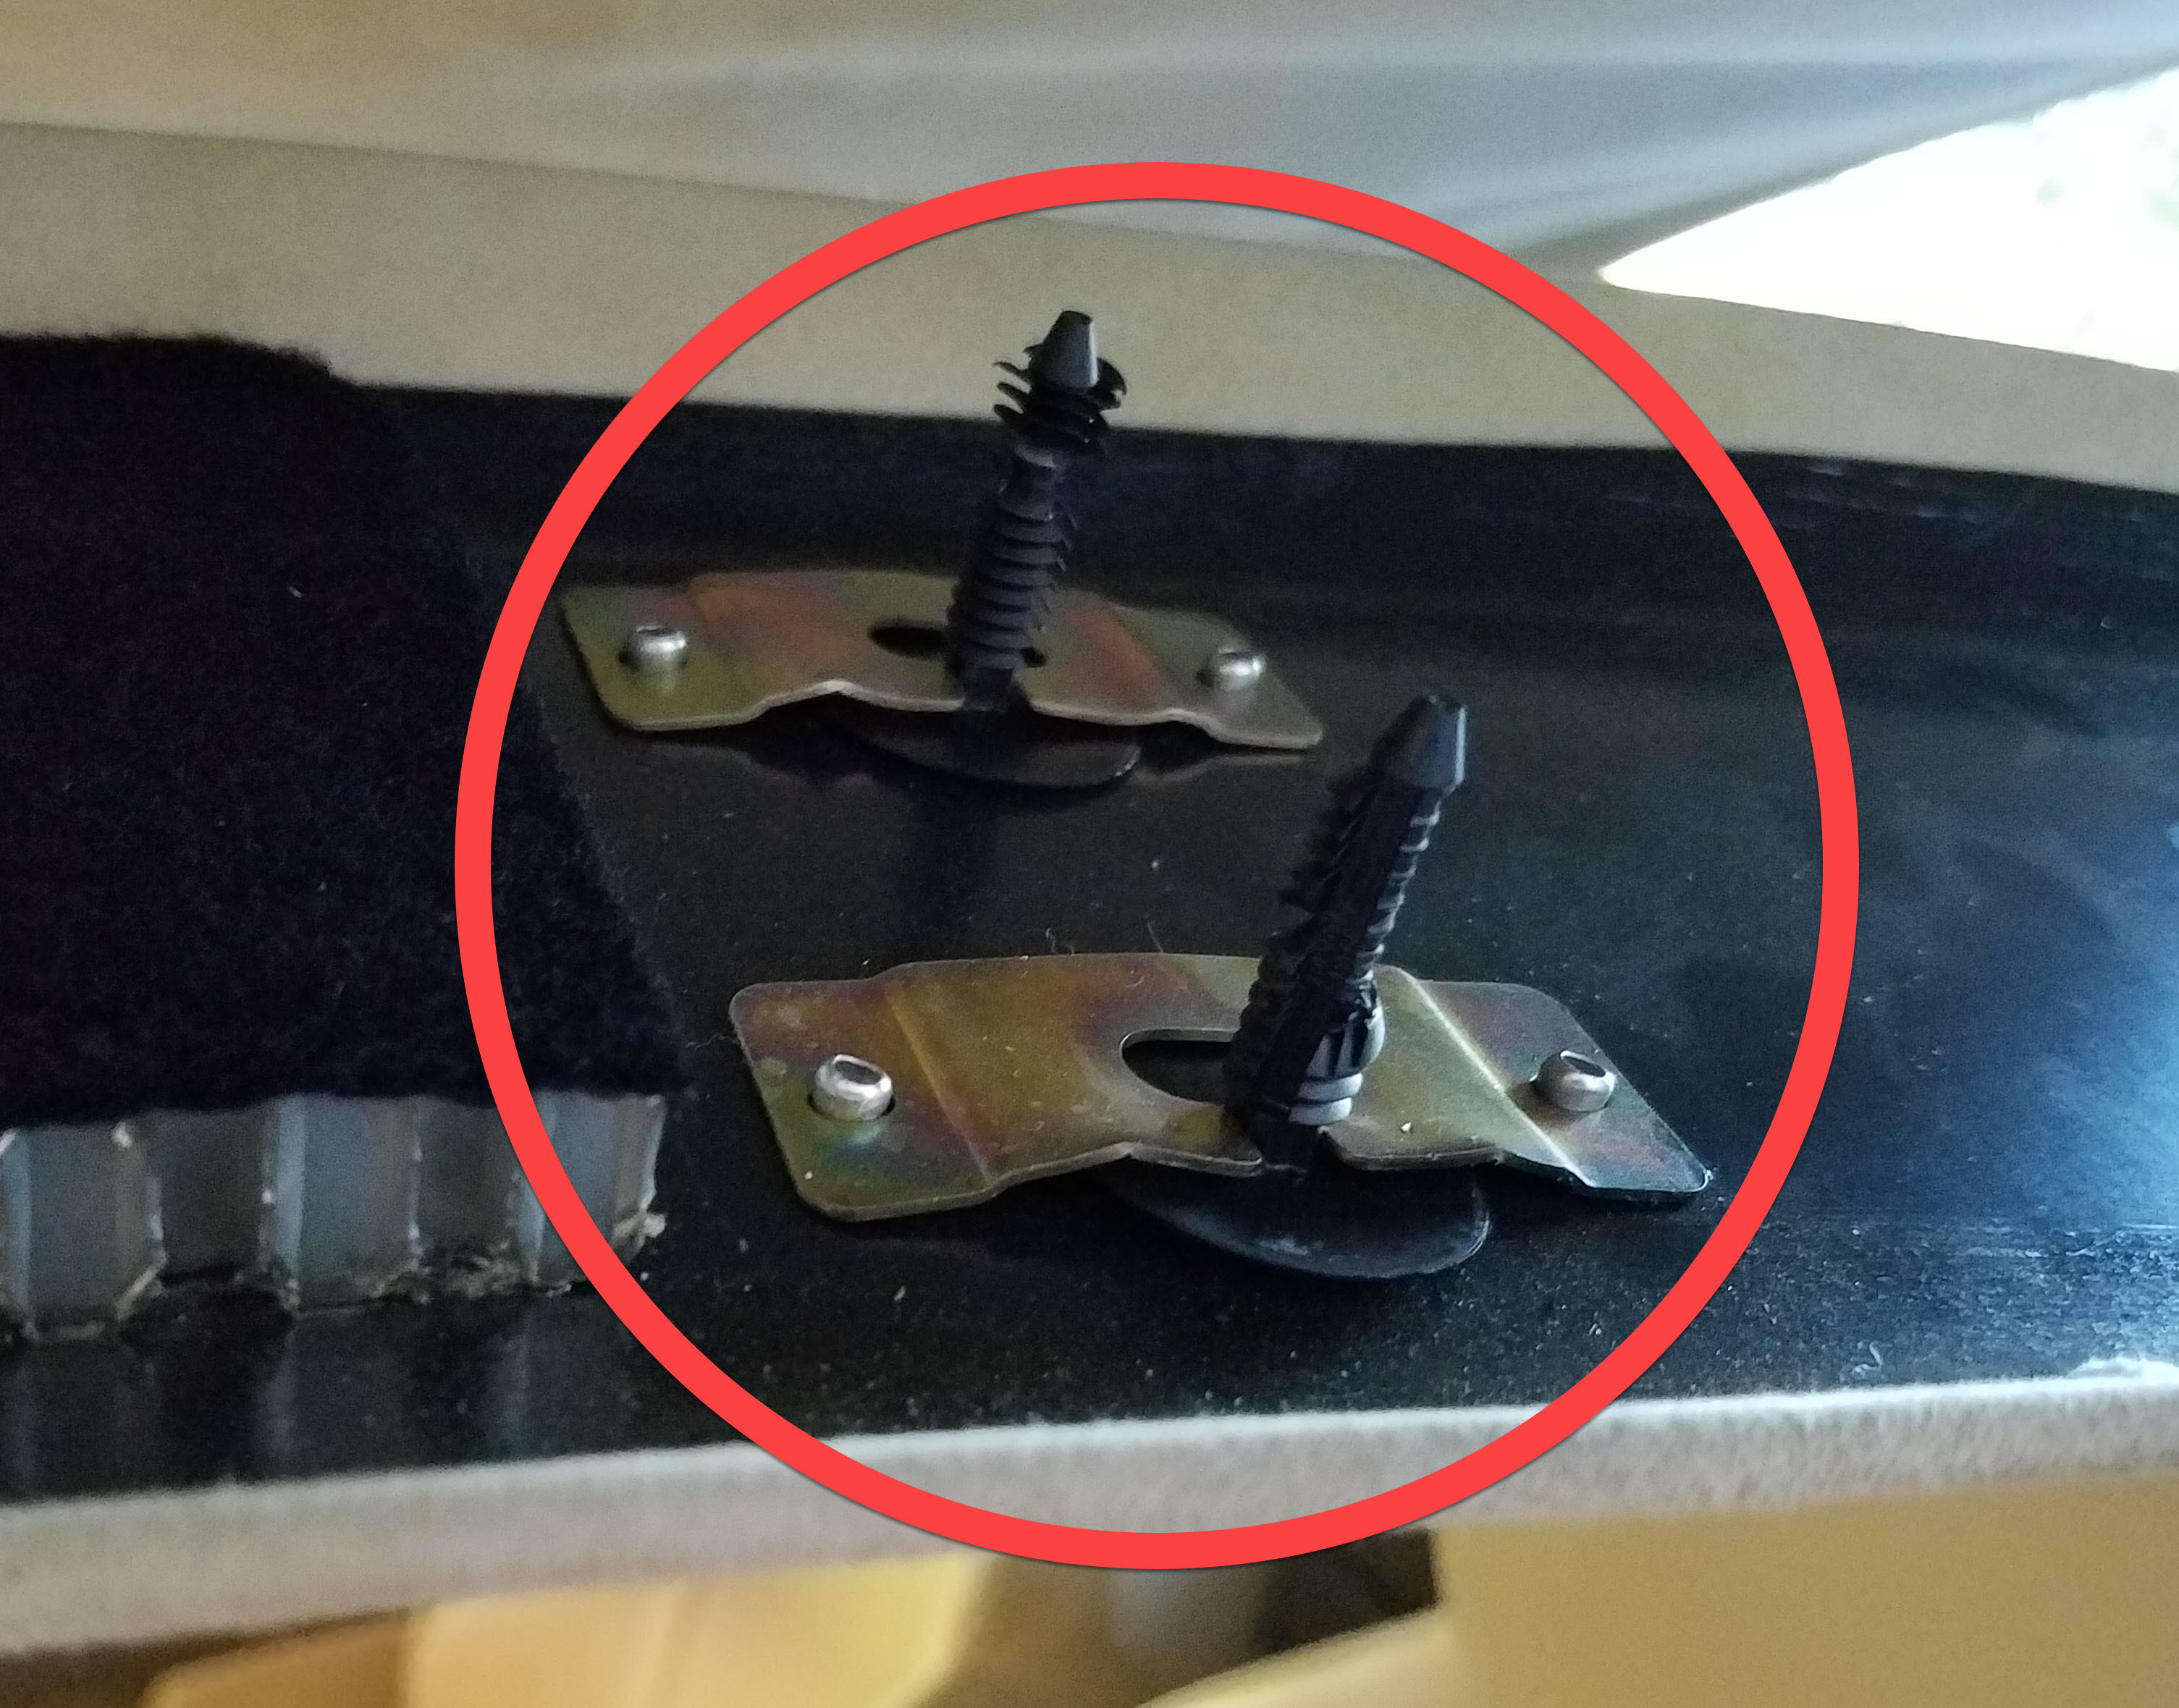
A view of the clip so you can see what you are battling with
- The next two clips are a pair that you will find at about 8 inches ahead of the door opening. Slide your fingers along between the headliner and trim panel from the back moving forward. As it gets really tight again, you’ll just reach these two clips. Since there are TWO of them side by side, it will take about twice the effort to pull them down. Same process, cram your fingers in and pull the panel away. It will make that same scary pop/snap sound as the clips release.

View of the pair of clips - The last two clips are another pair near the sun visor position. Same process, continue to slide your fingers forward from the last clips until you feel them. In the video you’ll see I had a harder time popping them loose, but it just took a bit more determination pulling them out. Just be careful.


- Once all 5 of the clips are released, the trim piece is still held in place at the front and back by the other trim pieces.
- The goal is to ‘bow’ the piece a bit to pull it forward just enough from under the rear window trim so the back can sag down and rest on the head rest of the seat. Again, this is best watch the video below to see what I mean.

A view of the rear edge released 
- If you were going to remove it entirely from the car, all that you should have to do to complete this is just ease the front portion away from the A pillar and it should be completely free to remove. Just be careful to not ‘bend’ the piece now as it becomes long and floppy since all the clips are released.

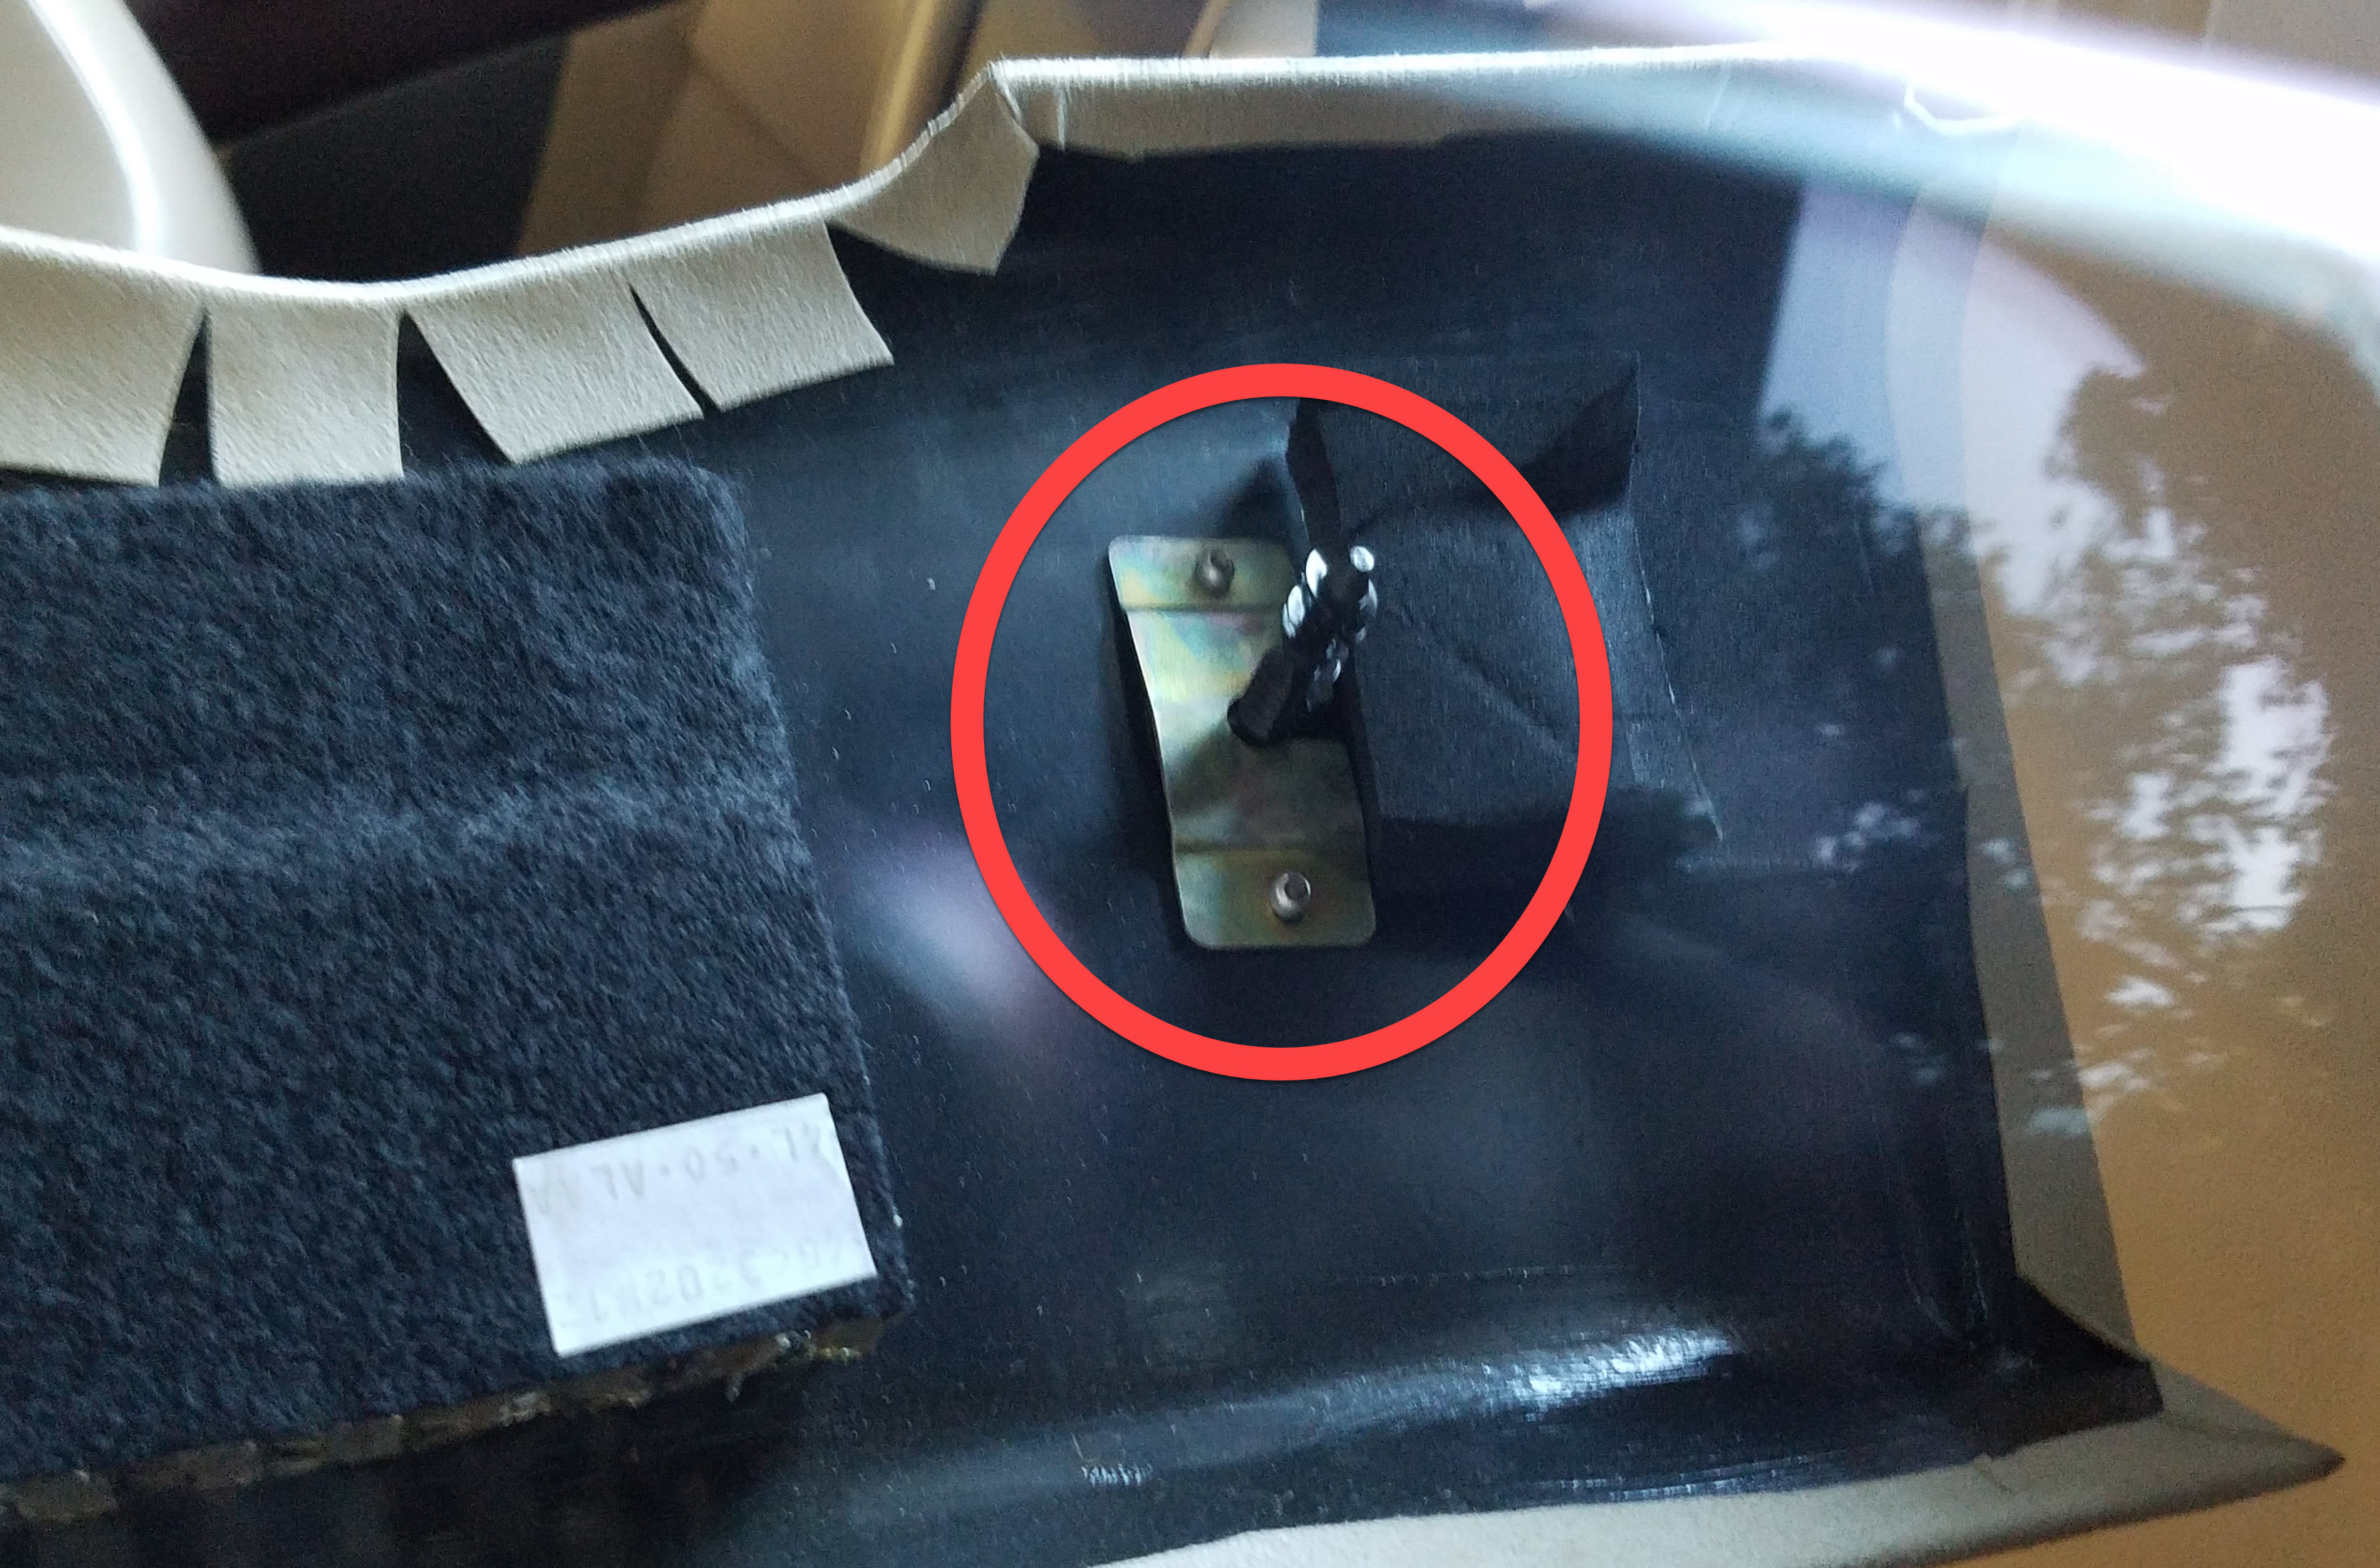
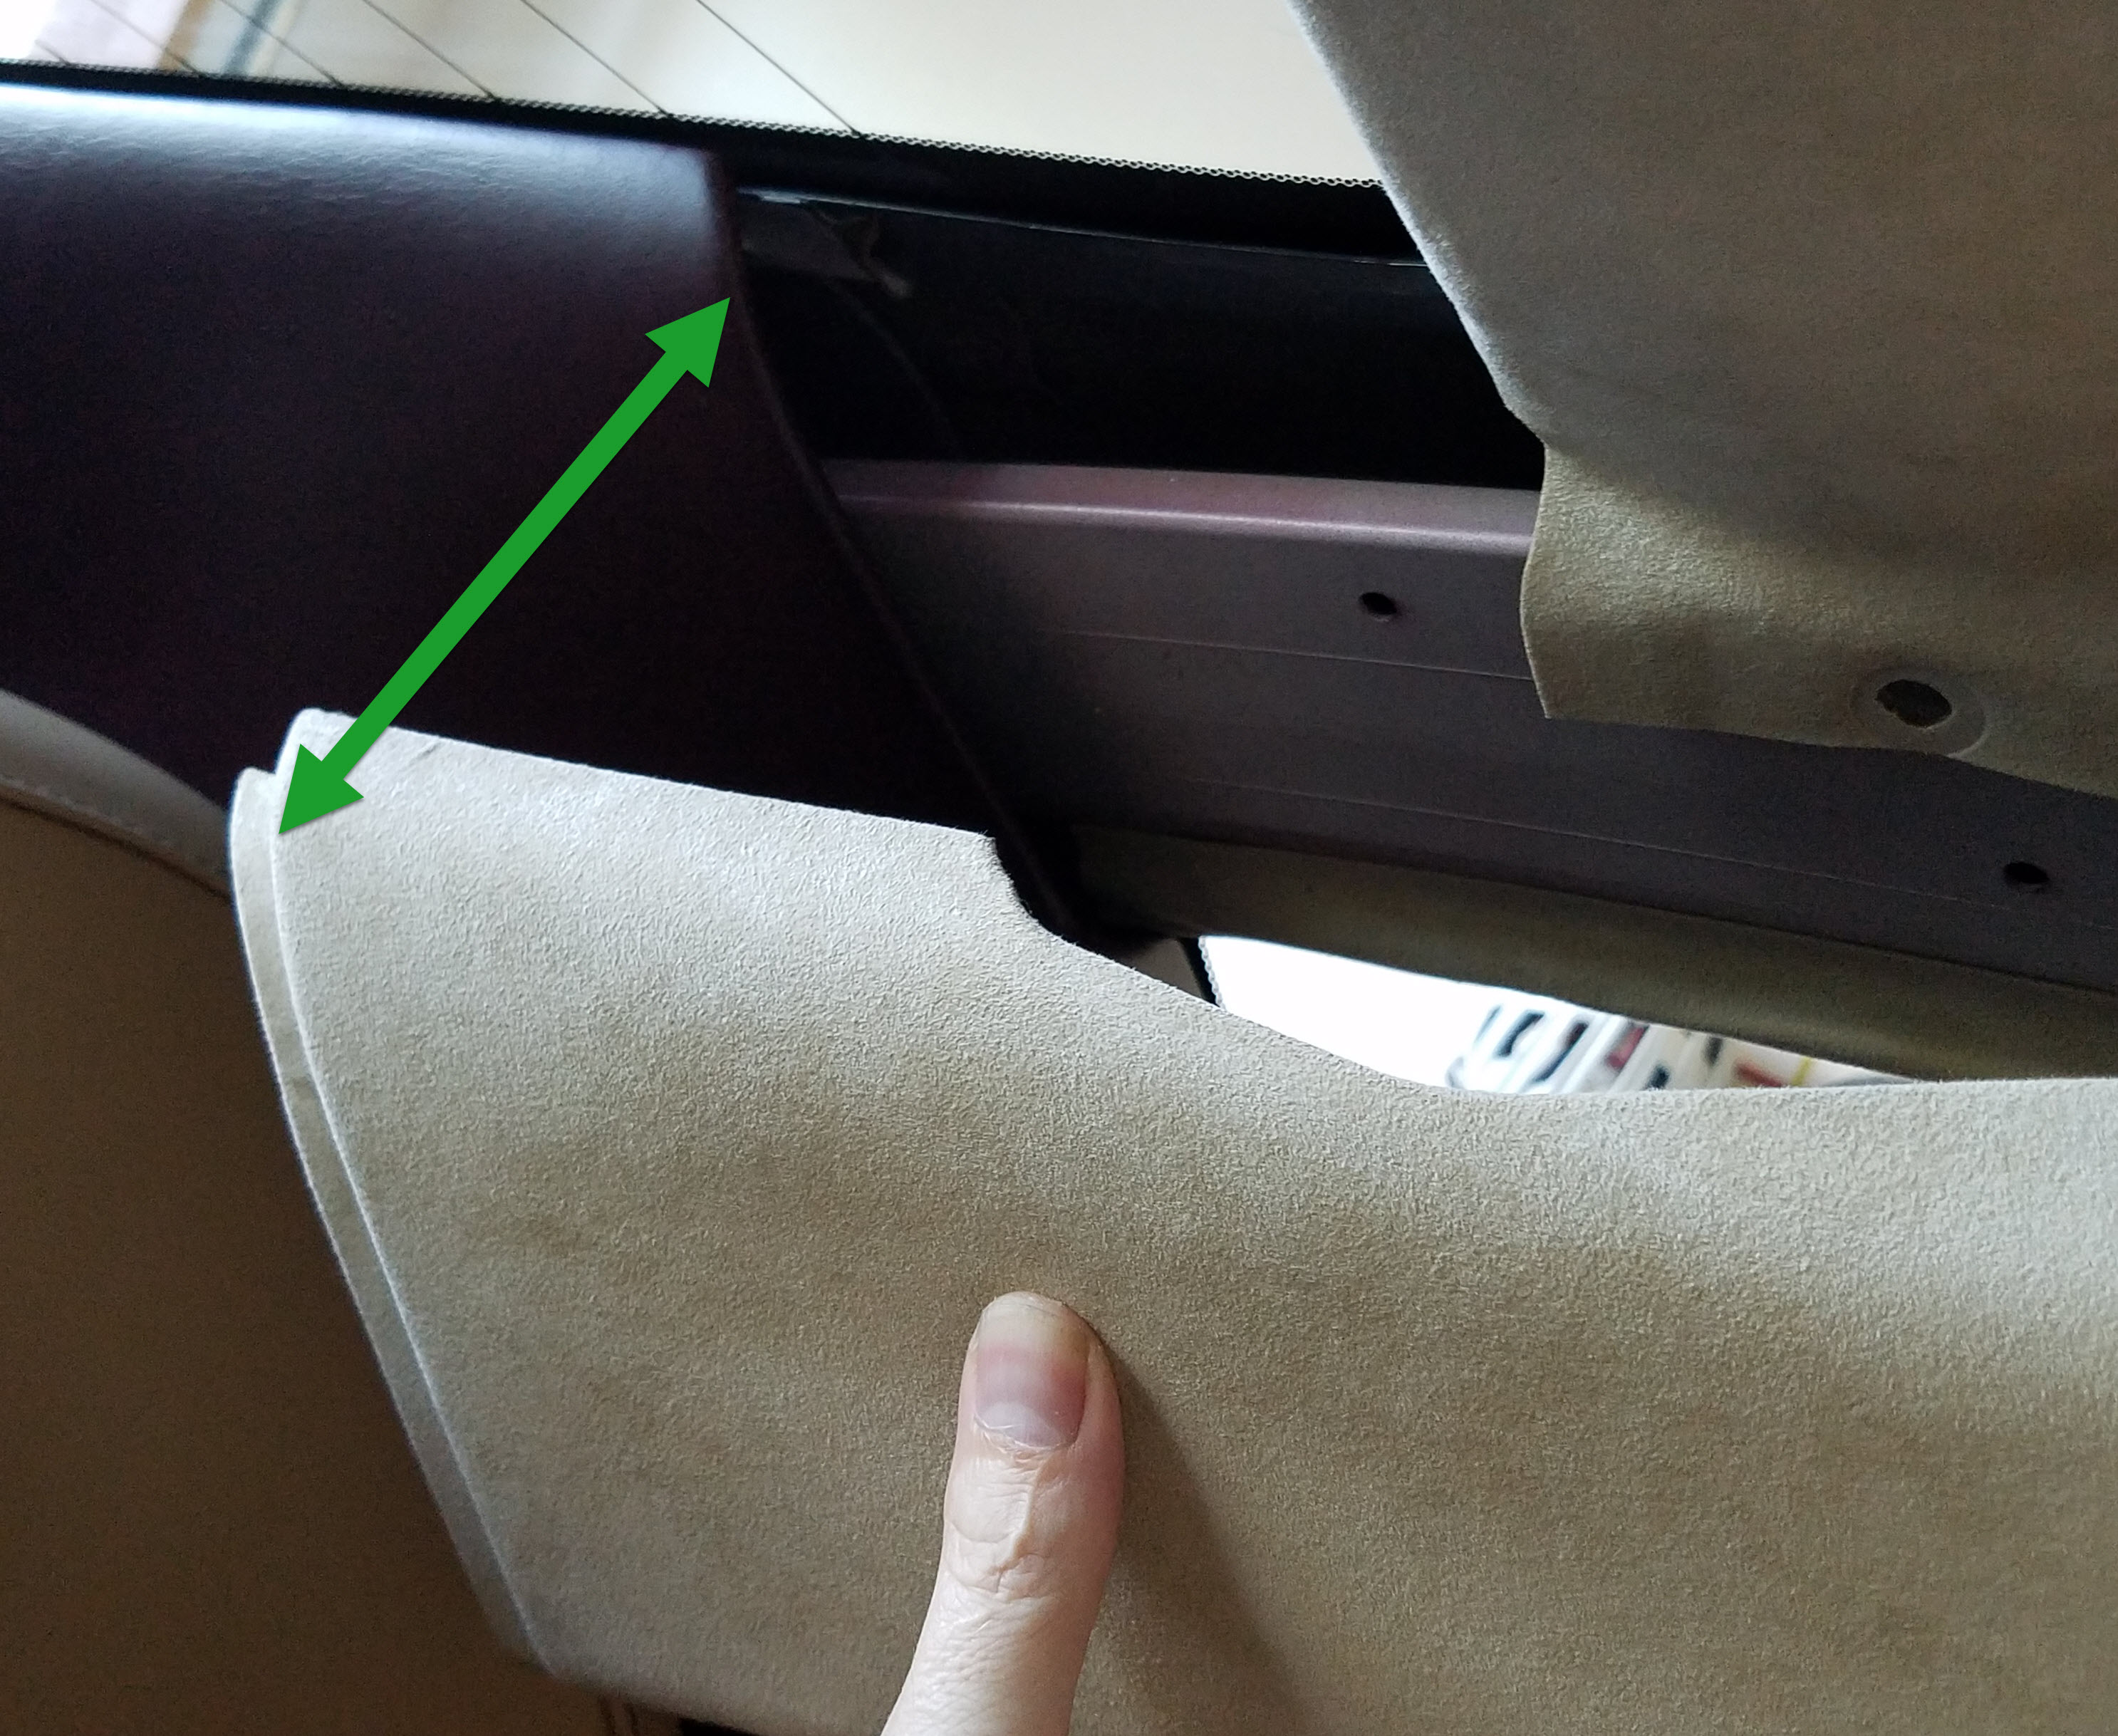
Where the Trim Panel meets the Dash (dash panels are removed in this image)

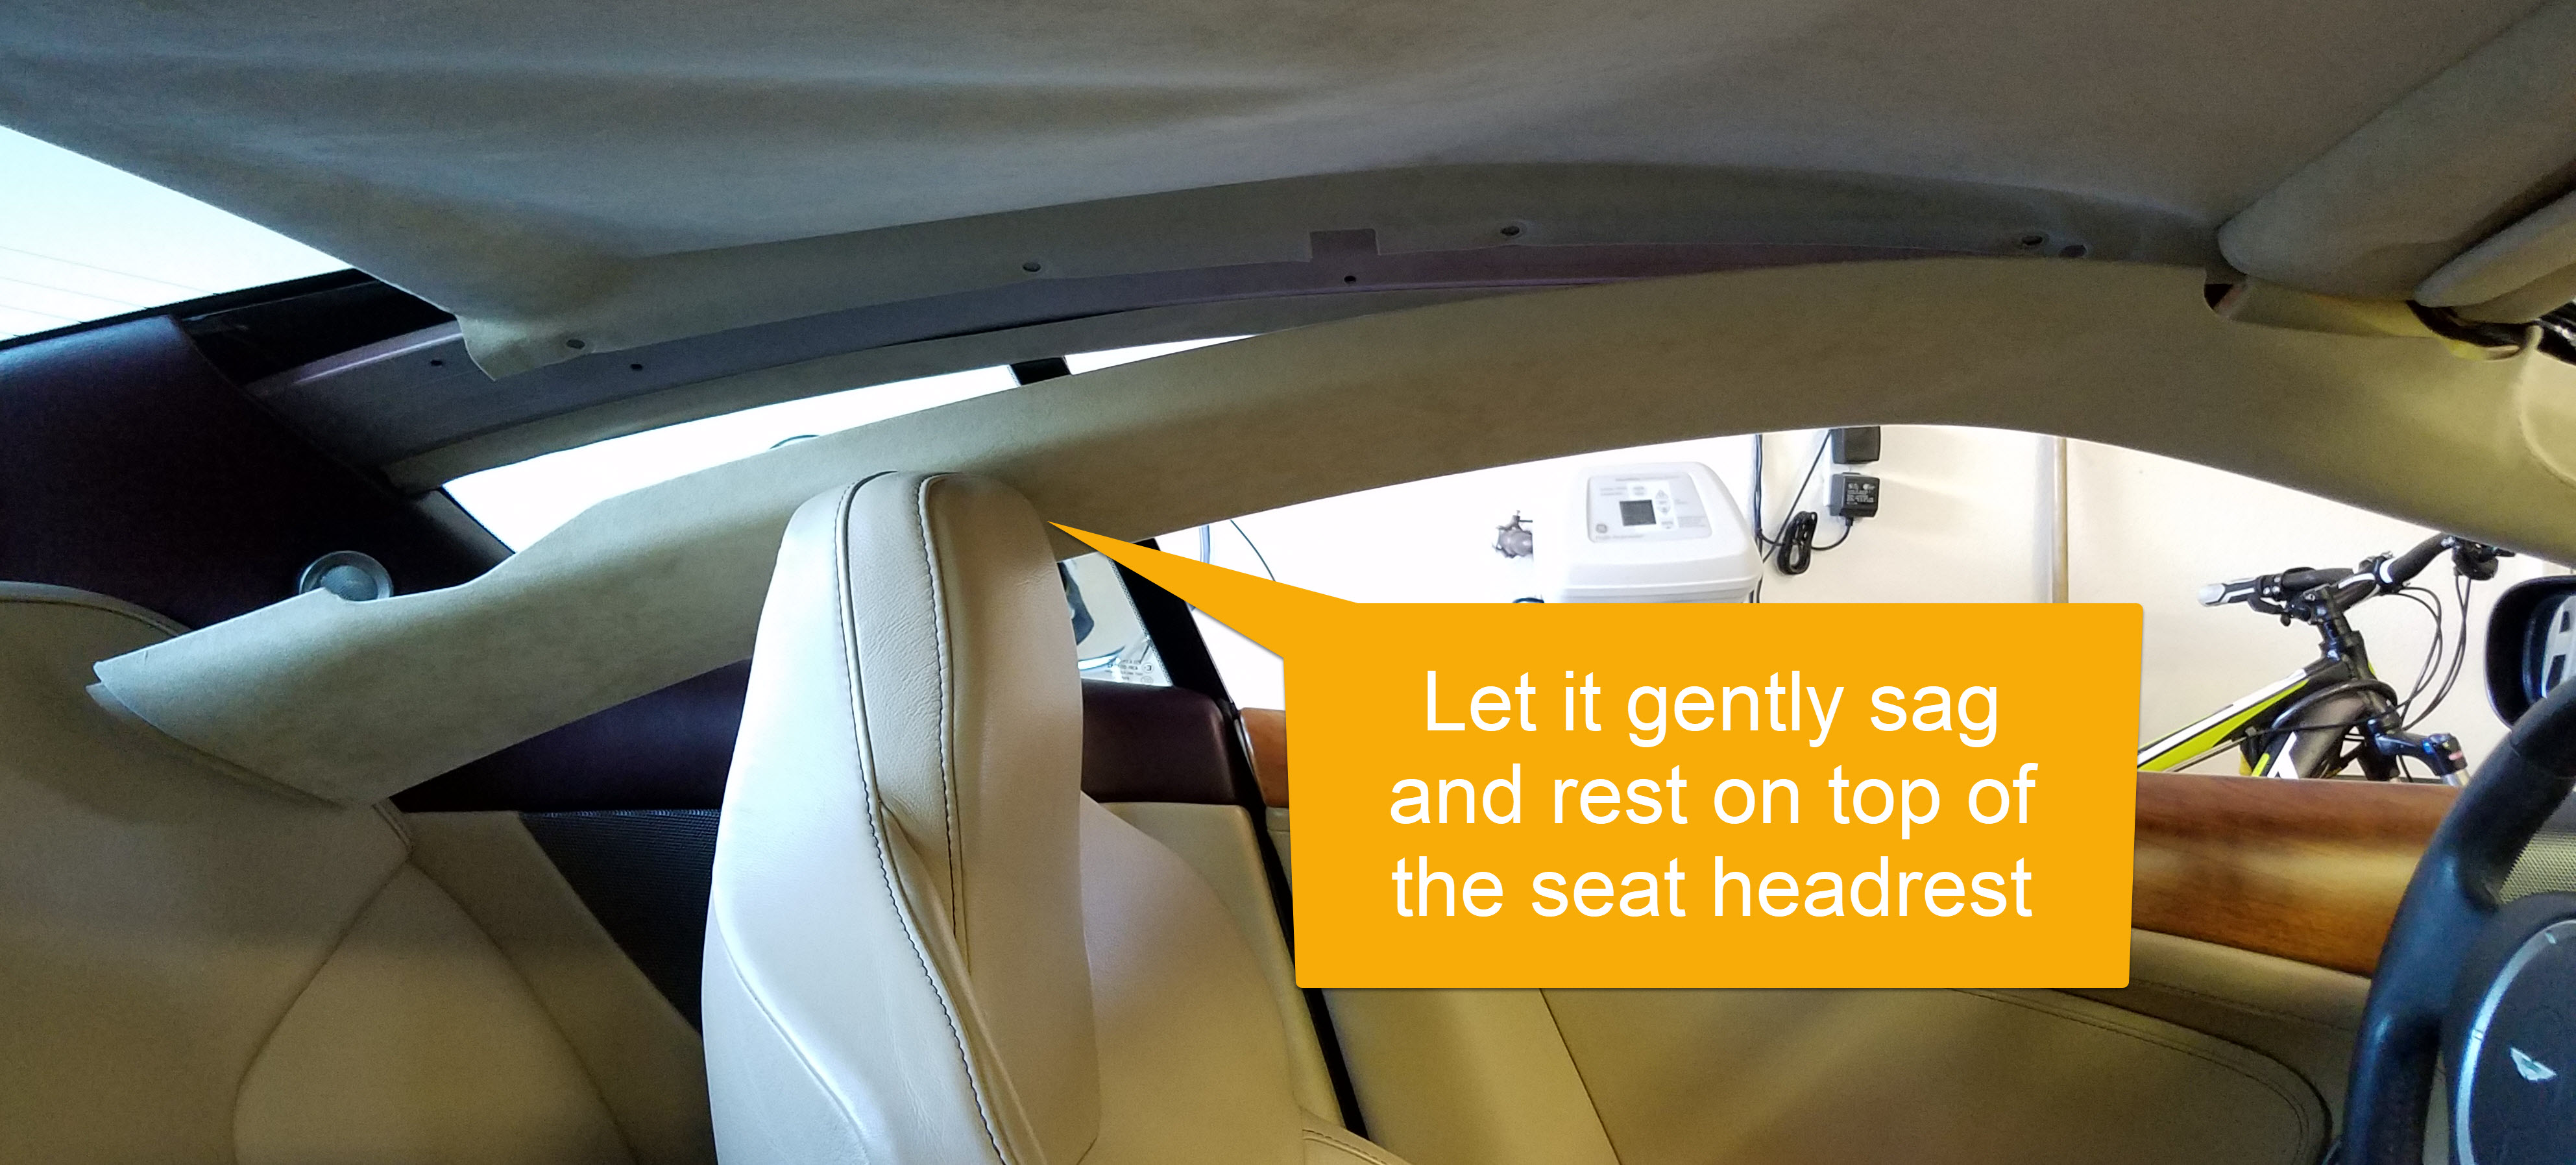

Once its sagging and resting on the headrest of the seat, you can finally see the prize (at least for my challenge), the hidden clips that hold the headliner up in place.
Video
Here is a short video on the process described and I think it will be easier to understand all the motions if you watch it.

Steve, your posts are fantastic. Even reach us here in New Zealand. Thank you for such great reference material. Hope you fix that sagging!
LikeLike
LOL!
LikeLike
Hello Steve, you have fans in Mèxico City ( build the wall! Lol). Have DBS (not DB9) but still enjoy your website.
Regards.
LikeLike
Hi Luis, thanks very much! I was in Mexico City for the F1 race back in October and enjoyed the dias de los muertos celebrations at the Zocalo. Enjoyed Mexico City very much! I am jealous about your DBS!
LikeLike
Hi Steve, great work as always. My question is, if there is no clip near the dash trim, how is it staying in place even after you’ve removed the dash trim and all the fir trees? I’d like to remove my PS cant rail because of some bowing by the windshield on the A-pillar portion, but don’t want to screw anything up near the dash panels.
Thanks!
LikeLike
Hi Nick,
That portion of the Cant Rail is held held in place partly be friction (just pressed in place around the pillar) and being trapped by the dash panels at its base. Sorry I didn’t get any pictures of it while I was doing the work. Eseentially you would just ease it back off the pillar and up out of the dash panels. Hope this helps a bit….. Good luck!
LikeLike
Hi Steve,
I’m just now getting around to removing the A-pillar trim as I’ve recently noticed the back portion of my headliner is also failing and beginning to fall. I’ve also noticed that some of my rear-defroster lines don’t work. This may have been done intentionally as I heard there was an issue w/ some DB9s rear windows exploding when the defrost was active. I see no breaks in the lines so it must be near the window edges. My question is – Have you ever removed the back portion of the trim around the rear window? I presume those leather pieces are also just “clipped” in.
Thanks!
LikeLike
Hi Steve, thank you so much for your video! It made very easy to remove the headliner from a customer’s car, here in Southern California!
LikeLike
Hi Alex. Glad it helped!
LikeLike