 Regularly inspecting the brakes on your DB9 should be part of your routine service, same as changing the oil. I would suggest it’s a bad idea to “Forget about them until something breaks”. In fact, this is so important it’s part of the official Aston Martin 1 year and 2 year service regimes. We all grouse about the cost of dealer service, but the fact is part of that time (and $$$) is well spent inspecting things we might skip since we are uninformed. If you are going to take care of your Aston yourself, this is a procedure you should get good at, you’ll be doing it each year.
I am doing this as part of my larger series on a complete brake service. How do you know if you need a complete brake service? You inspect your brakes and find something indicating it’s necessary. This article will tell you how.
WARNING: This is going to be a standard disclaimer for all the articles in my Brake series. While I believe that anyone with a modicum of mechanic skills can tackle these tasks, it is important they are done right. No shortcuts, no guessing. Your life (and others) depends on the proper operation of your Brakes. If you aren’t confident you can do the job properly I encourage you to take your car to a specialist or an Aston Martin dealership.
Tools Required
A couple of special tools are required to do this job properly, but nothing exotic or very expensive (about $80 USD all totaled). You should have on hand:
- Digital Caliper
- You need to be able to measure the remaining brake pad thickness and the rotor thickness accurately, and a tape measure or ruler won’t be good enough.
- The tool needs to have a ‘step’ in the jaws so it can measure over the ridge at the outside edge of the rotor.
- I use my caliper for all sorts of other things, so its probably worth the small investment.
- You can get a nice steel bodied one from Amazon.com for under $20 USD with free shipping.

- ‘Run Out Gauge’ dial indicator with magnetic or clamp base.
- You need this to be able to measure the warp in the brake rotor to the thousandth of an inch, and there really isn’t any other tool that does it as well.
- You can get a clamp on style one from Amazon.com for under $50 USD with free shipping.

- Inspection Light
- I am keen on the new style of the small battery powered magnetic COB ones. Incredibly bright, and the magnet lets you ‘stick’ them to steel structures in the car so you have both hands free. Super handy in all sorts of situations around the house and garage.
- They can be found on Amazon.com for about $11 USD with free shipping.


If you need any of these bits, I have put links to them over on the Aston1936 Amazon.com page so they are easy for you to find and purchase for cheap, most with Free Prime shipping.
Procedure
 I started by looking up how Aston Martin suggests we do it. The Official Workshop Manual section 6.0 on the Brake System doesn’t really have a section on inspecting the brakes (only servicing them), but includes some of the specifications you need to refer to.
The Official Aston Martin Annual Service Checklist includes a bit more advice about what to check and what action thresholds you should consider.
I’ve taken their information and combined it with my own experience to come up with my own process detailed below.
Time Required
The whole inspection process should take less than 20 minutes if you already have the wheels off the car. Yes – to do this properly you need to remove the road wheels. If you are doing your annual service you are going to have all four wheels off anyways (since you need to change your Brake fluid), so I combine the inspection in with my yearly service routine.
Preparation
As mentioned you’ll need to have the wheel removed from the vehicle to do this properly. You could do one wheel at a time, or put the car up on jack stands and do all fours at once. I’ve created a series of articles and videos to help you get this done:
Documentation
You might want to keep a note of the results each year. Just write down the mileage, the date, and the thickness of the pads and rotors remaining. With it you can predict about how much longer the pads and rotors will last by extrapolating their life. If its wearing about 10% per year (based on how you drive your car) and there is 70% of the thickness left, you can estimate that you’ve probably got another 5+ years of life left in them until a service is due. It doesn’t mean you skip inspecting them each year (one Track Day or mechanical issue can wear them out in a day), it just gives you a target of when to plan to do the work.
An easy way to document and store the info is to jot it down on a piece of paper, and if you are a person that hates to keep paper (or loses it all the time) take a picture of the completed form with your smart phone and keep the photo tagged or saved somewhere.
Brake Pad Inspection
Brake pads are designed to wear out. There are TWO pads on each wheel, an inner and outer. We need to measure the thickness of the remaining wear material on each of them.
- Raise the car and remove the road wheel as previously noted
- When checking the front wheels you can make it easier for yourself by hopping in the car and turning the steering wheel all the way left (when inspecting the right front) or all the way right (when inspecting the left front) to position the brake caliper in an easier to see location.

Improve access to inspect the right front brake by turning the steering all the way to the left - Visually inspect what you can see of each brake pad
- Use your inspection light so you can see everything clearly
- If you see some abnormal condition (chunk missing, wearing unevenly on an angle, any form of damage) you should investigate and repair the cause of the issue and also replace the pads.
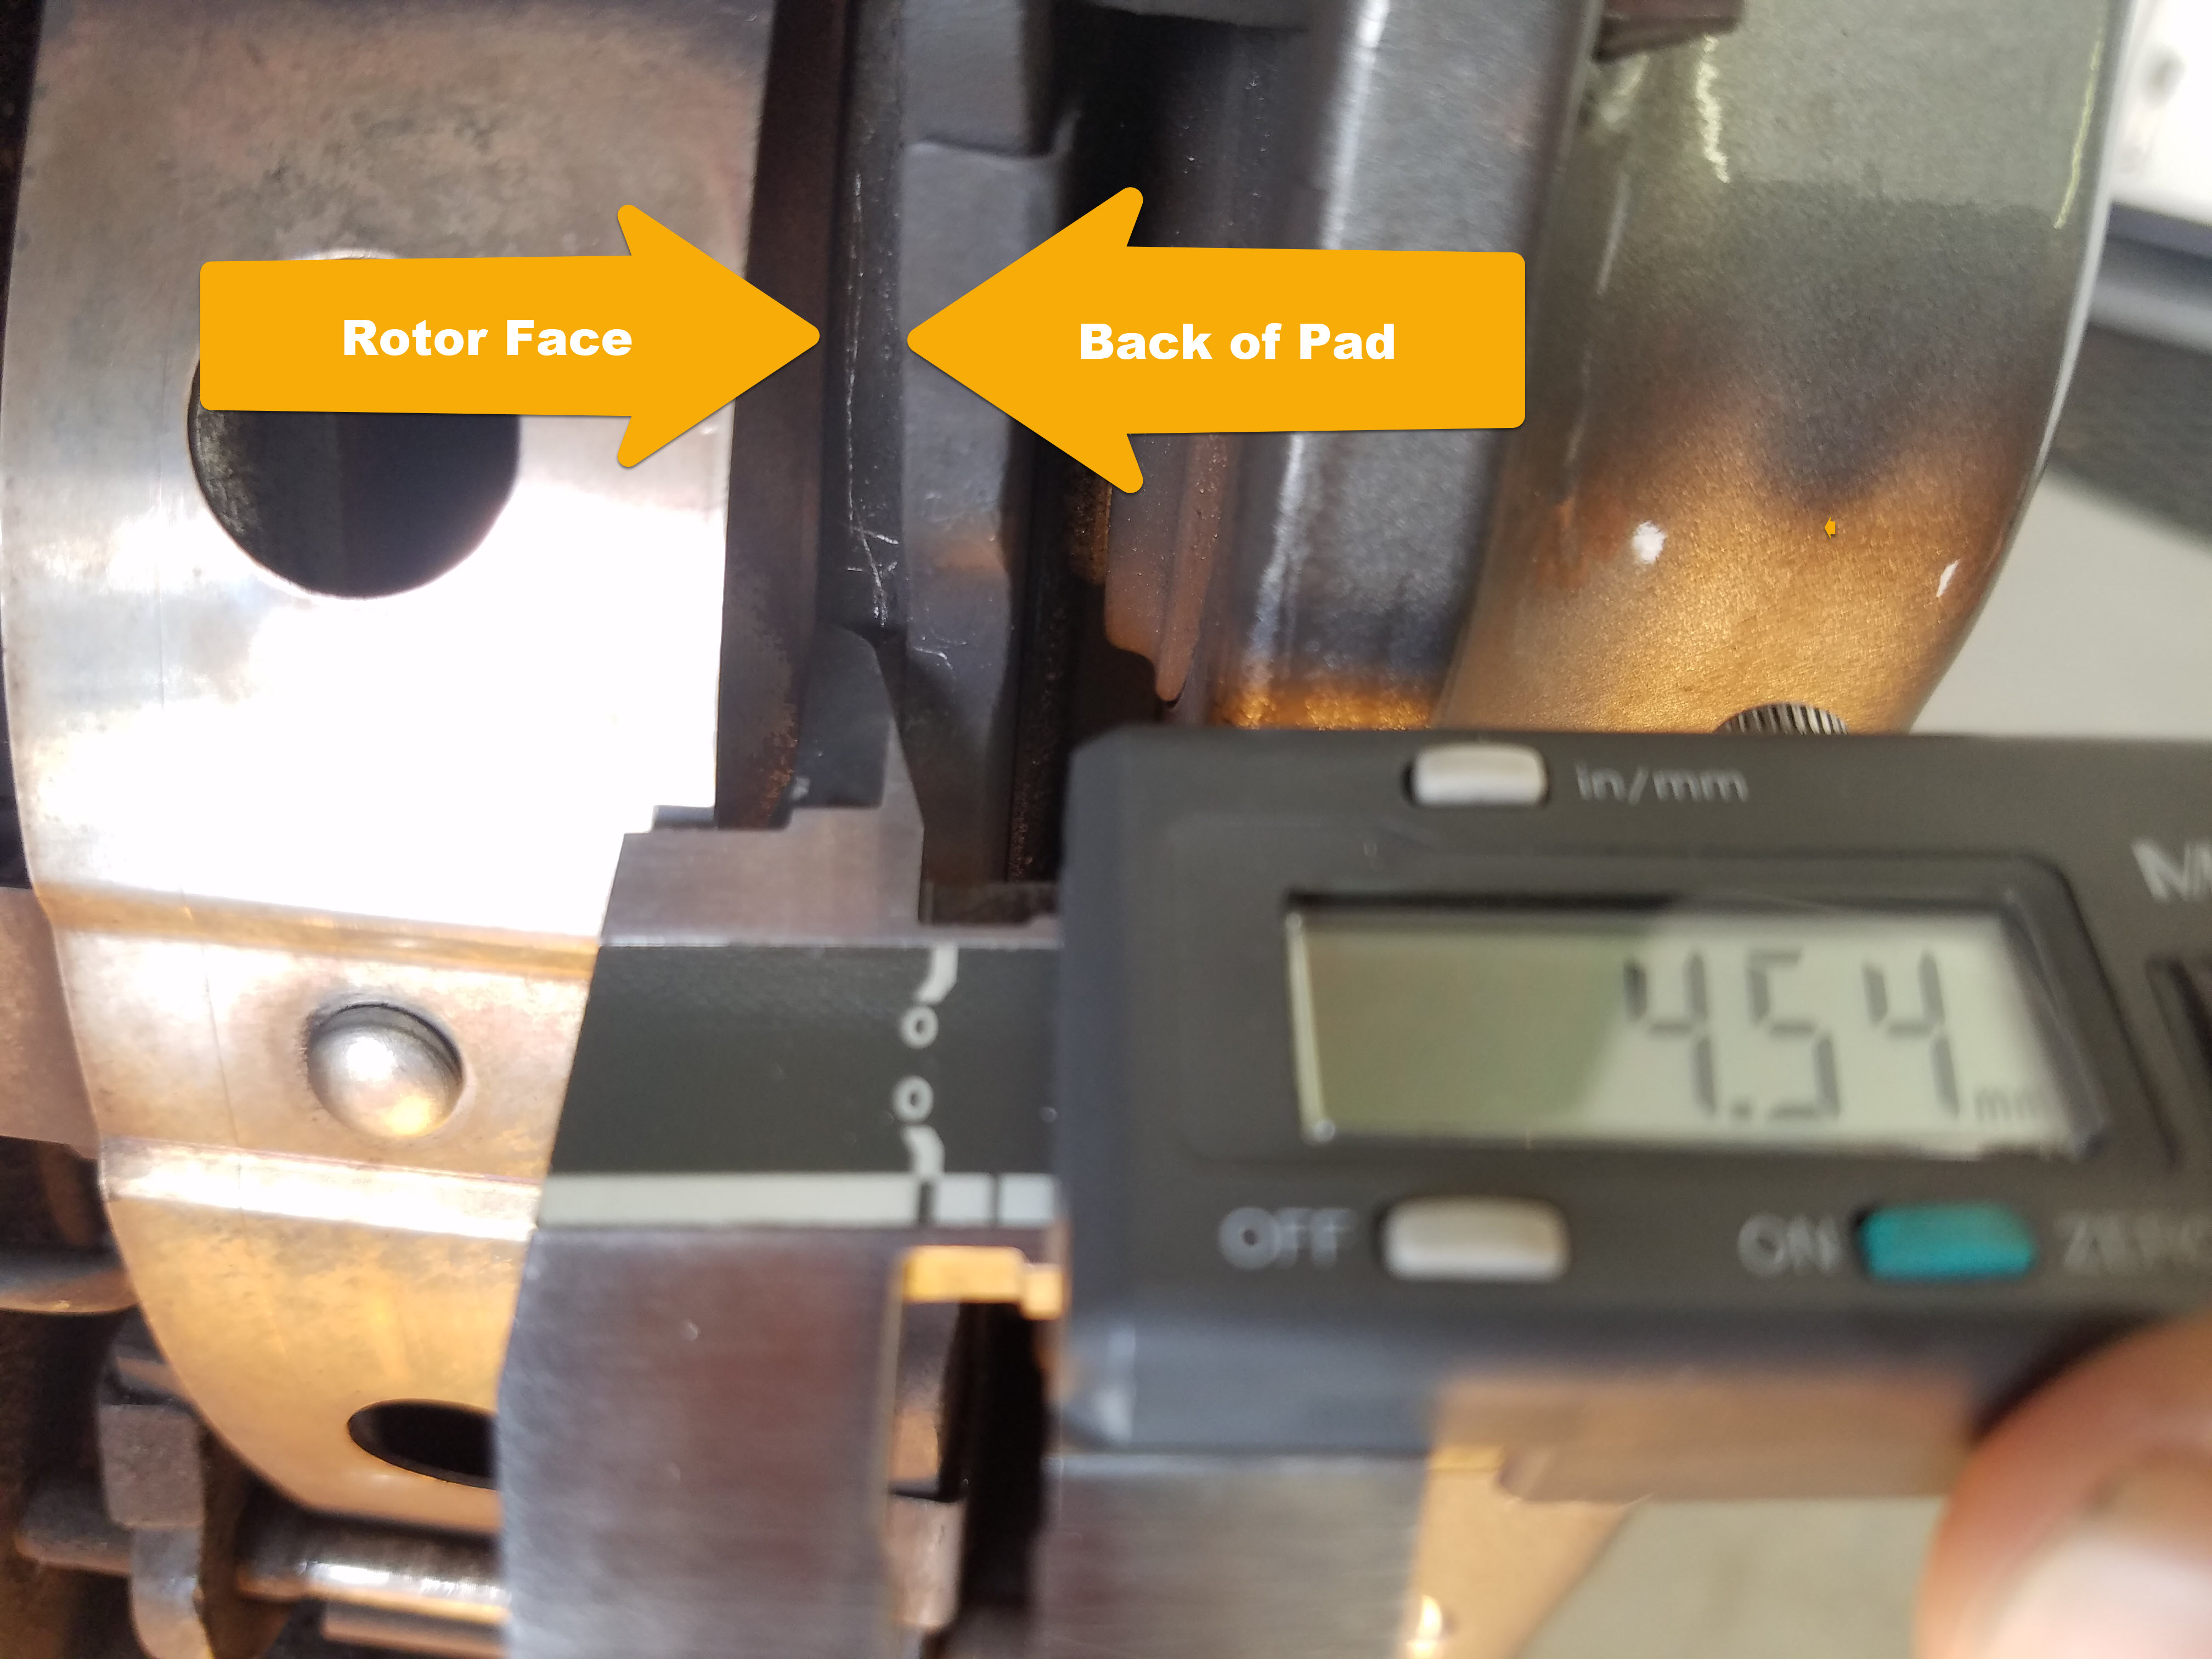
- Use your digital caliper to measure the brake pad material remaining between the brake rotor and the pads steel backing plate.

- Measure this thickness for the inner and outer pad separately.
- They should be similar and wear at about the same rate. If one is massively different than the other, you may have a problem with your brake caliper and likely a seized piston or plugged caliper passage. Troubleshoot the problem or take your car to a dealer to inspect.
- The smallest (thinnest) measurement is the one that matters most.
- When new the pads are new they are approximately 9.4mm (0.370″) thick.
- Aston Martin states that the MINIMUM pad thickness is 2.5mm (0.1″ thick). I suspect this is when the Brake Wear Sensor is designed to trip and set the warning on the dash.
- You can work out your ‘percent life remaining’ by putting your pad thickness into this equation:
- (Current Thickness – Minimum Thickness) / (New Thickness – Minimum Thickness) x 100
- For example if your current pad thickness is 4.54mm (like mine is in the photo above)
- (4.54mm – 2.5mm) / (9.4mm – 2.5mm) x 100 = 29% life remaining
- If you knew the remaining amount at your last service (last year), you can predict how much will be left a year from now.
- For example, if you had 84% remaining 12 months ago at your last inspection, and have 72% remaining now, that was 12% got used up in one year. If you drove the same amount in the coming year, you could predict that you would have (72-12) = 60% when you perform your inspection next year.
- You probably don’t want to risk driving with less than 20% of your usable pad life left
- If the prediction for next year is greater than 20% left, nothing to do!
- If the prediction is that you’ll have less than 20% of the life left, it’s time to replace the pads now (at least very soon – not a year from now).
- If you don’t have any previously recorded data and can’t predict your usage, the Aston Martin Annual Service Checklist recommends that the pads be replaced when they are less than 40% of life left. I think that’s pretty conservative and designed to sell a lot of brake pads.
- Measure this thickness for the inner and outer pad separately.

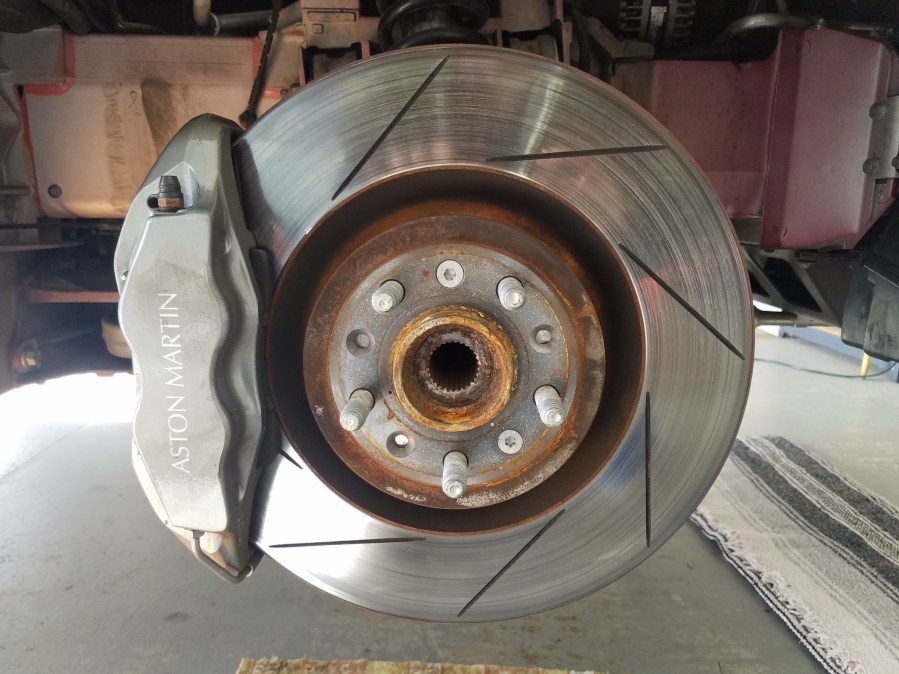
Brake Rotor Inspection
Thickness
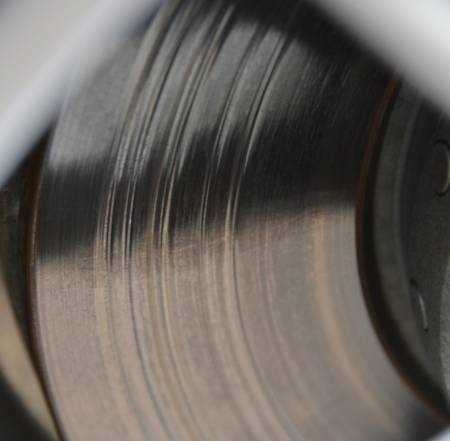
The brake rotor gets worn out over normal use. The friction causes them to slowly wear and get thinner. If a rotor gets too thin, it loses mass and it won’t be able to absorb and dissipate the heat generated by the braking friction. This will cause them to overheat, wear even faster and perhaps even warp.
Measuring the thickness of the rotor is fairly simple:
- Use your digital caliper to measure the thickness
-

Ridge at edge or rotor The trick to this is you have to clear the ridge at the outer edge of the rotor with your calipers. The ridge forms because the pads sit just inboard from the edge, and thus the wear occurs leaving the original rotor thickness in place at the outer edge. Your calipers need to have a recess in their jaws in order to reach over this ridge.
-
- I usually measure a few time at various places around the rotor. Typically the measurements are the same, and any variation is usually in my technique, not the rotor.
- The smallest (thinnest) measurement is the one that matters most.

- Aston Martin states the original (new) rotor thickness is:
- Front Brakes – 32mm (1.26″)
- Rear Brakes – 28mm (1.10″)
- Aston Martin states the MINIMUM rotor thickness is
- Front Brakes – 30mm (1.18″)
- Rear Brakes – 26mm (1.02″)
- Similar to working out the remaining life of the brake pads, you can work out your percent life remaining for your rotors by putting your measured rotor thickness into this equation:
- (Current Thickness – Minimum Thickness) / (New Thickness – Minimum Thickness) x 100
- For example if your current front rotor thickness is 31.66mm (like mine is in the photo above)
- (31.66mm – 30mm) / (32mm – 30mm) x 100 = 83% life remaining
- If you knew the remaining amount at your last service (last year), you can predict how much will be left a year from now.
- For example, if you had 84% remaining 12 months ago at your last inspection, and have 72% remaining now, that was 12% got used up in 1 year. If you drove the same amount in the coming year, you could predict that you would have (72-12) = 60% when you perform your inspection next year.
- My brake rotors wear out SLOWER than my brake pads. This is normal. I might see 25% wear per year of my pads, and only 10% of the rotors. This means you will likely only need to change pads for a few brake services before you need to change your rotors.
- You probably don’t want to risk driving with less than 20% of your usable rotor life left
- If the prediction for next year is greater than 20% left, nothing to do!
- If the prediction is that you’ll have less than 20% of the life left, it’s time to replace the rotors now (or very soon, not a year from now).

Warping or Runout
We also need to check for warping of the rotors. As noted above this can occur if a rotor becomes overheated (either too thin or overworked on a track day). A warped rotor can cause you to feel a shudder (vibration, pulsing or oscillation) through the steering when you are braking. This sensation could also be caused by glazing (see below).
Measuring the warp or runout isn’t too hard:
- The rotor needs to be firmly mounted in place (it can’t be wobbling around). It is normally held in place with two Torx screws. If you’ve had the rotor off for some reason, be sure the screws are properly torqued.
- Securely Mount the base (clamp style or magnetic) of your dial indicator assembly, and position the measuring tip perpendicular to the rotor surface about 1/8″ to 1/4″ in from the outer edge of the rotor. Be sure to be clear of the ridge at the outer edge.
- Zero out the dial on your gauge
- Slowly rotate the rotor through one full revolution, all the while monitoring the indicator. It may go through a range of +0.001″ to -0.001″ as your rotate, you need to note the extremes. Ignore the blips as it passes over the machined grooves.

- The total runout is the difference between the max and min recorded. In my example above, the total runout is 0.002″.
- Aston Martin states the MAXIMUM acceptable runout (front or rear) is just 7o μm (micrometers), and this is 0.0027″. The ideal runout is of course ZERO. This is a case of less is better.
- If your rotor exceeds this level of runout, it’s essentially warped. Your options at this point are:
- I would definitely recheck the measurement a few times to make sure it wasn’t your gauge base wobbling or something else.
- You can remove the rotor and take it to a machine shop to have it ‘turned’. They will machine a new face on the rotor, true to the center hub. This will remove the warping. Machining will of course reduce the thickness of the rotor, so be sure the repaired rotor is still within the serviceable range (30.4mm to 32.0mm).
- You can replace the rotor with a new one. Ideally they would be replaced in sets.

Glazing

We also need to check if the rotors are ‘glazed’. Glazing usually occurs when the surface of the rotor gets hardened by overheating. The rotors metal surface is meant to be soft enough to grip and wear with the brake pads. Repeated overheating can lead to surface hardening, and this can lead to decreased braking performance and other issues. Glazing can happen to one wheel or all of them.
If you find glazing on your rotors you have three options to try:
- Try following the brake bedding in procedure to see if it will cleanup the condition. I will cover this procedure in a future article.
- You can removed your rotors and take them to a machine shop to have them skimmed. This will remove a small amount of the surface and make them like new again. Machining will of course reduce the thickness of the rotor, so be sure the repaired rotor is still within the serviceable range (30.4mm to 32.0mm).
- Replace the rotors. Ideally they would be replaced in sets.
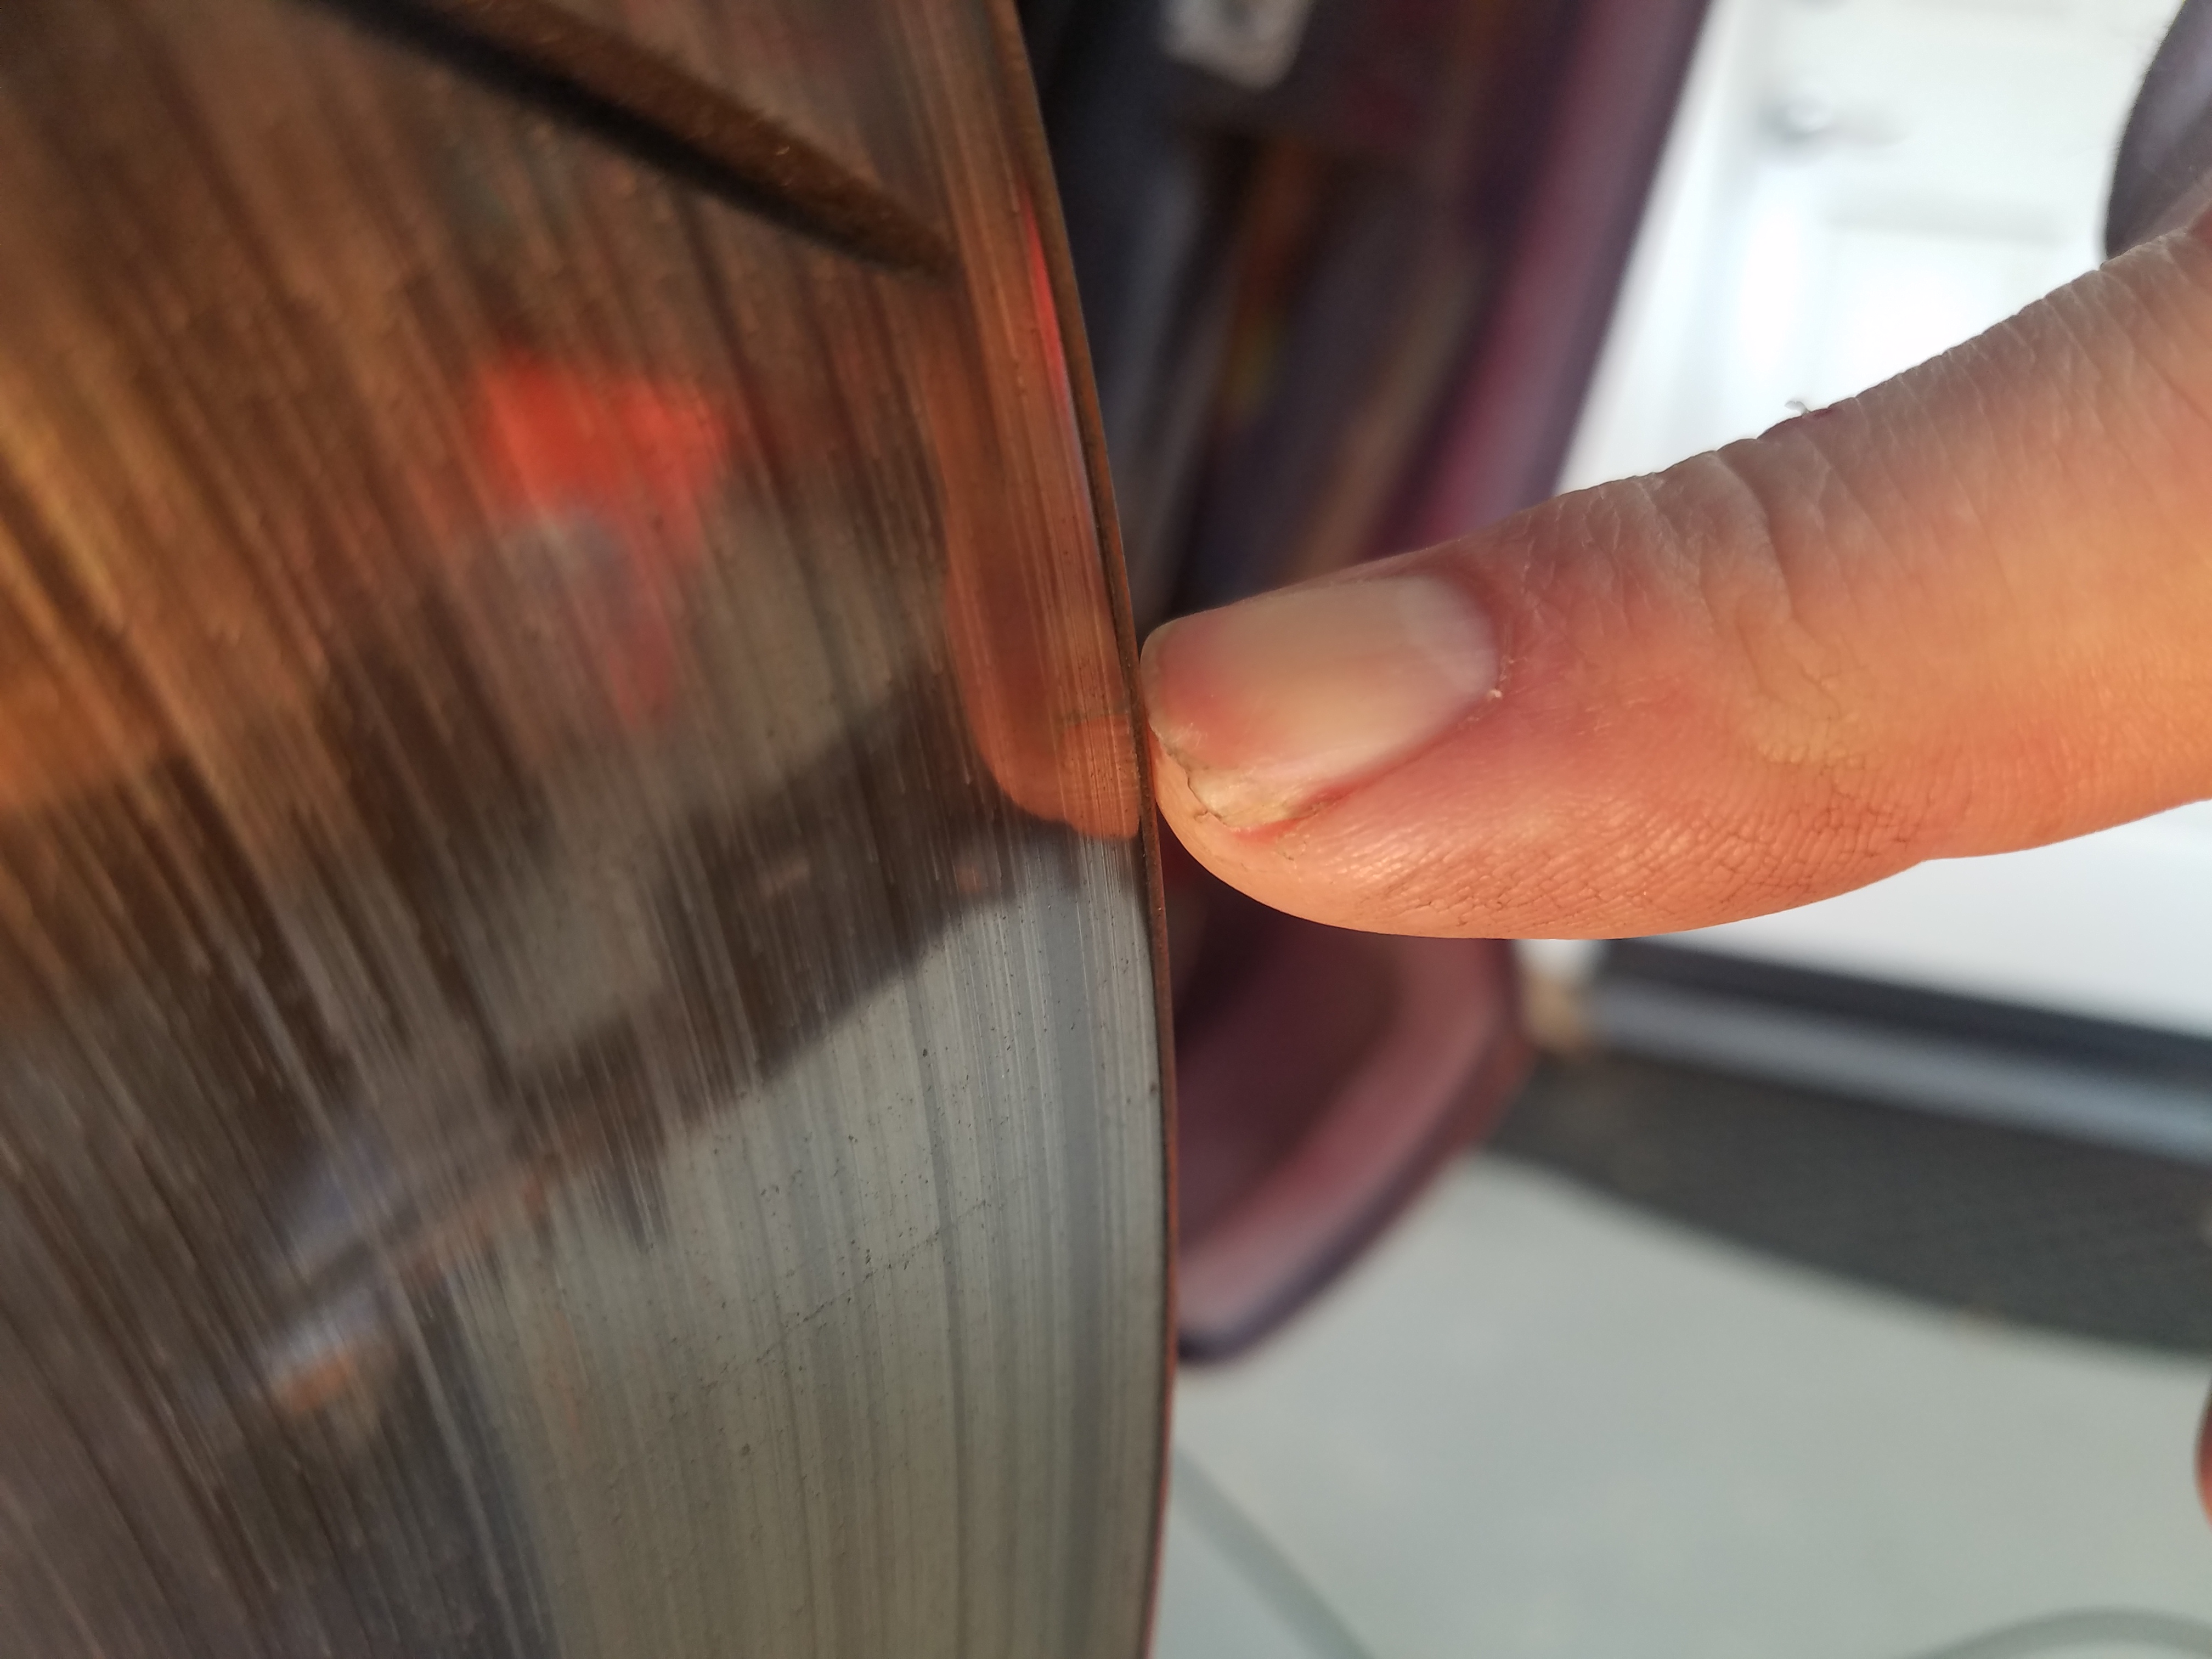
Irregular Wear
We need to visually inspect the inner and outer surface of the rotor for any signs of irregular wear. This usually manifests itself as grooves or scoring in the rotor surface (rather than a nice even smooth/level surface). This can be caused by a worn out brake pads (to the point where the rivets or backing plate of the pad is grinding against the rotor. This condition is usually accompanied by all sorts of bad noises. If the grooves are extensive the rotor should either be machined or replaced.
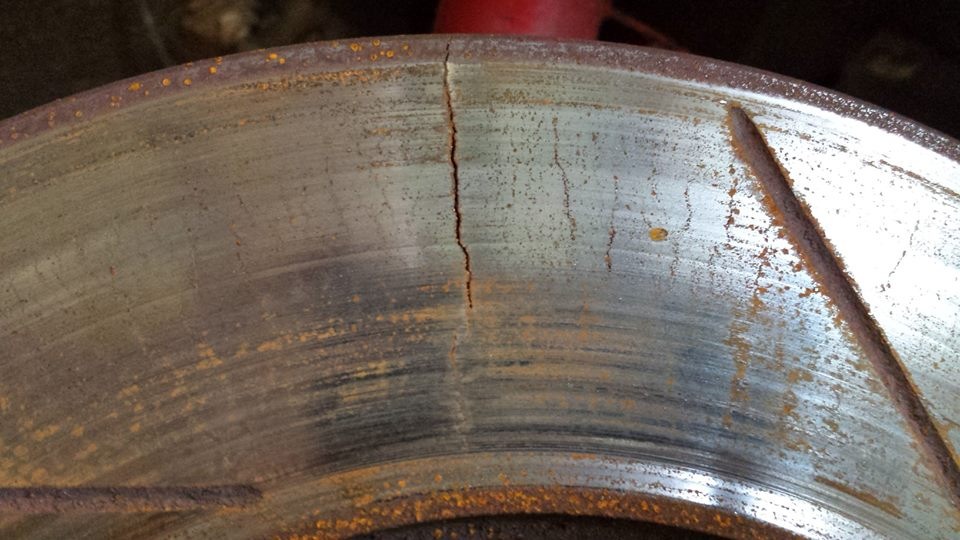
Another condition could be a cracked rotor surface. inspect the entire face of the rotor for any spider web cracking. Cracking is almost always caused by overheating a rotor. A cracked rotor should be replaced immediately.
Brake Wear Warning Sensor

The DB9 is equipped with a brake pad wear sensor at all four wheels. It is fitted to the inner brake pad on each caliper. The sensor fits into a slotted groove in the brake pad. It has a plastic coated metal ‘tit’ that protrudes toward the rotor. If the brake pad material wears so far that the plastic coating on the sensor tit wears off, it will eventually expose the metal contact and it will electrically ground out to the metal rotor, setting off the warning on the instrument panel. Once this wear has reached this point, you’ll need to repair the brakes AND replace the wear sensor (an additional cost).


You should inspect that the sensor cable is not damaged, is properly fitted into the brake pad, and the pad isn’t worn to the point where the sensor tit is starting to wear off. In my last brake service, when I finally changed my pads I discovered the front brake wear sensors we already partly worn and would have tripped in the not too distant future. They were also cracked due to overheating, and the wire was abraided. Time for replacement!
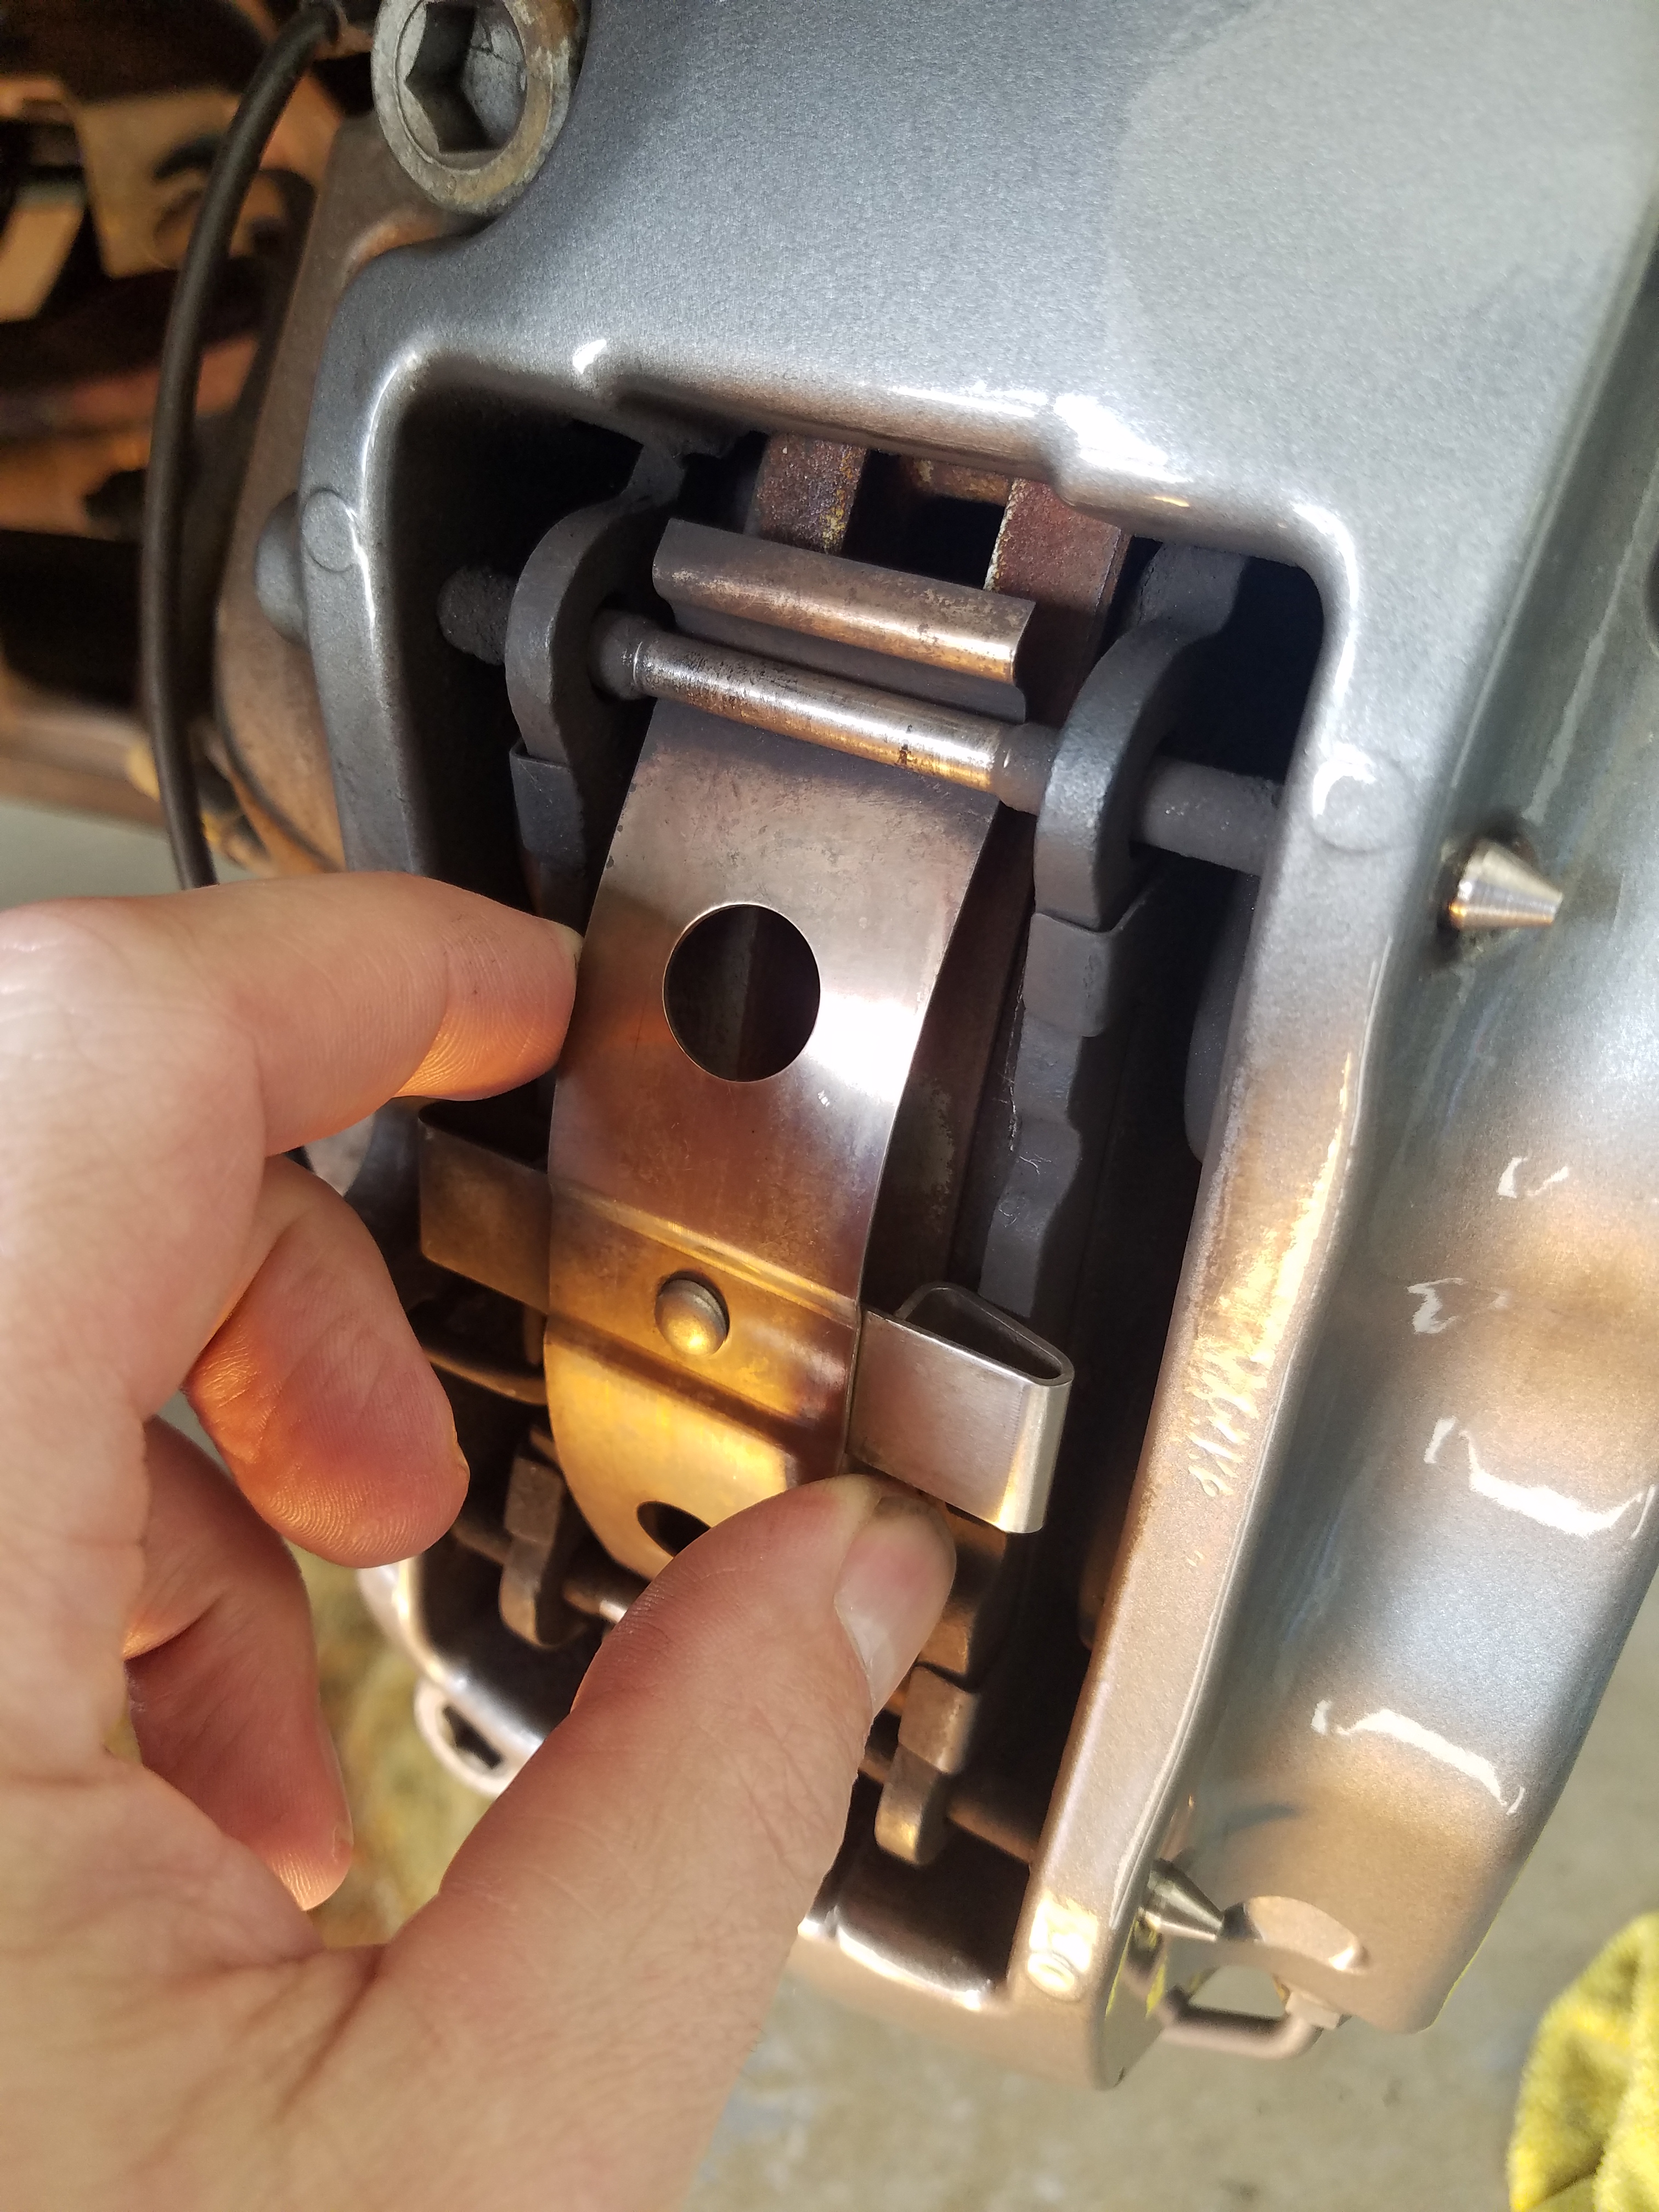
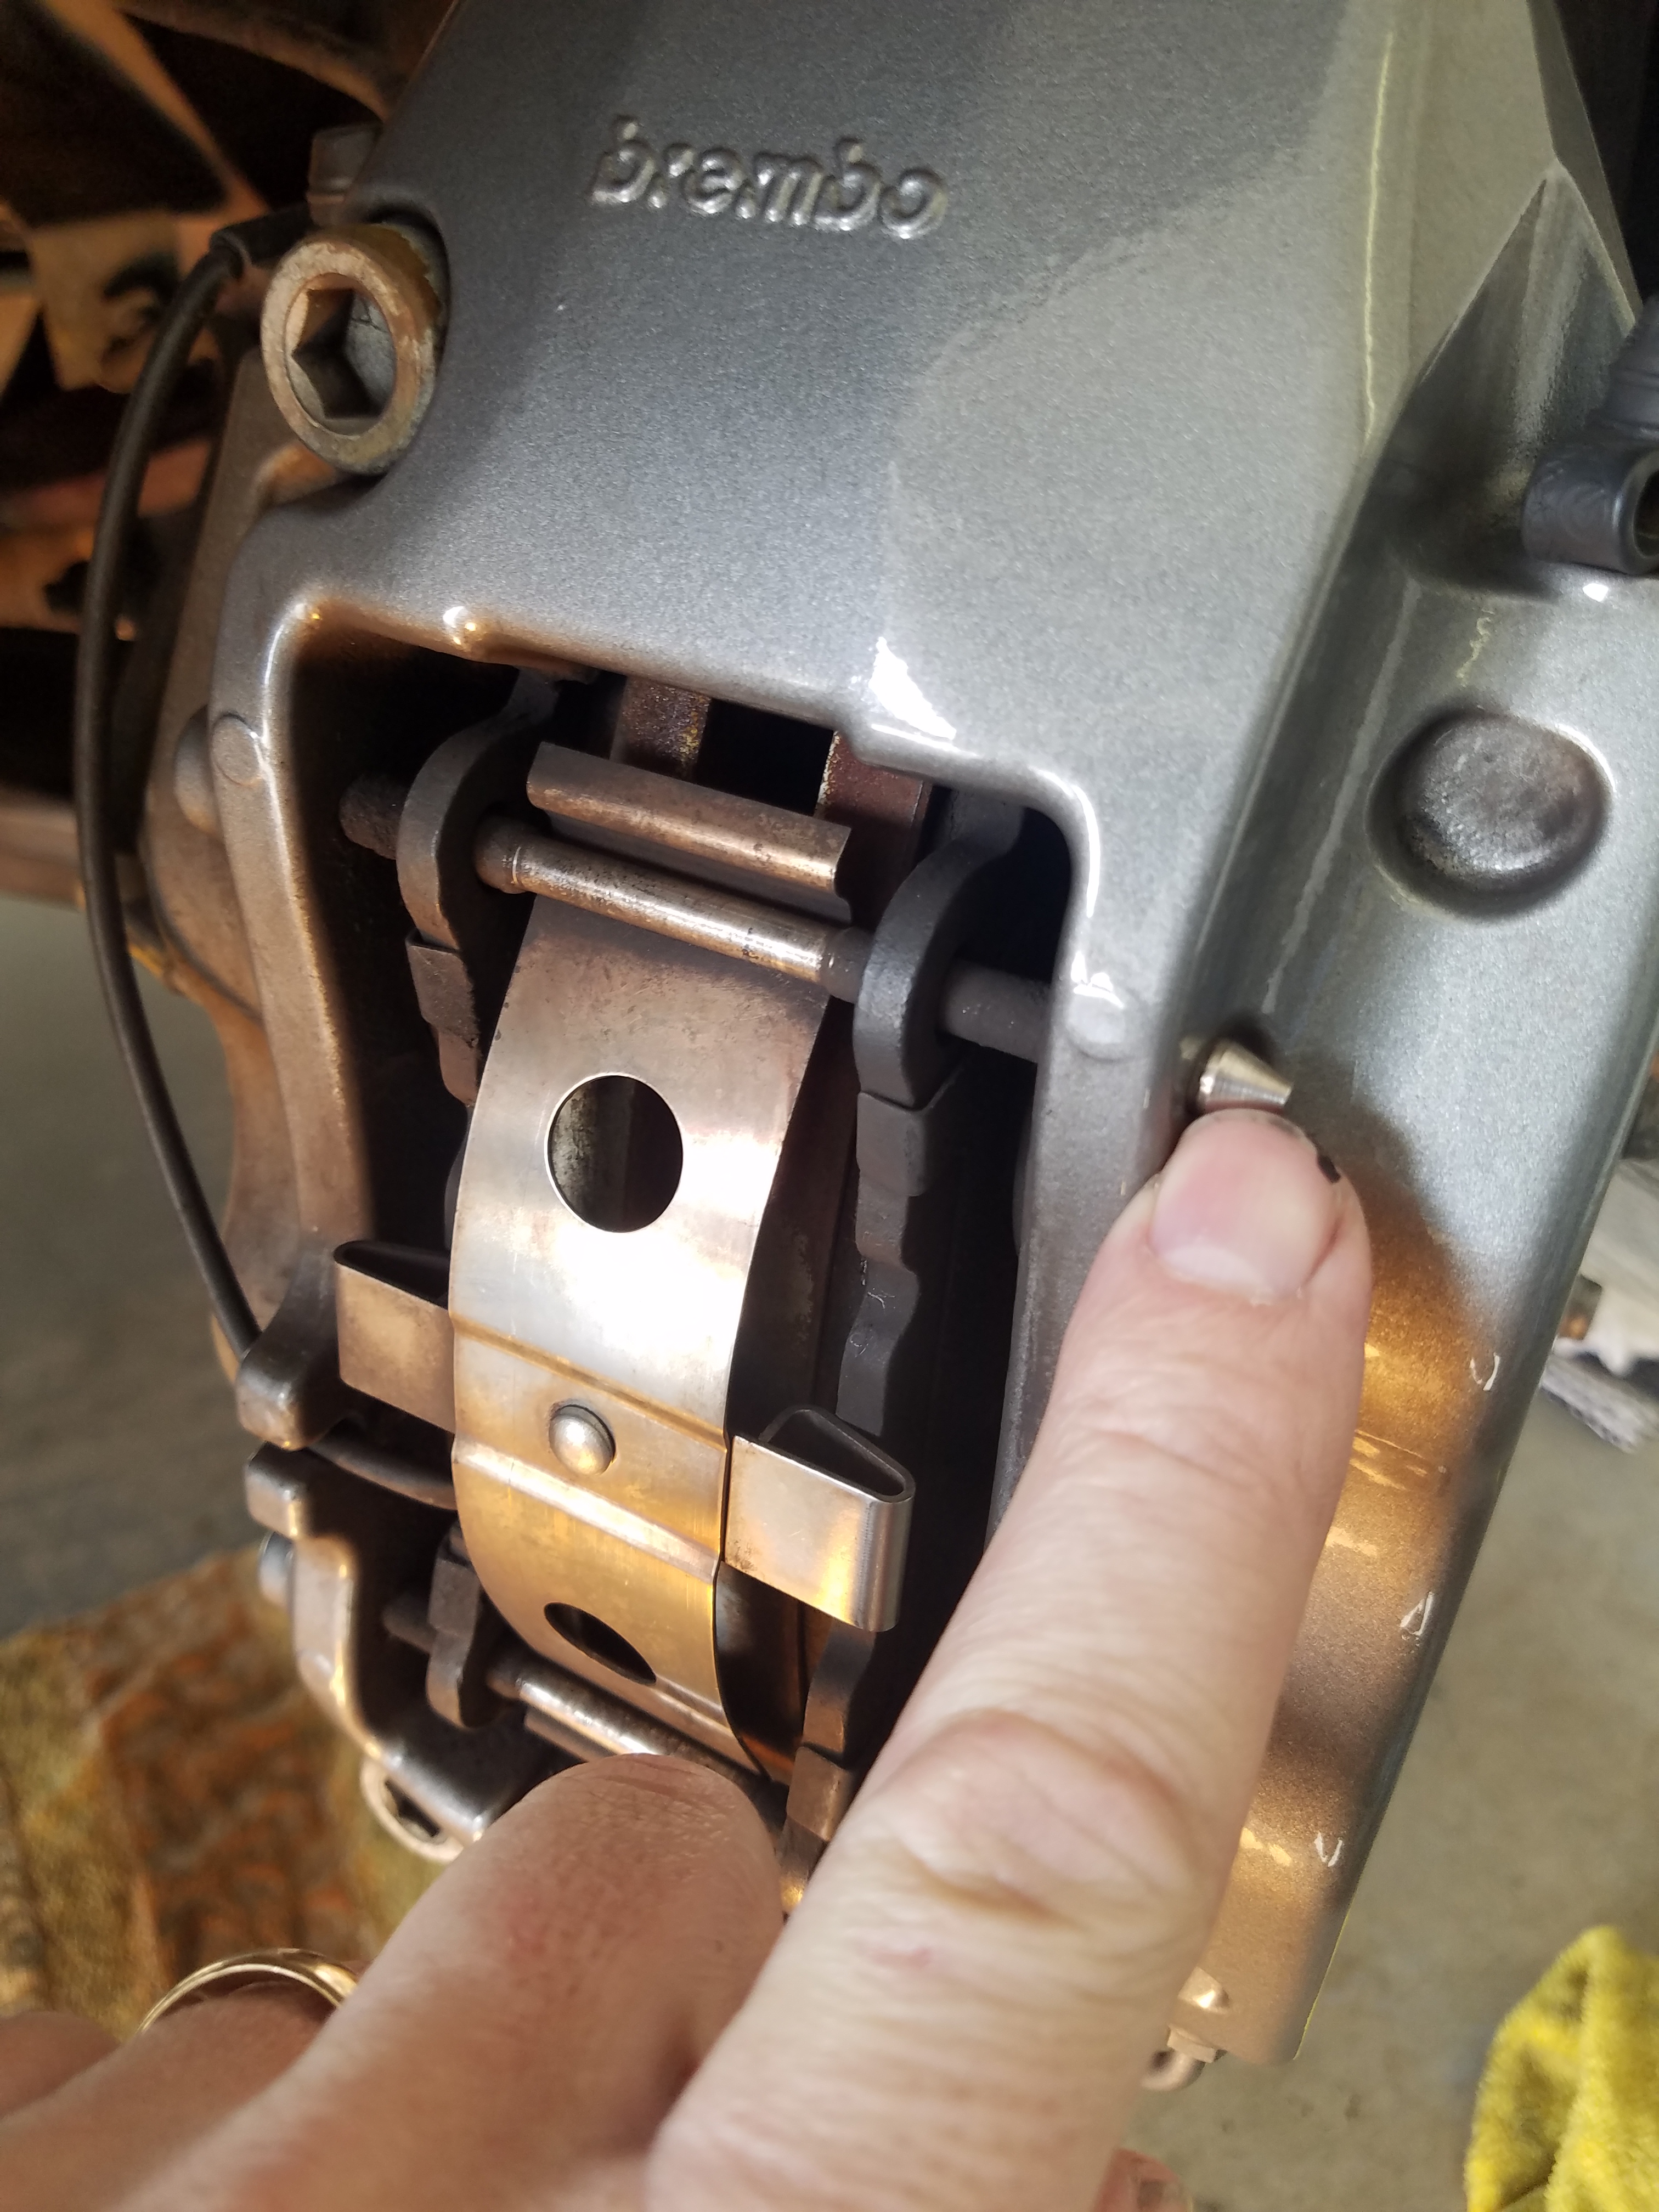
Brake Caliper Inspection
Great pads and rotors are useless unless the Caliper is working properly. There isn’t much we can do other than visually inspect its condition.
- Use your inspection light and carefully peer in and check that there is absolutely NO sign of leaking braking fluid at the four (4) pistons.
- The rubber boots at each piston should be dusty, but not torn.
- Inspect the brake pad retaining pins and spring clip. They should be properly fitted, snug and not rattling.
- Inspect the caliper for any general signs of damage or corrosion. If anything looks untowards, I’d suggest taking it to a brake specialist or dealer.

Brake Fluid Inspection
The brake system relies on the condition of the brake fluid to work properly. The annual service schedule actually requires that the brake fluid be completely flushed each year. Brake fluid is hygroscopic, meaning that it absorbs moisture (even out of the atmosphere). If your brake fluid builds up a significant amount of water, in a hard braking event where the caliper temperature can easily exceed 100°C (the boiling point of water) the water will turn to vapor in the brake system, and vapor is compressible, and you will loose most if not all your braking pressure. Very, very NOT good.
If you change your brake fluid each year, this shouldn’t be an issue unless you don’t have a cap on your master cylinder reservoir.
About all I do each inspection is to check that the brake fluid level is topped up to the ‘Max’ level in the master cylinder. This can be tricky since it’s not easy to see the level, but I use my inspection light to backlight the side of the plastic reservoir to better spot the fluid level.
I also check the general condition of the brake fluid. It should be clean and a clear light yellow. If its cloudy, foamy or dirty brown, something is wrong and it should be completely flushed.
Flexible Brake Lines Inspection
Another key component of the brake system if the flexible brake lines that connect to each brake caliper. Over time they can wear due to flexing, aging or heat. They can be damaged by road debris.
Inspecting them is easy enough, just use your inspection light and give them a close look from where they attach at the caliper all the way along the flexible portion until it meets the hard connection point near the frame. Look for any signs of leaking brake fluid at the connections. If there is ANY abrasion or cracking, it’s time to replace them immediately.
Hard Brake Lines Inspection
More difficult to inspect are the hard brake lines that run from the master cylinder to the traction control device, and then along the frame to each of the four brake caliper flexible lines. I don’t have a protocol to inspect this other than to observe what you can. I also don’t believe the dealer inspects every inch of this each time either, to do so would require removing the inner fender liners, under trays, and all sorts of crawling around. I would suggest that when you are doing other service to your car and can inspect parts of the hard lines, give them a good look. They should be free of corrosion and leaks. If you find some in deteriorated condition, probably time to consult the dealer for their opinion.
Hand Brake Inspection
The last and often overlooked component of the brake system is your hand brake. While it normally shouldn’t wear much at all if properly used (and may last the lifetime of the car), it still needs attention.
- A simple first test is to check that it works. Apply the hand brake fully and put the car in gear. Does it hold the car in place? If not, you have problems.
- When you apply the hand brake it should ‘Click’ four (4) times as you pull the handle up. Less or more isn’t ideal. If it clicks more than four, try releasing and applying the brake again. The system automatically adjusts to a degree. If you have four clicks, you’re good.
- Visually inspect the separate hand brake caliper on each rear brake. It has a mechanically operated (by cable) single piston caliper with a small inner and outer brake pad.
- Inspect the pad thickness. No wear sensors or minimums are listed here, but I think there should be at least 2mm thickness or more of material on each pad. Replace them if they are too thin.
- Inspect the caliper, pins and spring plate same as you did on the main brake calipers. They should be firmly fitted and without damage.


That should do the trick. All you need to do now is put the wheels back on, lower the car, and remember to properly torque the wheel nuts. I’ve got a couple of videos that might help you with that:
- Installing a Road Wheel on an Aston Martin DB9
- Lowering your Aston Martin DB9 Off Jack Stands
- Torqueing the Wheel Nuts on an Aston Martin DB9
Honestly once you have the hang of this, it might take 20 minutes to complete for the whole car. Hopefully this article helps you out.
If you find that something needs serviced, check out my other articles on: [Coming Soon]
- Performing a Brake Pads only service
- Performing a Full Brake Service (Pads, Rotors, Sensors, etc)
- Performing a Hand Brake Service
Video
Perhaps more interesting than reading about all this is my video on performing a full brake inspection. Check it out here.

Hi Steve,
I’m an avid follower of your essential videos regarding the care and repair of DB9’s. I also own a 2005 DB9 and am enjoying every moment I’m behind the wheel.
I need new brake pads and rotors – my local AM dealership wants $4500. Canadian to
replace….I’m saying no – even though I am tempted to do it myself based on your great videos, I will probably go to a reliable and hi-end garage for the work.
Question: can I purchase pad kits and rotors on my own – can you recommend a source….
Regards, Caryl Hathaway
LikeLike
Hi Caryl. I will have that article out sometime soon, but I would recommend aftermarket Porterfield Brakes R4-S pads (AP1165 front and AP1166 rear)(https://www.porterfield-brakes.com/search.php) and then contact Richard at HWM in England (Richard.hayward@hwm.co.uk) for the Rotors AND the 8 caliper bolts you’ll need. Let Richard know you got his name from Aston1936 and he should look after you. An online source for rotors and bolts would be https://www.scuderiacarparts.com/part-finder/astonmartin/db9/oe/151/659 Often HWM can beat the online pricing. Let me know how it goes.
LikeLike
Hello Steve,
Thank you so much for your reply – I appreciate it, and will make contact with your sources.
I’m tempted to follow your steps to replace the pads, rotors and sensors myself – I’m very comfortable with tools and would be able to follow your video and I think save quite a bit of money – $4600.00 Can., but this is such an important area that needs to be done by someone more qualified than myself.
Just to let you know – you are an amazing person to put so much of your time into helping all of us Aston lovers. I always look forward to your videos.
Any thoughts regarding minor stone chips…
All the best and many regards,
Caryl Hathaway
LikeLike
I will have a stone chip article coming soon as well, but finishing the brake series is my priority at the moment. Trying to get one a week done, but challenging with vacations, etc.
You can get all the parts for under $1500 I think if you do it yourself. They are just brakes. I will be publishing the ‘Full Brake Service” articles right after the brake parts article
You can do it, I know you can!
LikeLike
Hello Steve,
An update to my Brake quest….
As per your advice, I contacted Richard Hayward at HWM and explained my request for four rotors and 8 caliper bolts.
His response was – “Unfortunately Aston Martin have stopped us from supplying parts outside of Europe.
You would need to get them form your local dealer.”
Back to square one –
I looked into the Brembo Aftermarket website – put in 2005 DB9 and up popped rotor disk data with a code number – 09.8780.21, Diameter 355mm, thickness 32mm – min thickness 30.mm
I called them and was told ‘No, not available’
Wow, does AM have that much reach and clout to stop aftermarket sales….
I just sent a message to Scuderia –
I asked Scuderia for prices on 4 rotors, pads, 8 caliper bolts (are they necessary ), and pad sensors….
Regards,
Caryl
LikeLike
Hi Caryl. I had heard Aston was cracking down on dealerships shipping to the US, but lets hope Scuderia works out with a decent deal. Please let me know what pricing you get from them, it will be helpful. Bolts are necessary, they are one time use.
LikeLike
Hello again Steve,
Just received a quote from Scuderia including-Front Disk(2)-$171. each – Rear Disk(2)-$179. Brake Pad kit front-$359. Rear-$320. – 8 Screw M8x14 Flat total $1.44, Pad wear lead rear x2-$31.00 – Pad wear lead front x2-$32.45
Total – $1770.00 US/$2314.00 Can.
Regards, Caryl
LikeLike
Those prices look decent, except I would really recommend skipping using the Aston Martin brake pads (made by Pagent) and go with the Porterfield R4S pads that are much better for half the price. They make MUCH less dust than the OEM pads, this was my main reason for switching and I’ve been very happy with them. I think they are $170 or so per set
LikeLike
Hi Steve,
You’re right – I will go with Porterfield R4S pads – I’ve got prices of $194. Rear/ $230. Front…
Will keep in touch.
Thanks – Caryl
LikeLike
Those prices are in Canuk money 8^)
LikeLike
Ahh, 80 cent dollars. I am a Cannuck myself hiding in warm California. Good luck with the brake project. I’ll have some additional articles posted soon.
LikeLike
Ah, a fellow Cannuck – no more hiding, come on back!
Will keep in touch…
Thanks for all your help, eh!
LikeLike
Great video and blog as always. Thank you. For those who do not have a service manual handy, the rear rotor initial thickness is 28mm and the minimum thickness is 26mm.
LikeLike
Hi Stuart. Excellent point, one I hadn’t realized I had omitted. I’ve updated the article with this info now so its easier to find. Thanks!
LikeLike
Hi Steve,
Do you know any resources on dealing with carbon ceramic brakes on the DBS? Would these principles still mostly apply?
LikeLike
Hi Robson. Yes and no. I’ve got small bits of knowledge about it, but not enough to be an authority. The discs should last potentially the life of the car, and measuring their life is done by weight, not thickness. The pads bed in differently. Changing the pads and bleeding the calipers should be mostly the same. Jealous – I just need a DBS with Carbon brakes to learn some new skills.
LikeLike