
When I purchased my DB9 used and was doing the initial walkaround, I opened the trunk and asked the sales rep “What’s this thing with all the LEDs?”. It wasn’t a main dealer, and the rep didn’t know. I figure there might be other owners out there that don’t know what it is, or what all the LEDs mean. Let me explain….
History
Gaydon Era Aston Martins (DB9, Vantage, DBS) used a Tire Pressure Monitoring System (TPMS) made by SmarTire. Back in 2005 having a TPMS was exotic. Fast forward 15 years and every car sold has some form of TPMS. In around 2010 SmarTire was purchased by a larger company Bendix, and ceased making passenger car systems (Bendix is largely used in commercial trucking). Aston Martin then switched to a company called Beru.
Aston Martin must have had an iron clad contract for spare parts and you can still purchase a replacement wheel sensor from them (for a dear price). You cannot buy an actual SmarTire sensor from Bendix. As many cars are now 10+ years old, many of the sensors are now failing and owners are looking for options.
The System
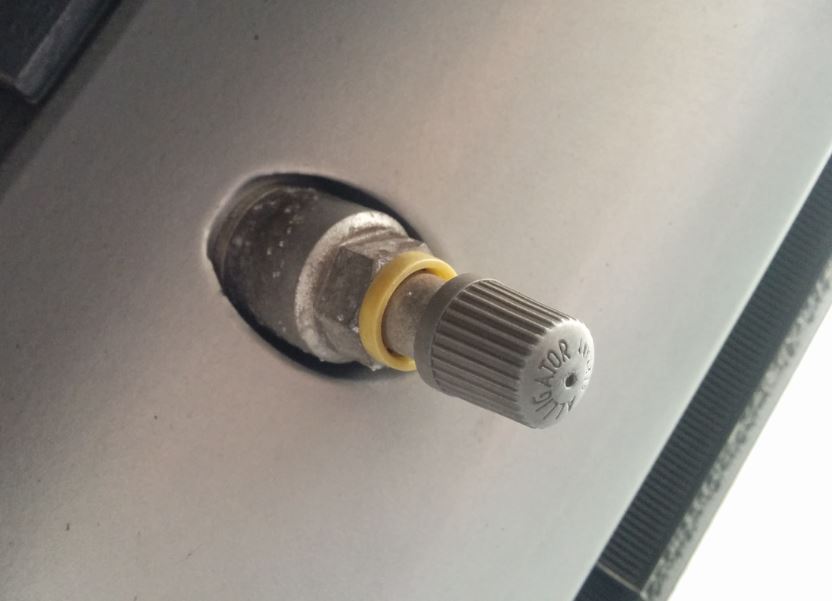
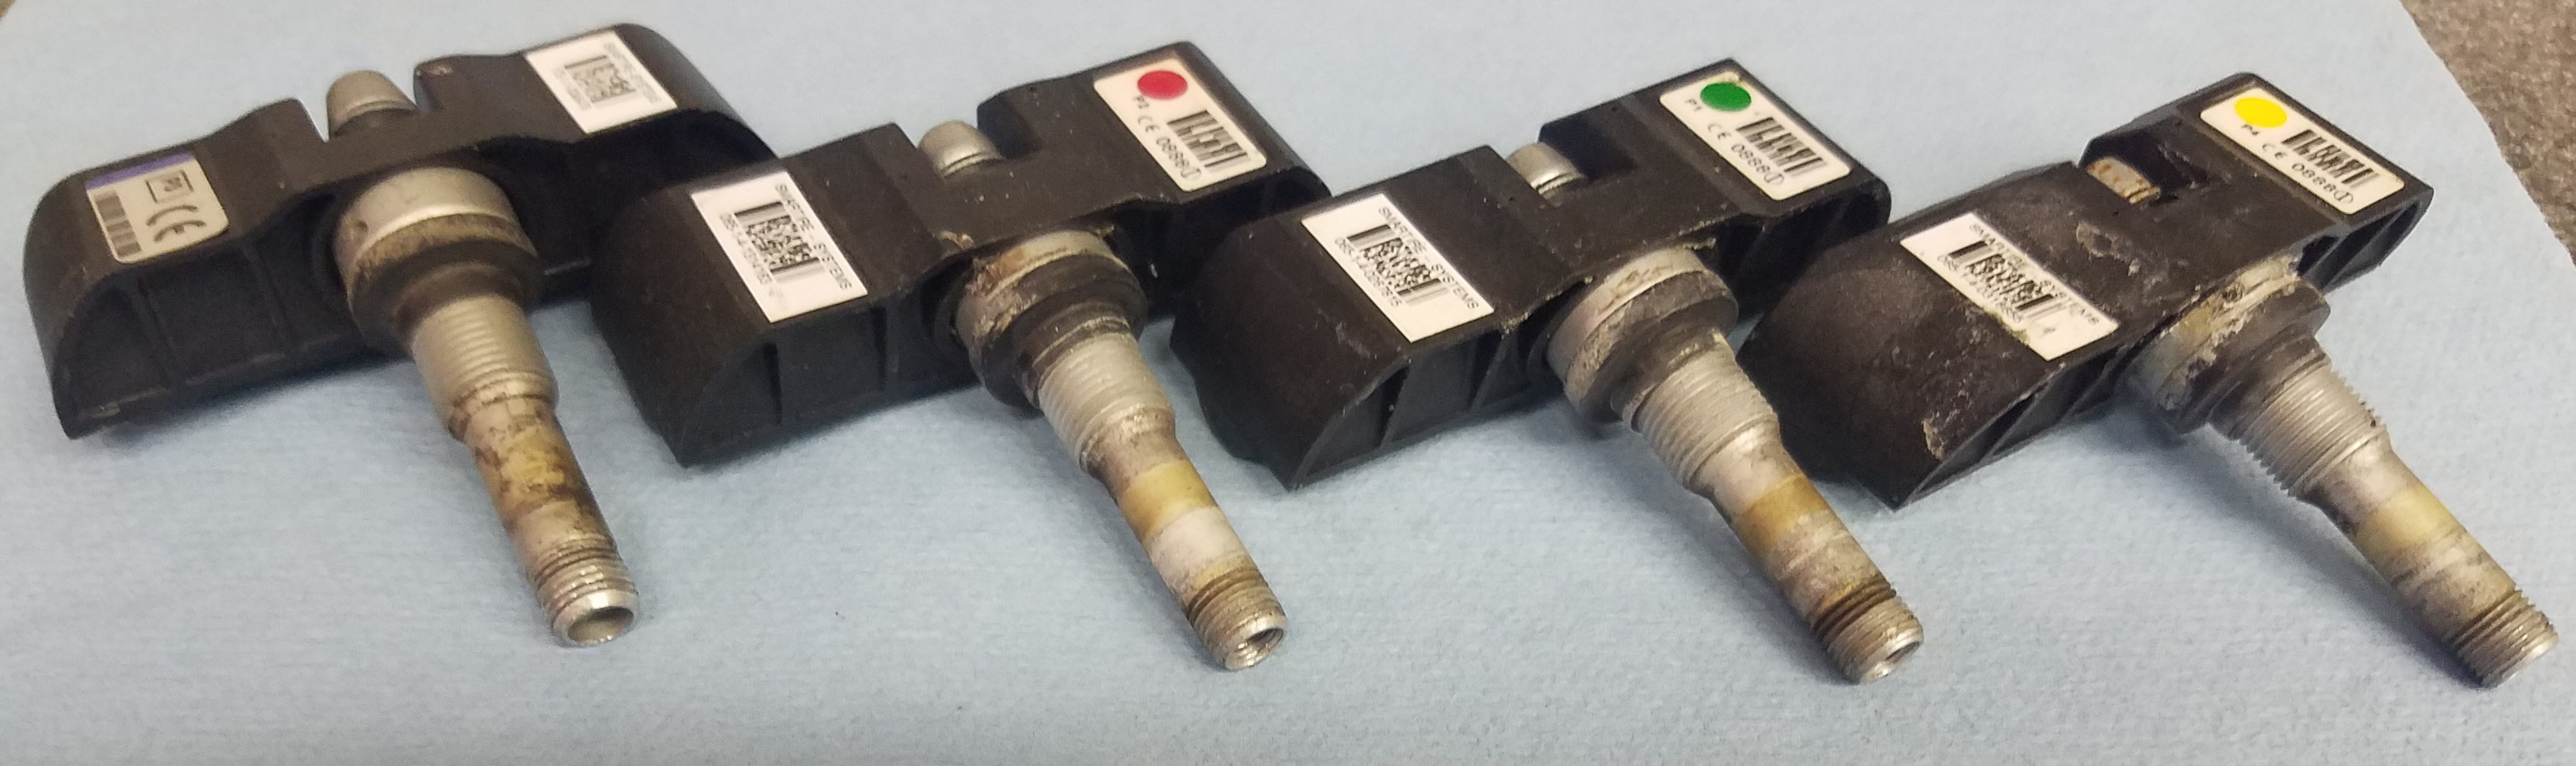
The SmarTire system is comprised of a Control Unit and four Tire Pressure Sensors. Each sensor is actually mounted in the wheel and is the air stem. You may have noticed that each tires air filler stem has a colored plastic ring (or should unless its been lost). The colors correlate to the specific wheel positions and should be:
- Yellow – Left Rear Tire
- Blue – Right Rear Tire
- Red – Left Front Tire
- Green – Right Front Tire
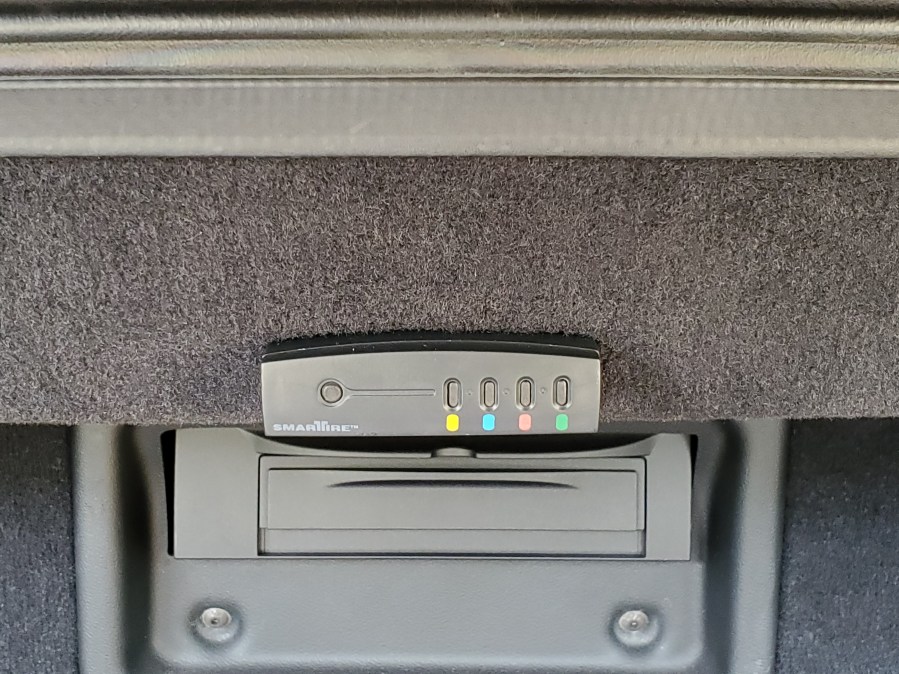
In the very early DB9’s (2004 to 2006?) the SmarTire control unit is mounted in the Trunk (Boot) along the top center edge (as with my car in my photos above). It seems somewhere around the introduction of the Volante and Vantage (MY 2006/2007?) they relocated it in the cabin under the Glove Box area out of sight for all models as seen here.

How it works
Each wheel sensor is BATTERY powered. Yikes! That means they were NEVER going to last forever. Mine gave up a few years ago and I opted to replace them (they lasted 13 years). Since they are battery powered they do have some smarts in them. They turn off when the car is not in motion for an extended period of time. Essentially when parked, they aren’t transmitting.
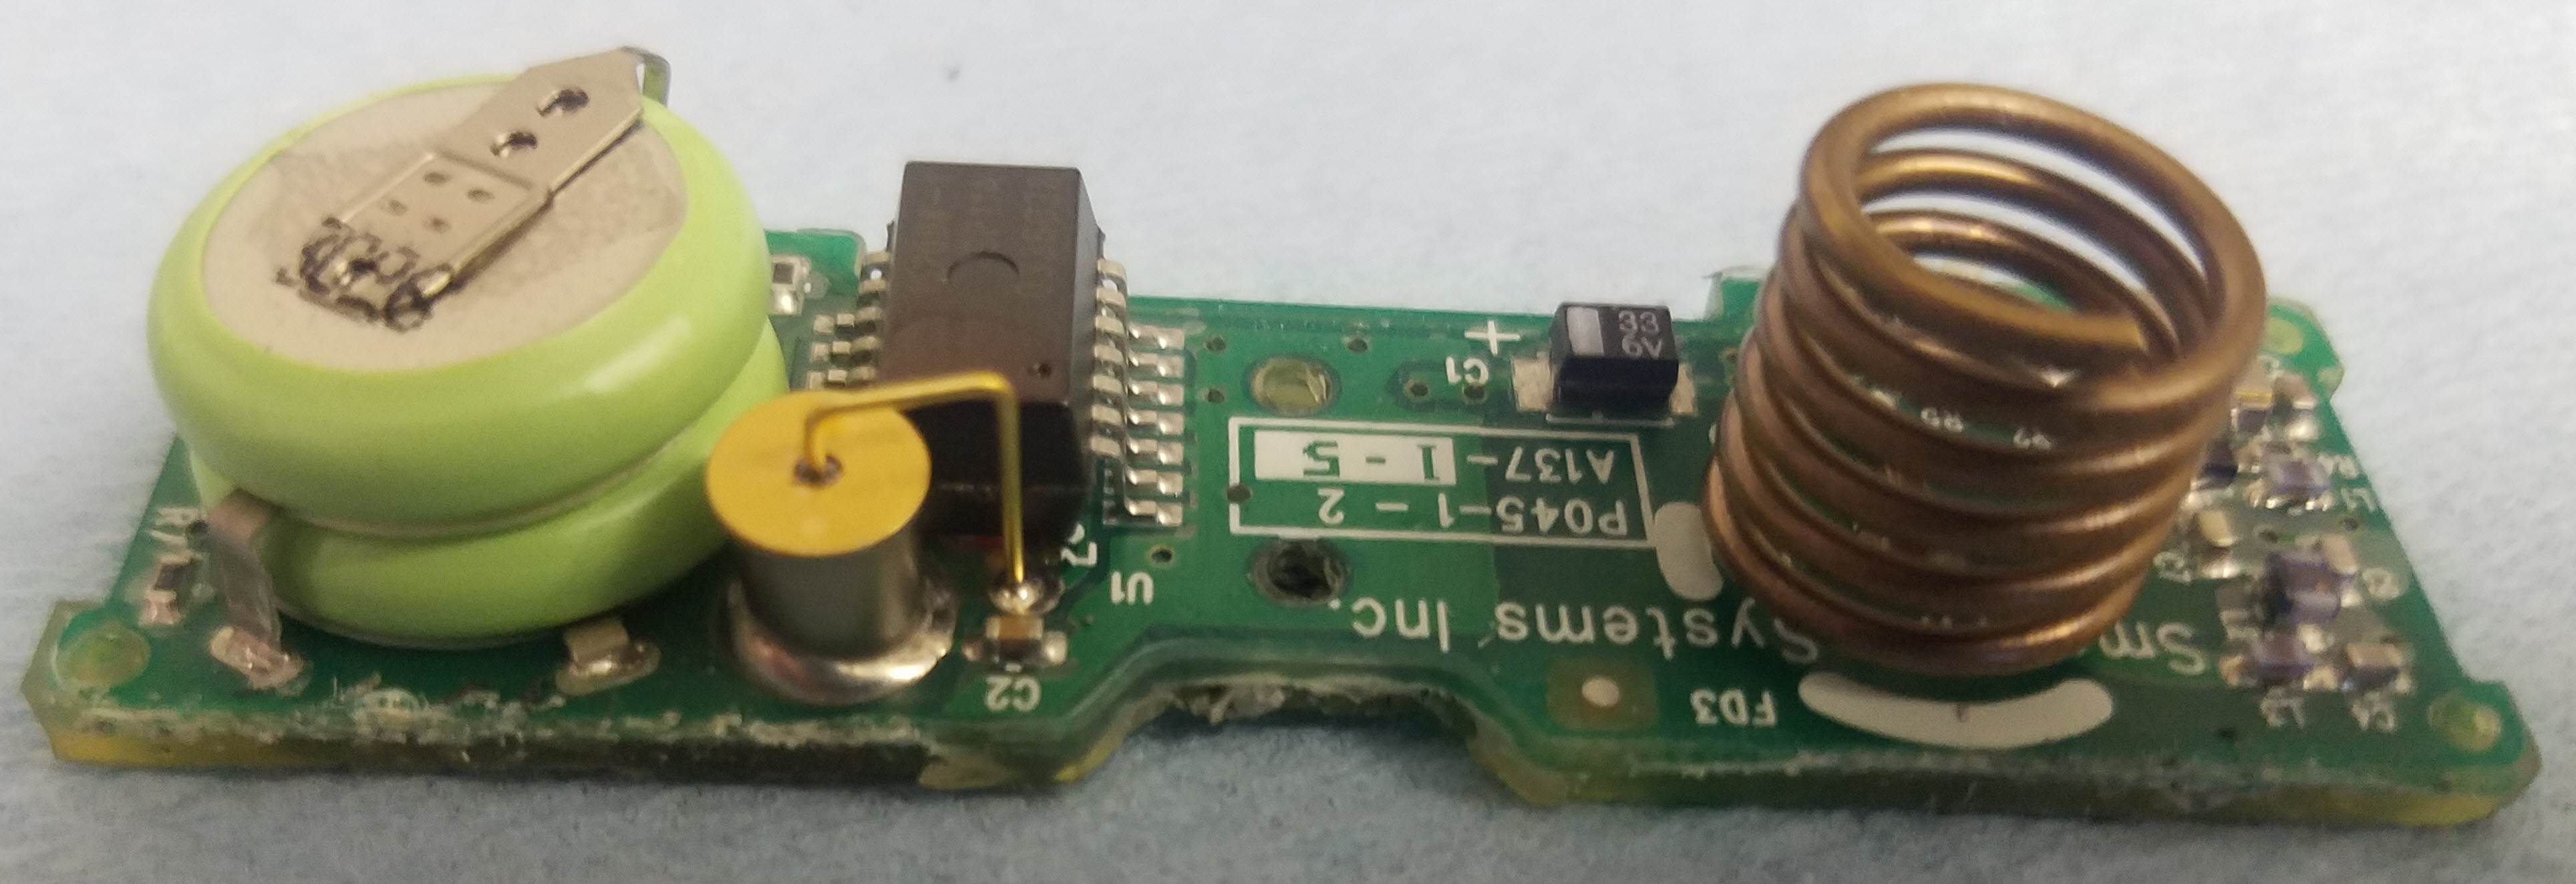
After they sense wheel rotation, they power up and begin transmitting at 433.92 Mhz. They are sending out more information that just the tire pressure, they also transmit the temperature of the tire. This is important as well if the tire is overheating due to overload or low pressure. Both are dangerous conditions you want to be alerted to.
All four sensors are transmitting, and listening is the control unit. The control unit is programmed by Aston to know that the target tire pressures are (36 psi up front, and 38 psi rear). Check out my article on properly setting the tire pressures. It keeps track of the sensors data and will alert you to many conditions:
- Tire pressure low
- Tire pressure VERY low
- Tire over temperature
- Tire pressure ‘changing’ at a pace faster than it should
- Sensor Failure
- Control Unit failure.
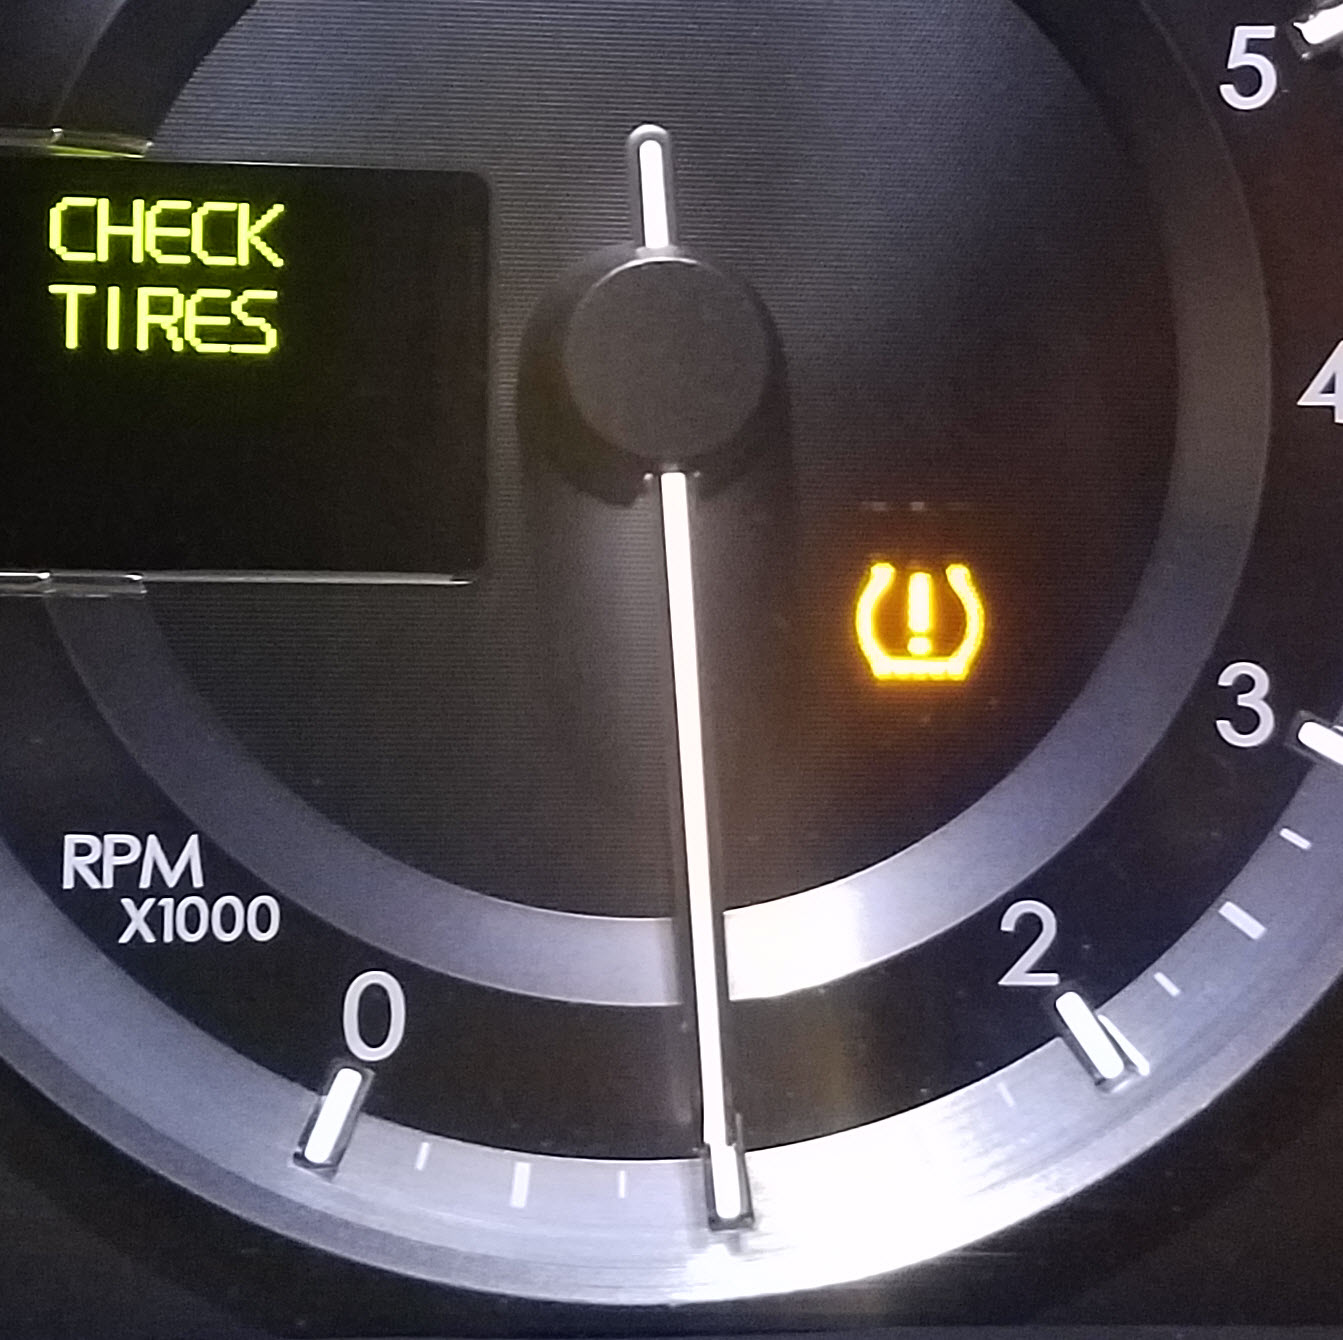
Where the system shows its age is that we don’t get a nice dashboard display showing individual tire pressures (like in many modern cars today). You simply get a warning light and one of two text displays “Check Tires” or “Tire System Fault”. Then, you have to stop, get out, and look at the Control Unit LEDs to work out what else is happening. That’s why I am writing this article, so you can understand the LEDs.
Quirks
 Ever start you Aston and leave it idling for a long period of time without driving off? You’ll most certainly get the “Check Tires” warning on the dash. This is because the Control Unit is all started up, but none of the Tire Pressure Sensors have turned on and started transmitting yet, so it thinks all four of them have failed. Not to worry, just eventually start to drive somewhere, the sensors will turn on and start to transmit, and the error will automatically clear. Usually within a block or so.
Not really a quirk, but you will likely get low pressure warnings in the Fall as temperatures start to dip. Tire pressure is temperature dependent, and if you last adjusted your tire pressures on a hot summer day, its likely they will be at least 4 psi lower on a cold fall morning. Just heed the warning and top up the air in your tires. Check out my article on Seasonal Tire Pressure Warnings here.
Understanding the System
The SmarTire Control unit has 5 LEDs.
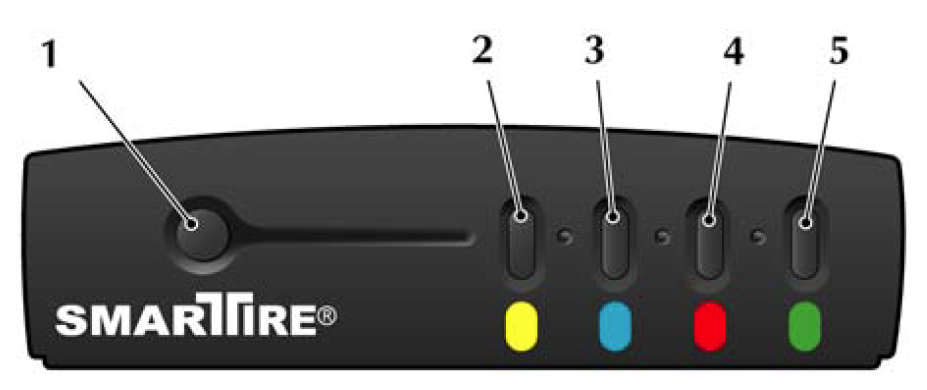
- Control Unit System Status
- Yellow Sensor – Left Rear Tire
- Blue Sensor – Right Rear Tire
- Red Sensor – Left Front Tire
- Green Sensor – Right Front Tire
Startup
When you first turn on the Ignition Key, the system will begin to power up. If you look at it during this time it’s lit up like a Christmas Tree. All the LEDs will cycle through all the colors so you could diagnose if an LED had died. This only take a few seconds.
After it’s powered up, it automatically begins to listen for the four tire pressure sensors. While it’s waiting for them to check in, you’ll see the System Status LED blinking amber, plus each wheel sensor that has not yet checked in will be blinking amber. If you’ve started the car, and it’s still sitting parked in the garage, this is the way it will stay until you start to drive off. Remember, the sensors don’t turn on and start transmitting until the vehicle is in motion for a bit.

Once the first sensor checks in the LED for that sensor will turn off. The System Status continues to flash amber since other sensors have not checked in. In this example, the Yellow sensor is communicating properly.

As you drive a little further the rest of the sensors will check in, and in this example all but the Blue sensor have checked in.

Keep in mind that when a sensor does ultimately fail (battery deleted after a decade or more) they typically all don’t fail at once. Your first sign of this will be a single sensor that fails to communicate even after driving around. See the signs of that below.
Normal Operation
Once you have driven far enough to wake up the four sensors and they’ve checked in with the Control Unit and all the pressures are fine, you’ll see the System Status LED turn to Solid Green and all the sensor LEDs will be off. This is what you hope for all the time. Green is good.

When Problems Occur
 Your first sign of a problem will be a warning message on the Drivers Information Module (DIM) and a TPMS idiot light. This is your call to action.
Stop the car and go examine the LEDs. It should point you at a problem with a single tire. Respond accordingly checking the tires pressure, looking for a puncture, etc. DON’T just keep driving assuming its some minor electronics quirk!
 When the DIM shows “Check Tires”
This is telling you that you have a problem with one or more tires pressure.
If the LED for a specific tire is SOLID Red, this means the pressure is at least 25% low. Since normal tire pressure is 36 PSI, getting this warning means you are already at least 9 PSI low on pressure. Something is wrong. It could be even lower, this really means 25-49% low. In this example, its telling you the Blue Sensor (Right Rear Tire) is Low.

If the LED for a specific tire is FLASHING Red, this means the pressure is at least 50% low. This is very dangerous to continue driving on. Since normal tire pressure is 36 PSI, getting this warning means you are already at least 18 PSI low on pressure. Something is wrong. It could be even lower, this really means 50-100% low. In this example, its telling you the Blue Sensor (Right Rear Tire) is Very Low.

When the DIM shows “Tire System Fault”
 This is telling you there is a problem with communication, either with the Control Unit itself, or one of the tire pressure sensors. If this alert comes up, I’d recommend pulling over to inspect the LED status and follow-up accordingly. Essentially you will be flying blind on either the whole system or at least one tire.
If the System Status light is FLASHING Amber and one of the Sensor LEDs is SOLID Amber, this means that there is a transmitter Sensor Fault. As I noted near the top of this article, the sensors are battery powered, and this may be your first sign that they have packed it in. The fix will be replacing the sensor at a dealer (ugh). In this example, the Blue Sensor (Right Rear Tire) has failed. If you continue driving, just remember you will have no warning of a pressure problem with that tire. Be careful, check it manually, etc.

If the System Status light is SOLID Red, this means the Control Unit itself has the Failure. While this seems catastrophic, this is actually the easier issue to fix. You can buy a refurbished identical control unit on eBay for about $20 USD. It still requires a dealer visit to ‘program it’ to learn each wheel sensor. Here is an example of that a TPMS failure will look like.

Where I gathered my Background
I’ve been learning more about the TPMS system as time goes on. I wrote an earlier article about them years ago when I first got my car (check it out here).
 I felt motivated to write this article based on what I learned recently reading through Aston Martin’s Field Service Bulletin (FSB 0297) that was published in July 2009 and sent to its Dealers to help educate the service team. I found this very informative, and used it as the basis for this article and supplemented it with my own additions. You can download all the FSB’s and other interesting stuff if you sign up for an Aston Martin Tech Info Subscription (check out how by clicking here). Here is a link to the entire original article if you’d like to see it.
Video
For those of you that might like to see it in action, here is a short walk around video of the SmarTire TPMS system on my DB9. If someone would be kind enough to shoot a supplement for a Vantage, I’d be happy to include it here. Please contact me on the Contact Page.
[Coming Soon]

Another great article! Just to clarify, my 2006 DB9 Volante also has the SmartTire control unit hidden away under the glovebox, like a Vantage.
LikeLike
Thanks for sharing! Make sense, that area is filled with convertible roof mechanism I bet. I will update the article.
LikeLiked by 1 person
Any problems with the roof module? I need to get my volante flashed so the roof will work.2009 Volante
LikeLike
Another Gem of an article Stuart 👍
I had a recent tire warning light on the dash. It was chilly and after a while it cleared. I did stop and checked for a flat. I try to make a point of checking and adjusting tire pressures monthly.
Am holding my breath for the TPMS battery to fail. 09 MY Vantage 🤔
John : Vancouver BC 🇨🇦
LikeLike
Sorry Steve Mixed up
LikeLike
Thanks again for your insight Steve!
LikeLike
Thanks, Steve! Just fyi, my ’07 DB9 also has the TPMS module under the dash. I wonder when they moved it?
LikeLike
Thanks for sharing. Is your car a Volante (convertible)?
LikeLike
No sir, it’s a 2007 coupe.
LikeLike
Hi Steve, great article. FYI, my 2009 DBS coupe also has the controller located under the glovebox.
LikeLike
My 2006 DB9 also has the SmarTire control unit under the glovebox.
LikeLike
Thanks for sharing. Is your car a Volante (convertible)?
LikeLike
Coupe.
LikeLike
My 2009 DB9 Volante has it in the glove box, prior owner must have moved it. Recently I have dreaded “tire system fault “ light
But system status light turns solid green and all 4 tire lights goes off after blinking.
What does that mean
LikeLike
I move my sensor reader to the glove box. I was also able to order a bypass cannon plug from”red Pants” the bypass plug allows for all sensors to read normal with different tires on the car.
LikeLike
Useful info Steve, my 2009 DB9 Coupe (6262) has the unit under the glovebox. I have the ‘Tyre System Fault’ message on the DIM and the Smartire unit system light flashes amber, together with one tyre indicator light. I have discussed with Aston in the UK and they suggest that it is most likely to be a battery problem (i.e. flat after 10 years).
I have sourced new Panasonic batteries and hope to refurbish the front TPMS units when I replace the tyres . I can’t justify the £164 per corner for new units from AM but thought the battery replacement was worth a go at around £20! If all else fails I will probably go down the ‘TPMS defeat’ route!
LikeLike
Hi Mike. Any chance you could take a nice photo of the sensor somehow in the context of its surroundings so I can include in the article? If you can, please email it to steve@Aston1936.com.
I happen to have 10 of those batteries on the desk in front of me and have soldered a set onto one of my old TPMS’s. Working on an article and video to show how to refurb them for $10 each. I bet a ‘man in a shed’ could go into business doing a set of four for $200 if you mail them the sensors. Does the soldering and mails them back. No reprogramming required.
Good luck with the sensors, its doable.
LikeLike
Hi Steve,
I’m thinking of replacing the aged tires on my ’06 Volante, which has only 5,000 miles on it. The TPMS system has been trouble-free; should I do anything with the sensors while I’m at it? Or should I heed the old maxim “if it ain’t broke, don’t fix it?”
Thanks!
Rick
LikeLike
Steve, any idea where to get the batteries from in Europe? Any progress with instructions?
LikeLike
Hi Steve
Just stumbled across this great site having experienced a tpms system fault. Pressures fine so given my car is a 2008 Vantage I suspect battery in blue sensor failing. I am pretty handy with a soldering iron but could you comment on how to open up the units to gain battery access, and also will the programming remain after battery change i.e. is it hard coded rather than resetting on loss of battery voltage. Many thank. Mark
LikeLike
Hi Mark. I am just creating a series of videos on TPMS repair. But, I can tell you the easy way. Replacing the Battery in the Smartire can be done (I have) but, I’ve just discovered that you can clone it with a $37 USD Autel MX Sensor. I purchased 4 sensors for $135 from amazon, and then spent about $200 on an Autel TP501 handheld programmer. It knows about Smartire sensors used on Aston’s, and it was simple enough to just clone the old sensor into the new sensor. If the old sensor is dead, you can read the serial number sticker off it, and manually program a new sensor, and thus it will just work with the existing Smartire brain in the car. Easy. For about $350 all in, you can do the set and be done with it for good. Plus, you can document the codes needed if you have to replace them again in the years ahead. If you are in the US, I could program a sensor for you if you send me a pic of the serial number label on the old one. Hope this helps!
LikeLike
Thanks so much for taking the time to respond. I am in the UK. I am just reading a Postonheads thread to further my knowledge. I have an early 08 Vantage. I have just tried unplugging the system 4wire plug but the display changed from tyre system fault to ‘check tyres’. The fault remain on the main display rather than going out. All that was done stationary without going for a drive. I was just a little confused about one thread which suggested a sensor change late 2008 so ‘be careful’ ?
Thanks Mark
Sent from my iPad
LikeLike
Long running thread on Pistonheads explains how to use lower cost Autel MX sensors with the SmarTire head unit. https://www.pistonheads.com/gassing/topic.asp?h=0&f=70&t=1845335
LikeLike
Thanks for the link Scott
Having read this, the Autel units and scanner seem to be the way forward if a sensor is faulty.
I think my sensors are OK except for the batteries, so that will be my first stop.
If battery replacement doesn’t do the job, (front left tyre currently showing fault), I will probably replace the units with Autel ones.
I will update on progress!
LikeLike
Hi Steve, Thanks for all your ‘how to’ posts I’ve made good use of them it’s a really excellent resource. An update on the Smartire system though it is possible to replace the sensors providing you have the originals with Autel sensors at c£20 each, detail is here
https://www.pistonheads.com/gassing/topic.asp?h=0&f=70&t=1845335&i=20
Process was developed on a Vantage and I’ve used it successfully on a DBS
Peter
LikeLike
Thanks for the detailed info.
I have a damaged valve stem on my 2005 DB9 on front right. The TPMS seems to working fine, so I am looking to replace just the valve stem. Aston bits in UK lists a tyre pressure sensor valve stem for £15, but wanted to check if it looks like it actually is possible to replace just that valve stem on the 2005 TMPS unit?
The exploded view of the Aston TPMS full unit part CG33-360671-AA suggest it is possible. Of course, It may be the valve stem is a generic unit and if so perhaps there is an alternate part available here state-side.
LikeLike
Hi Charles, I think the valve stem is generic and tyre shops change them routinely when fitting new tyres. Probably Roth talking to your local tyre fitter.
Peter
LikeLike
Hello,
Thank you for all great info on maintaining an Aston.
I have a 2011 DB9 with the newer TPMS system 433 MHz signal , a certain dealership in Beverly Hills quoted $400 per sensor….well enough said. I found new ones on the TPMS website $69.99 each, turns out the module was at fault but what the heck I now also have 4 new sensors at a fraction of the cost.
LikeLike
Steve:
I always love your straightforward articles. Recently after changing tires to PS4, after driving my 2007 DB9 Volante home from the shop (Steel Wings in Ivyland PA – great shop) I got a TIRE SYSTEM FAULT. Looks like either a communication error or a sensor is going. I manually checked tire pressure and all was fine. Not sure when the TPMS system was changed, but I will either go the defeat route or replace with the Autel TPMS.
LikeLike
Hello guys,
Have we got any idea on whether changing the battery is indeed doable? I would love to do all 4 of them to future proof things.
Front left has started acting on me and I think the battery is dead.
Also, what are the part numbers for an 08 DB9?
Cheers,
John
LikeLike
hello steve, is it possible to cancel the TPMS of the DB9 ?
thanks ans great job from a french Aston man 🙂
LikeLike
Thanks Steve for another of your excellent articles. I have a 2006 Vantage V8. The next time I have my tires changed I intend to install the Huf IntelliSens TPMS system you mentioned in one of your blogs.
However, I have noticed that some of your readers would like to change just the lithium coin cell batteries in the OEM TPMS wheel sensors. If someone chooses to do this here are some items to consider.
1) The numbers on the lithium coin cell batteries actually mean something. An example is BR2450. The “B” describes the cathode as being carbon monofluoride. If it was a “C” it would signify a manganese dioxide cathode. The “R” signifies that the cell is round (duh). The “24” signifies that the cell is 24mm in diameter. The “50” signifies that the cell is 5.0mm in height. Best to purchase the replacement batteries with the same number as the OEM batteries.
2) Best to purchase the replacement lithium coin cell batteries from a vendor that sells batteries intended for TPMS systems. These batteries will have an electrolyte capable of working at a wider range of temperatures than lithium coin cell batteries sold at retail.
3) Best to purchase lithium coin cell batteries with tabs already on them. These tabs are typically laser welded on the cell with a minimum of heat. Welding or soldering tabs on the minus (-) side of the battery is tricky. The metallic lithium in these batteries is just inside the shell on the minus (-) side & too much heat in this location could start a fire.
LikeLike
Dear Steve,
I have had new tires fitted on my V8 Vantage (2009) and now I get the message tire system fault. Looking at the TPMS module I see that the module is not connected at all, is not plugged in and so no lights are on. My question is how can I get rid of the message on the dashboard.
LikeLike
Hi Steve
I moved my smart tire reader from under the glove box to inside the glove box. Now i simply open the box and the indicators are in plain view.
LikeLike