

An Aston Martin DB9 has 3 separate fuse boxes, one in the engine compartment, one in the passenger compartment and the last in the boot. You may need to access the Cabin Fuse Box for a variety of service reasons as it contains fuses for a myriad of the vehicles systems. In addition to the fuses, this is also the location of the Fuel Pump Relay, something you may need to remove to depressurize the fuel system if you are working on your fuel injectors.
Accessing the Cabin Fusebox is pretty easy once you know where it is. From the owners manual diagram above you’d think it was under the dash on the right. Actually, its under the floor mat on the Passenger side, so it’s different than in the diagram shown if you have a Right Hand Drive (RDH) car. That’s right, under the floor mat, not hidden under the dash. Check out my video below for a clear view of where it is.
Tools Required

All you will need is a T30 Torx bit. I had it on a 6″ long 3/8″ drive extension so I could use it as a handle, and a ratchet of course to crack them loose and tighten them. A small inspection light might be handy to peer up at where the carpet tucks in to see how that’s done.
Removal Procedure
The process is pretty simple and will only take a couple of minutes:
- Move the passenger side seat as far rearward as possible to make the next steps easier.
- Remove the passenger side floor mat/carpet. It’s beautiful carpet, and goes WAAY up under the dash, and tucks under some of the HVAC system, so just take your time. Have a good look at where the carpet gets tucked in so you can put it back that way.
- Once you’ve removed the carpet, you’ll see the toe kick panel cover over that Fuse Box. It’s held in place with seven (7) T30 Torx screws. Remove the screws.
-

Cabin Fusebox with Cover Removed Carefully remove the cover panel. Some caution should always be used working near an exposed electrical fuse box. Since the battery may still be connected, be sure not to drop a screw or tool into this area that could accidentally short out.
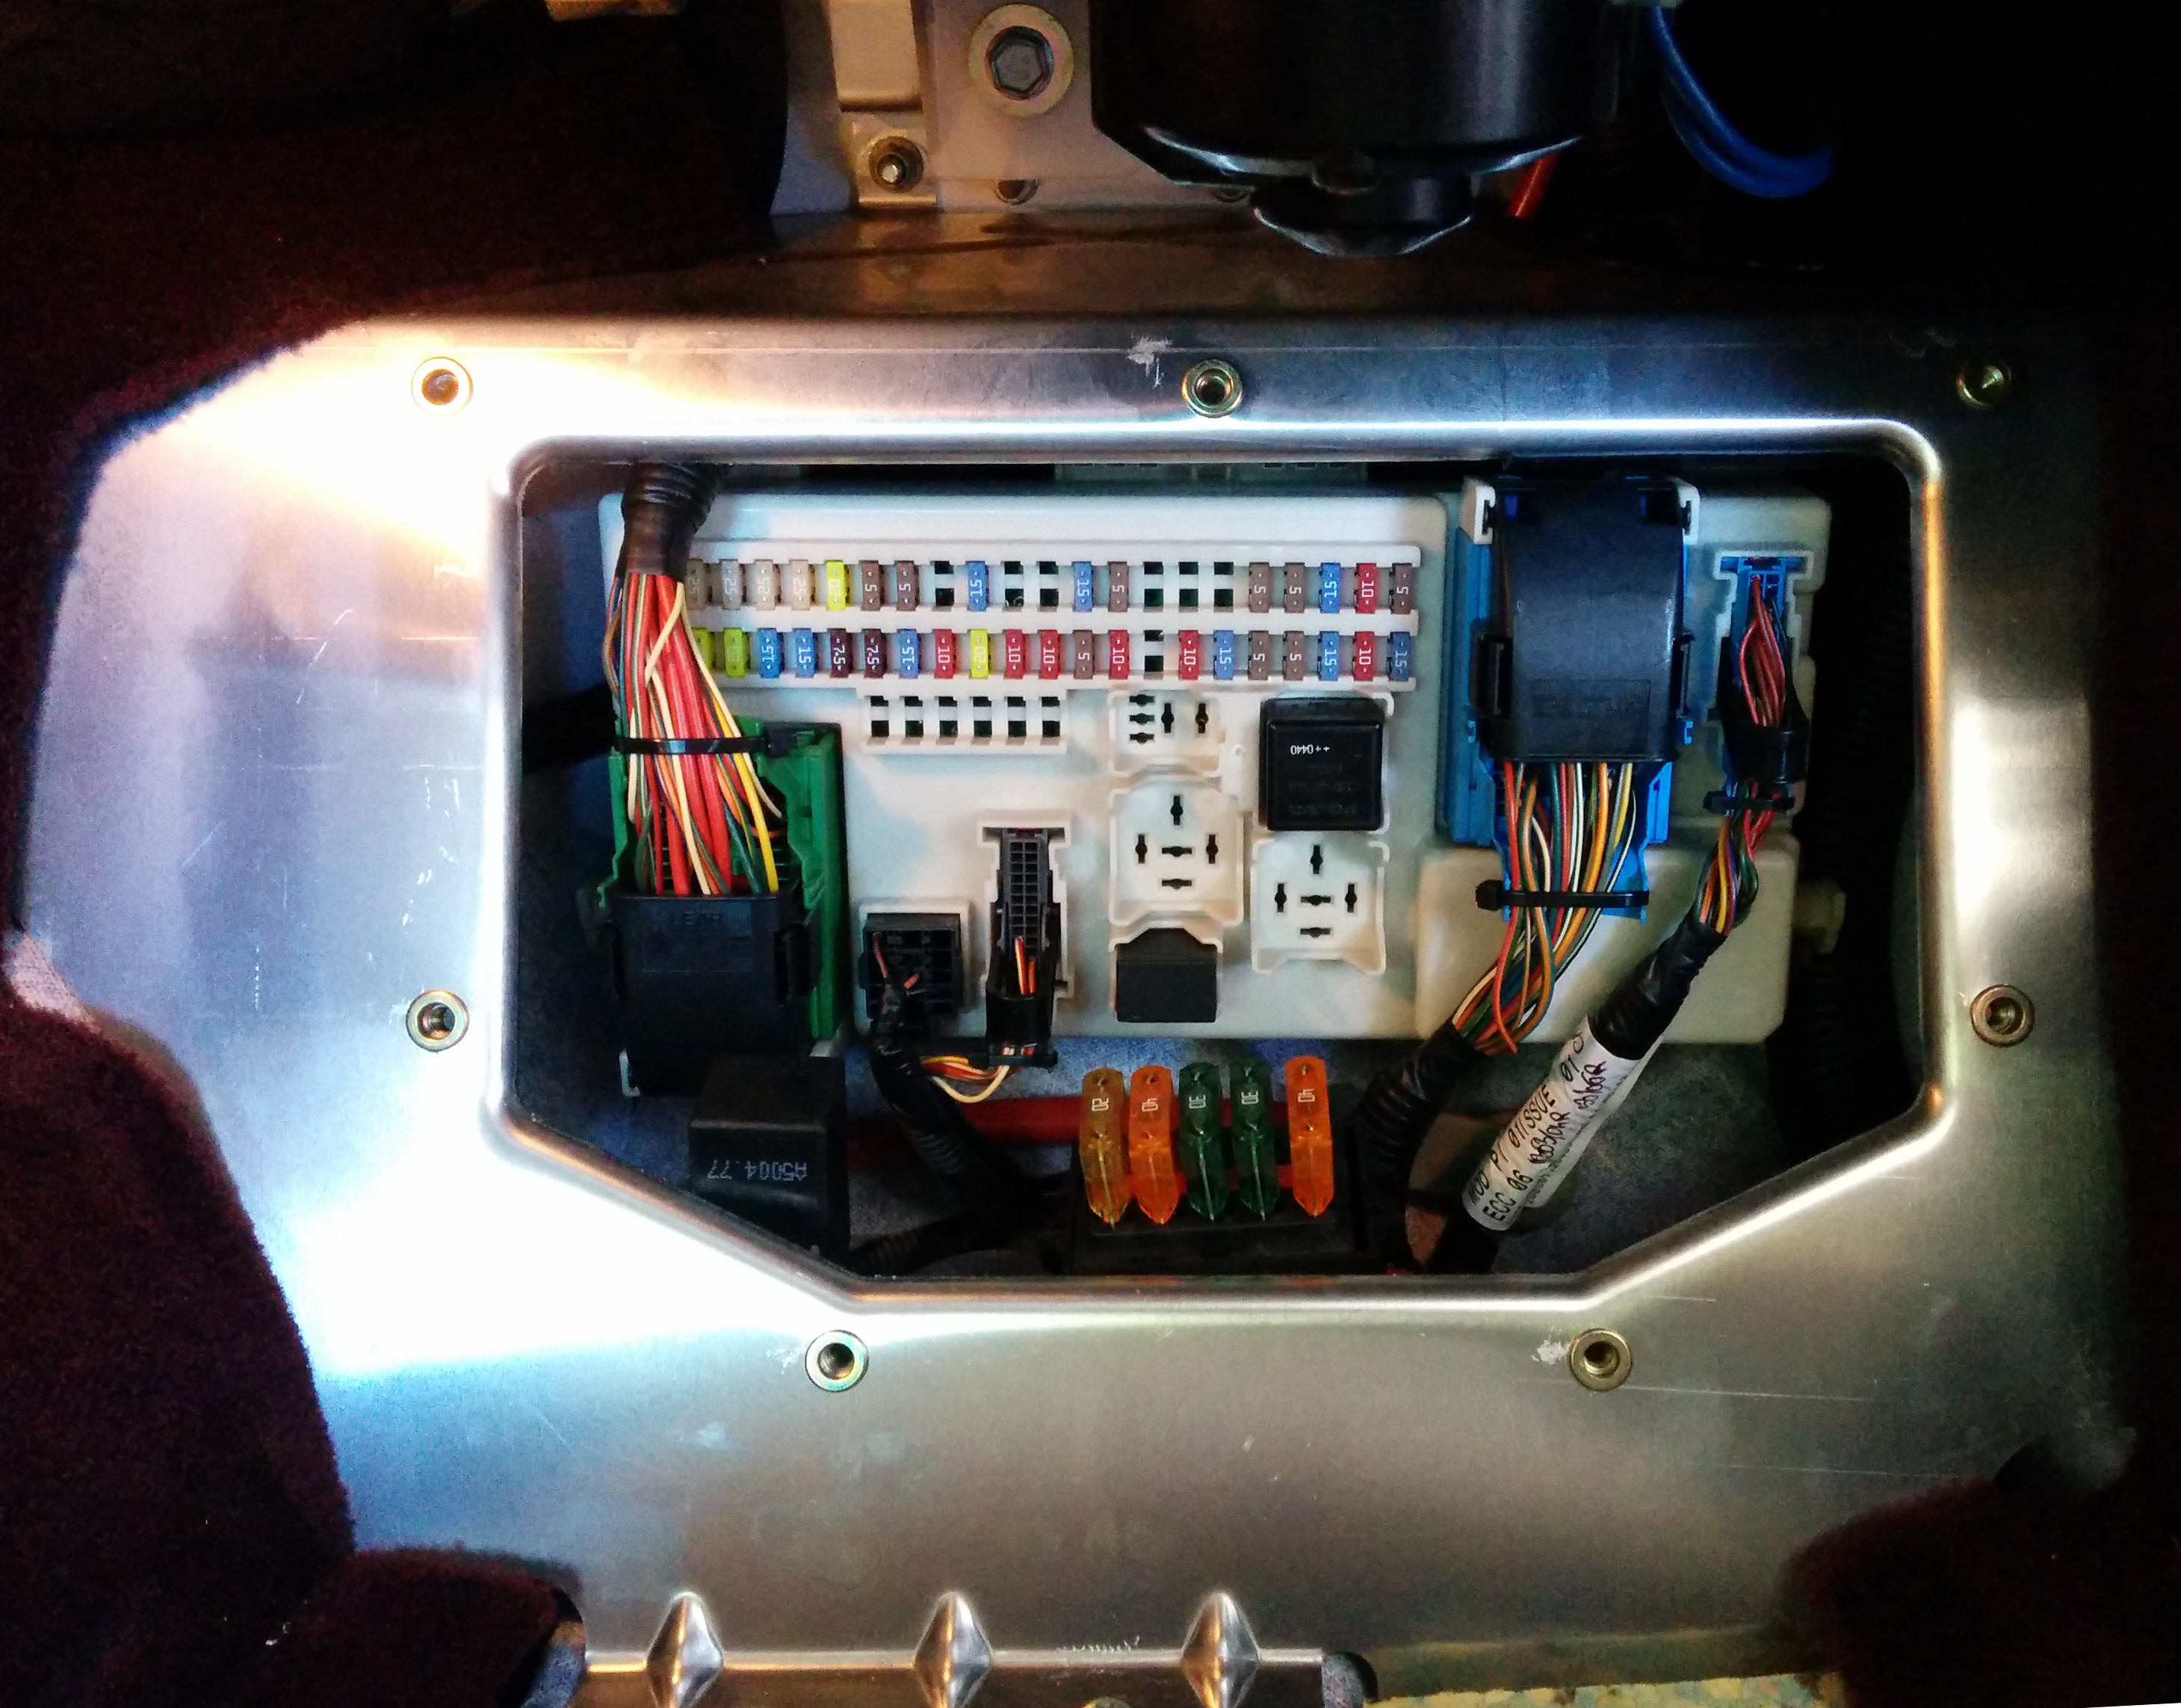
With the cover off, you now have full access to all the fuses, relays and wiring harness connectors.
Re-installation Procedure
Normally I’d have a separate video for putting it back together, but there isn’t much to this or extra wisdom to chip in. Just put it back together in the reverse order. Start all the T30 Torx bolts loosely first to make sure you can get them all aligned and started, then snug them up. I can’t find an official Aston Martin torque spec for this, but since they aren’t structural just snug them up (gee Aston, you think 7 bolts is enough to hold this small plate in place – yeesh!).
Here is a quick video of how to tackle this process.
What are all the fuses for?

Fuse F43 – 10 Amp – Multi media module display / Phone (option) / GPS tuner (option) / Media player
Fuse F44 – 10 Amp – Airbag Module
Fuse F45 – 15 Amp – Accessory Socket and illumination

Fuse F46 – 5 Amp – Deployable Rollbars (Volante) / Convertible roof switch (Volante) / Driver Information / Master lamp switch / Glove box relay / Master lock switch / Battery off switch
Fuse F47 – 5 Amp – Interior lamps (front / footwell / rear) / Trunk lamps
Fuse F48 – 15 Amp – Front windshield washer relay and pump
Fuse F49 – 10 Amp – Airbag module

Fuse F50 – 5 Amp – Spare
Fuse F51 – 10 Amp – Diagnostic inputs / Centre stack switches
Fuse F52 – 5 Amp – Start button
Fuse F53 – 10 Amp – Headlamp levelling module / power steering module
Fuse F54 – 10 Amp – Engine Fuse Box, Trunk fuse box
Fuse F55 – 20 Amp – Spare
Fuse F56 – 10 Amp – Centre console module / Sounder module / Hazard switch
Fuse F57 – 15 Amp – Diagnostic connectors / Brake pedal switch
Fuse F58 – 10 Amp – High Beam (RH)
Fuse F59 – 10 Amp – High Beam (LH)
Fuse F60 – 15 Amp – Drivers seat heater
Fuse F61 – 15 Amp – Passenger seat heater
Fuse F62 – 20 Amp – A/C module
Fuse F63 – 20 Amp – Spare
Fuse F64 – 5 Amp – AM/FM receiver module
Fuse F65 – 5 Amp – Media play / Multi media module and display / Antenna amplifiers / Audio amplifier
Fuse F66 – 10 Amp – Centre console module / Infotainment control module
Fuse F67 – 15 Amp – Spare
Fuse F68 – 5 Amp – Spare
Fuse F69 – 5 Amp – Convertible roof module (Volante)
Fuse F70 – 15 Amp – Spare
Fuse F71 – Spare
Fuse F72 – Spare
Fuse F73 – 5 Amp – Spare
Fuse F74 – 15 Amp – Fuel pump
Fuse F75 – Spare
Fuse F76 – Spare
Fuse F77 – 15 Amp – Trunk power outlet
Fuse F78 – Blank
Fuse F79 – 5 Amp – Reversing lamps / Parking Assist module
Fuse F80 – 5 Amp – Battery ‘Off’ switch
Fuse F81 – 20 Amp – Ignition Switch
Fuse F82 – 25 Amp – Passenger door module
Fuse F83 – 25 Amp – Driver door module
Fuse F84 – 30 Amp – Passenger seat power and switch pack
Fuse F85 – 30 Amp – Driver seat power and switch pack
Fuse F86 – 5 Amp – Start button, Driver and passenger seats
Cabin Stand Alone Fuses
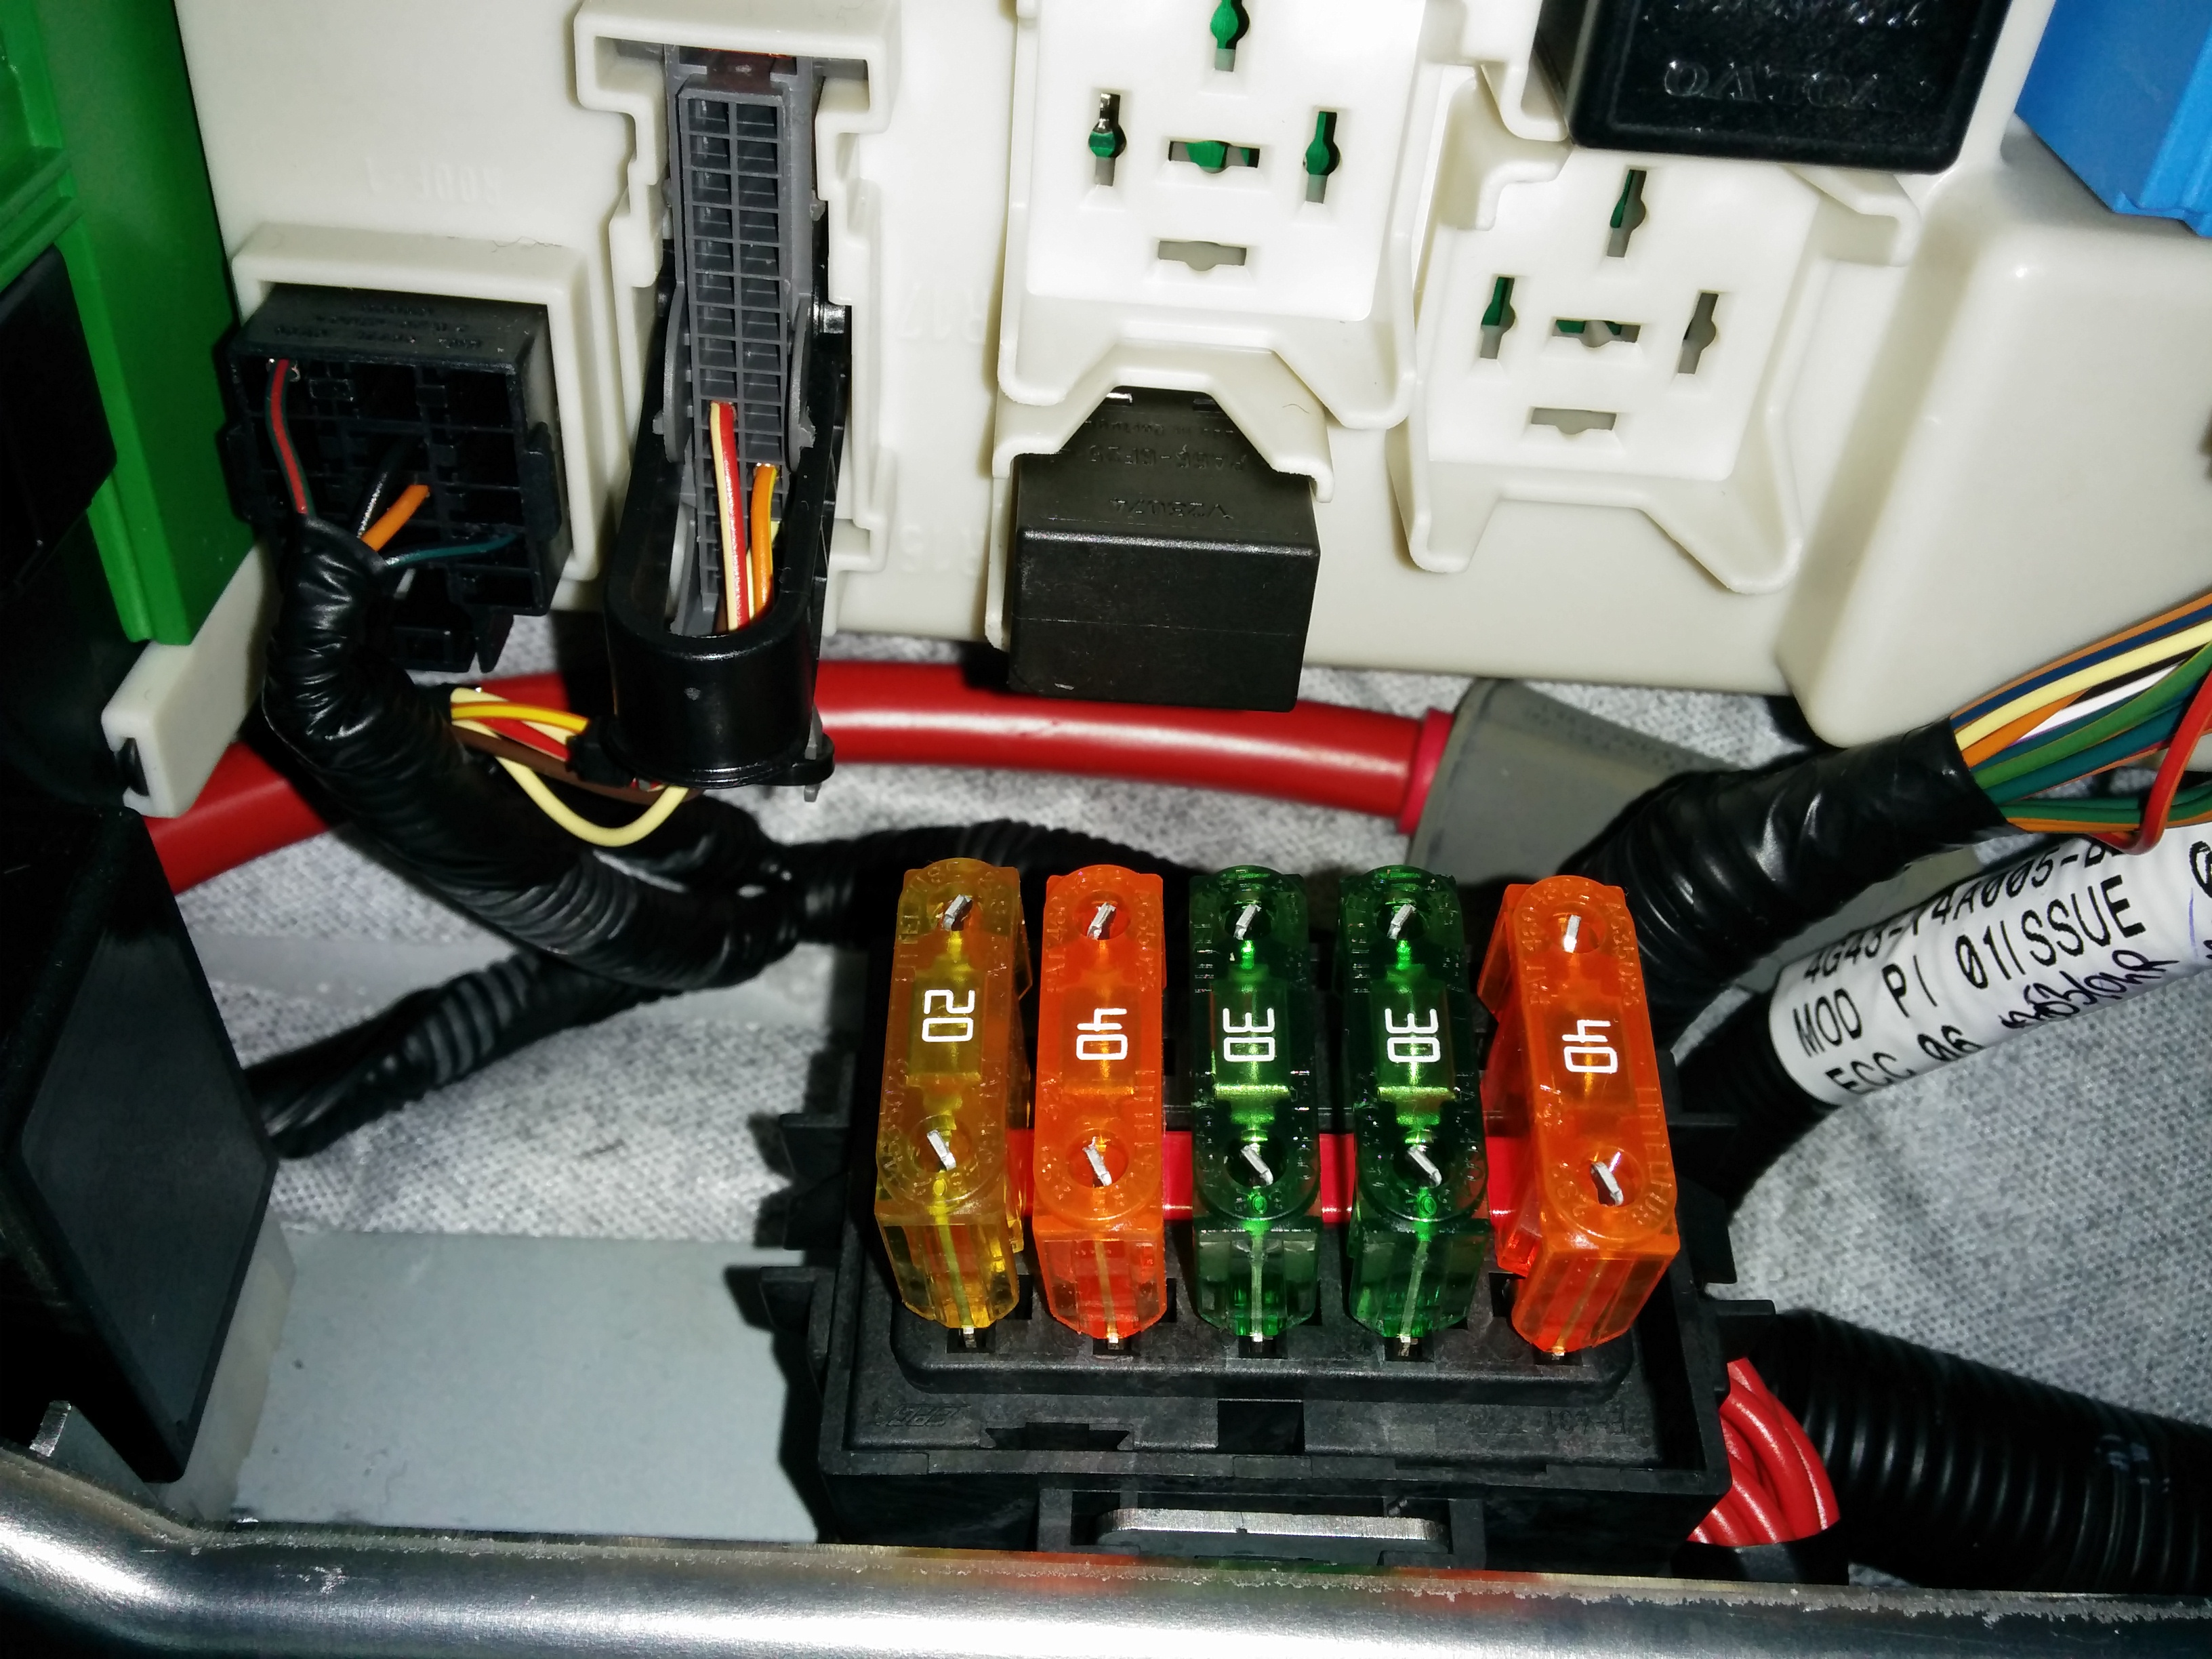
Fuse F1 – 40 Amp – Cabin Fuse box supply
Fuse F2 – 30 Amp – Cabin Fuse box supply
Fuse F3 – Blank
Fuse F4 – 40 Amp – Cabin Fuse box supply
Fuse F5 – 20 Amp – Cabin Fuse box supply

Pingback: Depressurizing the Fuel System on an Aston Martin DB9 – Aston 1936
2005 db9 coupe here. The cigarette lighter outlet has no power and my reasesrch says cabin fuse 55 which is 20A is probably the fuse for it. Only problem is the numbers on the cabin fuse block shows no number 55 fuse. Can you point me to fuse 55?
LikeLike
Hi Donny, I looked in my owners manual (glovebox) and it lists the F45 fuse as the “Accessory Socket and Illumination”. Its a 15 Amp. When I look at my article about it – should be the 2nd row third from the right. The fuse directly above it in F67 should be a spare 15amp you can try swapping in for it. Good luck. https://aston1936.com/2016/08/12/accessing-the-cabin-fuse-box-on-an-aston-martin-db9/
LikeLike
That was it. Thanks
LikeLike
Great info Steve, thank you!
If speedometer and dash light are not working check (5) AMP fuse 46 in the passenger footwell fuse box.
the fuse in question is only a 5 amp fuse, so it will not take much to cause it to blow, you have the glove box relay, tops and roof switch(volante) battery off switch, master light switch and the driver information all on this fuse a spike in any of these will cause the issue, in this case the car was on charge, was the charger disconnected from the mains on connection disconnection from the car, and in most cases we have found that the glove box motor has failed which technically it is the glove box relay not a direct connection to the motor that is on this circuit but still causes this fuse to blow and not fuse 17 strange but true,the identical part is used for the fuel flap but we do not see these failing often but these are used a lot more than the glove box, is it the lack of been used that is causing the problem
the V8 vantage and DB9 use the same instrument clusters albeit variations on years, in my experience I have not seen this as a common issue or with the wiring looms apart from the odd poor connection or bad earth, but four cars in as many weeks with instruments not showing and glove box not opening all have been this fuse blown and two I know of have required replacement of the glove box motor, the other two I have not looked at, I can \not remember the last time I replaced an instrument cluster,
LikeLike
Great information Jay, thanks for sharing. Sounds like you work on a lot of Astons?
LikeLike
Hi Steve, thanks for the reply! No I don’t work on them, but I wanted to pass on info I received with you since you did such a great job on your detailed analysis on every aspect!!
Here is a Reply from Kin-dig-it in Utah, the Car builder and TV show on Velocity network. below is the only thing he would do to an Aston, I agree! Lol
Good afternoon Jay,
The only thing I would do with that DB9 is a set of wheels with red pinstripe tires, nothing else that I could think of and there is some really great looks on their website.
Best regards, Dave Kindig
Take a look at http://bforgedwheels.com and
http://www.wheelsandmore.com
LikeLiked by 1 person
Thanks Jay. I watch Bitch’in Rides too. Cool you heard from him!
LikeLike
Hi Steve,
Great blog! Great to see all the work you have been doing!
Just checking that the fuses in footwell are all of mini size?
Thanks!
LikeLike
Ho does Amy one know where the ECU (engine computer unit) is located in Aston Martin db9 model please thanks
LikeLike
Correction: https://www.wheelsandmore.de/en/
LikeLike
Fuse F55 – 20 Amp – Cigarette Lighter Power
LikeLike
Hi Steve
Just brought my 2009 Volante home. Purred for 500 miles. At the last fuel stop 15 minutes from home, the car has a nervous breakdown. First received anti skid and break failure messages. Dash lights failed, gauges went dead, etc.
Being told that the roof module that sits inside, above the rear, right wheel well will fail and cause this havoc.
I understand it is a plug and play replacement, and in most cases does not require flashing the system? Also, this is a known failure association.
How difficult of a job is this? Module number and cost? And how do you flash the system if needed? I am 6 hrs from the closest dealer.
Thank you
Robert
646-894-2447
Navarre, Florida
LikeLike
Found this article over at Redpants.lol Check it out and see if it helps
https://www.redpants.lol/crm-replacement/
LikeLike
Anyone have any advice. I have an 07 Vantage V8. Headlights and tail lights won’t come one, but the high beams work, and the tail lights work when parked and I hit the lock button. Is there a relay or fuse that handles both. No onwers manual, so if anyone knows which fuse or relay, I’d greatly appreciate it.
LikeLike
Wow, that is a real electrical gremlin. I don’t know the details of the Vantage electrical system, but you might want to sign up for a one day subscription and download all the workshop manuals for your car. First thing I did when I bought mine. Wiring schematics and fuse details are part of it.
LikeLike
Hi – Great blog post! Would you happen to know what the supply fuses (stand alone, F1 through 5) control?
I have a strange issue – started yesterday when my daughter accidentally flicked drink into the centre console. Sat Nav went haywire, would not close etc, delay in button response. Then the whole console went dead. However, some functions (hazards, fog lamps etc) are still working. Weirdly, un ‘splashed’ features such as wipers and indicators have stopped working, as has the HVAC controls. I assume part of the circuit has failed, as things like the switch for the indicators (or I think in the US you call them repeaters) still works when operating the high beam. I was reluctant to start pulling the supply fuses out as it is dark here, however was wondering if anyone happened to know what parts of the fuse board these chunky fellows control!
IN advance many thanks, and also great blog – I think I might start being a regular poster as I begin getting a little more hands on with the old girl!
Kind regards
Paul
LikeLike
Hi Paul. Yikes! Flicked drink into center console. I’m sure that was an emotional roller coaster.
Sadly I’m not sure what the F1 through 5 control. Reviewing the Official Workshop Manual might reveal that if you have an electronic copy. They have all the wiring diagrams in the back.
There is also the wildcard of the computer aspect. If thats been zorched, a fuse won’t fix it.
If you are interested in writing up an article or two, get in touch and we can coordinate.
LikeLike
I have a problem with my 2008 DB9. I drive away and the doors lock. When I reach my destination I find that I cannot get out because the driver’s door will not open. The passenger door is ok.
If I lock and unlock several times by using the central manual locking switch it sometimes will then open but not always. I then have the choice of climbing out of the passenger door or lowering the window and opening the door from the outside. V. embarrasing. Any ideas?
Great blog.
Colin O Simpson
LikeLike
Sounds like the drivers door has a solenoid thats packing it in, or, the lever mechanism for the lock is binding up. I’m no expert at either, but I suspect taking off the door card and observing the functions would be a next step. If the levers and mechanism seem fine, then the solinoid is likely culprit. Let me know how it turns out.
LikeLike
Steve – thanks for sharing this info.
I have an ’05 DB9.
My sat nav screen is not working – no mechanical movement and the screen/control buttons are not working either. I took a look at the cabin fuse box and saw two related fuses were out – F43 (10A) & F65 (5A). I got F43 replaced with a spare, but when I attempt to replace F65 (with a spare) the fuse breaks as soon as I place it into the slot. I am assuming there is a short somewhere in the system, and wanted to know if you have heard of this before or have an idea of likely culprits for the short circuiting.
– Theo
LikeLike
Hi Theo. Uncharted territory for me I am afraid. Haven’t heard of this issue before. As you note, if its blowing the fuse immediately something significant is wrong. Shorted wire, stuck motor, etc. Sorry couldn’t be more help.
LikeLike
Hey Steve, Dr. Browns Speed Shop in Las Vegas, Nv. here. Customer has a 2005 DB9 with 19000 miles on it. Nice vehicle,like new. The entire Radio/DVD, Nav. System wont fire up at all.
Dealer said it was the Linn Amplifier.They quoted him $11,000.00 to get a new one. the system has power,all fuses good. the fan on the unit in the truck tries to run a little. i found one from Aston Bits in England for 1127.98 Lbs. exchange only. Talked to Linn and they have discontinued servicing those units. it is the lower power model #4G43 18C808 DA. I just dont want to order it unless I’m sure thats the problem. Have you or anyone run across this problem before?
Seems strange to me that the Amp. wouldn’t let the whole system fire up but these systems are so rare, anything is possible. If all else fails I’ll order the part on a gamble (It Is Vegas, we do that).
the only other thing i can think of is the whole unit in the console. Customer thought about an aftermarket Radio/amp. System but that doesn’t integrate with the Nav. any info would be a great help. Thanks, Doc Brown
LikeLike
Hi Gary. Bummer about the Amp. I’m not certain about how it all grafts together, but it might be the amp. I would keep hunting until you find the amp of the same power. Did you have the 950watt amp, or the 260, or the base?
Another source for dismantled parts in US is Pacific Motors
https://www.pacificmotors.com/product-category/aston-martin/
LikeLike
I believe it is the 260 model. There are only two Linn Amps installed in that model and it was the lower amp. version. the problem with these low production exotics is they seem to change build specs whenever the situation changes at the assembly plant. i was hoping someone else might have had the same problem. the proper Amplifier is available, so i’ll just order one and hope for the best. AstonBits has 750 parts in stock for these but I’ve never dealt with them. if you or anyone has i’d like to know what the experience was like.They look reputable, but I don’t want to
have to fly to England to get a problem resolved, if you understand where I’m coming from.
I’ve dealt with this kind of parts things on older Lamborghinis and Ferraris, you kind of get used to it after a while. Takes more research to find the right parts than to install them. thanks for your help, i hope someone else sees this and maybe can shed more light on the subject. I’ll check with
Pacificmotors and see if they might have one in stock.
LikeLike
YOU REALLY COVER JUST ABOUT EVERYTHING. BY THE WAY THAT CABIN FUSE PANEL LOOKS IDENTICAL TO A MID 2000’S VOLVO S40/V50 CEM! DO YOU KNOW ANYTHING ABOUT THE LCD SCREENS FOR ODOMETER / MESSAGES ON A 2006 DB9 ? MINE IS UNREADABLE IN DAYLIGHT.
LikeLike
Thank you for this, I was changing all the lamps in my newly purchased 2005 DB9 and managed to short out the interior lamp circuit, fixed in 10 mins with this guide.
LikeLike
My 2019 DB11 Volante sound system wont un-mute. Any suggestions ?
LikeLike
Hi, first off all I wish to thank you for your excellent posts that are hugely helpful.
Today, driving my 06, DB9 Volante I lost info from display on speed, blinkers and probably more. So I stopped and suspected a fuse, but which? The glove compartment button and access to the manual inside did not work🤔 So, google led me to your page again. Tools in the trunk gave me access to the fuse box as described. You guided me to check fuse f46, and yes it needed replacement. But there is an error in the Cabin Fuse Box Layout on your page as fuse f43 is listed twice. So counting leads you to the wrong fuse. I found a spare 5a fuse and problem solved. Have purchased spare fuses and a tool to pull them out. Greetings from Norway 👍
LikeLike
2008 DB9 Volante. Fuel cover door won’t pop open when button is pushed. Opens when I pull the emergency loop. Where is the fuse for this. Hoping it’s just a fuse.
LikeLike
Thanks for sharing, handy tips. I have a B/O sound setup in mine and folks say its underwhelming. Is it supposed to sound muted say compared to what other cars have ? Should delve into the fuses ?
LikeLike