HELP! Please join me and have some fun at AMOC Track Day 2019!

I would really like to get all the Aston Martin owners near me to come out to the upcoming AMOC West Track day.   I’ve done this every year I’ve had my Aston and it’s been a little sad when only 10 Astons show up and we have to fill the rest of the event with BMW’s and Porsche’s (fine cars, just not my tribe).  Can you make the pilgrimage for a day of fun?   Please do.

Track day ISN’T racing day.  You may feel trepidation about coming out to the event since you don’t think of yourself as a ‘racer’.  This event isn’t about racing, its about taking your car out on a safe piece of road and being able to feel it accelerate on the straights and hug the corners, all in the safety of a racetrack.   Racing other cars isn’t part of it.

In the past we’ve had all manner of the Gaydon era cars (DB9, Vantage, DBS, Vanquish and 4 doors), plus a smattering of older Vanquish, Vantage and even some DB5’s and DB6’s.   I’d love to see some new DB11 and Vantage (Dare I dream for a Superleggera to appear?)

This is a privately organized event by AMOC title, Aston owner and enthusiast George Wood.  Here is how the event generally works out:

  • We hope to fill the event with 40 Astons
  • The event will be on Sunday January 13th, 2019
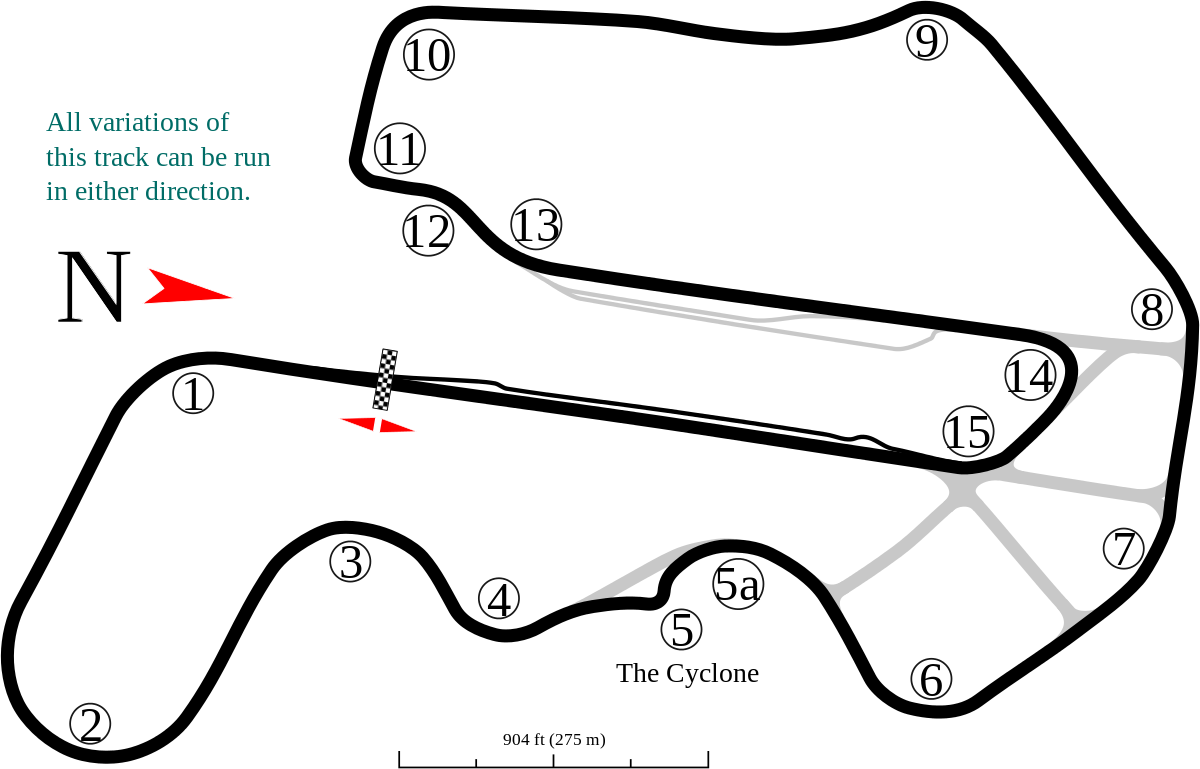
  • The event is held at Thunderhill Raceway in Northern California.
  • George asks that you sign up in advance so he knows who’s coming and can plan accordingly for food, etc.
  • Those travelling from a distance often choose to stay at one of hotels in nearby Willows, California (about 10 minutes from the track).
    • The Holiday Inn Express is new’ish and reasonably priced.  Check out all your options here.
    • You could stay in Napa Valley or Sacramento the night before and make the drive out early in the morning.  I leave Sacramento about 6am and get to the track right about 7:30am.
  • An informal group dinner is held at the Casa Ramos restaurant in nearby Willows at 7pm for those staying overnight Saturday before the event (click here to learn more about Casa Ramos)
  • Cars start to arrive at the track about 7:00am on Sunday morning.
  • George will meet you in the main building and sign you in
  • A nice buffet breakfast is served starting at 7:45am
  • At about 8:30am a drivers meeting is held to lay out the rules for the day
    • This is a TRACK day, not a RACING day.   No one is allowed to race.
    • Everyone wants to finish the day with undamaged vehicles.  Everyone respects that.
    • The group is split into Novice/Intermediates and Experienced.
      • I usually run in the Novice class – less stress and I don’t fancy myself a racer.  I just want to get out and listen to the roar of the engine on the straights and not worry about tickets for a change.
      • Passing is generally limited to safe and controlled waive byes only in specified areas.   If you are just out for a fun stress free day, this is your group
      • The Experienced group is for the go fast folks that want to push their cars a little harder.
  • Racing helmets are required.  Not to worry, the track rents them for a nominal fee for those that don’t have their own.
  • Experienced drivers are at the event and will gladly take a few laps with you to help you get acquainted with the track.   Very worthwhile if you are a complete novice and a little nervous
  • The groups alternate 30 minutes on, 30 minutes off.
    • You can pull off anytime you want, and go back out anytime you want during your session.
    • 30 minutes may not sound long, but its just right when you are doing it.
    • The 30 minutes in the pit is some of the most fun time to BS with the other owners and ogle all the cars.
  • A lunch is catered at 12 noon and everyone relaxes and refuels.
    • This is a good time for a Group photo session
  • The afternoon is more sessions until we all tire out.  I’m usually mentally done by 4pm and make my rounds to say goodbye and head for home.

You can even bring a friend!   My Sweetie usually comes along and George only asks for a nominal extra fee to cover the meals.  She usually drives a session or two.

Planning on attending?   Check out my article on how to prepare your car for a track day.  It’s easy.  I’ve blogged about my past track day outings with the group and you can see some photos and videos here.

Help me out!  Let’s fill the event completely with Aston Martins.  Download the signup form here and please send it back to George ASAP so he reserves your spot.

Also – Please leave me a comment below if you are thinking of coming, and we can say Hello in person at the event.


Here is a short video describing the event:

How to Install the Airbox in an Aston Martin DB9

I had to remove the airbox from my DB9 to replace the Front Position Lamp Bulb that had burned out (Check out that article and video here).   I’ve already shown you how to remove it in a previous article, and in this one I will show you how to reinstall it. Installing the airbox isn’t hard, and can be done with just a few basic tools. Continue reading “How to Install the Airbox in an Aston Martin DB9”

How to Remove the Airbox from an Aston Martin DB9

You may need to remove the airbox from your DB9 (or Vantage) to get to some other component that is buried in behind it.   In my case, I needed to reach the Position Lamp Bulb which had failed and is located in the deepest, darkest reaches of the inner fender area well-hidden above the airbox (check out my other video on how to change this).   Removing the airbox isn’t hard, and can be done with just a few basic tools. Continue reading “How to Remove the Airbox from an Aston Martin DB9”

Parts needed for a Full Brake Service of an Aston Martin DB9

If you drive your DB9 (or Vantage) regularly eventually you will need to service the brakes.  I started the process for my car by writing up an article about all the details of the braking system (read it here).   In another article I’ve covered the details of how to inspect your brakes to check if the pads, rotors, calipers and wear sensors are in good condition (read it here).  Based on that inspection if you’ve found that you only need to change your brake pads, I’ve created a separate article just covering that (read it here).  If you need to change more than you pads, then this article is next up for you.   I wanted to cover the parts and supplies you should round up before you do a Full Brake Service. Continue reading “Parts needed for a Full Brake Service of an Aston Martin DB9”

Seasonal Tire Pressure Warning in an Aston Martin DB9

First cool day of Fall

When I start my DB9 on the first cold day every fall it greets me with a scary “Check Tires” tire warning alert on the instrument cluster.  In frustration and alarm about all I can think is “Now what!”.  As it turns out this hasn’t been a big deal.

When the ambient air temperature falls, air gets denser.   Consequently, this causes the air pressure in a cold tire to drop slightly.  In our DB9’s, if the pressure drops below 30 psi the alert will trip the Tire Pressure Monitoring System (TMPS) to warn you of a potential issue.  A small pressure change isn’t the end of the world, but we need to follow up.   You can learn more about the TPMS system and what will cause an alarm in my more detailed article here.

I check the pressure in my DB9’s tires a few times each year, and when I set them in the summer the ambient air temp is usually 85+ degrees.  In the fall where I live (Northern California) the ambient temperature can drop to below 40 degrees, a 45+ degree change.  This appears to be enough of a change to trip the alert each fall.

Really bad photo in the dark (sorry) of the TPMS status lights in the trunk. The red LED is solid while the rest are blinking.

The next logical step is to get out of the car, open the trunk and look at the brains of Tire Pressure Warning system mounted along the top.   There are five (5) colored LEDs on the device, and you should discover at least one lit up solid and the rest blinking.  The one that is on solid is the one with a pressure problem.   In this occurrence on my car it was the Red LED that was solid (meaning the left front tire had an issue).  Each color corresponds to a specific wheel (that’s that those little colored bands are around the tire valve stem).  They are:

  • Yellow – Left Rear
  • Red – Left Front
  • Green – Right Front
  • Blue – Right Rear

[Note:  My car is a 2005, and later model cars may have a more integrated TPMS system, or even just tell you which tire is low and its pressure.  Early model owners need to follow this more manual approach].

Once you know which tire is alerting, grab your tire pressure gauge and check the pressure of that wheel (you can check out my other article on how to do this).   If its below 30 psi, you can confirm this is the problem tire.   Personally, I would recommend you check all four tires while you are at it since the others will likely be close to the same issue.

The solution now is to top up your tire pressures.   If you have your own compressor just add air to reach the ideal pressure of 36 psi in the fronts and 38 psi in the rears.  If you don’t have a compressor, and the tire is just down a couple of PSI, you can still drive safely to the nearest gas station and top of your pressure there.

Once you’ve topped up the pressure back to normal, the alert should clear.   You may need to turn off the car completely and start up again for the TPMS to recognize the issue is resolved and clear the alert on the instrument cluster.

Warning:  If you top up the air and the problem returns quickly on the same wheel, this is likely not because the outside air temp has dropped and you may have a puncture in the tire.   Time to take the car to a tire repair specialist immediately.   Don’t drive on a tire if the pressure is below 20 psi.  Don’t drive very fast or very far either or you risk damaging the core of the tire and it will need replaced (at significant expense since they have to be done in pairs).  And I wouldn’t use the can of tire repair ‘Goo’ in the toolkit of the Aston unless I was desperately stranded roadside.  That Goo may solve the problem temporarily, but you’ll be messing up the inside of the tire, the TPMS and the wheel rim.  My tires have been ‘Screwed’ a few times, check out this article.


Video

Here is a quick video of the experience I recorded on one of those days….


Changing the Front Position Lamp Bulb in an Aston Martin DB9

I hadn’t even noticed that my DB9 had one of these until a reader of this blog asked me how to change it out.   In each headlight cluster there is a small ‘Position Lamp’ that is always on when the lights are on.  You can see it here in this picture.  If you peer through the glass when the lights are off, you’ll notice the bulb is actually BLUE, even though when it’s on it appears mostly white.  Like any bulb they can burn out, and eventually one of mine did.   Is it the end of the world?  No, but one you notice it all I can think of is that it’s a one eyed pirate.   Changing this bulb isn’t trivial.   As you can see it’s right at the very front most area of the headlight pod and there is no easy access to it.   As you will learn in this article, it’s 99% prep getting to it, and 1% changing it.  Read on to learn how. Continue reading “Changing the Front Position Lamp Bulb in an Aston Martin DB9”

How to Replace the Wheel Center Caps in an Aston Martin DB9

Rolling along slow in or out of the garage I could hear a quite ‘Rattle – Rattle – Rattle’ in my DB9.  Not like a loose nut and bolt, but a quieter shuffling rattle.  While I was washing the car one day I finally found the source – the Wheel Center Cap on one rim was loose, and could flop around making the noise.

Epoxy Repair to back of tabs. Yes, that is a Ford logo on there too.

The center caps are a beautiful painted piece with the Aston Martin wings on them, but they are still just made out of plastic.  They just press/snap fit into the center hole of each wheel.  13 years in the California sun and heat takes its toll, and the fingers on the back of the caps weren’t springy any more.  Each time the tires have to be changed they need to be removed, so that’s at least two or three times.  Worse yet, I eventually discovered the one in question had been damaged, and a quick fix with some epoxy employed to hold the cracked tabs in place.  DPO (damn previous owner).

Changing them is a pretty simple task, and here’s how to do it. Continue reading “How to Replace the Wheel Center Caps in an Aston Martin DB9”