
 One of the best ways to look after your Aston Martin DB9 is with regular service. Most of the 1 and 2 year service work can be done by anyone with a modicum of mechanical aptitude and the desire to ‘Go for it’! My articles and video’s below should help guide you along in the process.

More or less you alternate between a 1 year and a 2 year service procedure. Yes, they say every 1 year OR 10K miles, but rarely do DB9 owners pack on more than 10K miles in a year, so we’ll just call them the 1 year and the 2 year. The 1 year service is a simpler Oil and Filter change, the 2 year is the more elaborate service (covered in a separate collection).
 The Dealer mechanics use this checklist to help them keep track and record what they find as they complete the inspections that are part of each service. I have digested this checklist for you and have a written out and slightly more organized version of it at the bottom of this page if you’d like to check it out.
Much of the checklist is inspections. I think these are important. The idea is to catch something in a partly degraded condition and act upon it prior to it becoming a crisis. In most cases, it will be time well spent.
I’d suggest you fill out this checklist each time you do your own service, sign and date it. Keep the record as part of your cars maintenance history (along with the receipts for the parts you buy stapled to it – oil, filters, etc), and it will be important to have this someday if you pass the car along to a new owner. They will be thrilled to know what was done and when. It still counts even if the work wasn’t done at the main dealer!
Steve’s Version of the 1 Year Service
I’ve read the lists and have done my own service a few times now, making articles and videos of many of the steps. I will confess now that I don’t do all the steps explicitly every year. For example, if I know the tire pressure monitors were on the correct wheels last year and I didn’t change my tires, why would I inspect them again? A few of the steps I don’t know how to do well yet, for example if I “Inspect the door locks, latches hinges and joints” what exactly would I lubricate with what and how much? I will learn these things over time and add to the knowledge here [feel free to comment below and let me know what you do].
Here are all the article (with videos) that I have prepared so far. Enjoy!
- Parts you will need for a 1 year service
- Disconnecting your Battery
- Protecting the Fenders
- Single Point Jacking of your Aston Martin DB9
- Putting you Aston Martin DB9 onto Jack Stands
- Removing your Aston Martin DB9 Front Under Tray
- Draining the Oil from your Aston Martin DB
- Removing the Throttle Body from your Aston Martin DB9
- Changing the Oil Filter on your Aston Martin DB9
- Cleaning the Throttle Body of your Aston Martin DB9
- Installing the Throttle Body on an Aston Martin DB9
- Refilling the Oil in your Aston Martin DB9
- Removing a Road Wheel on your Aston Martin DB9
- Inspecting the Brakes in an Aston Martin DB9
- Bleeding the Brakes on an Aston Martin DB9
- Checking and Adjusting the Windshield Wiper Jets Spray
- Checking the Tire Pressures on an Aston Martin DB9
- Tire Pressure Sensors on an Aston Martin DB9
- Inspecting the Tires on an Aston Martin DB9
- Measuring the Tire Tread Depth on an Aston Martin DB9
- Cleaning the Wheel Rims on your Aston Martin DB9
- Inspecting the Sway Bar / Anti-Roll Bar Bushings
- Installing the Front Under Tray on an Aston Martin DB9
- Installing a Road Wheel on an Aston Martin DB9
- Lowering your Aston Martin DB9 Off Jack Stands
- Torqueing the Wheel Nuts on an Aston Martin DB9
- Reconnecting the Battery
- How to Crank the Engine over without Starting to avoid a ‘Dry Start’
- Adjusting the Time on the Clock in an Aston Martin DB9
- Performing a Seat Module Calibration on an Aston Martin DB9
- Recalibrating the Door Window Glass Auto Drop Positioning on an Aston Martin DB9
- Relearning the Misfire Correction Factors on an Aston Martin DB9
- Resetting the Time for Regular Service Indicator
Aston Martin’s Official 1 Year Checklist
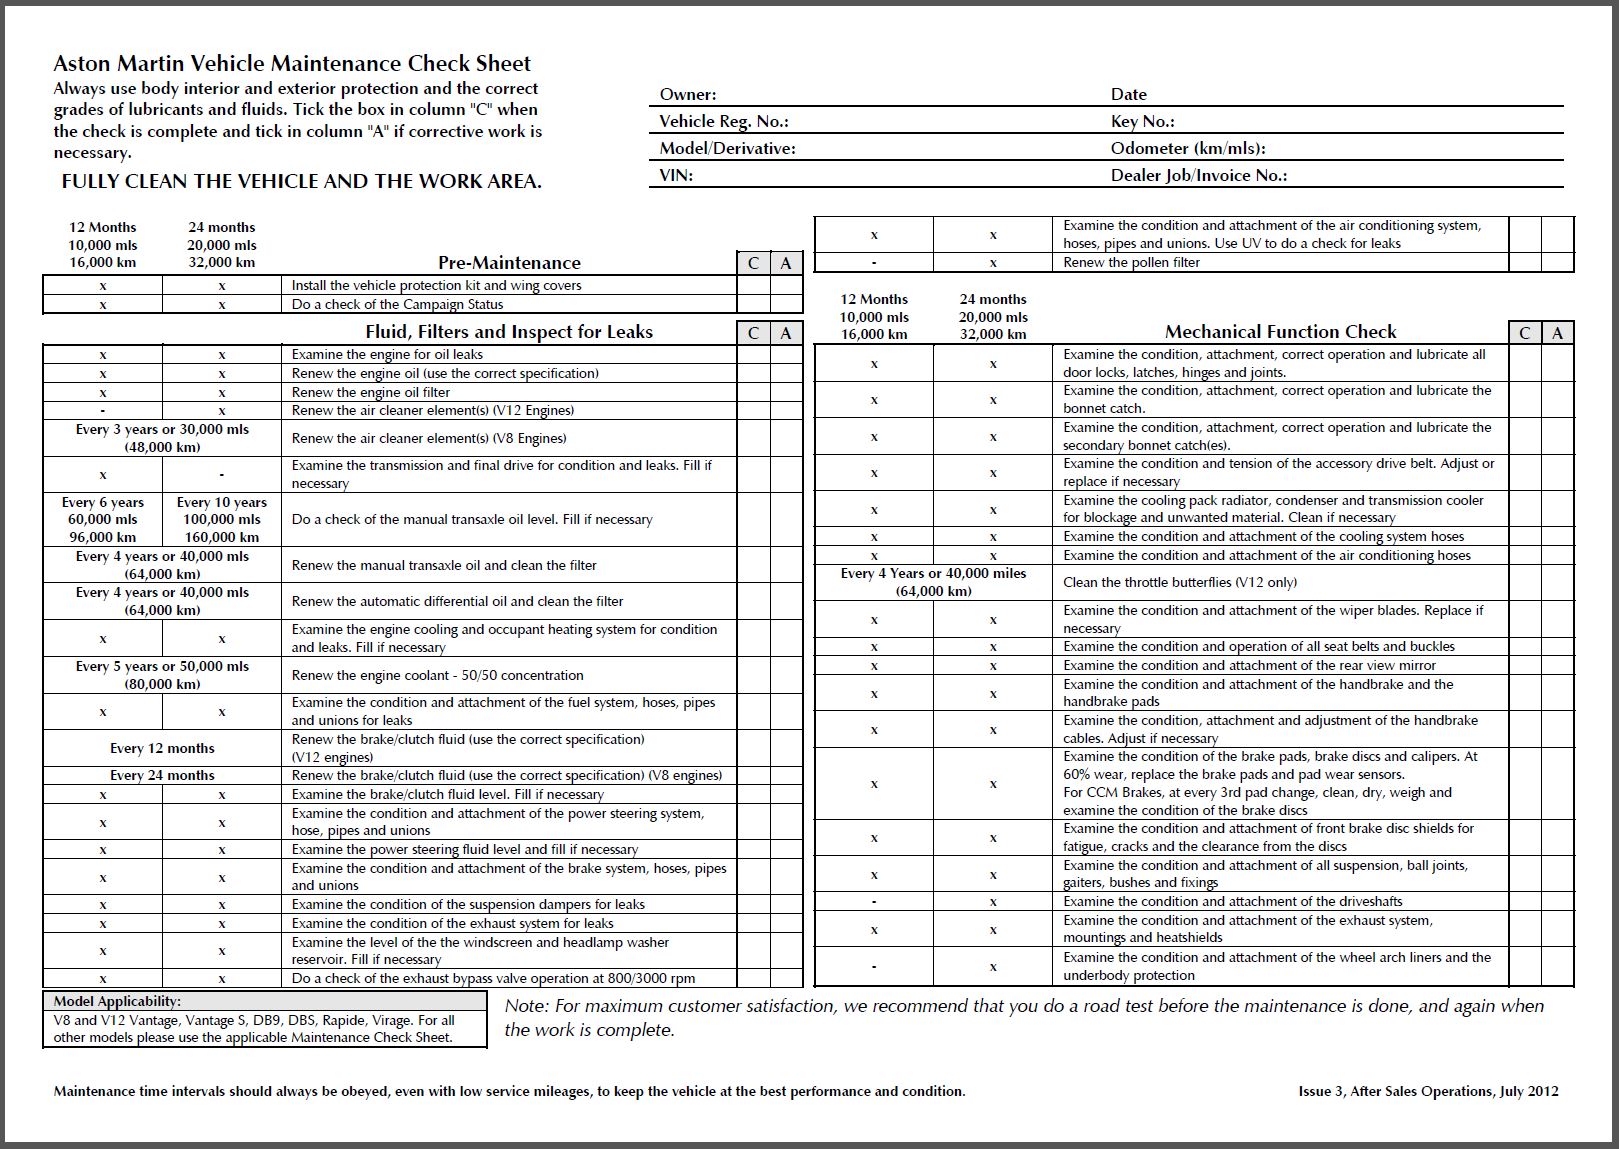 I have reviewed the Owners Manual and the Dealer checklist and created this list of the service steps below. They state the Dealer Checklist is for “V8 and V12 Vantage, Vantage S, DB9, DBS, Rapide, Virage.” My list below is tailored just for the V12 cars, and of course my articles and videos are showing the work done on my own 2005 DB9 Coupe – methods on the other models might vary.
Pre-Maintenance
- Pre-Maintenance Road Test Evaluation
- Install the Vehicle Protection Kit and Wing Covers [install fender covers]
- Do a check of the Campaign Status [check for recalls in the AMDS]
Fluid, Filters and Inspect for Leaks
- Engine Oil & Filter
- Examine the engine for oil leaks
- Renew the engine oil (use the correct specification)
- Renew the engine oil filter
- Power Steering
- Examine the condition and attachment of the power steering system, hose, pipes and unions
- Examine the power steering fluid level and fill if necessary
- Cooling System
- Examine the engine cooling and occupant heating system for condition and leaks.
- Examine the Coolant fluid level. Fill if necessary
- Fuel System
- Examine the condition and attachment of the fuel system, hoses, pipes and unions for leaks
- Brakes
- Renew the brake/clutch fluid (use the correct specification)
- Examine the condition and attachment of the brake system, hoses, pipes and unions
- Examine the brake/clutch fluid level. Fill if necessary
- Transmission and Final Drive
- Examine the transmission (Manual or Automatic) and Final Drive for condition and leaks.
- Examine Automatic Gearbox Fluid Level. Fill if necessary.
- Examine Final Drive/Differential Gearbox Fluid Level. Fill if necessary.
- Other
- Examine the level of the the windscreen and headlamp washer reservoir. Fill if necessary
- Examine the condition of the suspension dampers for leaks
- Examine the condition of the exhaust system for leaks
- Do a check of the exhaust bypass valve operation at 800/3000 rpm [You can omit this step if you have Uncorked your Exhaust by removing Fuse 22 – Check out my Article and Videos on this]
- Examine the condition and attachment of the air conditioning system, hoses, pipes and unions. Use UV to do a check for leaks.
- Every 4 years
- Renew the manual transaxle oil and clean the filter
- [Note – My Owners Manual lists this as every 3 years, but the Dealer Checklist has it at every 4 years. Since the Dealer list is from 2012 and much newer, I am going to go with that interval]
- Renew the automatic differential oil and clean the filter
- Renew the manual transaxle oil and clean the filter
- Every 5 years
- Renew the engine coolant – 50/50 concentration
- Every 6 years
- Do a check of the manual transaxle oil level. Fill if necessary
Mechanical Function Checks
- Examine the condition, attachment, correct operation and lubricate all door locks, latches, hinges and joints.
- Examine the condition, attachment, correct operation and lubricate the bonnet catch.
- Examine the condition, attachment, correct operation and lubricate the secondary bonnet catch(es).
- Examine the condition and tension of the accessory drive belt. Adjust or replace if necessary
- Examine the cooling pack radiator, condenser and transmission cooler for blockage and unwanted material. Clean if necessary
- Examine the condition and attachment of the cooling system hoses
- Examine the condition and attachment of the air conditioning hoses
- Examine the condition and attachment of the wiper blades. Replace if necessary
- The Owners manual says to replace the wiper blades every 20,000 miles [seems odd to make this a mileage based requirement, and I personally would defer to an annual inspection and replace only when needed]
- Examine the condition and operation of all seat belts and buckles
- Examine the condition and attachment of the rear view mirror
- Examine the condition and attachment of the handbrake and the handbrake pads
- Examine the condition, attachment and adjustment of the handbrake cables. Lubricate and adjust if necessary
- Examine the condition of the brake pads, warning leads, brake discs and calipers.
- At 60% wear, replace the brake pads and pad wear sensors.
- For CCM Brakes [Carbon Ceramic], at every 3rd pad change, clean, dry, weigh and examine the condition of the brake discs
- Examine the condition and attachment of front brake disc shields for fatigue, cracks and the clearance from the discs
- Examine the condition and attachment of all suspension, ball joints, gaiters, bushes and fixings
- Examine the condition and attachment of the exhaust system, mountings and heatshields
Electrical Function Tests
- Measure and record the battery voltage
- Examine the condition and attachment of the battery connections. Adjust if necessary.
- The owners manual service schedule says to ‘Clean and Grease Battery Connections’
- Do a functional test of the battery disconnect switch
- Examine the condition and attachment of all lamp units
- Do a functional test of all of the lights and the auto-sense function
- Do a functional test of all warning indicators
- Do a functional test of the audible warnings and security system
- Do a functional test of the horns
- Do a functional test of the windscreen wipers and auto-sense function
- Do a functional test of the windscreen and headlamp washers
- Examine the condition and attachment of the door mirrors
- Do a functional test of the fold-back door mirrors
- Do a functional test of the electrically operated windows
- Do a functional check of the service indicator. Reset the indicator
- Renew the batteries in the remote key fobs
- Renew the tracker tags (where applicable)
- Every 70,000 Miles
- Renew the Spark Plugs [Ha – Ha – Ha like we can go that far with the coil packs and plugs being replaced. Funny.]
Anti Corrosion Check
- Examine the body panels and under body for corrosion. Work from the inside out (do not include stone chips)
Wheels and Tires Check
- Make sure that the tires are the correct size, type and orientation
- Measure and record the tire tread depth
- Examine the tires for uneven or excessive wear or damage
- Measure and if necessary, adjust the tire pressures
- Do a torque check of the road wheel nuts
- Examine the road wheel rims for inside or outside damage. Record all damage
- Make sure that the color coded tire pressure monitor system valve caps are on the correct wheels (if applicable)
- Do a functional test of the tire pressure sensors
- Do a check of the date of the tire inflation kit
Final Checks
- Degrease [clean] the windscreen
- Do a road test
-
Including operation of all auto gearbox modes (Auto, Sport, Touchtronic [Paddle Shift], Reverse)
-
- Do a functional test of the ABS and the traction control operation
- Check the operation of all seat belts and buckles
- Make sure that the drain for the fuel filler bowl is clear
- Do a functional test of the adaptive damping system
