In a previous article I discussed how to remove the chassis stiffening ‘Shear Panel’ from my DB9 (read about it here). I was removing it to access the exhaust system hidden above it while I was tackling installation of a Secondary Cat Delete kit (read more about that here). Reinstalling the panel is the last step of the process, and it’s important to get it right so your DB9’s structural rigidity is restored. Here is how I did it. Continue reading “Installing the Shear Panel in an Aston Martin DB9”→
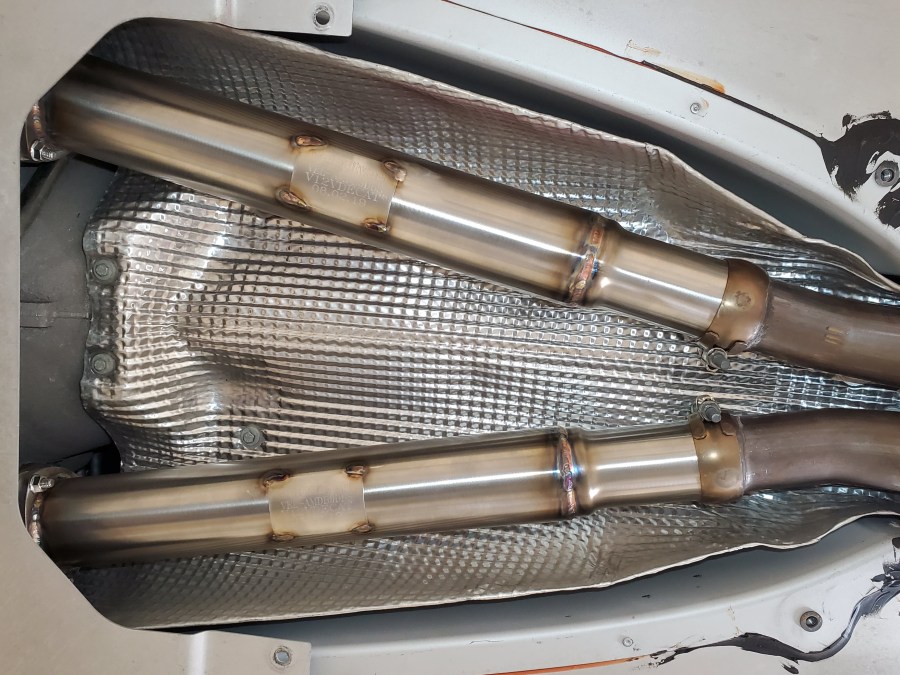
If you are a member of any of the Aston Martin Owners FaceBook Group or online Forums (like PistonHeads or 6SpeedOnline) you will likely have seen some chatter talking about fitting a ‘Secondary Cat Delete Kit’ (SCDK) in your car to increase the power and improve the sound. It’s not like the stock DB9 has a deficiency in either department already, but its promise is a simple change will give you more of each. Intrigued by this I couldn’t resist researching how to tackle this.
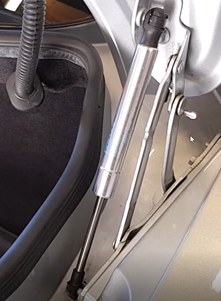
Ever since I bought Aston 2209 the boot has effectively closed under free fall. We have of course learnt to be careful with it, but after a couple of frighteners where we have dropped it and it has slammed shut I decided for the small amount of money involved it was crazy not to resolve the problem. The potential for breaking the rear glass really exists. The boot lid is supported on gas struts that are part of the hinge assembly but once the gas has started to leak away they loose their effectiveness. Even when you have removed an old gas strut you will find it very hard to depress so you might think there is nothing wrong with it. Unfortunately there is, so bite the bullet and buy a couple of new ones. Continue reading “Don’t slam your DB9’s Bootie – Changing the Boot Lid Gas Strut on an Aston Martin DB9”→
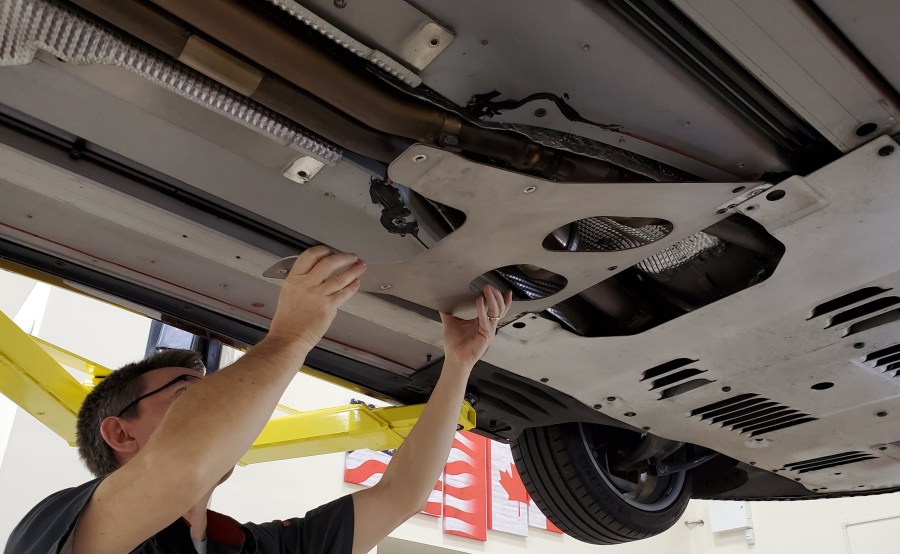
One of the terrific aspects of any Aston Martin is the handling. Part of the magic to that is creating a car that is ‘stiff’, meaning that it doesn’t twist and flex during cornering or over bumps. The DB9 is no exception, and part of that body stiffness is created by a thick aluminum plate underneath the bottom of the car in the center of the vehicle, the “Shear Panel”. There is nothing fancy to it, it’s just a metal plate bolted up rigidly to the left and right hand sides of the transmission/drive shaft/torque tube tunnel the runs from front to back. The tunnel itself is a weakness to the car, so the plate bolts across the bottom of the tunnel to make the vehicle stiffer.
Why would you care about this? You probably wouldn’t unless you need to do some work on the things that are up inside that tunnel, above the Shear Panel. In particular, the dual exhaust pipes run along there. For me, I am planning on installing a ‘Secondary Cat Delete Kit’ which is a fancy way of saying removing the two rearmost catalytic converters and replacing them with a straight pipe kit offered from several vendors (more about that in a future article). Any maintenance to the center portion of the exhaust system will require removal of the Shear Panel.
So, either it was a coincidence or something to be remembered in the future. Just before Christmas I washed Aston 2209 and put it in the garage where it stayed for nearly 3 weeks over the Christmas / New Year period. In the New Year we decided to go to Anglesey for a day trip and a walk along Newborough Beach to Llanddwyn Island followed by an early evening dinner at The Oyster Catcher in Rhosneigr.
Newborough Beach to Llanddwyn Island
The Oyster Catcher in Rhosneigr
I got in the Aston and selected “R” and didn’t move …… strange I thought, so I gave it a little more right foot and with a loud bang/crack we were moving. I put it down to the brake pads and discs/rotors being stuck and thought no more about it. I guessed that the wheels having just been washed and rinsed off meant that there would still be water between the pads and the discs/rotors. As you will have probably seen when you leave a car for a few days following rain or washing a light rust discolouration can take place on the surface of the discs/rotors which disappears as soon as you start driving. Aston 2209 had been put away with wet discs/rotors and stood for about 3 weeks so I suspect that there was a bond created between the pads and the discs/rotors.
So off we went on our day out but it was soon apparent that something wasn’t quite right. As we pulled out onto the main road there was quite a loud knock that sounded like something banging against the underbody of the car. You start to think of all the worst-case scenarios …. Is it gearbox? Is it the differential? What is it?. I drove on carefully with no other noises and in fact kicked the Aston down and accelerated along the country lane and nothing, no noise at all. I then had to stop when a set of traffic lights further along the road changed to red, as I started to brake we heard the knock again. When we set off again “knock” ….. I was now convinced that we most probably had a bush that had worn and quickly found that as long as I didn’t accelerate hard from rest or brake hard the Aston drove perfectly so we continued on and had a fantastic day.
A few days later I got Aston 2209 up on the lift/ramps to see what the problem was. Out came a couple of levers to start levering all the ball joints and bushes on both sides of the rear end with a bias towards the LHS as that was where the sound seemed to be coming from. I missed the offending bush the first time around and wrongly came to the conclusion that it must be something else.
I have been wanting to change the differential oil for a while and as I had everything already bought and available I thought I would do it now to rule out any damage that might be evident in the differential. My thinking was that if the knock was coming from the differential then when I dropped the oil there might be some metal bits on the magnetic drain plug. After the oil had fully drained I checked the filter which was relatively clean and there was no evidence of anything metallic on the drain plug.
A warning when undoing the filling plug take care you don’t do as I did and damage the oil cooler fins as the filling plug comes loose. I had the socket on a breaker bar and the filler plug being quite tight caused me to swing the breaker bar into the cooling fins, fortunately no real damage done.
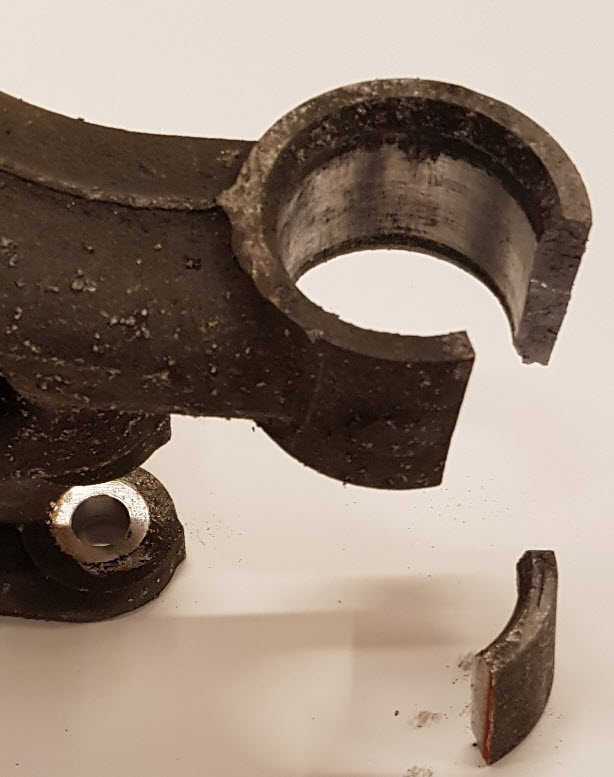
On the second pass of playing with the levers I found the offending bush. What I found was not actually a damaged bush but in fact a fractured outer bush mounting in the lower wish bone suspension arm on the LHS. The bottom outer bush mounting in the arm was completely cracked across its width as you can see in the photo indicated by the arrow.
The 3D drawing extracted from my workshop manual shows a good view of the rear subframe and the various suspension item locations. I have highlighted the Lower Wishbone.
Once the mounting bolts had been removed from the lower wishbone it was a simple manoeuvre to lever it downwards and out.
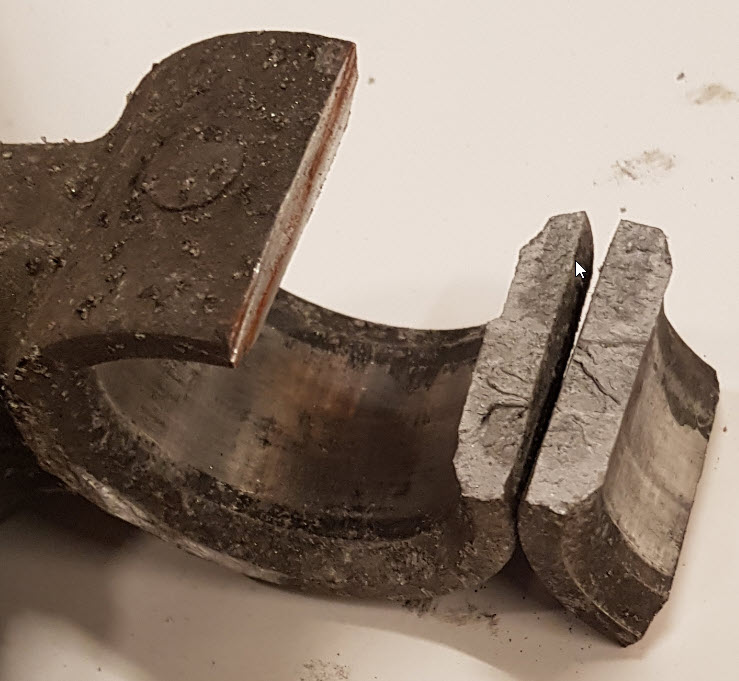
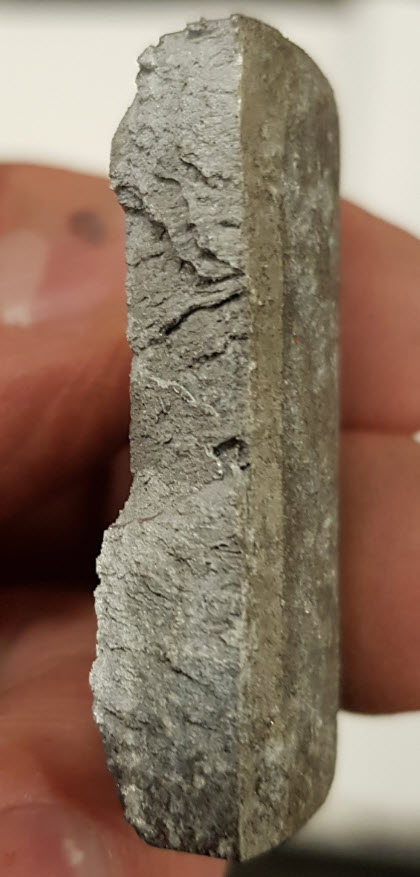
With the wishbone out it was easier to see the extent of the fracture that extended the full width of the bush mounting area.
The bush is an interference press fit into the wishbone arm at the outer end where the wheel hub mounts. Having been cracked the required interference fit is compromised and the bush is able to move backwards and forwards when mounted in the car and as it moves from one extent of travel to the other it “knocks” against the body of the wheel hub. The bush was very easily tap out.
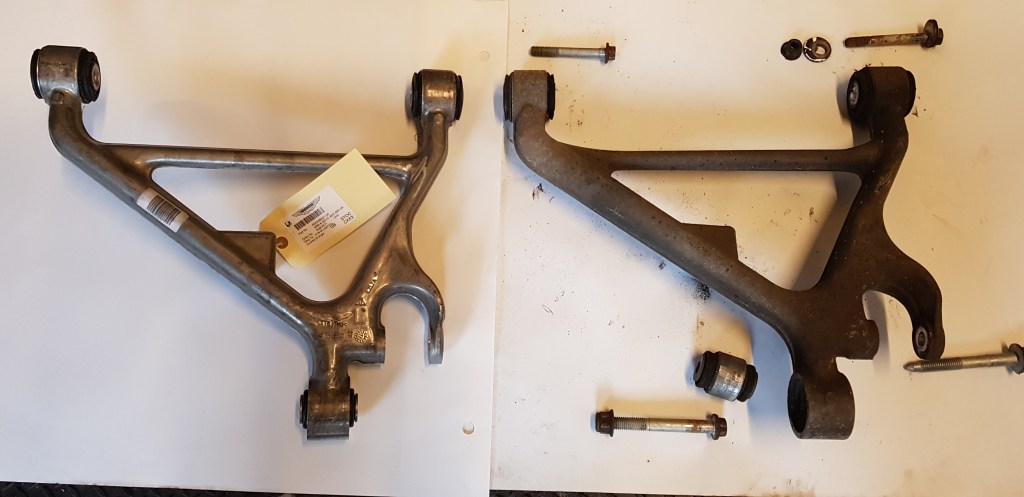
NEW and OLD
The new wishbone comes complete with factory pressed fit bushes already in place. Installation of the new wishbone arm is a direct reversal of the removal sequence however there is one aspect that must be adhered to. Rubber bushes have a predetermined operating range from the as installed position. Bushes are not a rotating joint, the bush is designed to allow say a defection / part rotation of +/- 10-20 deg dependant on the characteristics of the rubber and the application.
Aston require that on assembly none of the bolts are torqued up until the ride height is set and to do this requires movement of the suspension to simulate the weight of the car + passengers + Fuel + luggage.
Ride height measurements
How do we do this? In my case I have the advantage of a car lift so what I can do is lower the car so that the disc/hub rests on wooden blocks on the floor thus compressing the suspension as though the wheel was on the ground
If you don’t have the benefit of a car lift and you are on axle stands you can use a jack from the floor under the disc/rotor but take care that the disc does not rotate. Apply the handbrake particularly is your Aston is a manual drive as you will not have the benefit of the gearbox being locked in park.
So the car has to be lowered onto my wooden blocks until we reach a normal ride height at a hub centre to underside of rear bodywork dimension of between say 360 – 390mm, but these dimensions are based on the following according to my manual.
“2 x 68kg people in the car + 14kg luggage in the boot (trunk) + a full tank of fuel” ….. really !!!!
I’d better start bringing people in off the street and weighing them as I weigh about 85kg so that would give an uneven weight distribution, besides I can’t be in the car and torqueing up the bolts at the same time and I’ve got less than half a tank of fuel in anyway !!!!!!!!!!
Since the height is to be set without being fully loaded I decided that if the dimension was a little higher than the target 276.5mm then it wouldn’t matter too much as there is quite a wide tolerance of +/- 15mm. This dimension is only to set a neutral position for the rubber bushes so they are in their optimum position for least stress during normal running.
With the lower wishbone bolts in place (snug) but not torqued up the bushes will rotate on the bolts to the correct neutral position as the Aston compresses the suspension to the correct ride height as it sits down on the wooden blocks. With the lower wishbone positioned to the ride height the fixing bolts can then be torqued up. If you simply torque up the bolts with the wishbone in the lower position you are effectively fixing the bushes in a very low position. When the rubber of the bush in the wishbone rotates as the car sits down on the suspension it may, as a result, already be at the end of its working limit with just the weight of the car. The reality is that as we drive the bush has to accommodate +/- movements from the norm and if the bush is already at its extreme position it will then be over stressed and lead to premature failure due to the rubber failing.
With everything back together and checked all that remains is to refit the inner wing liner. As it’s still winter and damp, I have decided to defer the surface rust treatment of the subframe until the summer when everything will be a lot drier and more conducive to doing a good job and getting a good result.
Even though I removed the inner wing liner you could do this job leaving it in place. Unfortunately at the time I didn’t know that the nut for the front inner wishbone was captive as it was hidden behind the inner liner. You now know so you can remove the bolt without having to get a spanner on the nut.
A video of the search for the problem is below and includes the steps to do the repair. If you ever have this problem don’t be afraid to handle it yourself as it’s quite straight forward.