

Last November I was replacing the coil packs and spark plugs on my 2011 Rapide and the oil in the inlet manifolds and throttle bodies made it pretty clear that my PCV valves were past their best.
I decided to replace the PCV valves with these £15.98 metal ones from i6 Automotive (check it out here) in Sheffield, England. But since it would take them a few weeks to get to me here in Adelaide, South Australia I set to thinking.  On my diesel 4wd one of the first modifications you do is to fit a catch can into the PCV system. Good ones are incredibly effective at removing the oil mist and preventing it being recycled through your engine.
After quite a lot of Googling, I came across this kit for the v8 vantage offered by Redpants.lol (check it out here), but couldn’t find anything suitable for the V12. So with the PCV harness already in pieces to refit the valves I started fiddling…
Since the Rapide is mechanically almost identical to the DB9 I was making extensive use of Steve’s website and emailed to thank him. Somehow I volunteered to write up the catch can installation…

[Editors Note: Ah-hah! Sucked another person in. Kidding aside, this article was contributed by Ian Watson. Great Job Ian! Thank you for sharing your insight and skills with other owners. This approach would likely work for the DB9 as well.]
Which Catch Can?
I wanted something functional, but also something nicely made that would look quite “factory” on the car. My car doesn’t do huge mileage so the can itself didn’t need to be huge, but I wanted good-sized inlets and outlets to make sure I wasn’t restricting flow through the system. I settled on a Mishimoto baffled oil catch can kit that is available for about $254 USD (check it out here) as they are easily available here in Australia. They are well made and are both baffled and have a bronze filter to make sure that the oil mist doesn’t just pass straight through. The kit includes brackets, clamps and about 4 ft of 1/2″ hose (which is plenty). They’re also available in a variety of lurid colors if that suits your taste. I went for classic black.![]()
Plumbing it in
The tricky part was working out how to plumb it in. Steve has a photo of the standard PCV harness on the site.

In this standard setup, air flows out of the air-oil separator and into the harness at the point I’ve marked “A” before being divided at the Y-piece and flowing through the two PCV valves. In both these photos the harness is roughly as you’d see it, installed in the car, if you were standing by the radiator grill looking under the bonnet.

I wanted to take a hose from the air oil separator (nestled in the vee of the engine) to the catch can, then back from the catch can to enter the harness at the Y-piece. But the best way to route the hoses was in the space behind the right hand bank of cylinders between the engine and the firewall. So to enable this, when I rebuilt the PCV harness I reversed the Y-piece per the photo on the right. The long piece of pipe in this photo is the return from the oil catch can. A closer view of how I did it is shown below. 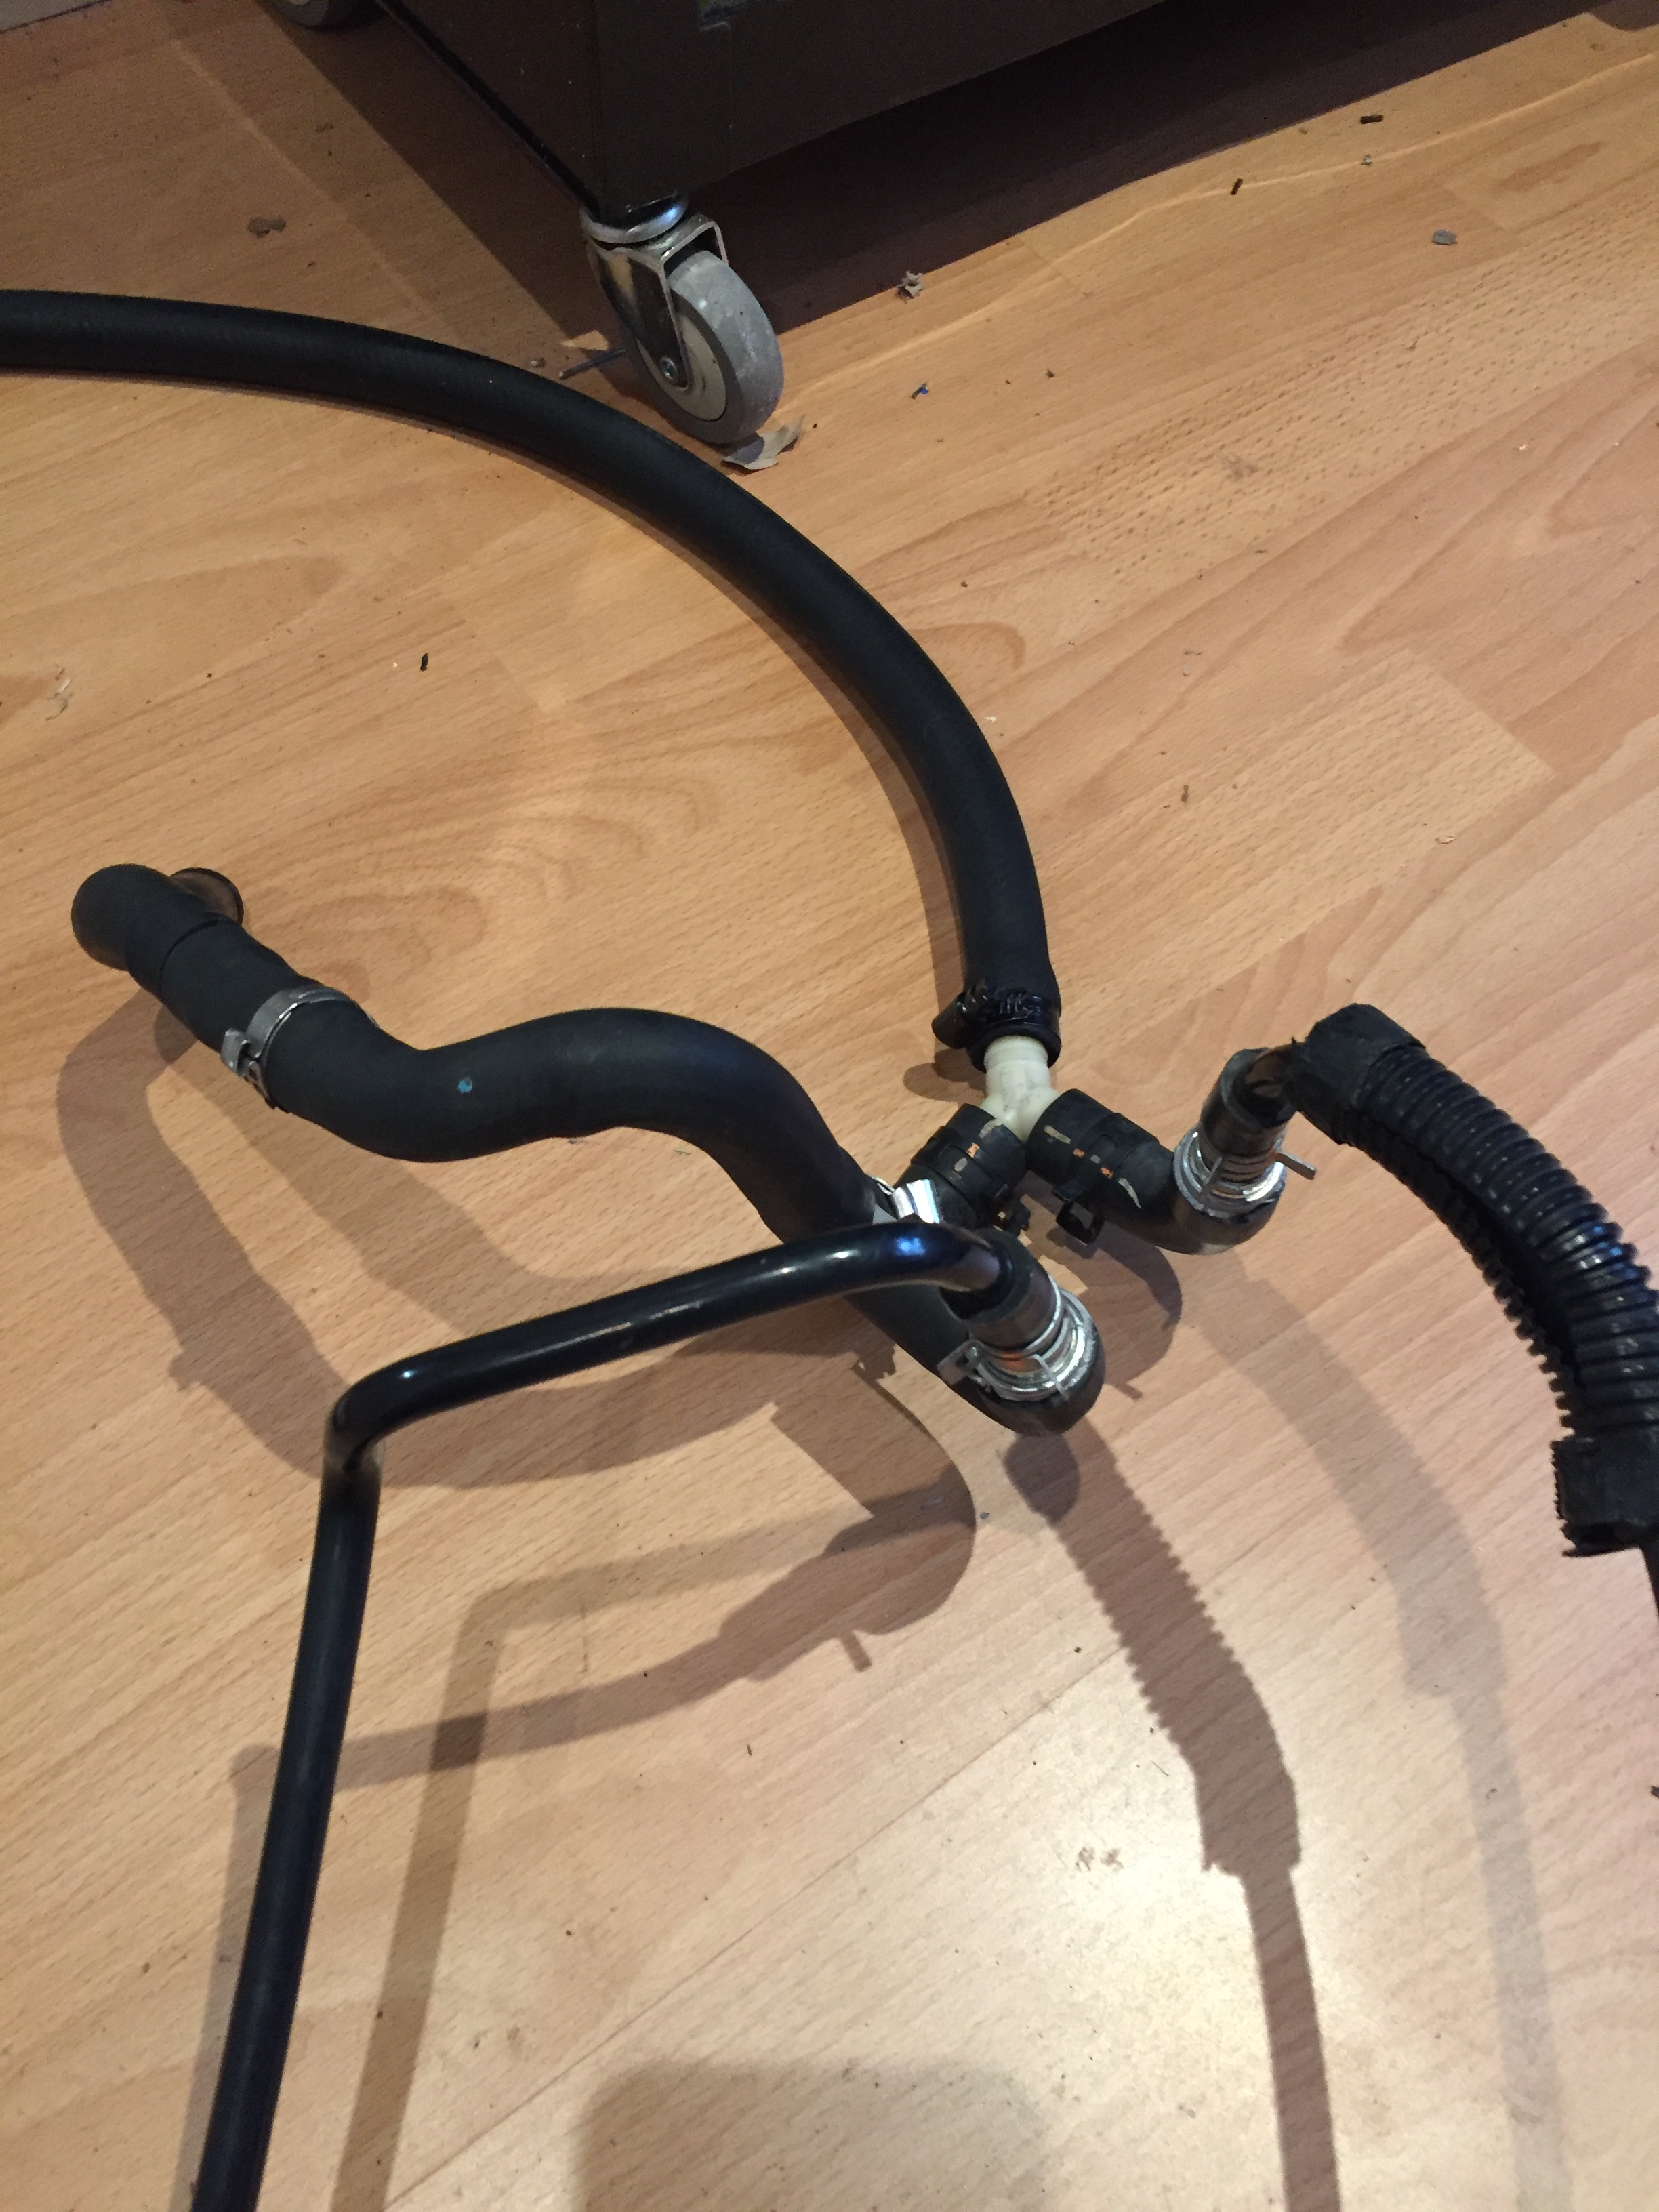
Installing it in the car
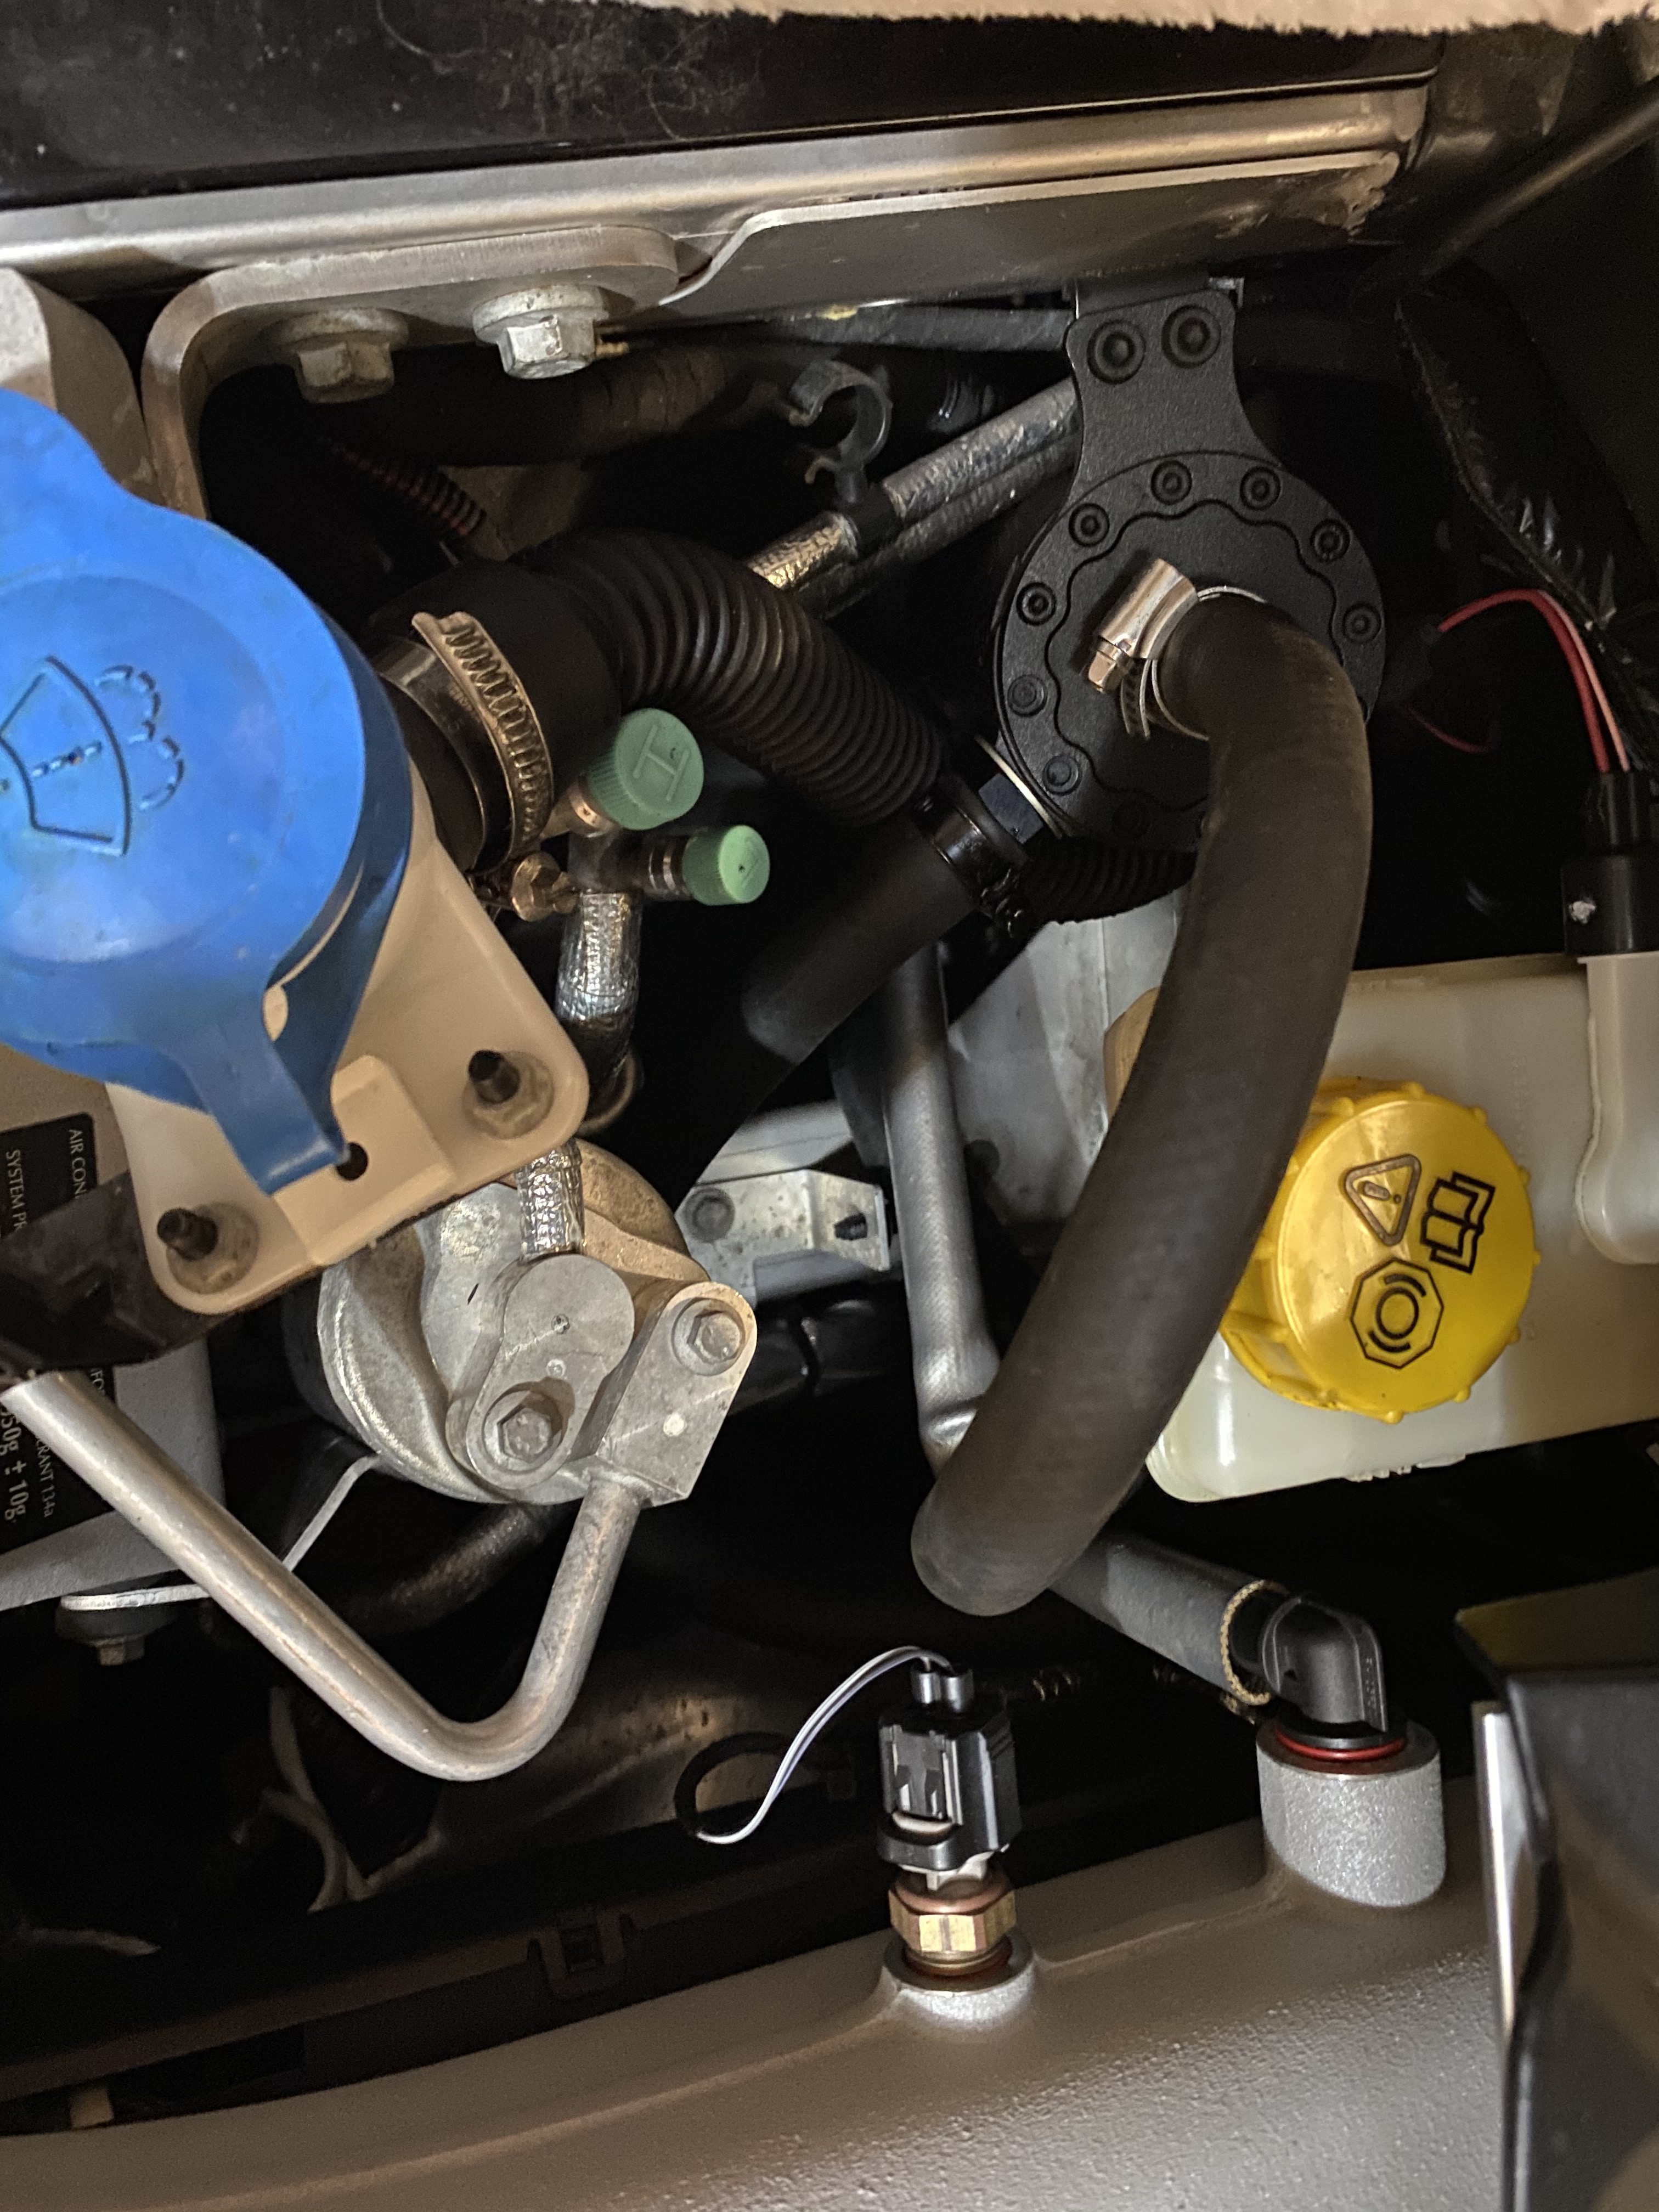
The idea was pretty simple. Mount the can behind the filler neck for the washer bottle (on the right hand side of the car in right hand drive cars). Pass the rubber hose behind the cylinder heads and down the vee of the engine to connect to the air-oil separator. The return line from catch can into the PCV harness follows the same route. I’ve tried to show this with the thick white line below. I’m regretting not taking more pictures at the time but when I came to write this up, I drew the line at removing the intake manifolds again just to take pictures.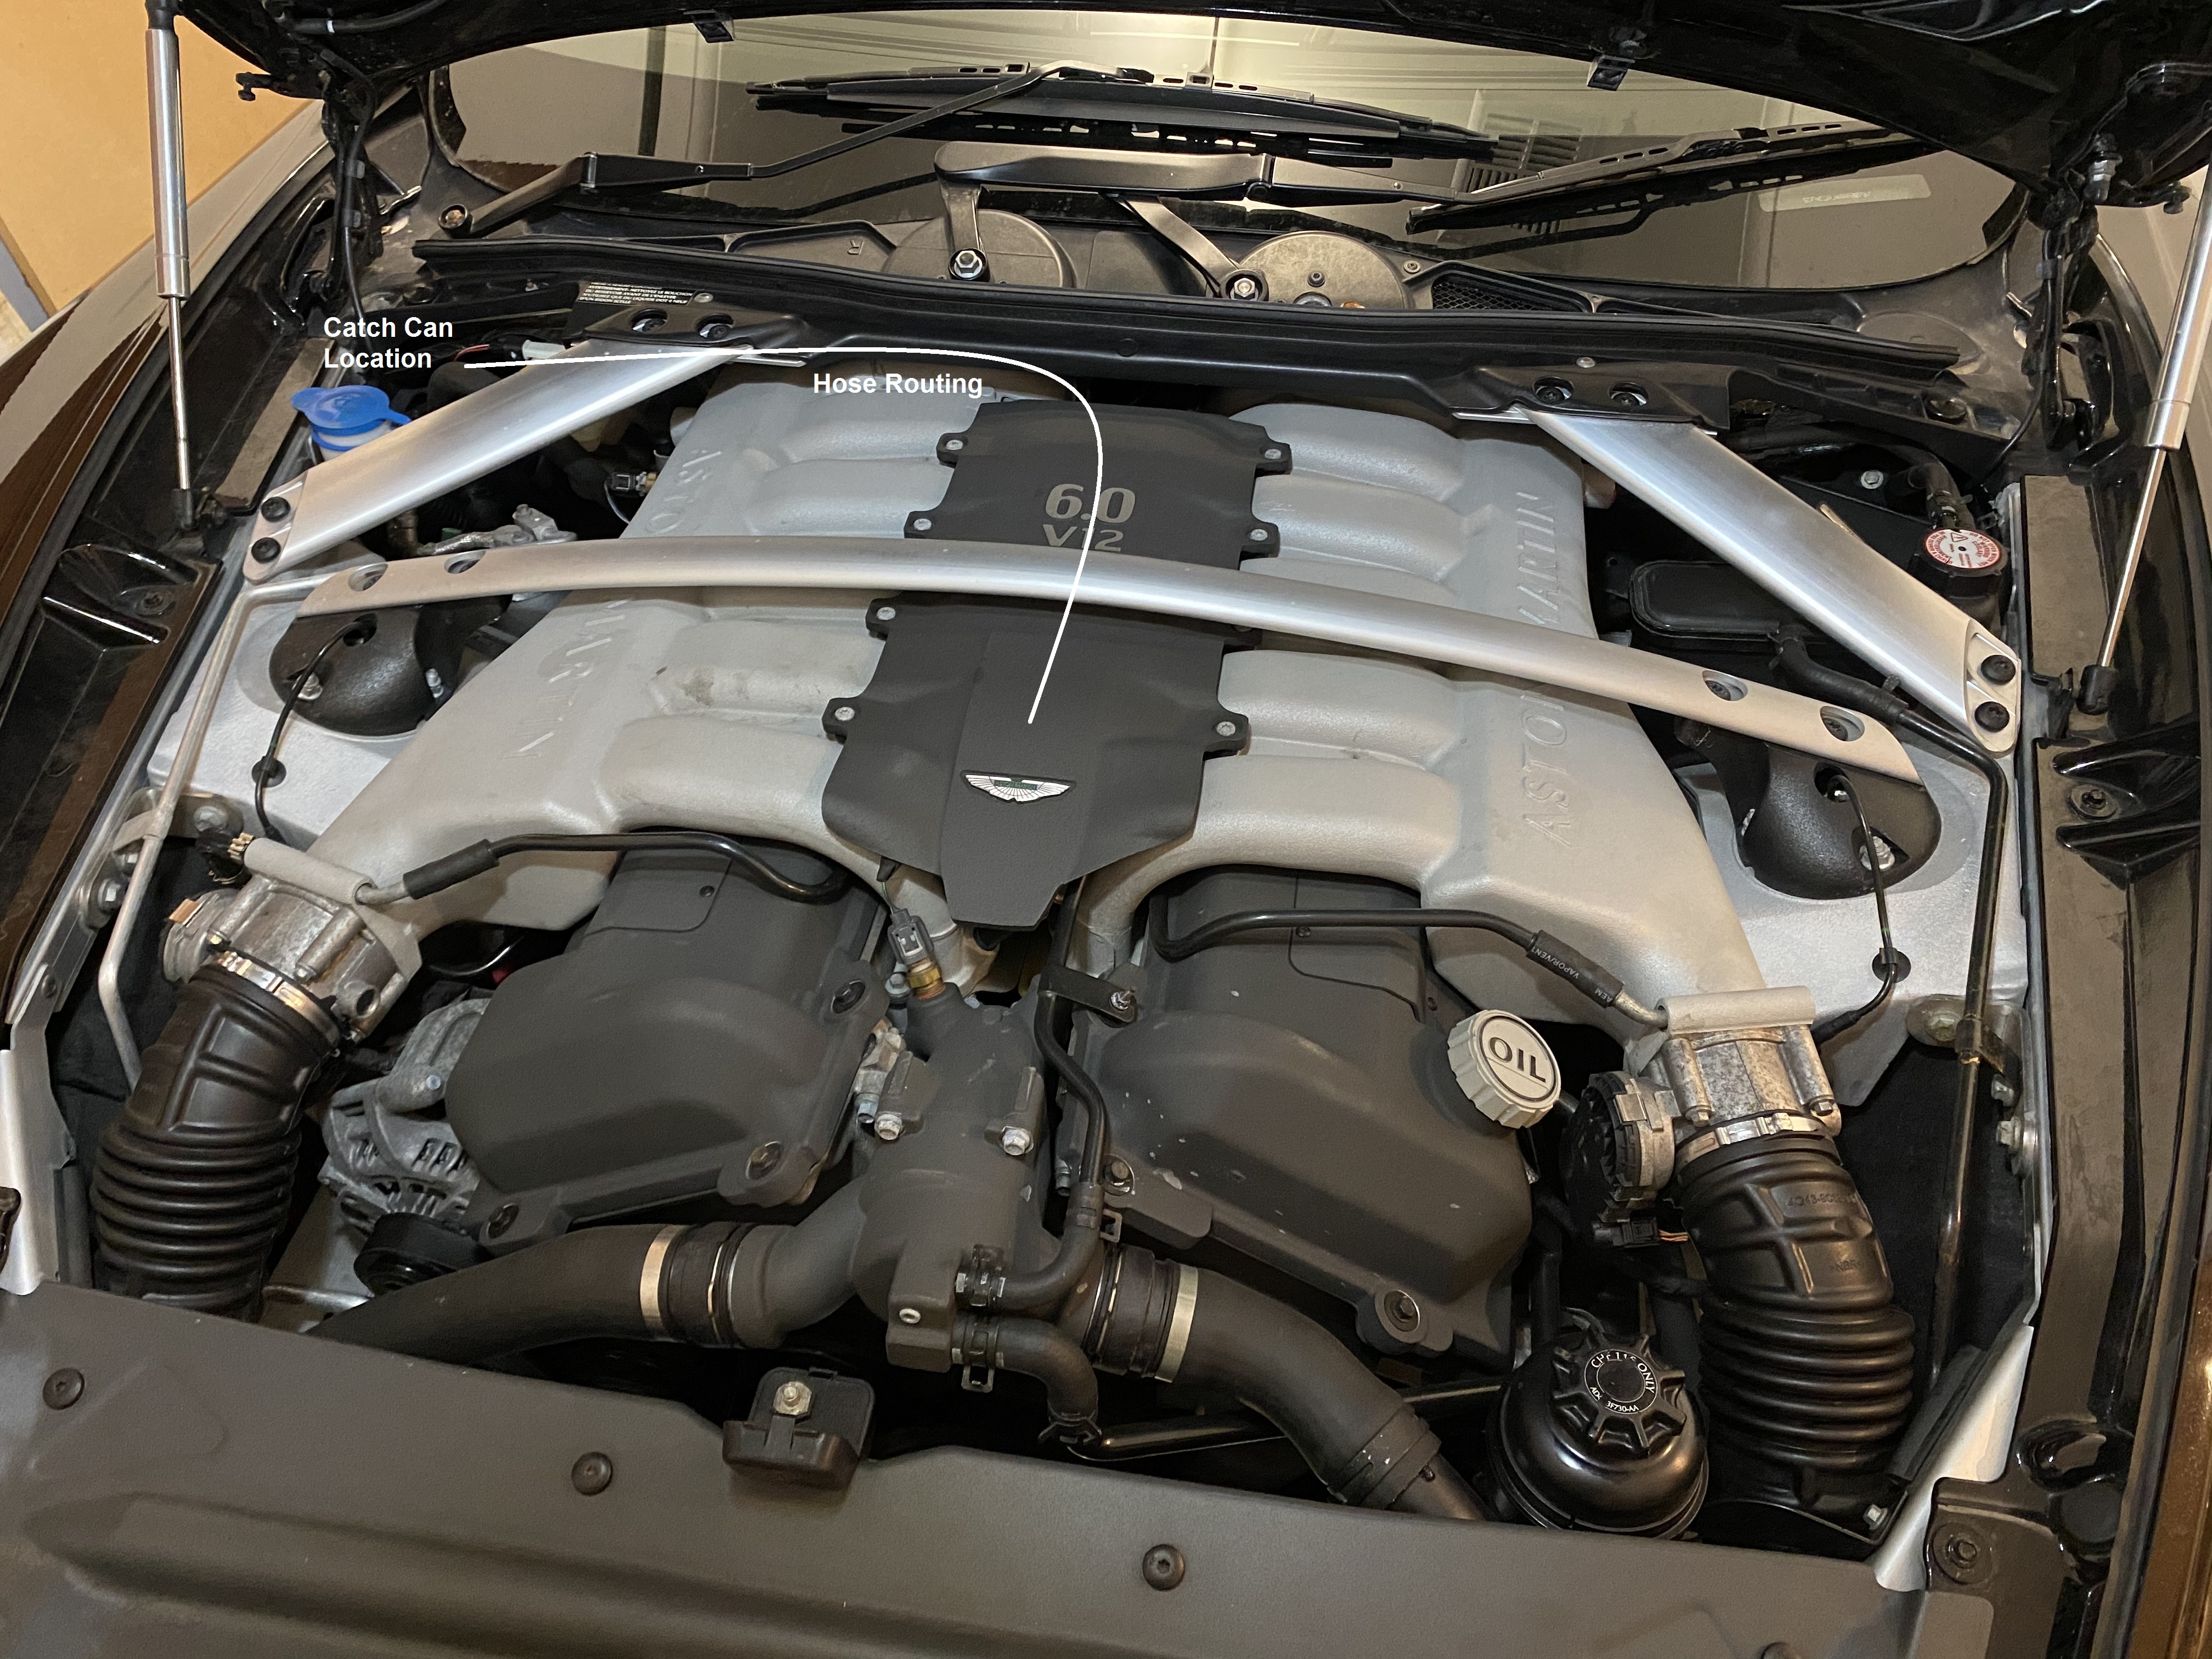
Routing the line from the engine to the catch can was easy enough –it sits low in the vee of the engine, and goes around the back of the engine well below all the other pipes. To get the supplied 1/2″ hose from the Mishimoto kit to fit on the 5/8″ barbed connection from the air-oil separator I had to mold the end slightly by heating the pipe with a hot air gun and pushing in a socket slightly larger than the original inside diameter of the pipe. I secured it with a jubilee clip from the Mishimoto kit.
Routing the line from the catch can back to the PCV harness was harder. I had about three goes before I was happy. The “Y” piece in the PCV harness needs to straddle the left hand fuel rail – this photo is taken through the little inspection hatch under the windscreen wipers. Once it’s in the right place reinstalling the PCV harness is as normal.
This one was taken looking under the wiper plenum from the front of the car.
Mounting the Catch Can
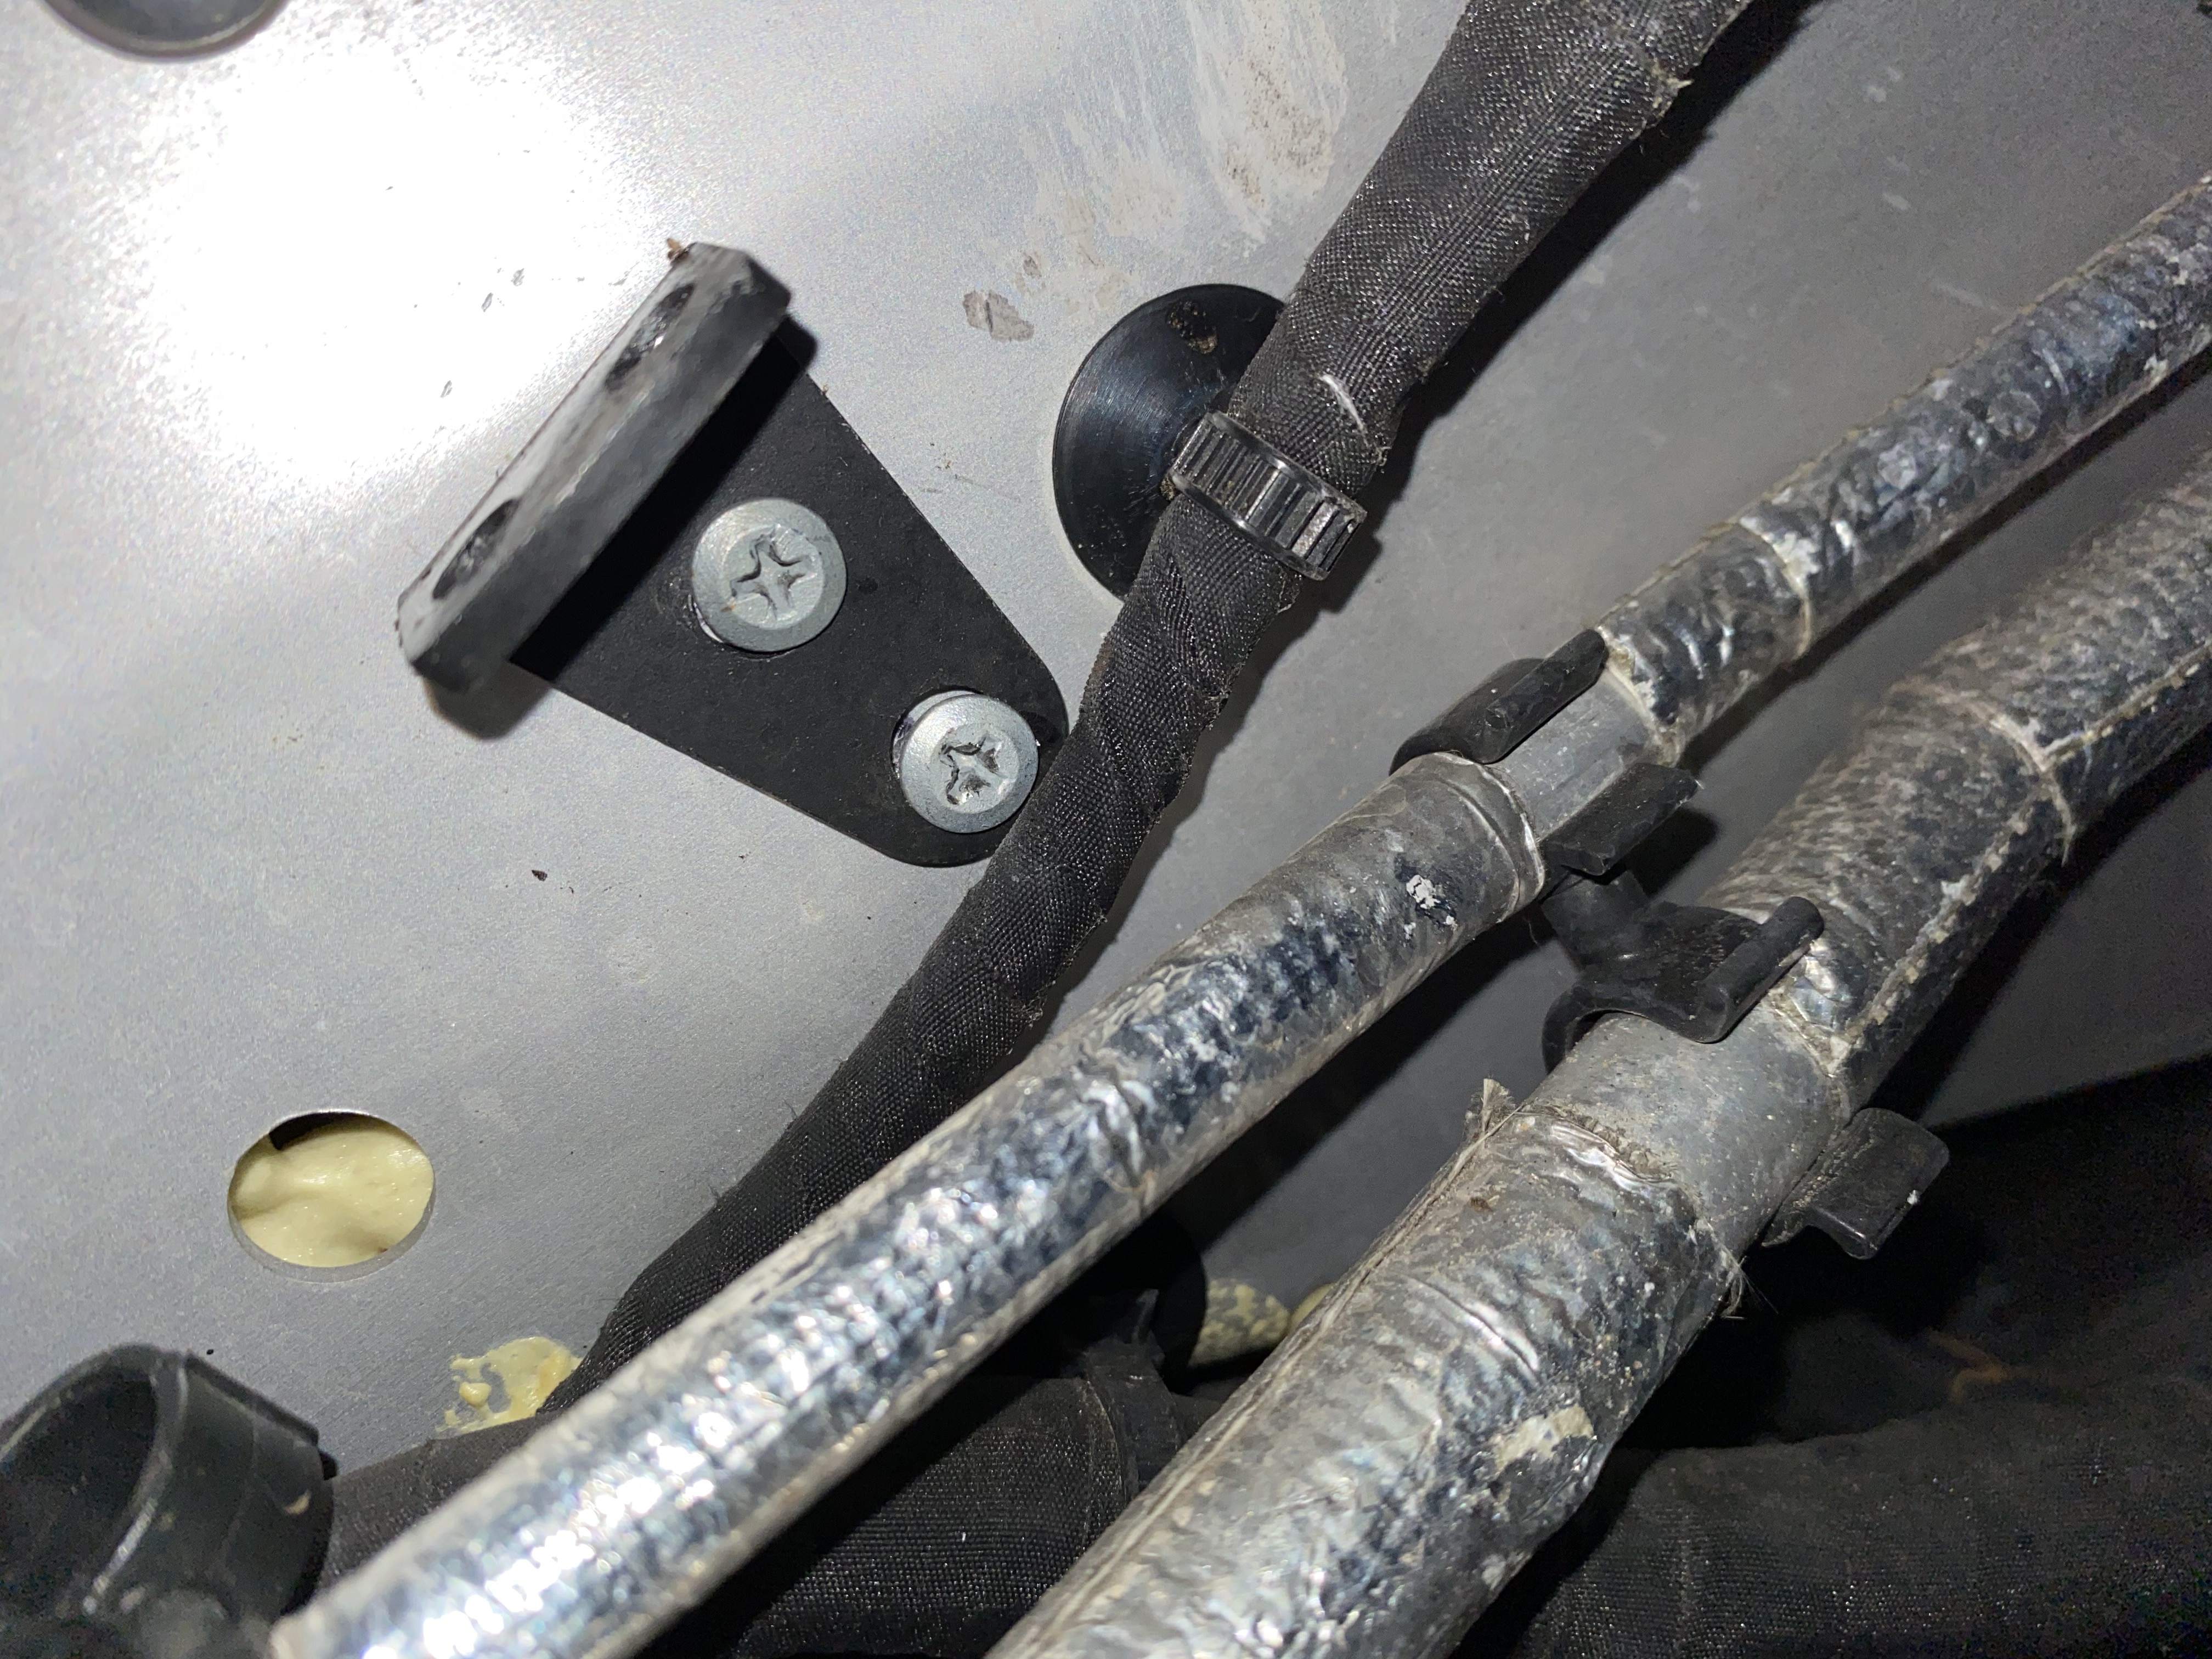
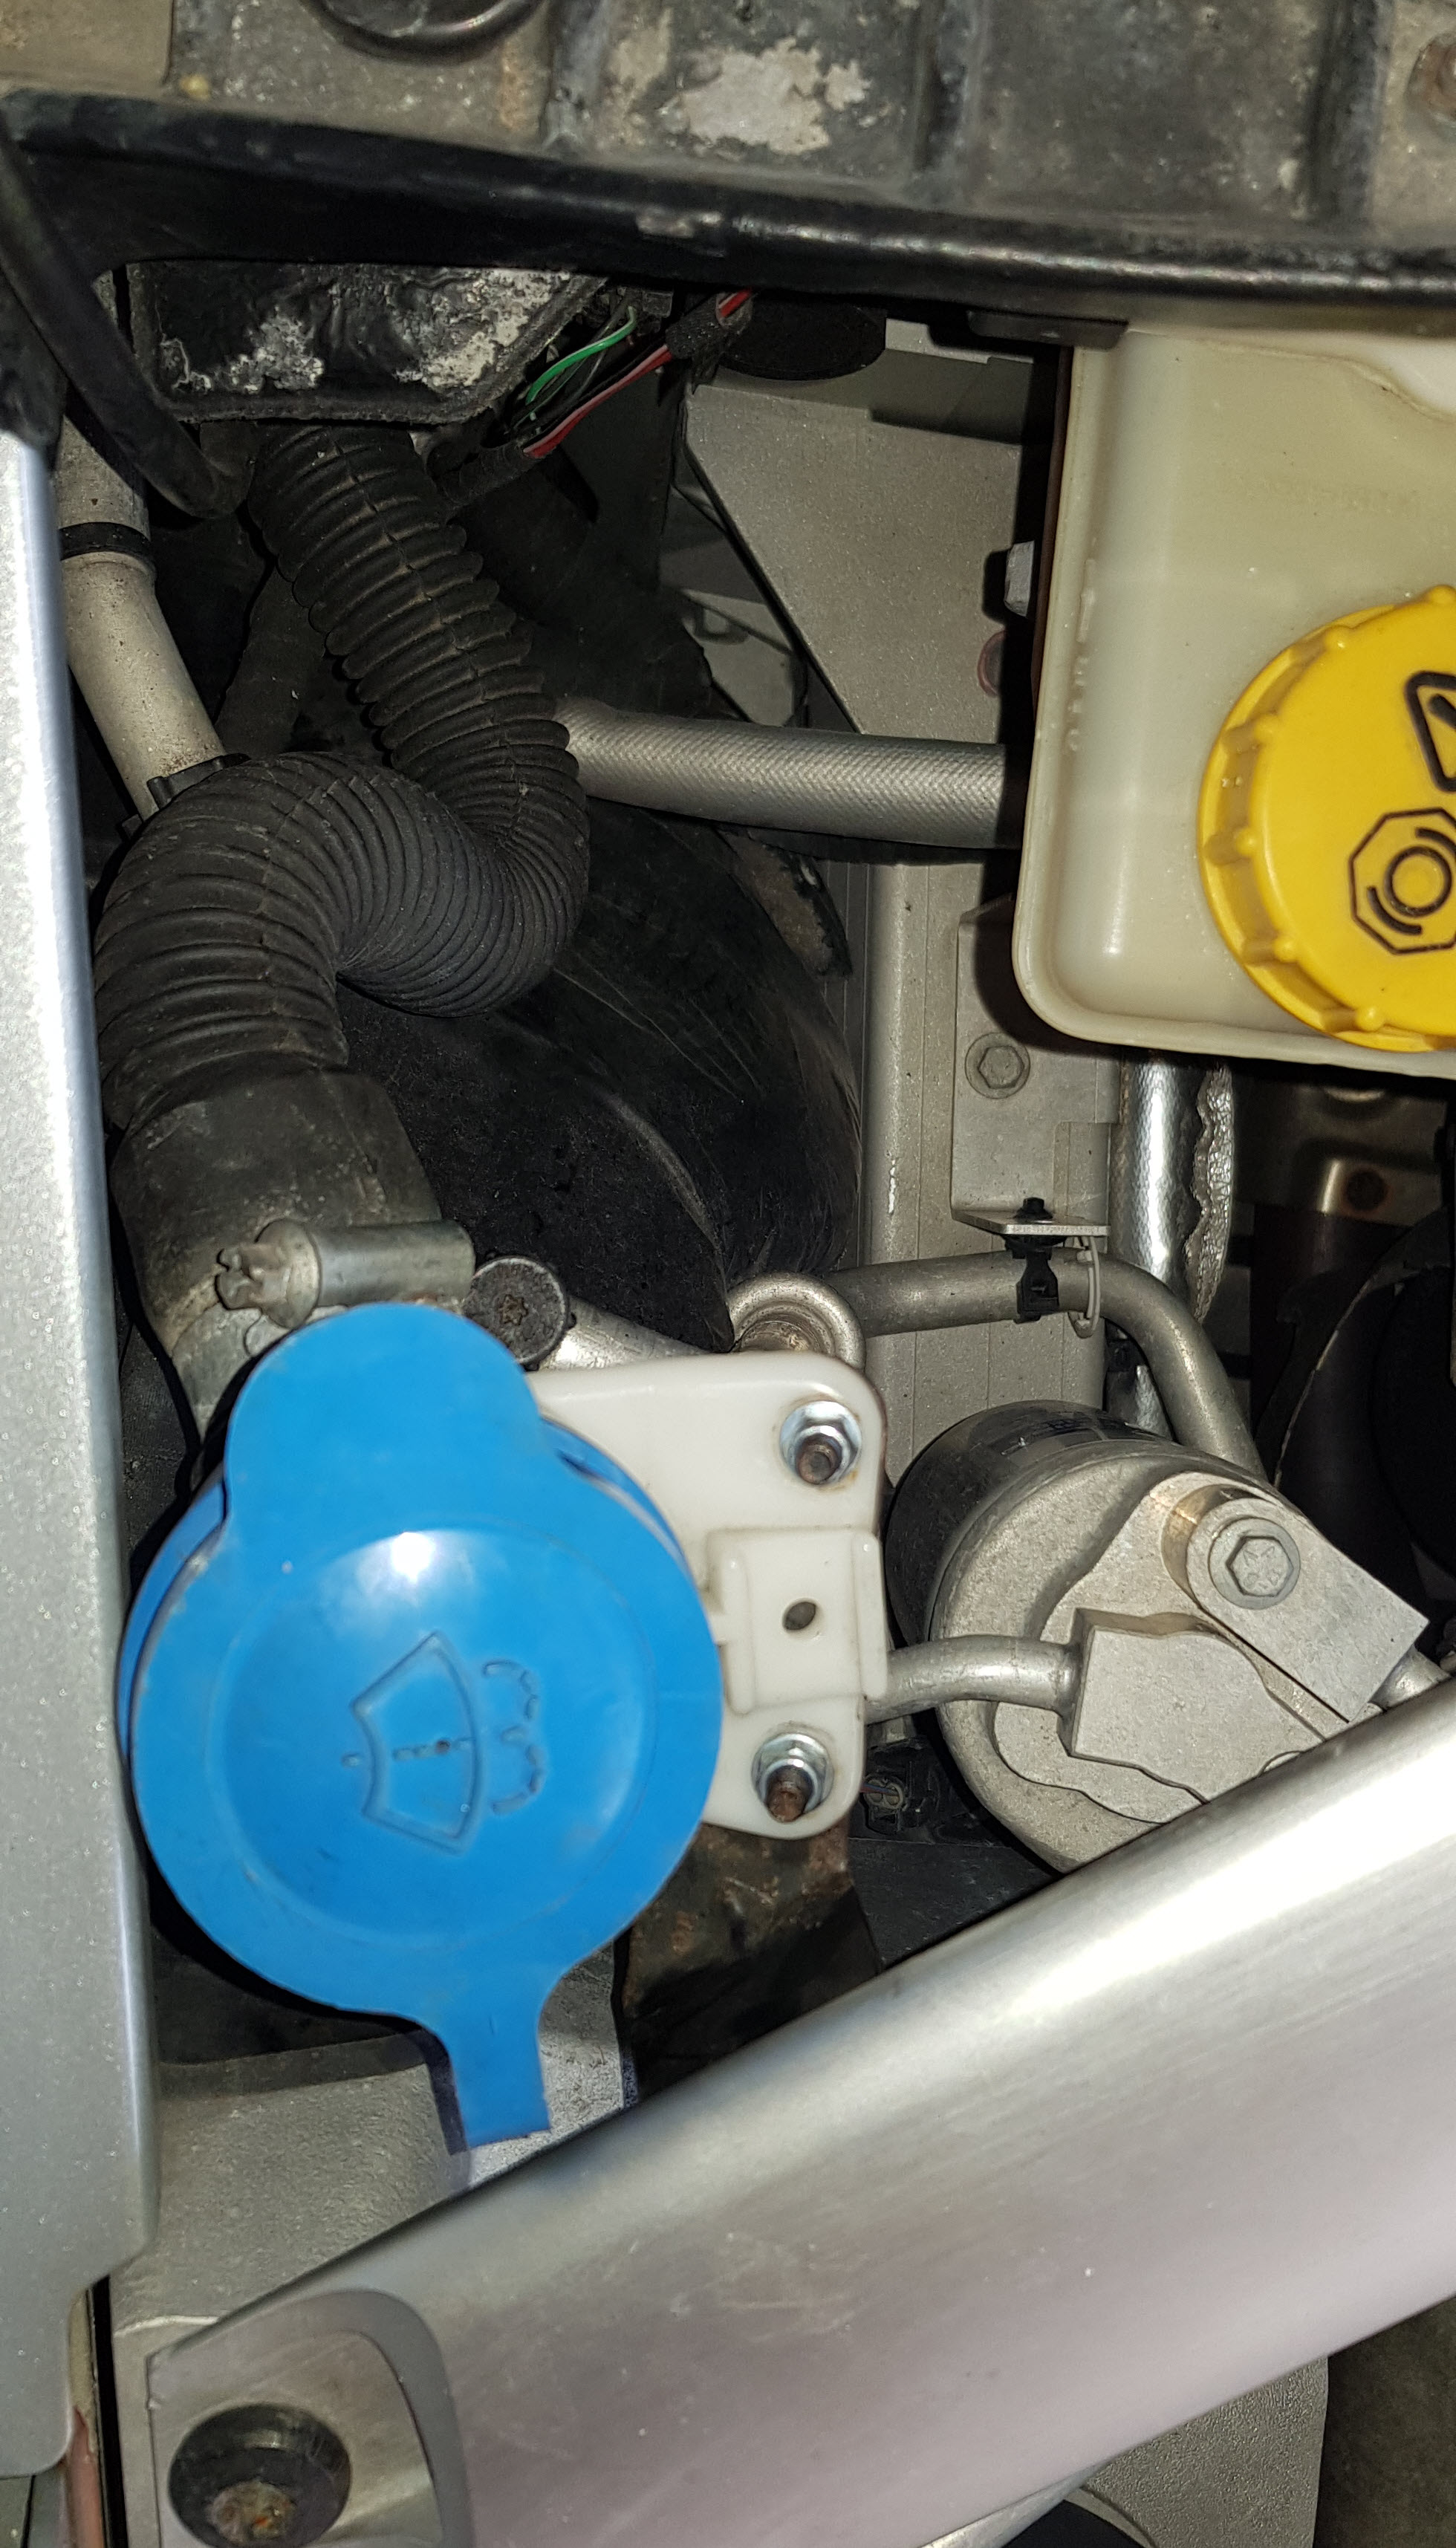
Things are much simpler at the other end. I mounted the can on the aluminium plate on the inside of the right front fender, using two fine threaded self-tapping screws to hold the bracket in place, and bolted up the can.
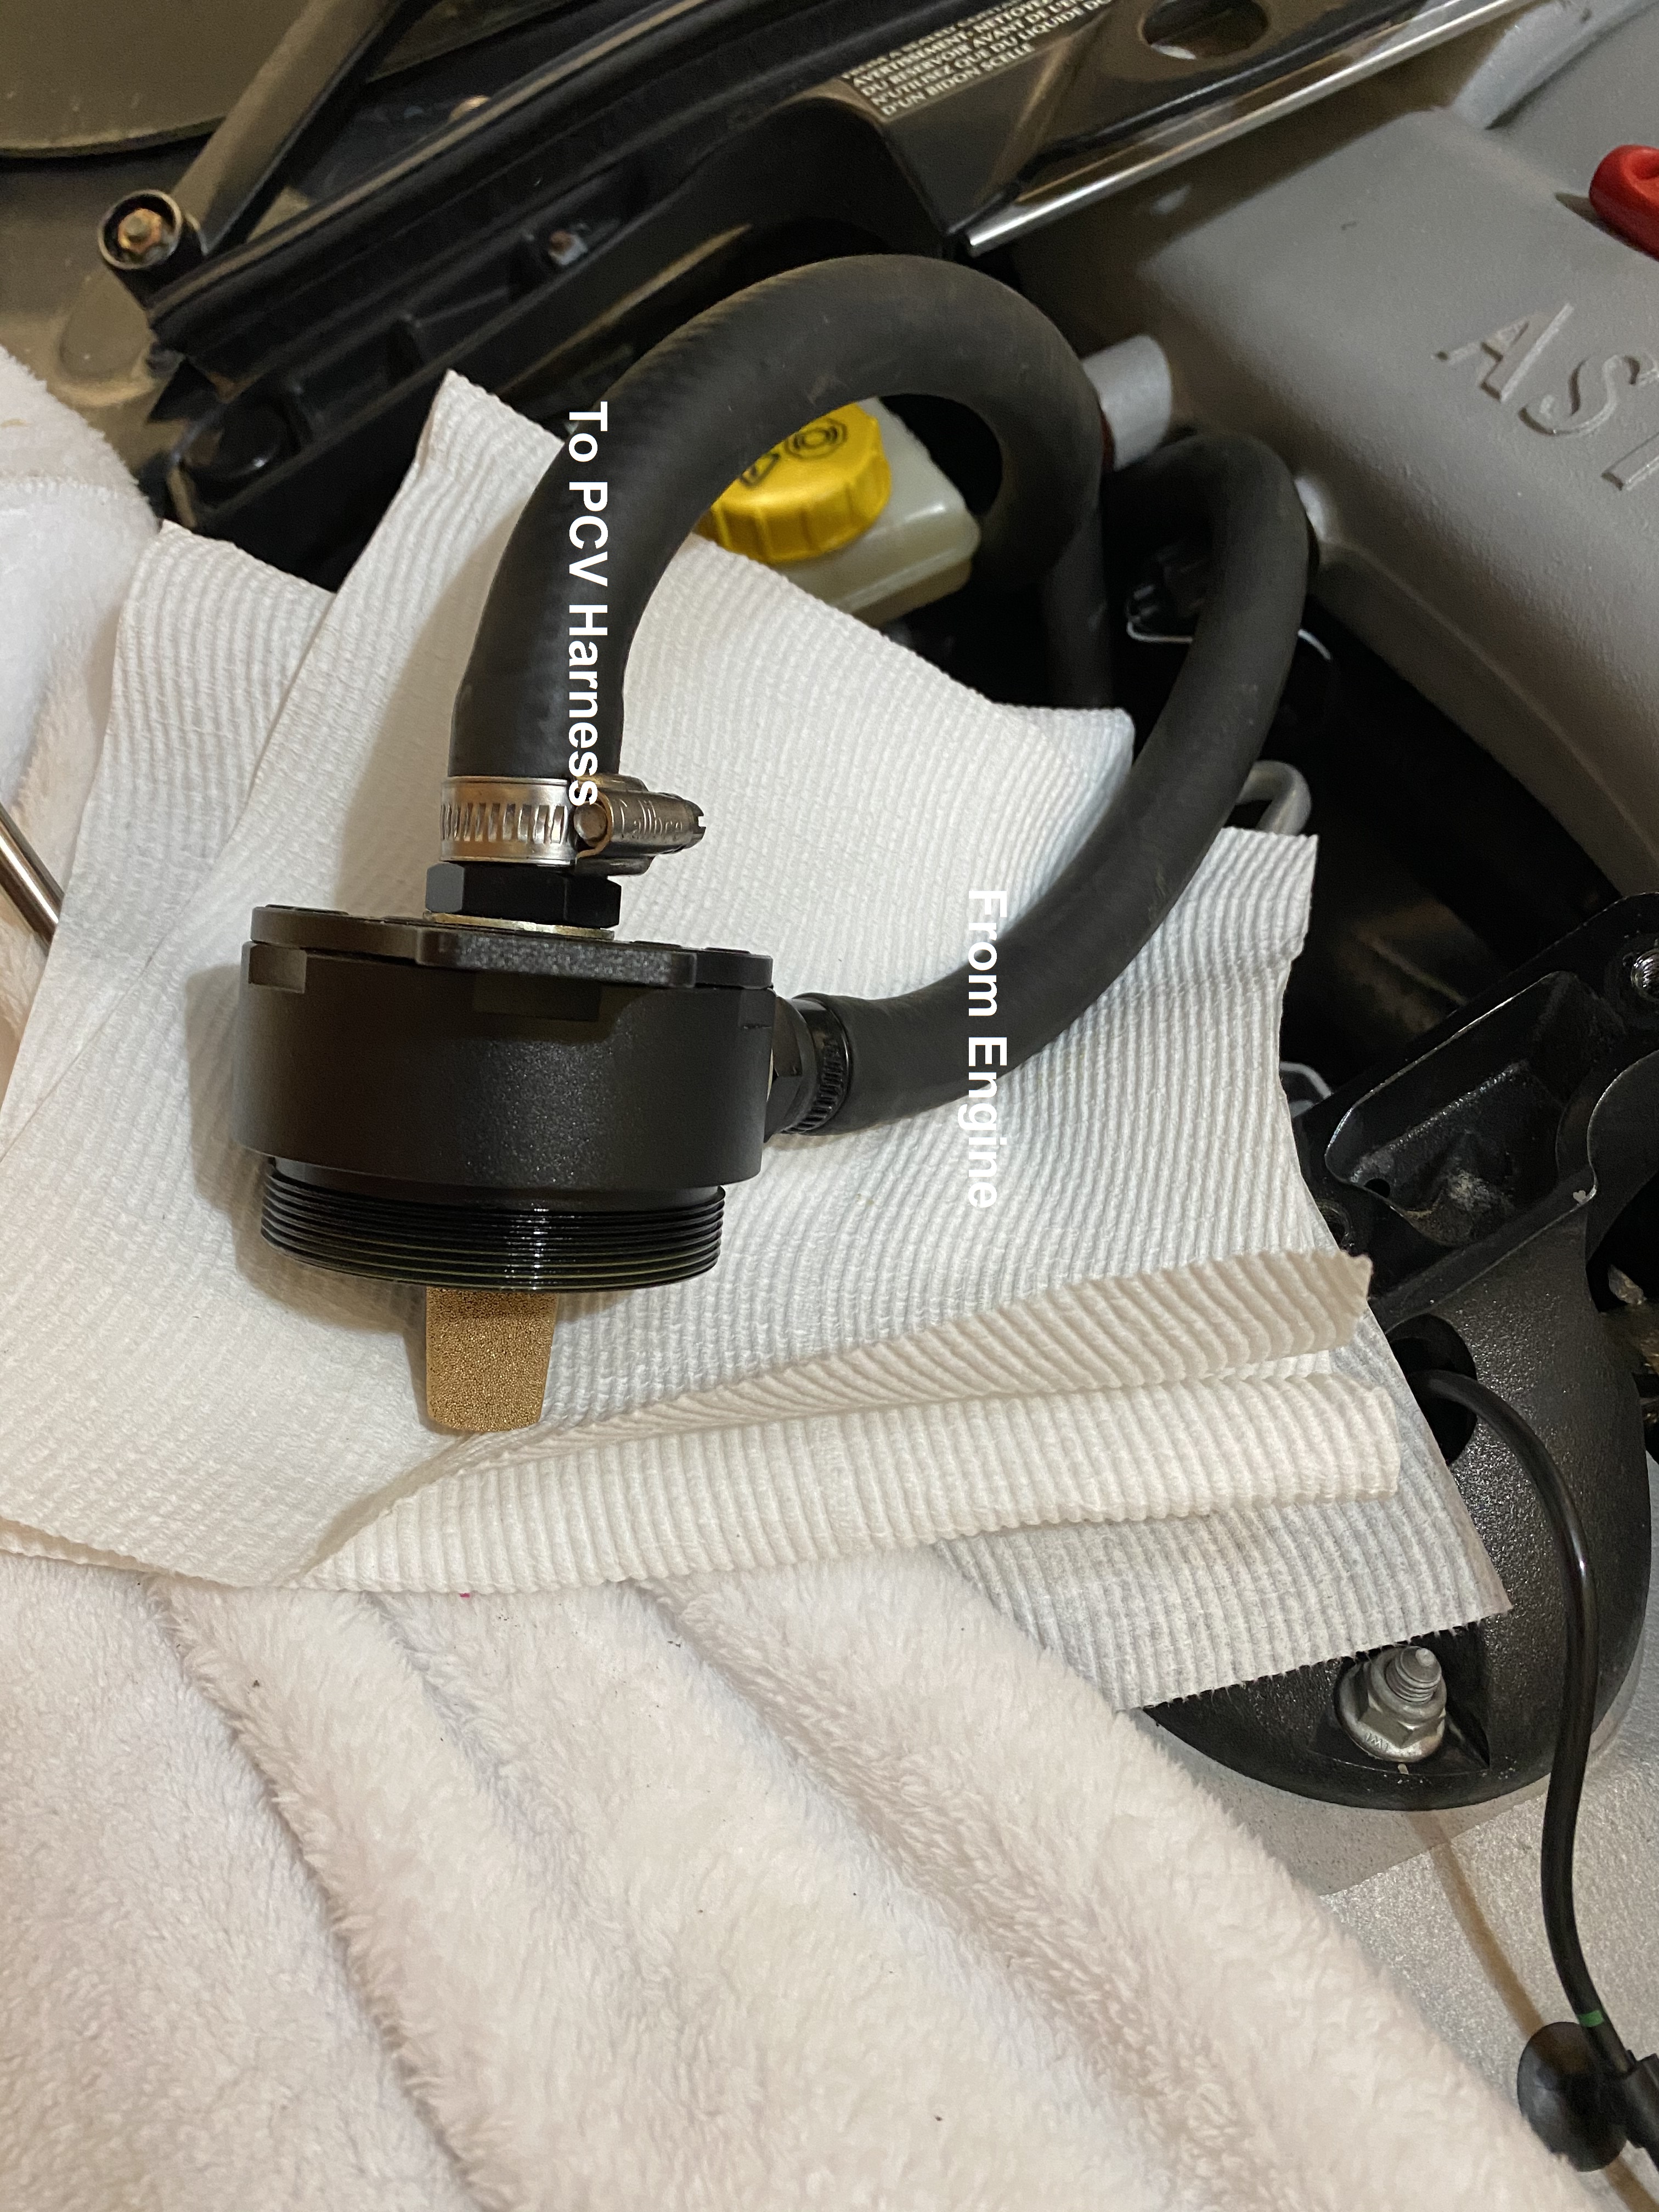
At this point I came to connect the can to the hoses and couldn’t remember which was which. Fortunately you can tell if you blow down the hoses. You can’t blow properly down the hose from the crankcase as you’re trying to inflate the engine!
In connecting the can, the flow goes into the can through the side, and out the top – the bronze filter makes sure that no mist gets out of the can.
Does it Work?
My car has only done about 500km since I installed the catch can, so it’s very early days. However 200km was on a track day so I thought I’d have a look.
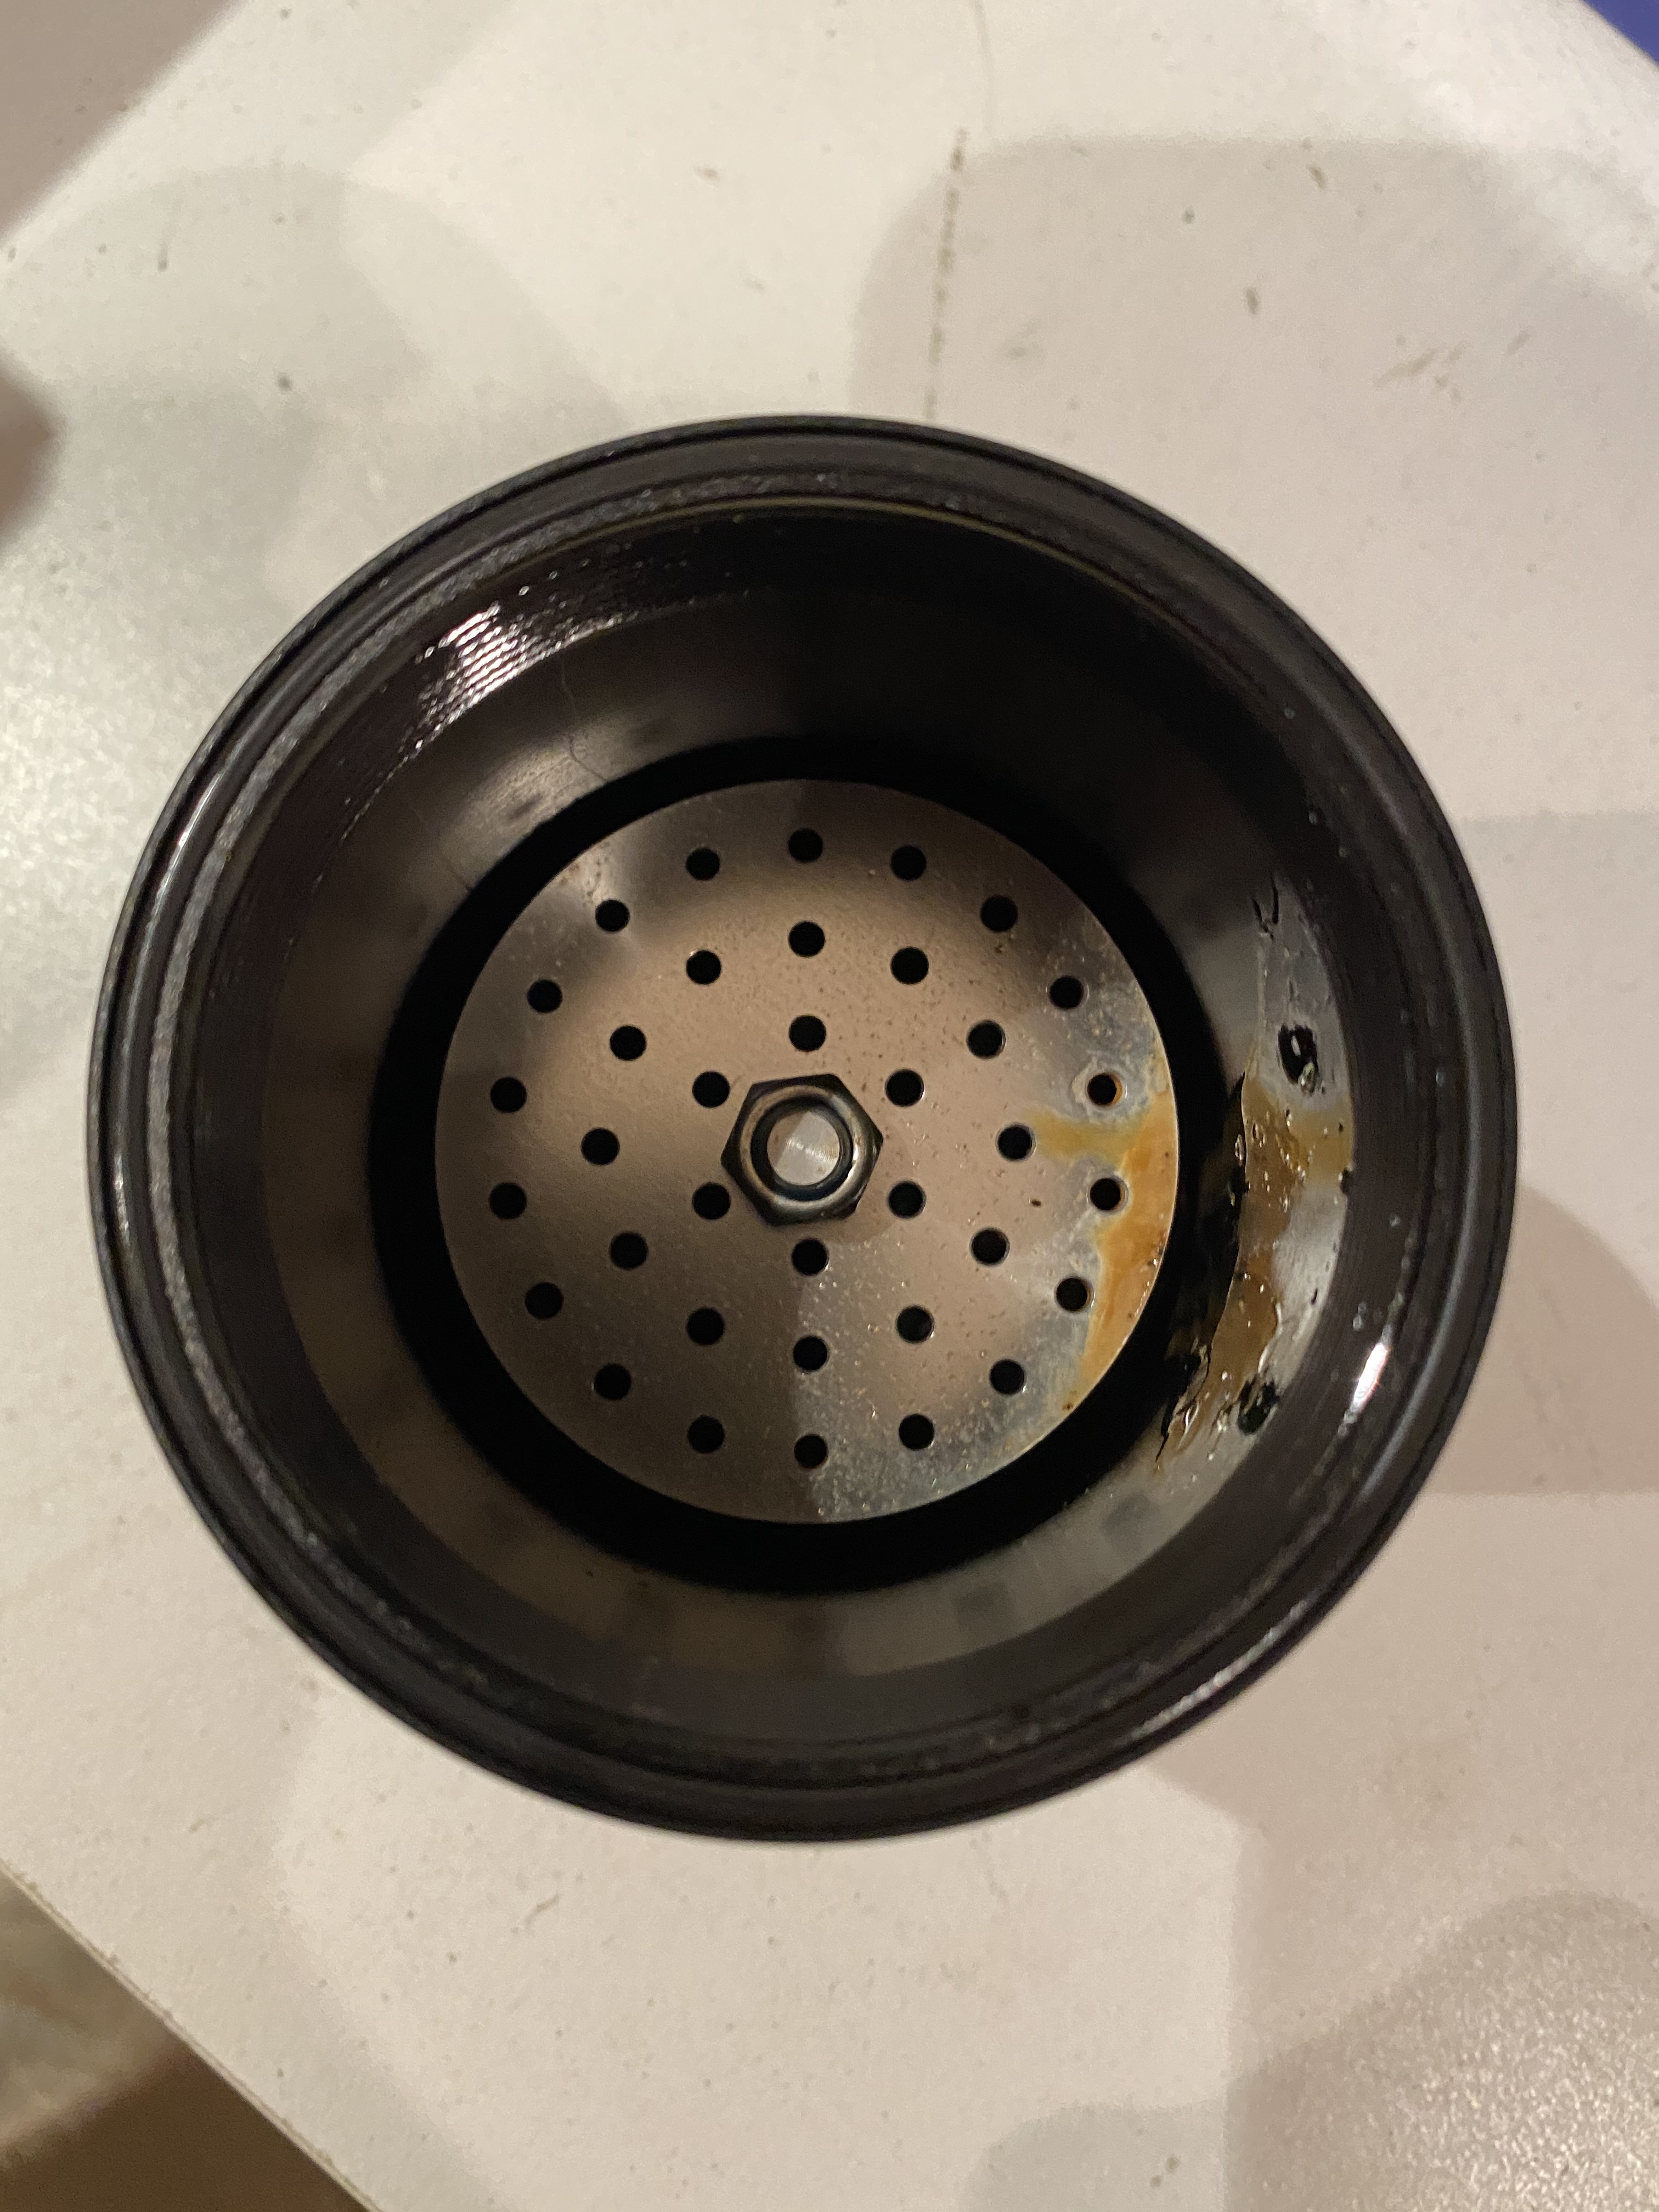

The inside of the can was oily to touch, and I drained a few ml of oily water. Not much to start with, but then again, the PCV valves are brand new and it really hasn’t done many kms since install. I guess the proof will be whether I have oil in the throttle bodies at the next service!
Reflections
I’m pretty happy with this installation. It’s neat and tidy and it seems to work. Where I’ve mounted the can is a bit tricky to empty it – it has to be unbolted from the bracket to unscrew the base of the can. This will almost certainly result in dropping the little Allen studs into the engine bay at some stage so I’m considering adding a small drain valve and a piece of hose to make this easier in future. I notice that Mishimoto sell a Petcock drain kit on their website…
Other Thoughts from Steve
Excellent write up about how to tackle this. You can check out my other articles on replacing the PCV Valves, they will show you the steps to get down to the manifold area where these are kept. Check out the PCV Valve Collection Here.
I’ve not done this to my own DB9 (yet) but next time I have this part of my engine apart I will definitely be looking to add the Catch Can.
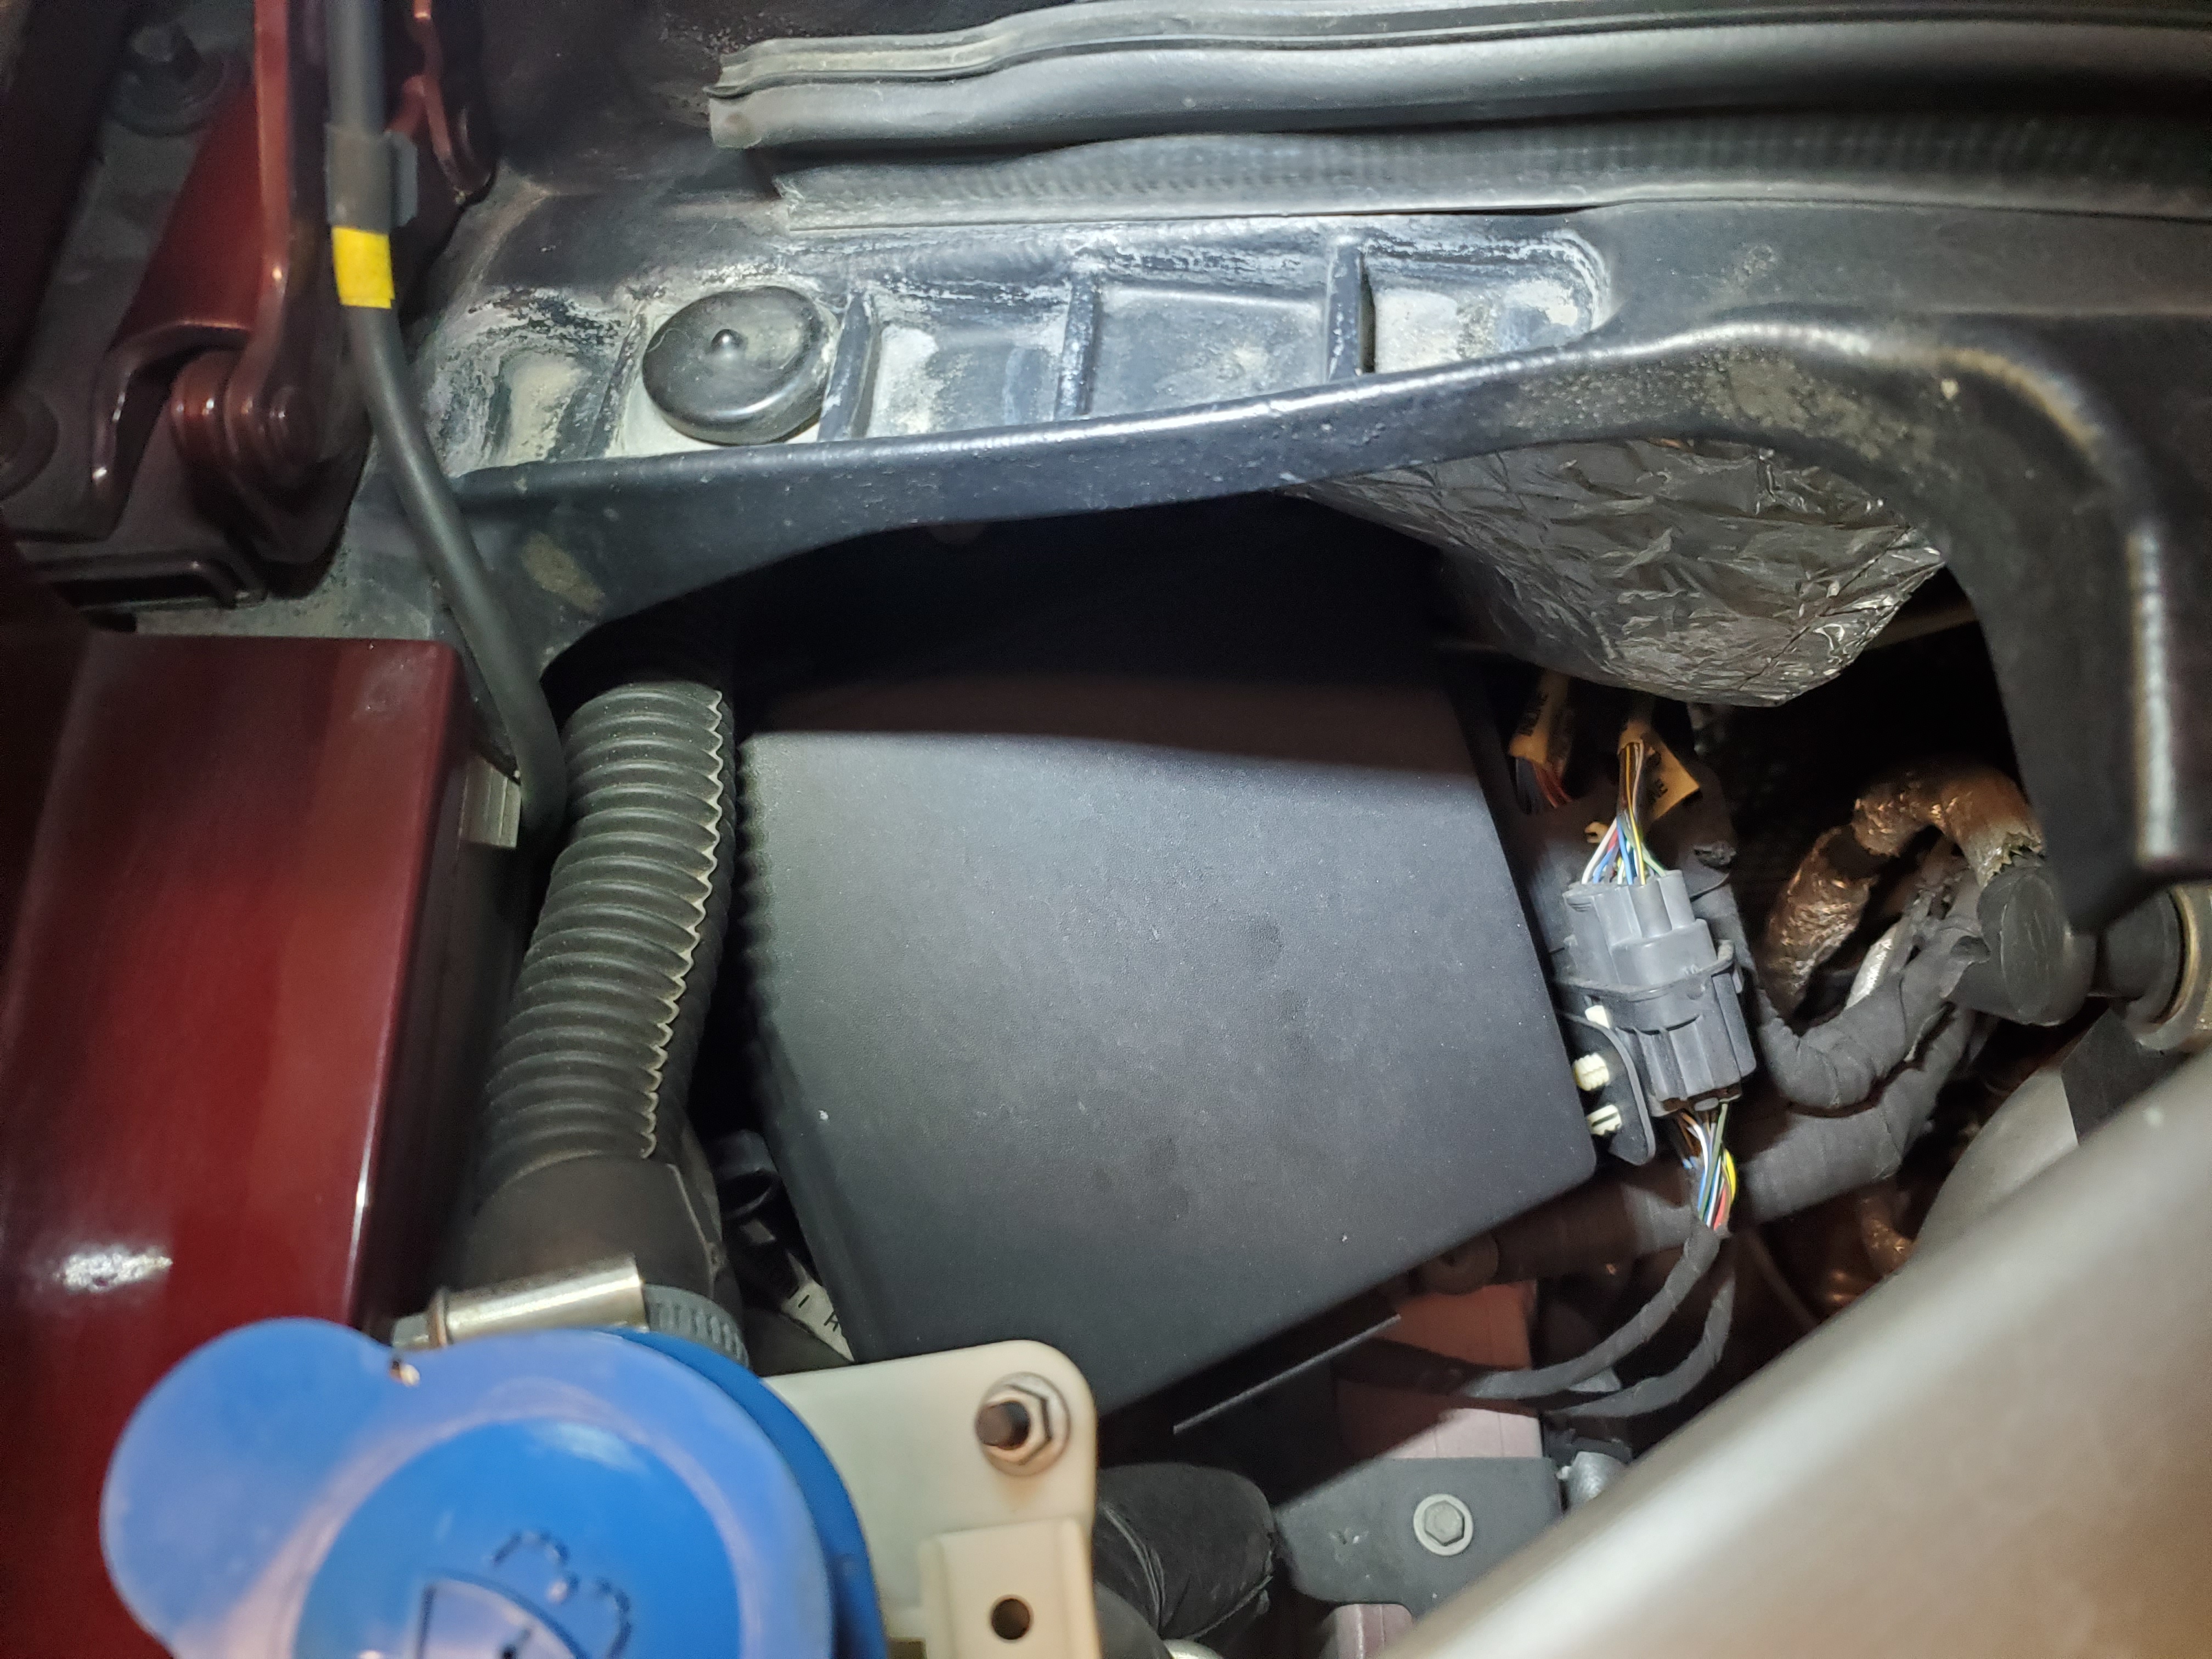
On a LHD vehicle the same area where Ian mounted this on his RHD is not clear for mounting the catch can. In my 2005 DB9 there is come large electronics module that I have yet to determine what it is. There may be another space somewhere it can fit, but Ian’s location in the RHD Rapide is certainly convenient.
If you are a RHD DB9 owner can you please look at this spot on your car and let me know if there is a small pocket of space as with Ian’s Rapide. Bonus points if you send me a picture I can include in this article!
[Updated June 8, 2020] Ask and thou shalt receive! Thanks to Mike Potts (@Aston2209) here are photos of the same mounting area in a Right Hand Drive (RHD) DB9 of the same vintage as mine. There IS a suitable and similar space to mount the catch can. The space is about 4″ x 6″ x 10″ deep. Check out Mike’s photos here.


Why is a little oil finding its way into the inlet manifold a problem?
Remember the old days (UK only or also US?) when we used to pay extra at the petrol station for a shot of “upper cylinder lubricant” into the gas tank?
LikeLike
Hi Steve/Ian
I was hoping to make direct contact with Ian as i am also Austrailia based and looking to make this mod to a DB9, i have a sligtly lumpy idle adter coil and plug replacement and oil in the manifolds so this is the next step, unfortunately i did nort realise how hard the PCV’s are to get at ! Woud it be possible to link myself and Ian directly ?, many thanks for all the useful information you provide i used your videos only the other week to strip the interior and its extremly helpful to have such guides available , Many thanks Doug
LikeLike
Hi Steve, I did kinda the same modification. However, after approx 1000km I got heavy misfires on 1 cylinder. Suspecting the coil pack first I went on to repair it. When taking off the inlet manifolds I encountered A LOT of oil. Turned out that oil had been collecting in the manifolds up to a certain quantity and then (rapid acceleration? Corner?) when a good amount of oil came in that cylinder it triggered >1% misfires, the injector was switched off (built-in protection to prevent cat damage) and made the misfire counter increase to >4500! Long story short; the metal PCV valves have a VERY limited flow rate limit. All the oil I got in the manifolds took the inlet path (from the top of the valve covers) into the engine again. Because of the limited flow (turns out a V12 can have up to 100l/min of blowby) I got overpressure in the crank case and it found this way. I have been VERY lucky not to have a crankshaft seal blow out! I ordered a PVC harness and this confirmed the HUGE difference between the EV152D PCV valve and the metal aftermarked ones….
The compounding factor why I have this issue and this author not (yet) is in the combination of the limited flow AND a slight over filling of the engine oil. This probably explains why the Rapide has not yet shown an issue but it might be a ticking bomb for a seal to blow out. I keep my fingers crossed for him 😉
This modification is a good one but pls make sure you use the original PCV valves and a catch can that can handle 100l/min. Also no hoses <1/2 ID, preferably ons size more….
As always thanks for all your write-ups!
Gertjan
LikeLike