

One item that pops up on the DB9 Annual Service requirement periodically is changing the rear differential / transaxle fluid. To be clear this is NOT the transmission fluid (which in theory never needs changed). I am covering only the process of draining the fluid in this post, and will cover changing/cleaning the filter and refilling the oil in the next post [I just don’t want the post to be too long].
As with most DB9 service tasks, the bulk of effort is in the preparation work. To access the differential to change the fluid the car will need to be up in the air using either a hoist, lift or in my case jack stands. It’s very important that the car be level since you will be refilling the fluids. Check out my other posts and videos on:

You’ll need a few tools for this task:
- Oil catch pan
- 14mm Allen Hex wrench or socket (I’d recommend a socket). I had to go buy one of these, I don’t know many people that have an Allen key this large.
- 22mm 6-point socket
- 8mm wrench or socket
 10mm box end wrench
- I’d suggest some disposable gloves for your hands
- Clean lint free rags
- Big piece of cardboard to place under the area
- Old milk jug or container to dispose of the old fluid in
To be honest, I made an absolute mess of my garage floor doing this step. A drip here, a dribble there, it’s a PITA. I regret that I didn’t lay down an old piece of cardboard under the area before I started. I’d suggest you find some old box and cut it open and lay it flat. Gear oil is like cold maple syrup, and there is no wiping it all off once you get it on you. Hence my suggestion for wearing disposable gloves (and have a few sets). Have some rags close at hand for mishaps as well.
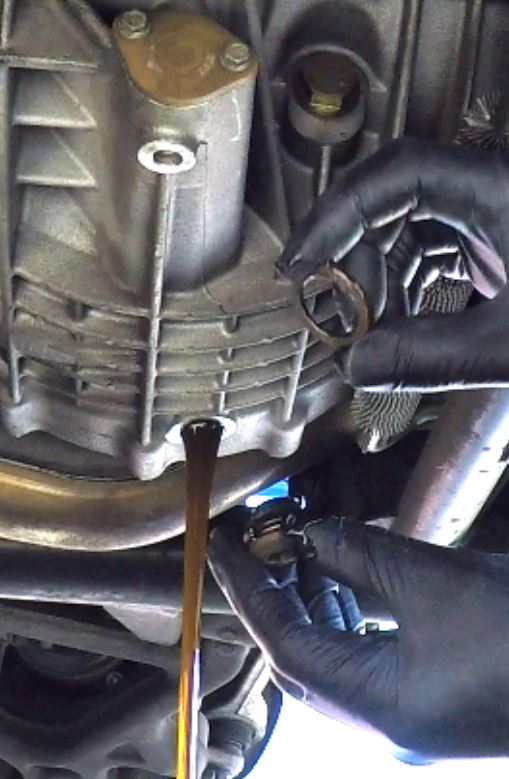
Place your drain pan under the differential drain plug. Use the 14mm Hex socket on a breaker bar and loosen the plug. Undo the plug the rest of the way with your fingers and remove it (being careful to get the copper sealing washer too). About 1.6 litres of old fluid will come out. It’s normal that the fluid is dark to black in color, that’s why you are changing it. Plan to let the oil drain and dribble out for at least 15 minutes, ideally it should have slowed to a drip before you start the refill process.
While it’s draining use a 22mm socket to carefully remove the upper fill plug. Just use the socket to crack it loose, then remove the plug and copper washer by hand. Be careful using the ratchet/breaker bar next to the oil cooler fins, you don’t want to mash them with a slip of the wrench.
Next up is removing the oil filtering screen. In the video I just went ahead and tried removing the filter, but got an unpleasant surprise that it can’t be completely removed without removing a small piece of the exhaust heat shielding. This wasn’t hard. There is a 12″ segment of heat shield mounted to the left hand exhaust pipe directly across from the filter screen. Use a 10mm box end wrench and remove the two short bolts that hold it in place (up on top). Remove the front one first. As I removed the rear one I left it in the hole and merely pushed the shield up out of the way. I’d really suggest checking this out in my video below, it will make a lot more sense. I got some nice footage of it.
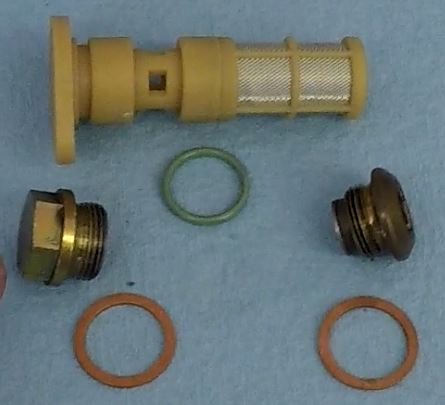
Now that you have the space, it’s time to remove the plastic filter housing. It’s held in place with two 8mm bolts. Remove the two bolts, and use a small screw driver to gently pryse the filter outward from the differential housing. Be careful – don’t scratch up the plastic or the housing. Be ready for some oil to drip down from here, so position your drain pan accordingly. Slide the filter out and let it drain into the pan.
Here is a short video on the process discussed in this post.
In my next post I will detail how to finish up the process of changing the oil.

Hi-
Did you ever completely remove the washer reservoir? I have exactly the same crack in exactly the same place on my ’06 DB9 Volante reservoir, but with the wiring harnesses, clamps, connectors, etc. all conspiring against removing it I finally gave up and tried epoxying the crack with the reservoir in place. It’s curing as I type this…
I will admit that the tiny 10mm bolt at the top is pretty puny, but it seems to be just a part of the system; even when I removed it the reservoir is wedged firmly in place!
That, I think, is the problem. The reservoir is forced to flex with the car, and it’s anchored too firmly at different places to do that successfully.
When it breaks again I’ll have to come up with a better solution.
LikeLike
Hi Mike. Nope, haven’t tackled that issue yet. Your epoxy idea might work out great. Its not a pressurized area, so as long as its water tight would work perfectly.
LikeLike
A Pro tip, whenever you are draining a rear diff, a manual trans, or a transaxle, make sure you are able to loosen/remove the filler plug. I’ve seen to many times that the filler plug is, 1-stripped so getting a tool to fit is a problem, or 2 it’s frozen in it and doesn’t want to come out. Much better to find out before you drain the fluid!! Also removing the filler plug helps the sticky/thick oil to drain. Just an FYI.
LikeLike