
![]() The Headlight assemblies in an Aston Martin DB9 are a major part of the it’s great looking front end. We spend all sorts of time polishing and protecting the paint, but we usually ignore the headlights. They are under constant attack from the Sun’s harmful UV rays that are trying to discolor them, and from road debris popping up to try and scratch and chip them. My DB9 is my daily driver here in California and I am out in the sunshine and on the roads every day. I wanted to protect them now before the damage occurs.
The Headlight assemblies in an Aston Martin DB9 are a major part of the it’s great looking front end. We spend all sorts of time polishing and protecting the paint, but we usually ignore the headlights. They are under constant attack from the Sun’s harmful UV rays that are trying to discolor them, and from road debris popping up to try and scratch and chip them. My DB9 is my daily driver here in California and I am out in the sunshine and on the roads every day. I wanted to protect them now before the damage occurs.
The solution to protecting them is quite simple actually. We can apply a Clear Bra of Paint Protection Film (PPF) to them. PPF is a tough, clear, UV resistant film that can be stretched and applied over the curved headlight pod. It filters out the Sun’s harmful UV rays, and is tough and resilient enough to prevent scratches from most road debris. The really good news is that a kit is inexpensive, and simple enough for anyone to install themselves in about an hour. Read on to learn how.
Parts Needed
PPF has been around for many years now. Usually you may see it protecting the paint on the front of a car. The quality of some films are so good now that you can actually apply them to the lenses of your headlights to protect them as well.

While you can buy sheets of the stuff and trim it yourself, I’ve always purchased precisely designed and precut kits. I’ve been very happy with kits from InvisibleMask.com. I’ve purchased a full coverage kit from them for my Sweetie’s VW GTI, and also for the headlights of my son’s Mini Cooper S. The kits from them have always worked perfectly.
On their website you just enter the specifics about the year and model of your Aston, and they show you a list of all the available kits they have for it. They have kits for all the various front end panels, mirrors, door sills, etc. The one we are interested here is called the Headlight Kit. It includes PPF for both headlights AND the headlight washer. [One oddity on their website, the outline of kit doesn’t look like headlights, it’s accidentally a picture of the lower sill kit, but don’t worry, you get a headlight kit]

After you select the kit you want, during the checkout process it will ask you which brand of PPF you’d like the kit cut from. Many companies make PPF, but I am partial to using one of the best, 3M ScotchGuard Pro. It cost a wee bit more than the economy brands, but I’d rather put the best material on that I can so it lasts longer. For my 2005 DB9 Coupe the headlight kit made from 3M Scotchguard Pro cost me a very reasonable total of $55 USD (including tax and shipping). It arrived by post in about a week.
Tools
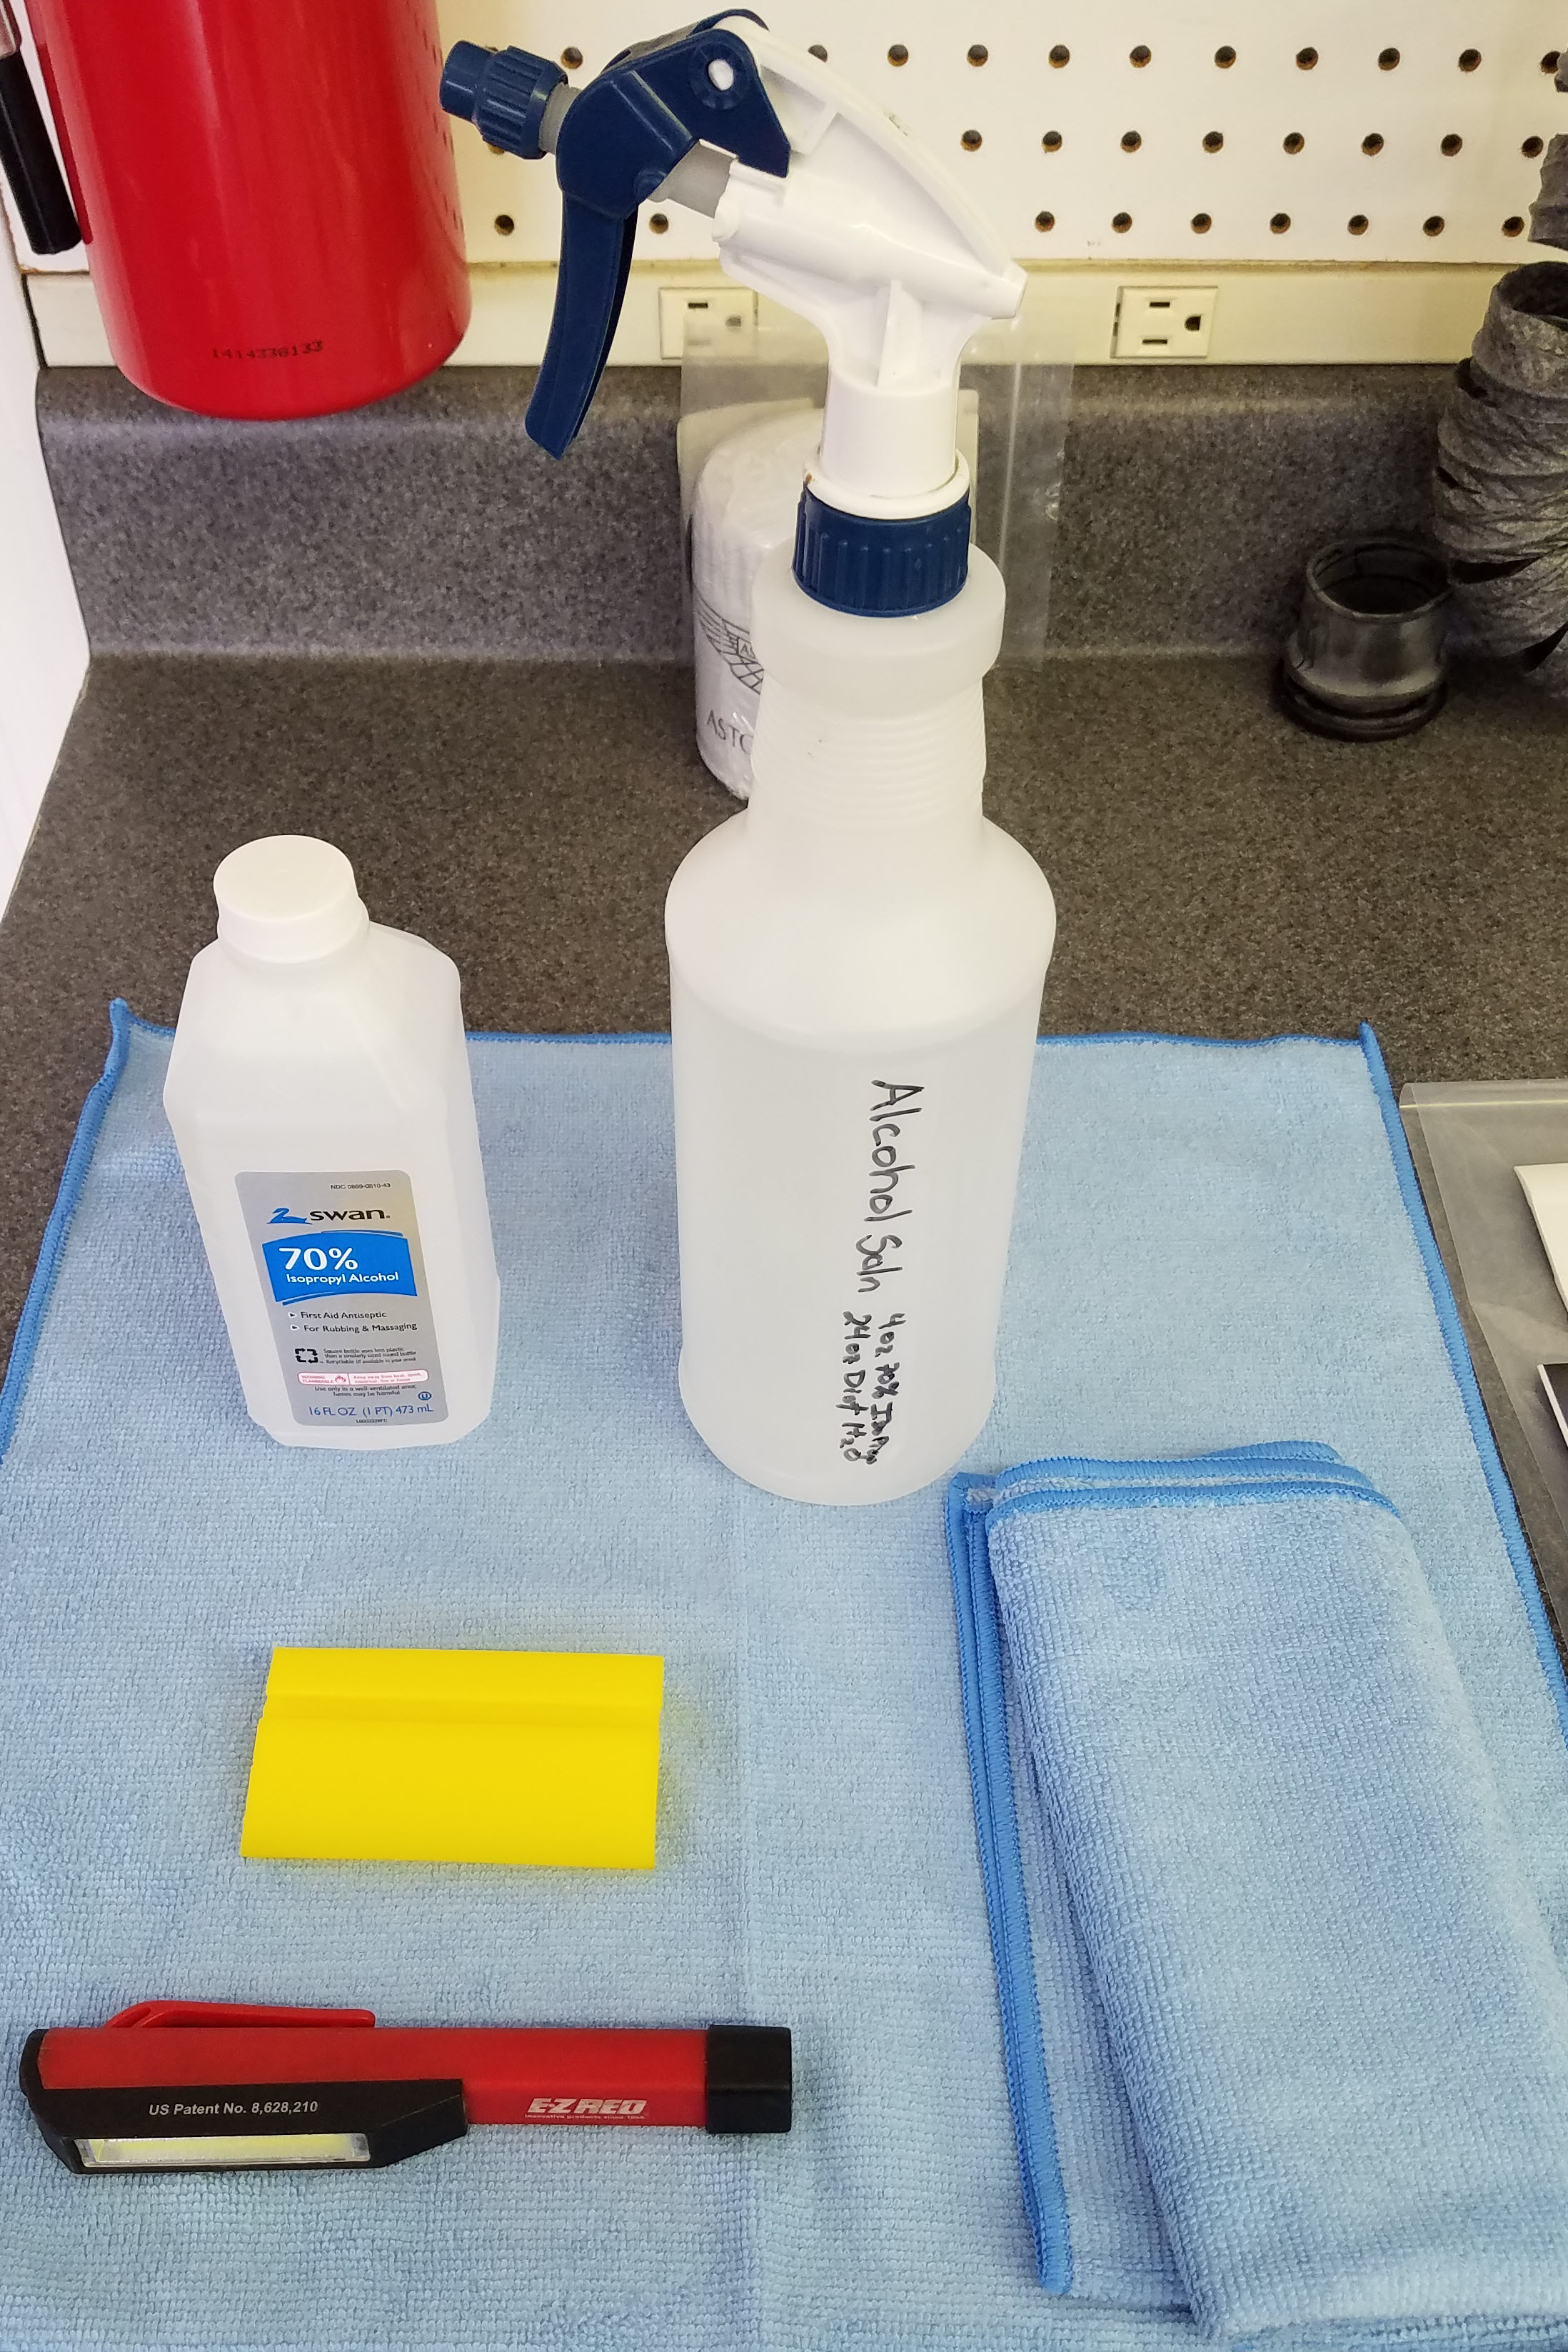
You need just a few tools and supplies to tackle this project, and not all of them may be around the garage already:
- Spray Bottle
- a 32 ounce bottle is suggested
- I purchased one that is generally sold for any ‘detailing’ tasks off of Amazon.com for about $7.
- 70% Isopropyl Alcohol
- You’ll need at least 4 ounces to mix up a full bottle of ‘tack’ solution.
- I purchased a 16 oz. bottle off of Amazon.com for about $8 USD. You can probably pick this up at a local pharmacy too.
- Clear Bra Squeegee
- A really basic one is included with the kit from InvisibleMask.com
- I purchased a little larger and easier to hold one from InvisibleMask.com for about $6.50 USD. Its called the Yellow Turbo Squeegee and is listed as being the ideal one to use with 3M Scotchguard PPF. You can find it online here.
- Really, really clean Microfiber towels
- Inspection Light to help see the edges once you’d got them pressed down (they nearly vanish).
![]() If you need any of these I’ve organized them onto the official Aston1936 Amazon page so you can find any of the products I mention easily. Most have free Prime shipping. Check it out here!
If you need any of these I’ve organized them onto the official Aston1936 Amazon page so you can find any of the products I mention easily. Most have free Prime shipping. Check it out here!
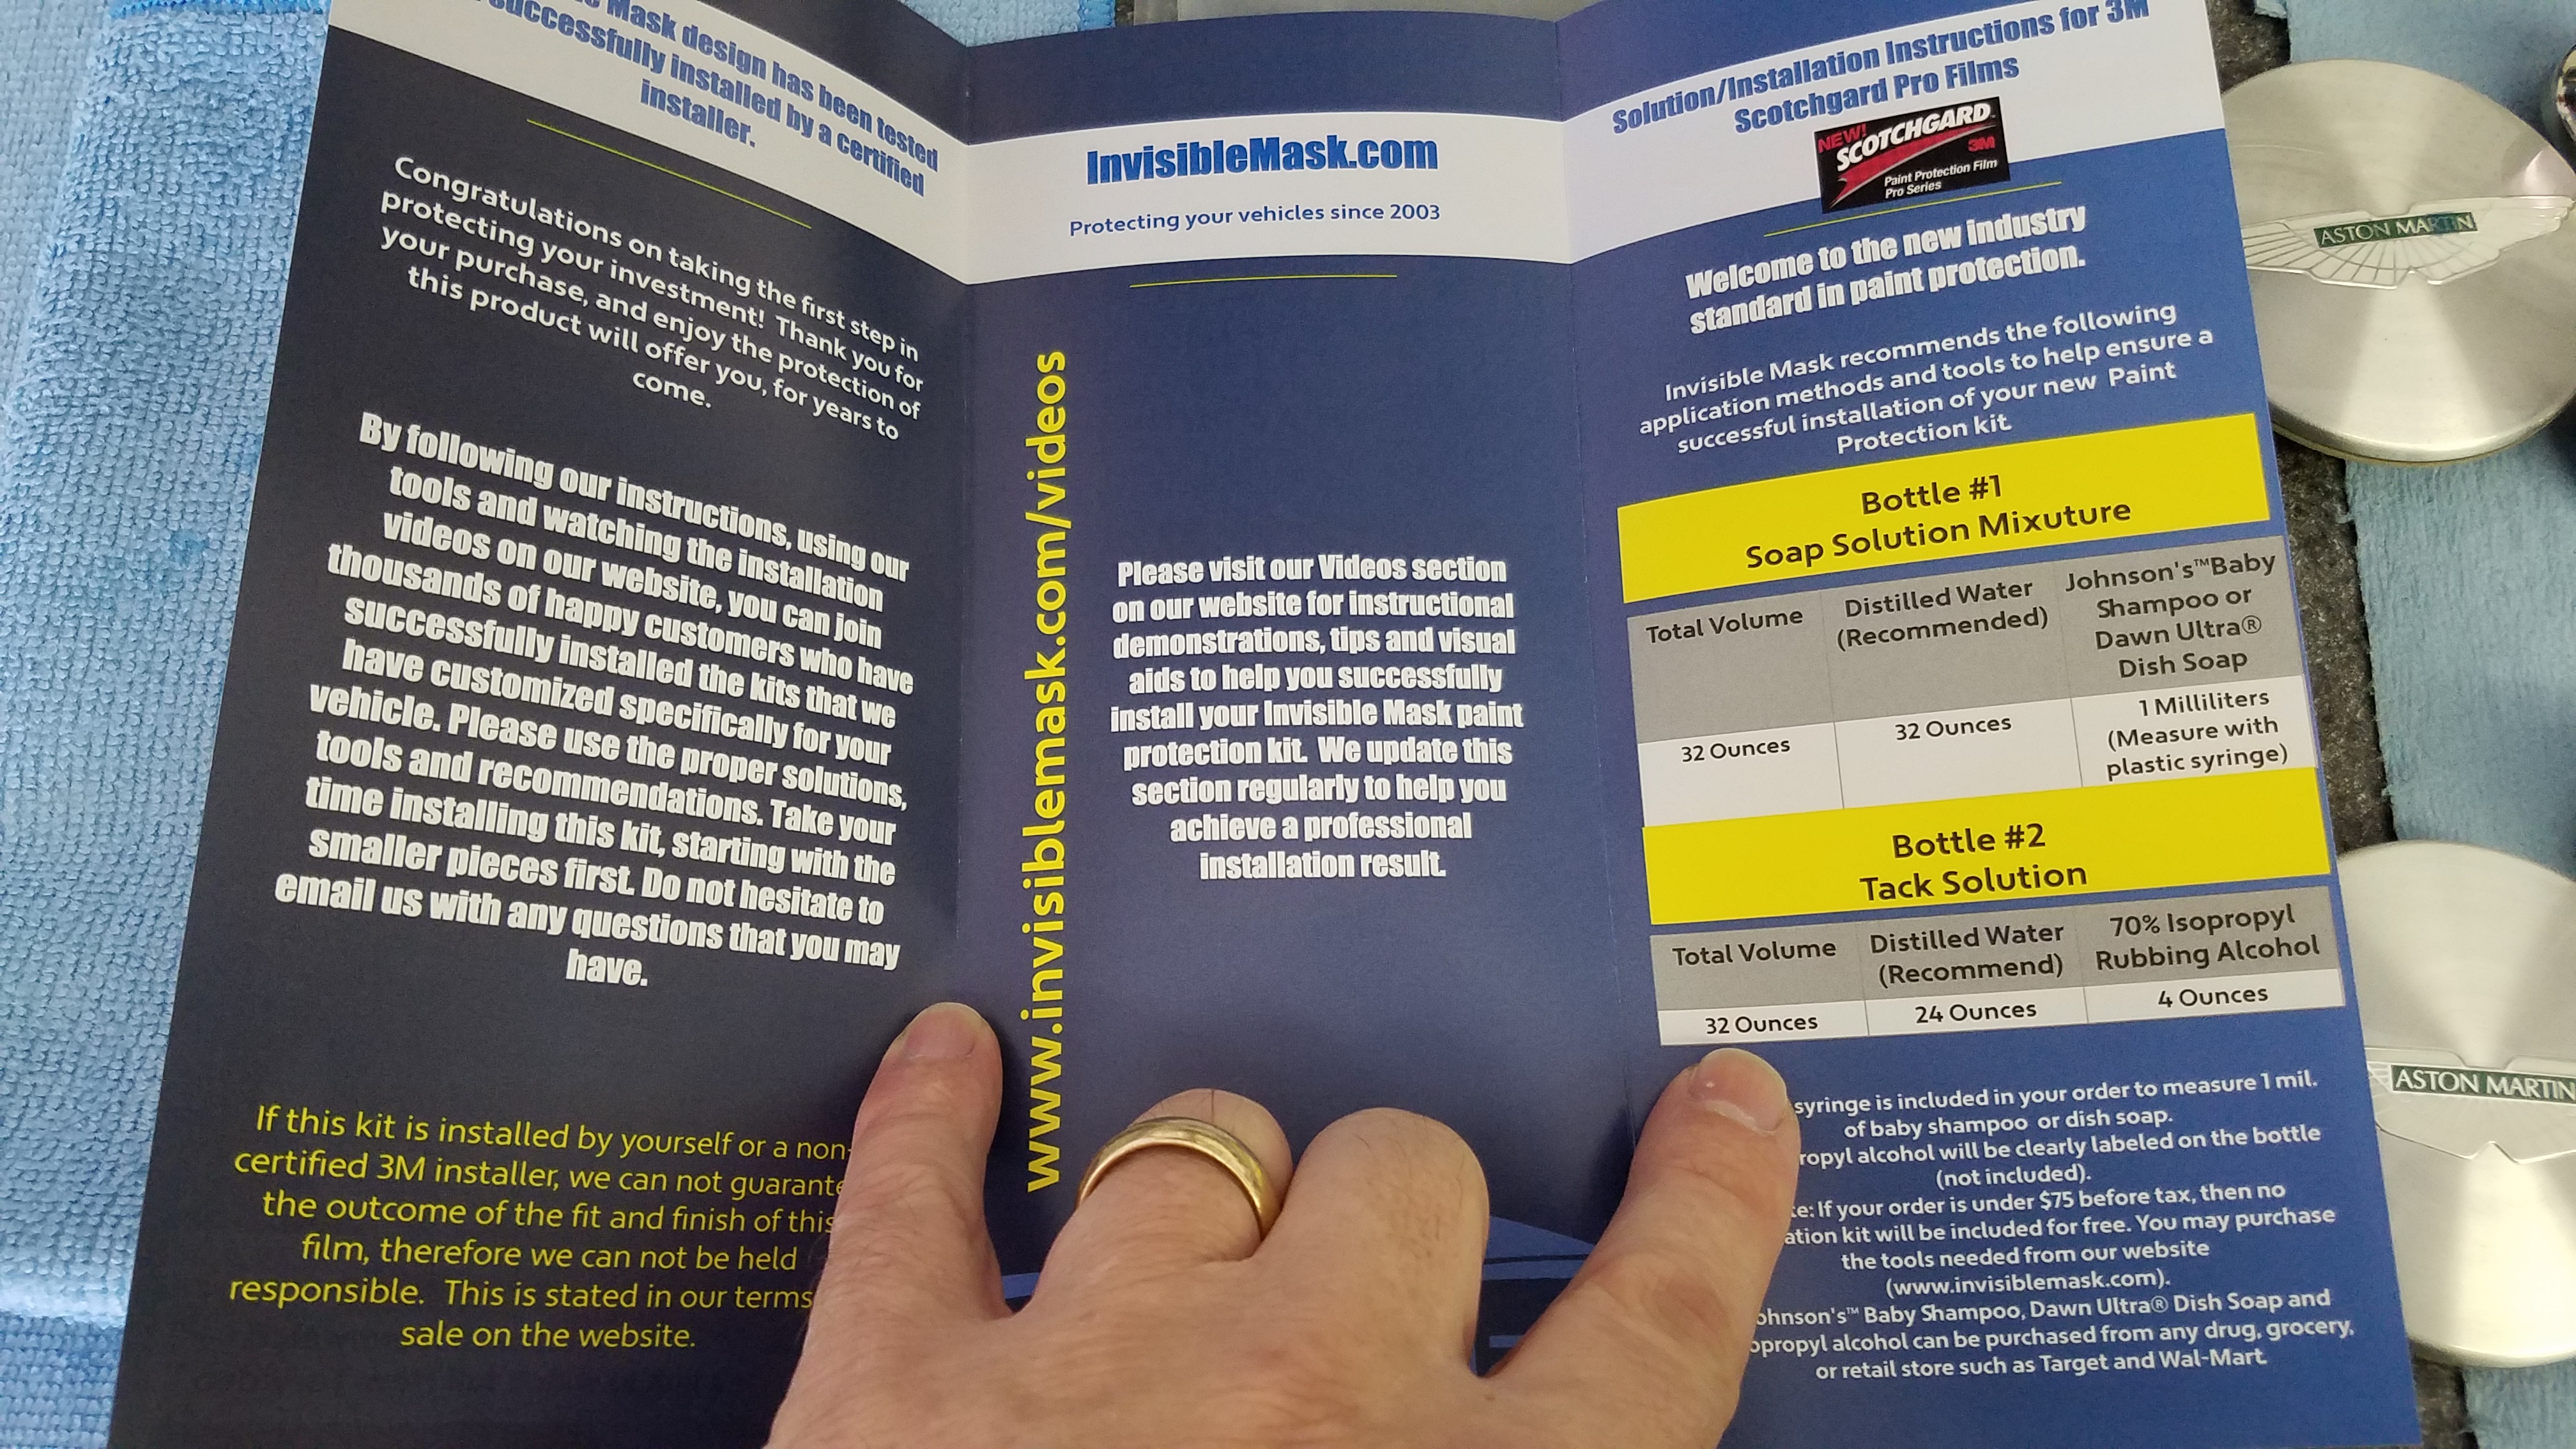
Once you have your tools and supplies together, you’ll need to make the required ‘Tack’ solution in the spray bottle. The instructions from InvisibleMask.com list the ratio as 4 oz. of alcohol to 24 oz. of distilled water (that’s a 1:6 ratio if you are going to make some other volume). I certainly didn’t use all 28 oz of solution during the process, but you don’t want to run short at some critical moment and have to stop to go mix up another batch. All of this is super cheap, so I just made the full 28 oz. I didn’t use distilled water either (my home has filtered and softened water). You definitely want to be using clean, clear water. If it leaves hard water stains when it dries, that may be left UNDER the PPF (not good). If your water is hard or off color, definitely get a jug of water from the local grocer.
 [Note: Follow the instructions for your specific brand of PPF. My instructions here are for the 3M Scotchguard Pro film]
Procedure
The whole process to apply the PPF to both headlights should take about an hour. Be sure to leave yourself ample time so you don’t feel compelled to rush and cut corners or compromise. Getting it aligned is a bit fiddly, and you want to be patient and precise.
I’d suggest you tackle this on a moderate warm day. Just a normal roughly 72°F (21°C) day. Can be warmer or cooler. It’s just easier when the PPF and vehicle are warm, it allows the film to stretch a little easier and your job will be easier. A day where its very hot, the alcohol solution will evaporate very quickly making it tougher. A day where its cool (like the 50°F (10°C) day I filmed my doing it in the video below) its just takes a little more effort to stretch the film.
Do the work in a garage or full shade. You don’t want the extra heat from the Sun evaporating the alcohol solution too fast.
I’d definitely recommend you watch the YouTube Video I have prepared on this whole process. Seeing how I really do it might be better than reading it. The video is a bit long, but I wanted to make sure you saw exactly how to get it done right. Check it out below.
Clean the Car and Headlights
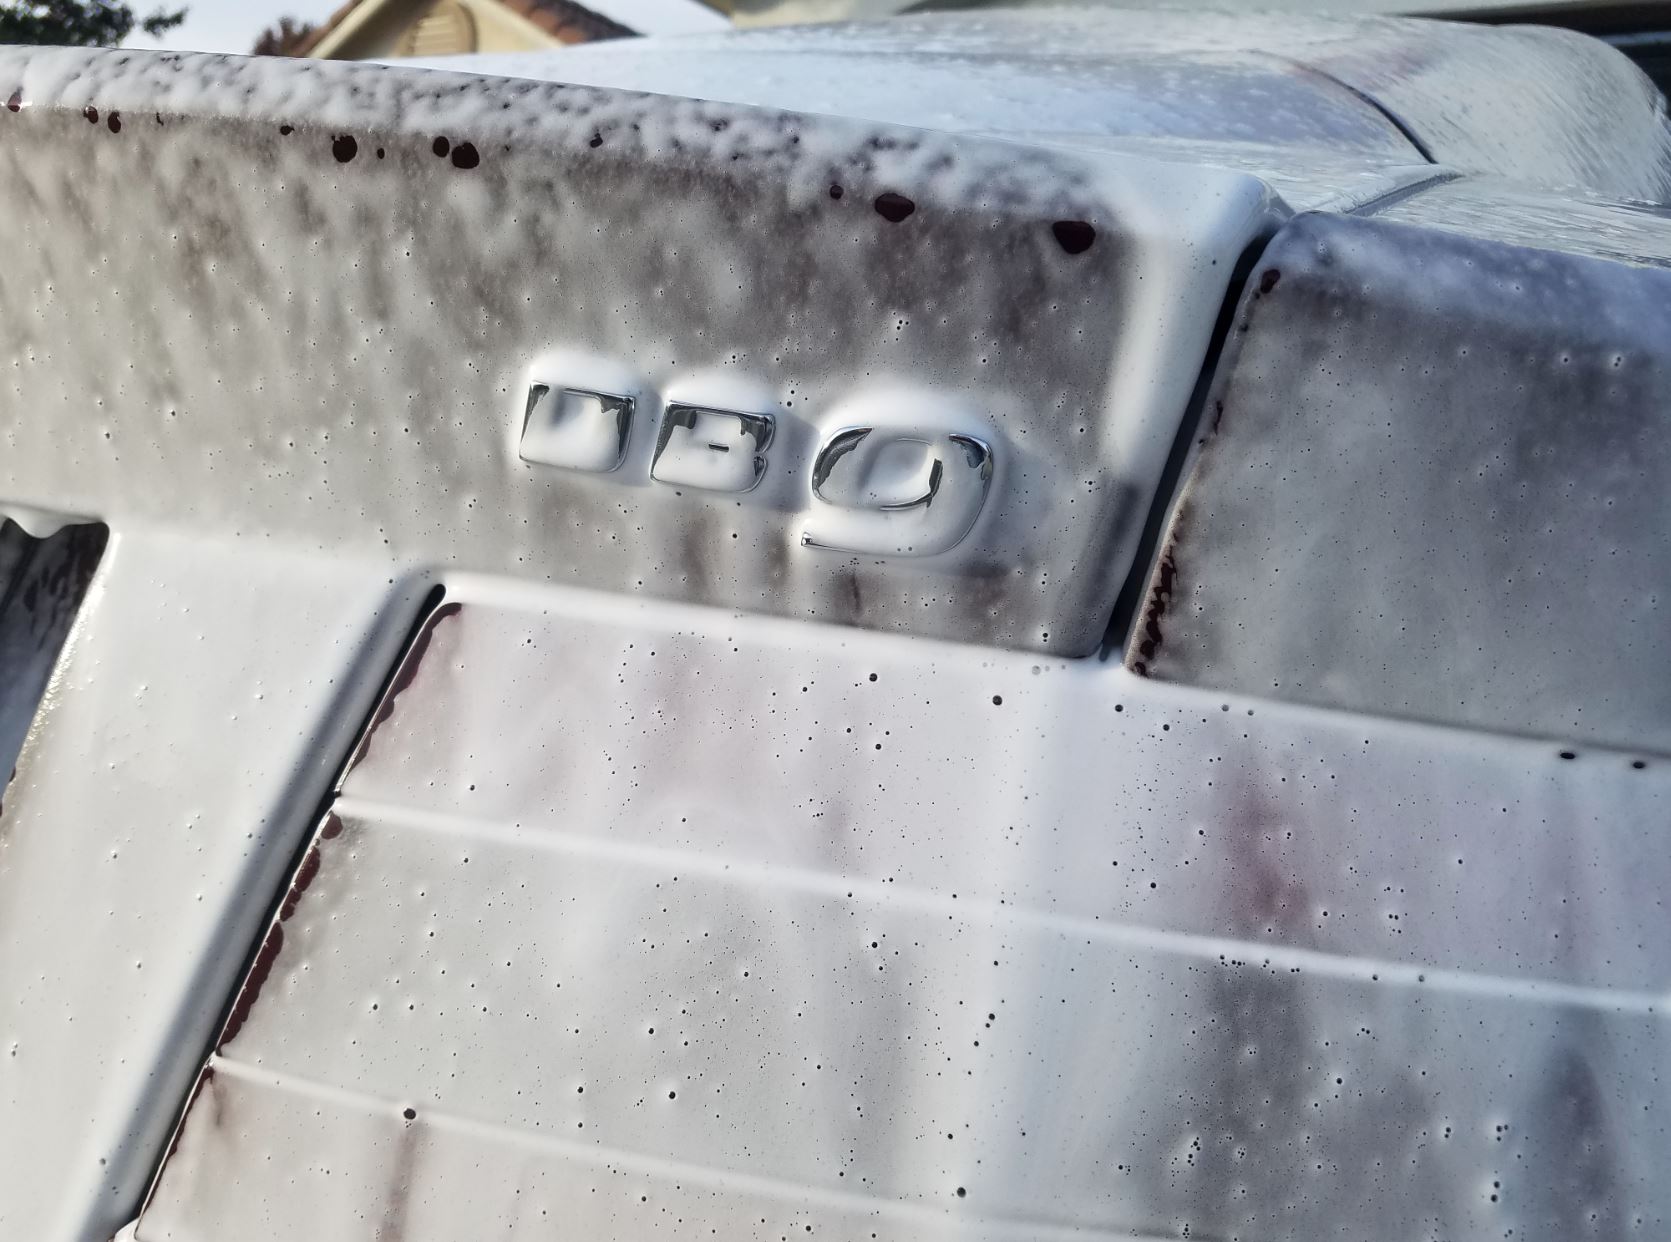 I washed my whole car before I started. We want the headlights to be clean, but I also wanted the surrounding fender and hood to be clean so that there wouldn’t be any dirt that I could accidentally wipe into the headlight area.
You are going to seal the current condition of the headlight surface in under the PPF. You of course want it clean and free of scratches. If you have any existing scratches or imperfections, now would be the time to polish them out. The headlights are polycarbonate like in most modern cars, plus it appears the factory applied the same paint hard shell of clear coat to them for extra protection and shine. Adding PPF over an existing scratch won’t make it disappear, it will trap it under the PPF. Fix any defects before you apply the PPF
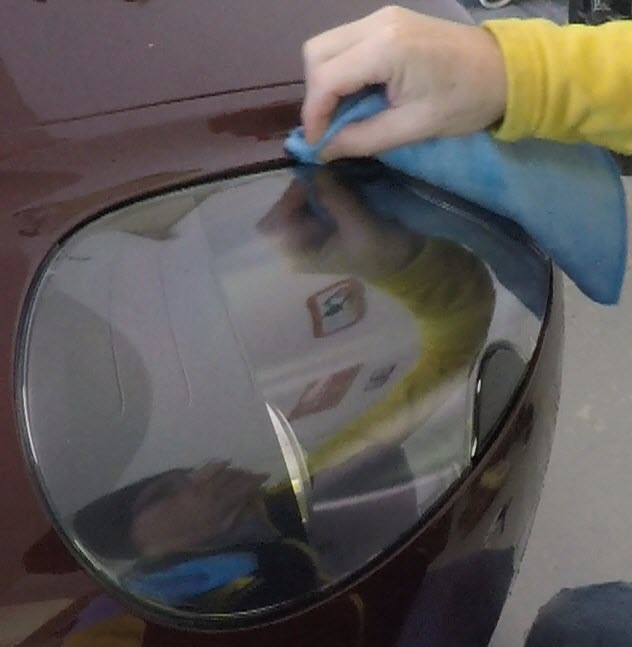
 We need to remove ANY traces of wax from the surface of the headlights. The adhesive of the PPF is made to stick directly to the plastic of the headlight. If there were traces of wax at the edges, your PPF won’t stick and may lift away prematurely. To remove the wax, we are going to use the alcohol tack solution we’ve mixed up. It will strip away the wax. Spray the surface liberally with the tack solution and wipe it off using a microfiber towel with vigorous pressure. Pay particular attention to the small groove surrounding the headlight where it meets the fender. This is the most likely place for any waxes you’ve applied to the painted fender to have bled over to the headlight area. Get an edge of the alcohol dampened towel into the edge with your finger and work it all the way around. Take your time and get this step done really well – it matters.
Clean Hands
 Your hands have to be immaculate. Your fingers will be touching both sides of the film, including the side with the adhesive. ANY oil or dirt on your fingers will transfer and embed in the adhesive, and show through the finished PPF. Just wash your hands thoroughly with soap and water before you start to handle the PPF.
As an added step I rinsed my hands with the alcohol tack solution. Dousing them with the solution and then wiping off with a microfiber just before I start to handle the PPF.
Peeling Off and Handling the PPF
Keep both surfaces of the PPF drenched in tack solution ALL THE TIME. It keeps the exterior of the PPF slippery so we can use our squeegee on it. It keeps the adhesive side ‘active’ so it doesn’t set up yet.
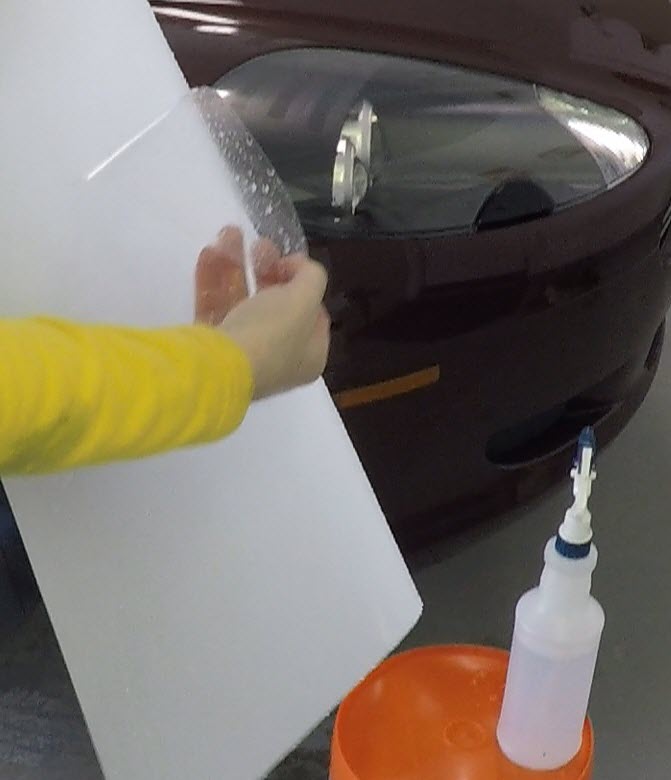 Start keeping it wet even as you peel it off the backing material. Fingers wet, PPF wet, everything wet. As you peel it off, periodically stop and spray the newly exposed adhesive side.
Be mindful not to drop it. If the PPF is peeled and touches a dirty surface (floor, bench, clothes, etc) it will pick up that dirt and stick it into the PPF and be trapped under your finished product. If this happens, I’d punt and throw it away and order a new kit.
Only peel off one piece of PPF at a time. Complete the installation of that piece entirely, then move onto the next.
Applying the PPF
This is the step where skill and effort come in. Just a reminder that you should really watch my video below.
- Wet the surface of the headlight with the tack solution. Drench it.
- Re-wet the adhesive side of the PPF. Drench it.
- Lay the PPF onto the headlight, it should be able to slide around.

The PPF is cut SMALLER than the actual headlight surface. You will find it will be several millimeters short of the edges no matter how you line it up. It is made to stretch, and we have to do this to get it to work with all the curves.
You have to pick a place to start and tack an edge. Since the half moon shape cut out for the headlight washer is a very complicated edge, I lined up here first. I slide the edge of the film up almost exactly to the edge of the plastic, maybe just 1 mm short. I also kept an eye of the overall fit of the rest of the PPF to make sure I didn’t have it overly twisted forward or backward.
Hard Tacking
 Once I was happy with the placement near the headlight sprayer I used my squeegee and carefully hard tacked down about a 1 cm area of the PPF all around the perimeter edge of the headlight sprayer area. This sticks the PPF down quite well, and will anchor it in place so I can stretch the film in other directions.
Re-Wetting
 All the while doing these alignment steps, I was mindful of whether the PPF was drying out. Time is passing, the alcohol is evaporating. Periodically I peel back the non-tacked areas and re-wet them with the tack solution. Do this throughout the process.
Stretching
We can’t stretch in every direction at once. The idea is to anchor one point, then stretch across from it in one direction. In the video you see my first stretch is across the headlight away from the anchored headlight washer area we hard tacked down.  I pulled and stretched the material in a narrow band towards the center of the hood, just enough until I got the edge to within 1mm of the plastics edge, and then I pressed it down with my fingers. Then, I used my squeegee and applied a smoothing hard tack stroke from the headlight sprayer area to towards where my fingers were pressing down near the opposite edge. This stroke now hard tacks that whole line. Keep the surface wetted with tack solution while doing this so the squeegee can easily glide along the PPF.
With that one whole line now hard tacked across the surface, your repeat the stretching process in opposite directions breaking the surface roughly into quadrants of smaller and smaller pie shaped areas.
 I gripped the forward most edge of the PPF, and stretched it out to about 1mm from the front leading edge of the headlight, and pressed it down with my fingers to hold it in place. Then I used the squeegee to hard tack down a line. See the video.
With the front section mostly stretched the correct amounts, you can now get down to business smoothing and aligning whole sections. Work from the hard tacked center lines towards the exterior edges, tugging and stretching where needed to get them to within 1mm of the edges. Keep re-wetting as necessary. Smooth out all the fluid and air bubbles carefully from the center out.
Peeling Up to Redo
You can peel the PPF up and redo an area or even the whole thing if you find your aligment has gone whacky. Just be gentle and slow as you pull it back up. Don’t overly stretch it while pulling. As long as it hasn’t completely dried on, you can peel it off. You’ll see me pull back an area several times during the video.
Excess Material ‘V’s
 These are compound curved headlights. You’ll see in the video I end up with some small ‘V’s of material built up right at the edges ahead of the headlight washer. This is excess material, sort of a sign that I didn’t stretch enough everywhere. I tiny V like the ones I got will stick down and vanish (the magic of PPF). Carefully hard tack down on top of them with the squeegee, applying and holding the pressure a little longer for the adhesive to really bond. While still wet, they may reappear, don’t panic. Just keep coming back to them during the install and pressing them down periodically.
Keeps Stretching and Doing the Other Areas
With the front two quadrants complete, keep going using the same technique to the rear section. Re-wet. Stretch the centerline to the rearmost edge, hard tack. Then smooth out the two quadrants. Again, watch the video.
Drying Off
 Once you have smoothed out all the PPF and have gotten rid of all the fluid and air bubbles, and are happy with all your edge alignments its time to dry it off. Use a fresh microfiber towel and dry the finished surface entirely. Wipe in a direction from the center of the headlight to towards the fender so your wiping motions are continuing to smooth the film down and won’t catch an edge of the film to peel it up. Then really carefully dry the edges to get rid of all the tack solution that will be hiding in the gap between the headlight and the fender. This is really important to do well.
Hard Tack the Edges
 The last step is to apply a really hard tack of pressure to the edges. This is important to help with your PPF install to last a long time. They fail at the edges, so getting the edge really glued down hard helps. Methodically work your way around the whole perimeter using fairly hard pressure. Do this dry with your squeegee, wiping from about 1cm away towards the edge, sealing it down tight. Now that the edge is dry of tack solution, this should be really effective to stick it down, and any remaining V’s you have should lay down permanently.
One piece down, three more to go…
After the hard tack of the edge is done it should be perfect and almost invisible to detect. I had to use m inspection light to actually be able to see the edges. This is the enjoyable ‘Tada!’ moment where you should feel well satisfied that you did this.
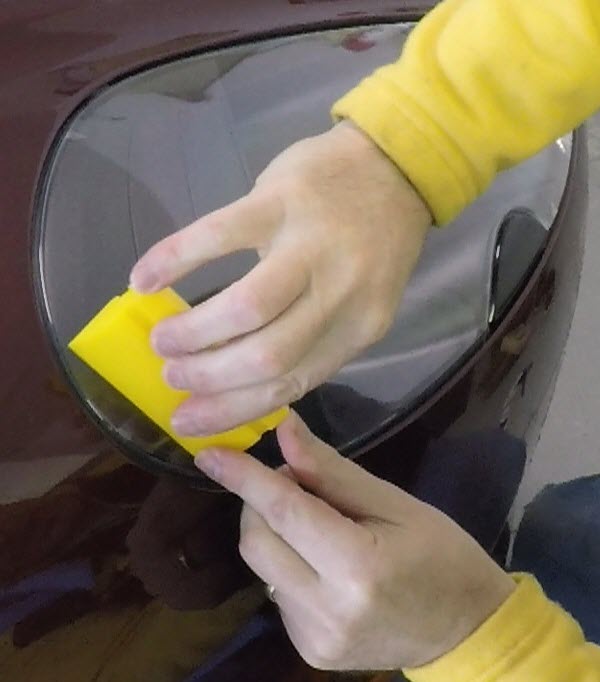
The InvisibleMask.com kit includes little half moon shaped pieces to protect the hard black plastic surfaces of the headlight washers. Follow the same process, but these are much easier as no stretching it required. Just lay them on, align, and hard tack.
Then repeat the whole process on the other sides headlight.![]()
Imperfections
If when you are all done you spot a small air bubble to tiny pocket of trapped fluid, don’t despair. DON’T use a pin to poke a hole to drain the pocket. The pin hole will remain forever. Small trapped air and fluid will eventually escape through the material itself, and will disappear. It may take up to a month, but they will go away.
Car Care
Immediately after installing don’t leave the car out in the rain for a day or two. Don’t wash your car for a day or two. We want to keep the PPF dry for a day or two to allow the adhesive to fully set. Probably wouldn’t be a problem, but better safe than sorry.
You can apply wax or sealant to the PPF like most any painted surface. There is no need to, but don’t worry if some gets on it.
 Be careful using any sort of machine polisher near the edges of the PPF. If you are using a DA polisher on the fender near the PPF, keep in mind that edge, and use the polisher in a way that is rotating in a way that would not be trying to peel up against the edge. Its stuck down hard and likely won’t peel up anyways, but again better safe than sorry.
Video
As noted above I’ve created an in depth video showing the process and in this case I really suggest you take the 25 mins to watch it all the way through to catch the techniques. Good luck with your install!

Another excellent blog Steve, many thanks.
LikeLike
Hi there I have a aston martin 2005 db9 and when the engine warms up I get a tapping sound under engine any answers thanks john
LikeLike
Hi John. I’ve heard about issues like this on the forums, and unfortunately its generally pretty grim news in some cases. Something about the pistons due to low oil. Could be something different though. Let me know what you learn
LikeLike
Hi Steve, like all the guys on here I want to say a big thank you for all your input, help and advice to fellow DB9 and want to be DB9 owners. I have been following your site since nearly the beginning when I followed your procedures and did the full coil pack, spark plug, pcv valve changes and misfire correction factor learning procedure. As they say in England you are a top man. I have just seen your video on car stereo volume not working occasionally. Hopefully I may be able to help you for a change. My car is a 2005 model car like yours and has done this. Mine tends to do it a lot more often when you unlock the car and open the passenger side (UK car) first, but still only very occasionally does it when I open the driver’s side door first. I find the quick fix is to (importantly) actually get out of the car, lock the car remotely again, wait 20-30 seconds and open the car up again and put your key in the ignition as normal and try the volume again. This normally works first time and if not I try again and it never seems to fail, the volume always works again. It will save you having to wait 20 to 30 mins. This might sound crazy (but note my opening the passenger side door first comment) but I have a sneeky feeling that it may (but may not) have something to do with a glitch with the door modules, because like in your video my car is the same, if you stay in the car and turn the ignition off and on again it does not fix the problem but when you went into work you locked the car up and came back and remotely opened the door again the volume worked. My car has in the past had computer reflashes to try and fix this at a very good Aston Martin main dealership in the UK but even they were not sure why it did not permanently fix it. I have owned my car for over 6 years and this fix of this occasional glitch has never failed. I hope this helps, please try it and let me know if this works for you, and hopefully others. All the best to you, GB
LikeLike