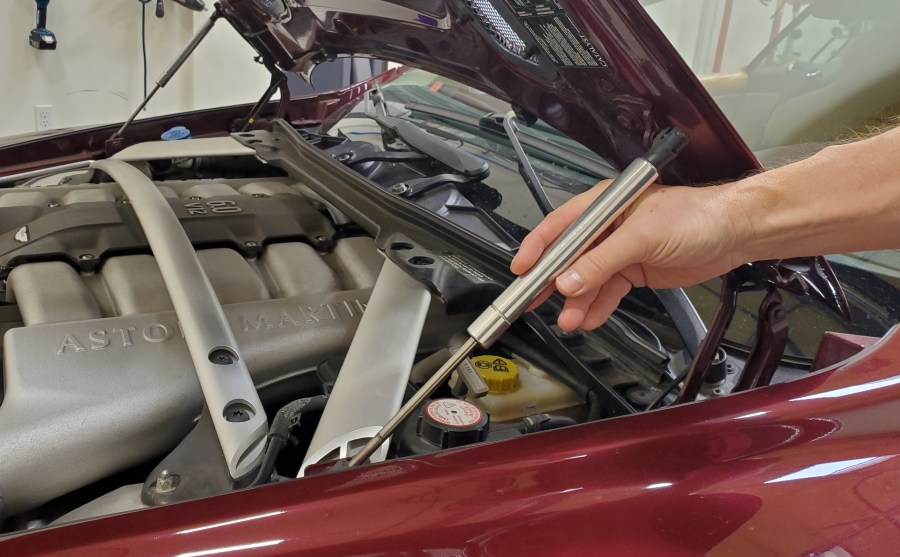
 During my recent 1 year service I had the hood (bonnet) up while I was raising the car to get under her to drop the oil. There was a little wiggle/jiggle to the hood as the car went up. Then SLAM! The hood slammed shut unabated from full open. Holy crap – scared the jeebers out of me.
Other than raising my heart rate, this could have damaged a lot of things. The hood ‘stops’ are on the plastic front grill surround, it could easily have broken those off closing with such force. If I had left something sitting on the engine or slam panel (funnel, tools) it would have slammed hard against those and could have dented the hood (or my back!).
What’s going on here is that the two hydraulic gas struts that assist in lifting the hood, and keeping it open, are getting weak. Eventually the seals begin to leak a bit and they no longer have the force they used to. This is normal behavior as a car ages, and gets even worse as winter closes in. The good news is that replacing them is a fairly simple process and doesn’t cost an arm and a leg. Let me show you how.
Background
Gas struts are very popular and it’s no surprise Aston didn’t make a bespoke strut but rather outsourced the struts to a German company Stabilus. You can see it right on the labelling.
I had a solid look around the Stabilus website thinking I could potentially bypass Aston for the purchase, but I wanted to be 100% certain of the part number and spec’s of the strut before I went this route. Stabilus has a ‘Spare Part’ lookup tool, and it included the Aston Martin DB9 Hood gas struts. It’s their part 3233YW.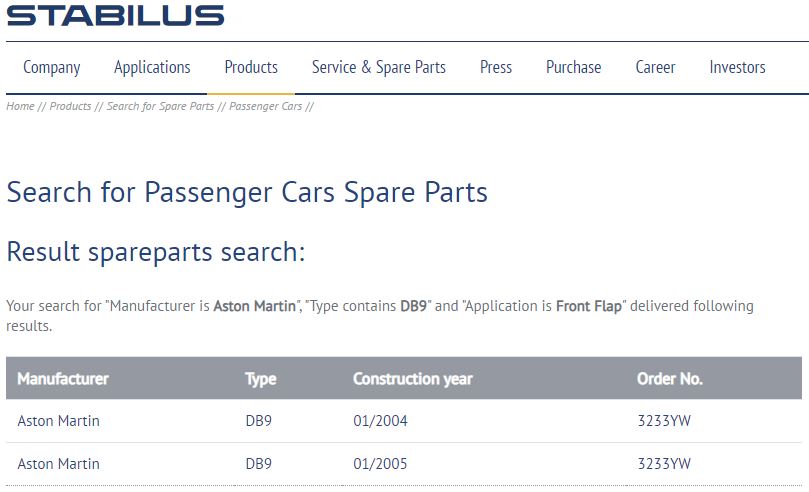
I figured great, I can Google that and get one off Amazon. Not so much. I certainly found some aftermarket struts that claim to be the equivalent, but I couldn’t be sure. I wasn’t able to find an exact ‘spec’ sheet from Stabilus with the dimensions and most importantly the Force rating [if you find an official one, please contact me with it]. I have measured it and the important facts are:
- Length (socket center to socket center) – about 345mm
- Shaft Diameter – 8mm
- Cylinder Diameter – 20mm
- Stroke Length – about 96mm (based on what I can see on the old ones)
- Ball Diameter – 10mm
I still didn’t know the ‘Force’ the strut was rated for. Then I noticed the line right on the label:
0042TZ 0310N 247/17 BE14
I wondered if the 310N meant 310 Newtons. Manufacturers rate the struts in ‘Newtons’ (N) of force. For the imperialists out there 1 pound of force is 4.448 Newtons of force (i.e. 10 pounds – 44.48 N). So, a 310N strut would be about 70 pounds.
I ‘borrowed’ my Sweetie’s bathroom scale (again) and made up pair of wood blocks with a divot that I could use to squash the strut between and measure the force.
The struts should be mostly linear (the same force anywhere on the stroke), but I aimed to compress them about one inch.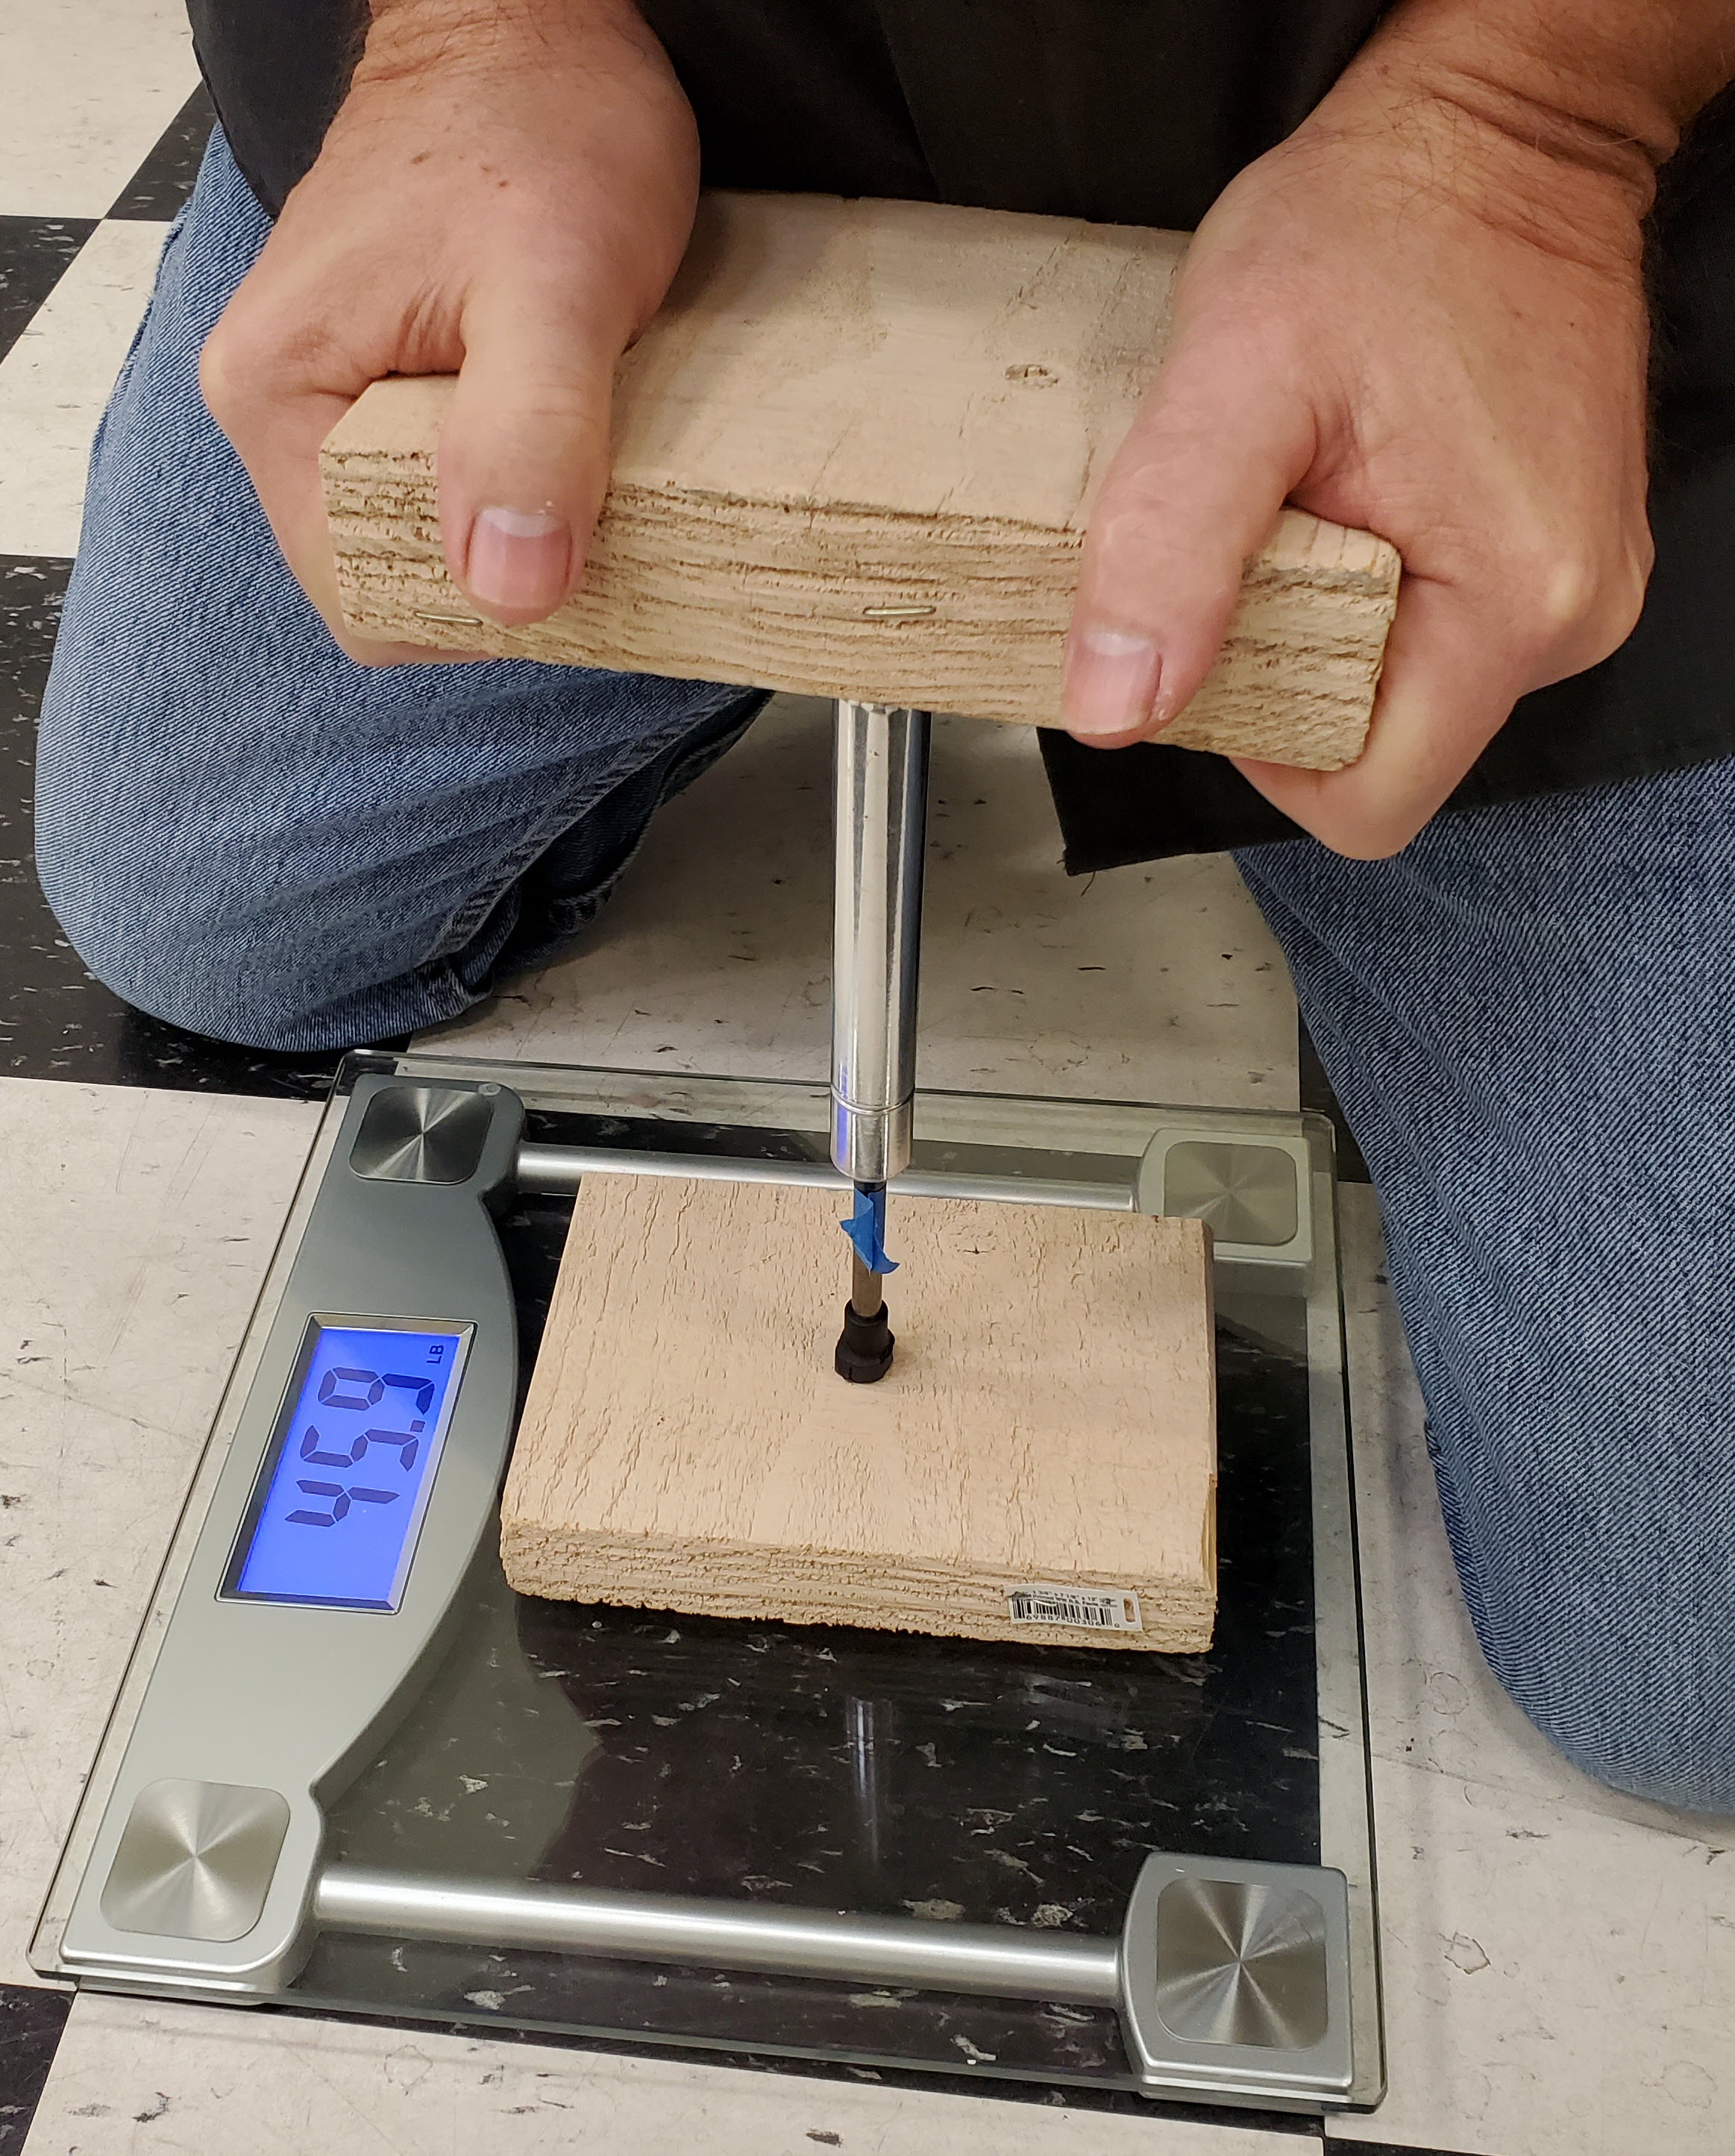
I tested both of the old tired struts and the new ones. The two old struts tested to 36 and 42 pounds. The two new struts both measured ~64 pounds.
The worst of the old struts was down by ~44% versus new. Considering the two struts, that would mean there was ~50 pounds less of supporting force holding up the hood. Explains why it was slamming.
Since the new struts measured out at 64 pounds, that’s 285 Newtons (N) and this doesn’t exactly match up to the label if they were supposed to be rated for 310N. I wasn’t sure if that’s what the label means, but maybe these two new struts weren’t as strong as they should be [if you get a pair and do a similar measurement test, please leave a comment down below what you get].
Dealer Cost to Fix
What does it cost to get this fixed at an Aston Martin Dealership? Good piece of data to know if you are weighing if its worth the bother to fix it yourself. Recently there was a 2007 DB9 sold over on www.BringATrailer.com, and the owner posted his last Dealer Service Invoice from a visit in 2020 when he had all the niggles fixed on his car. The dealership was located in Northern California (one that I’ve visited before).

They charged $186 USD for parts, and $118 USD to install them, for a total of $304 USD. As you’ll see below, you can do it yourself for about $84 in 10 minutes saving yourself about $220.
Parts
This is an easy one. If you own a 2004 to 2012 Aston Martin DB9, DBS or Rapide, you need two of Aston Martin part number 4G43-16C826-AB. 
You can find them online for about $42 USD each here. If you live in the UK or EU you can reach out to the parts team at HWM England and they can probably give you a bit better pricing if you mention you were referred from this website.
This is a rare time when the Aston parts aren’t massively overpriced. I’d recommend that you pay the couple of extra bucks to get the Aston ones for peace of mind (and a neat logo). Saving $10 on a part you change every 10+ years doesn’t make a lot of sense (IMHO).
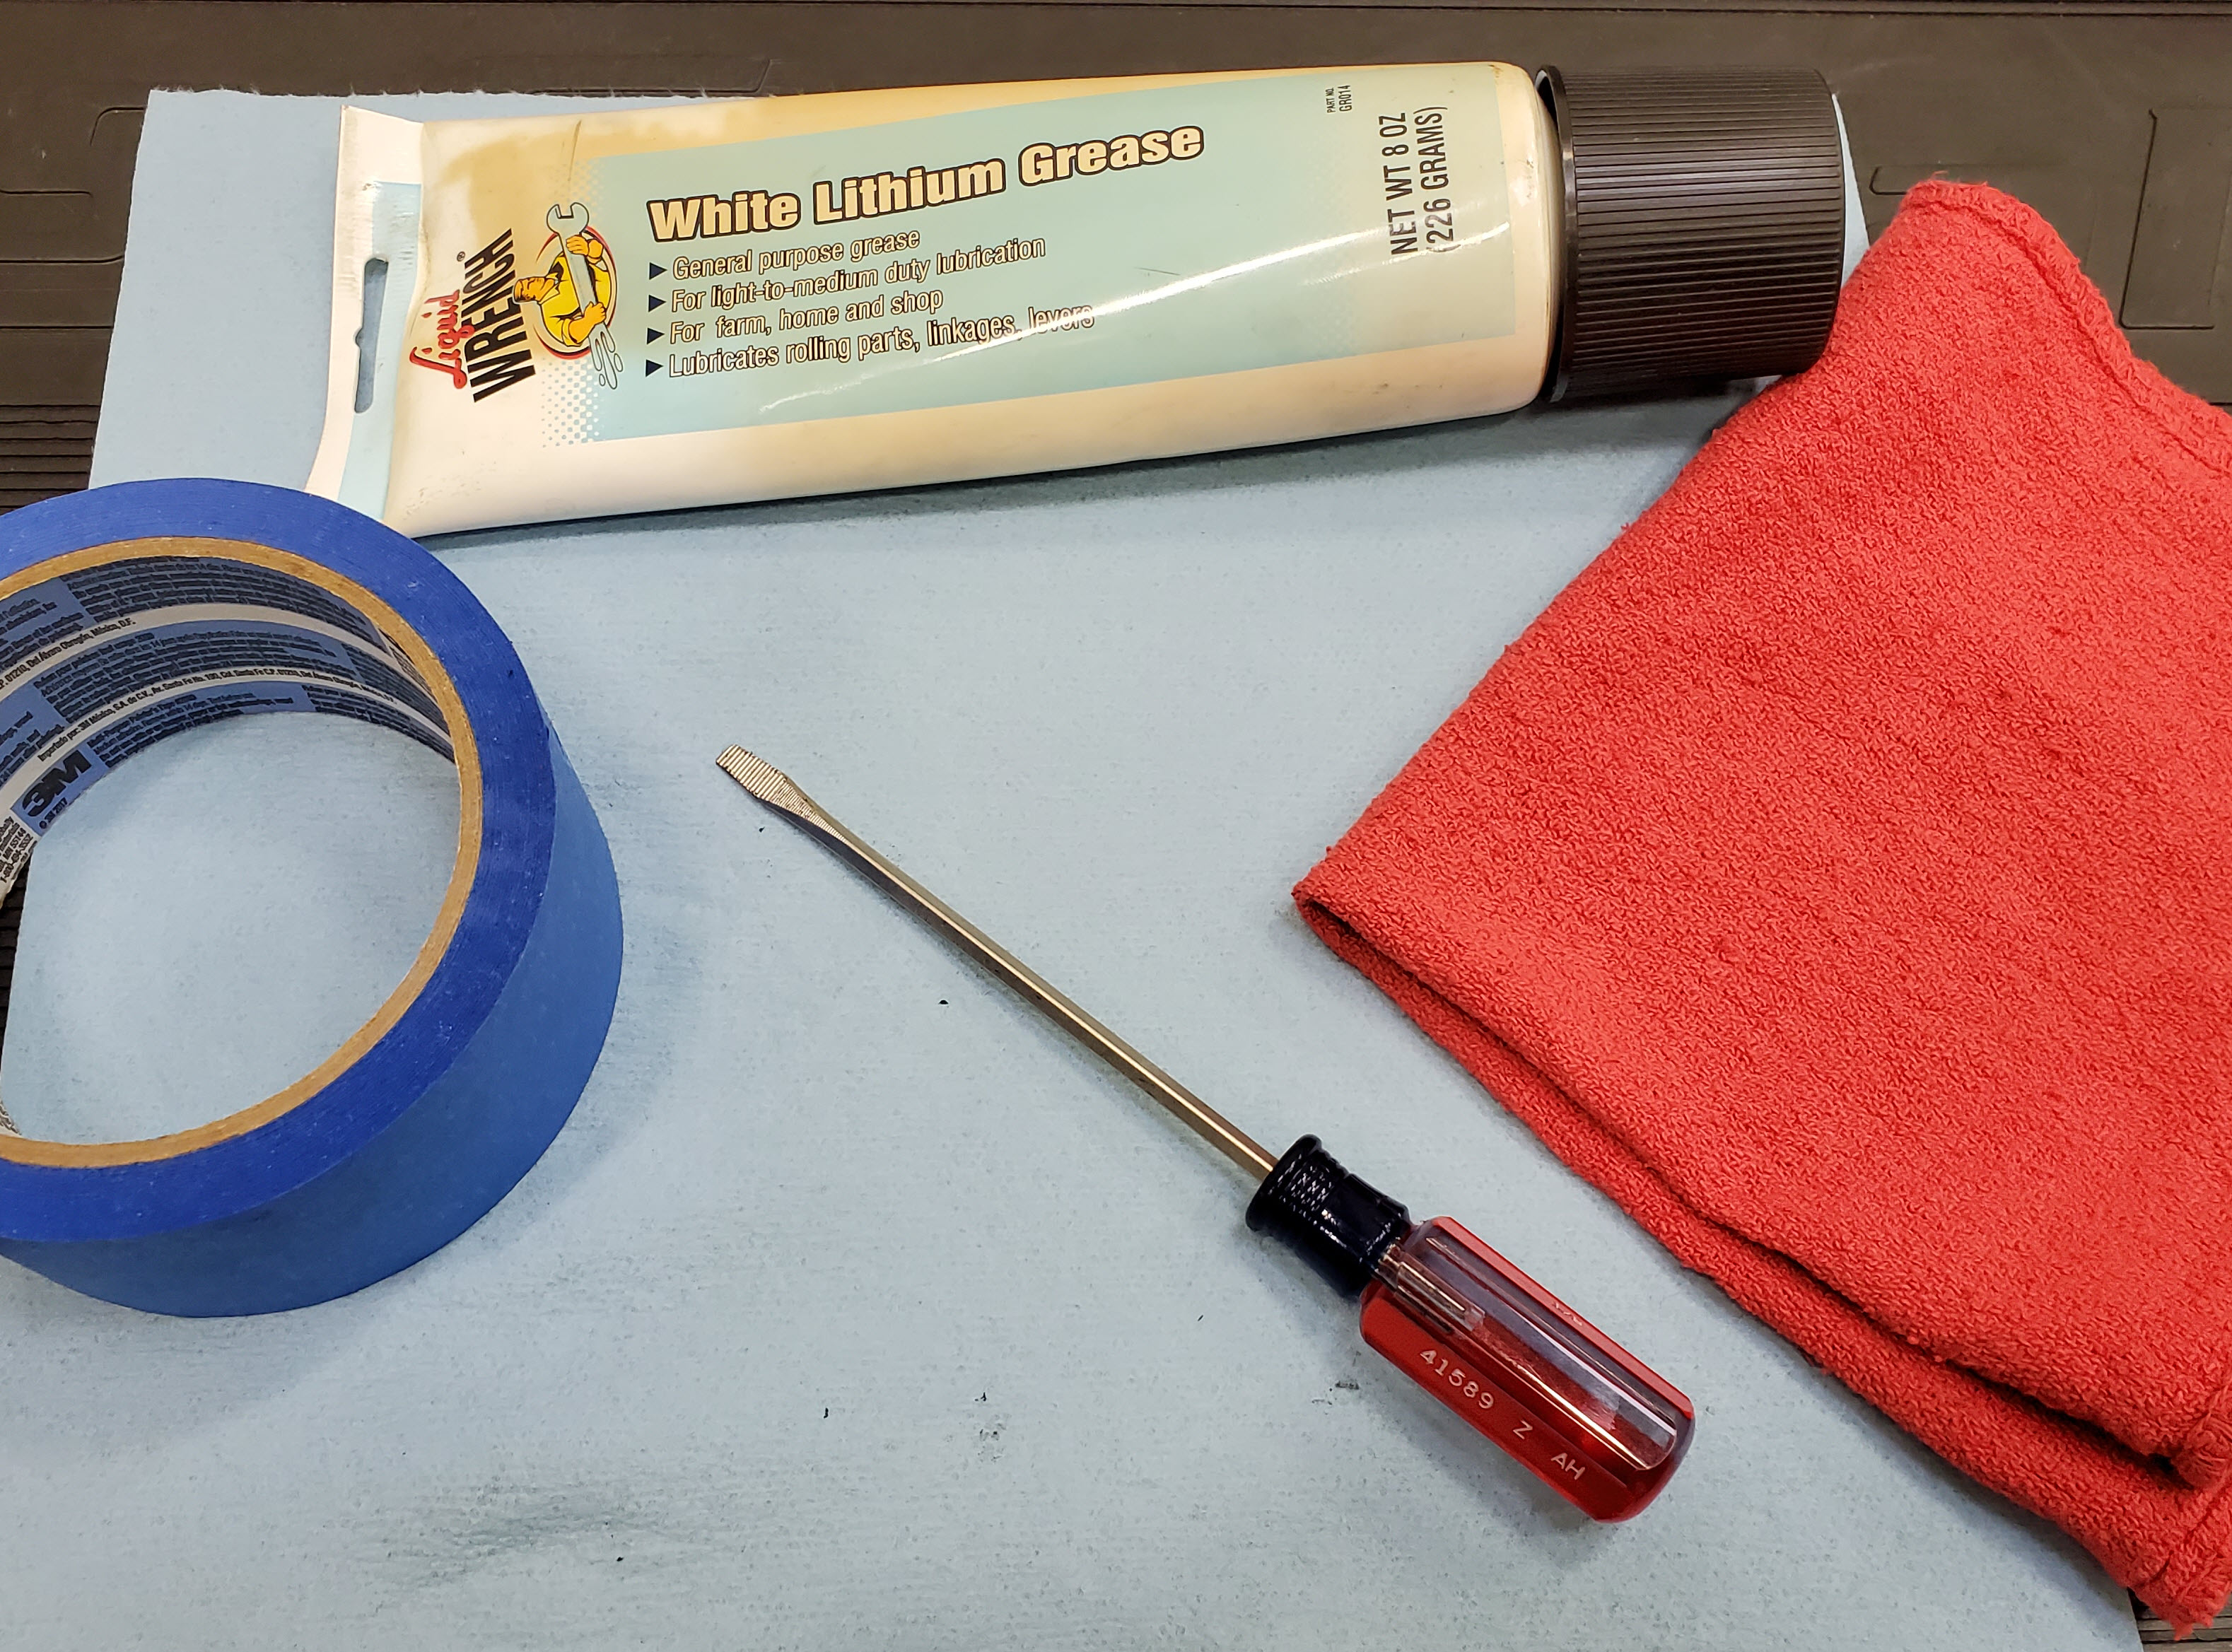
Tools
You need very few tools and supplies to accomplish this task.
- Small Flat Blade Screwdriver
- White Lithium Grease
- Masking Tape
- Lint free shop rag
One very important tool not in the picture is a HELPER. You need someone or something to hold the Hood up while you remove the struts. You’ll see me use a camera tripod and do it solo, but if you can entice your Sweetie or friend to help you for 10 mins it will be even easier.
Procedure
Swapping both struts will take less than 10 minutes and is pretty easy.
I checked the official Aston Martin Workshop manual and couldn’t find any specific reference to removing the struts. Other procedures mention removing them, but as “remove struts”. No details.
Learn how the Retaining Clips Work
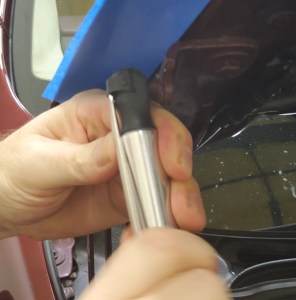
Each end of the strut is a ball and socket arrangement. To keep the socket from slipping off the ball there is a sprung metal clip that acts as a retainer. It’s a simple matter to release once you know these tips.
You don’t need to remove the clip entirely to release it. Doing that would create a problem actually, the clip is a witch to get reinstalled if you accidentally pop it all the way out. To release the socket so it can slip off the ball you only need to retract the clip a small amount. Do this by slipping a small flat blade screwdriver in the slot on the head of the socket (see photo). I strongly suggest you fiddle with this on the bench for a minute before trying it on the car. Figure out how it works.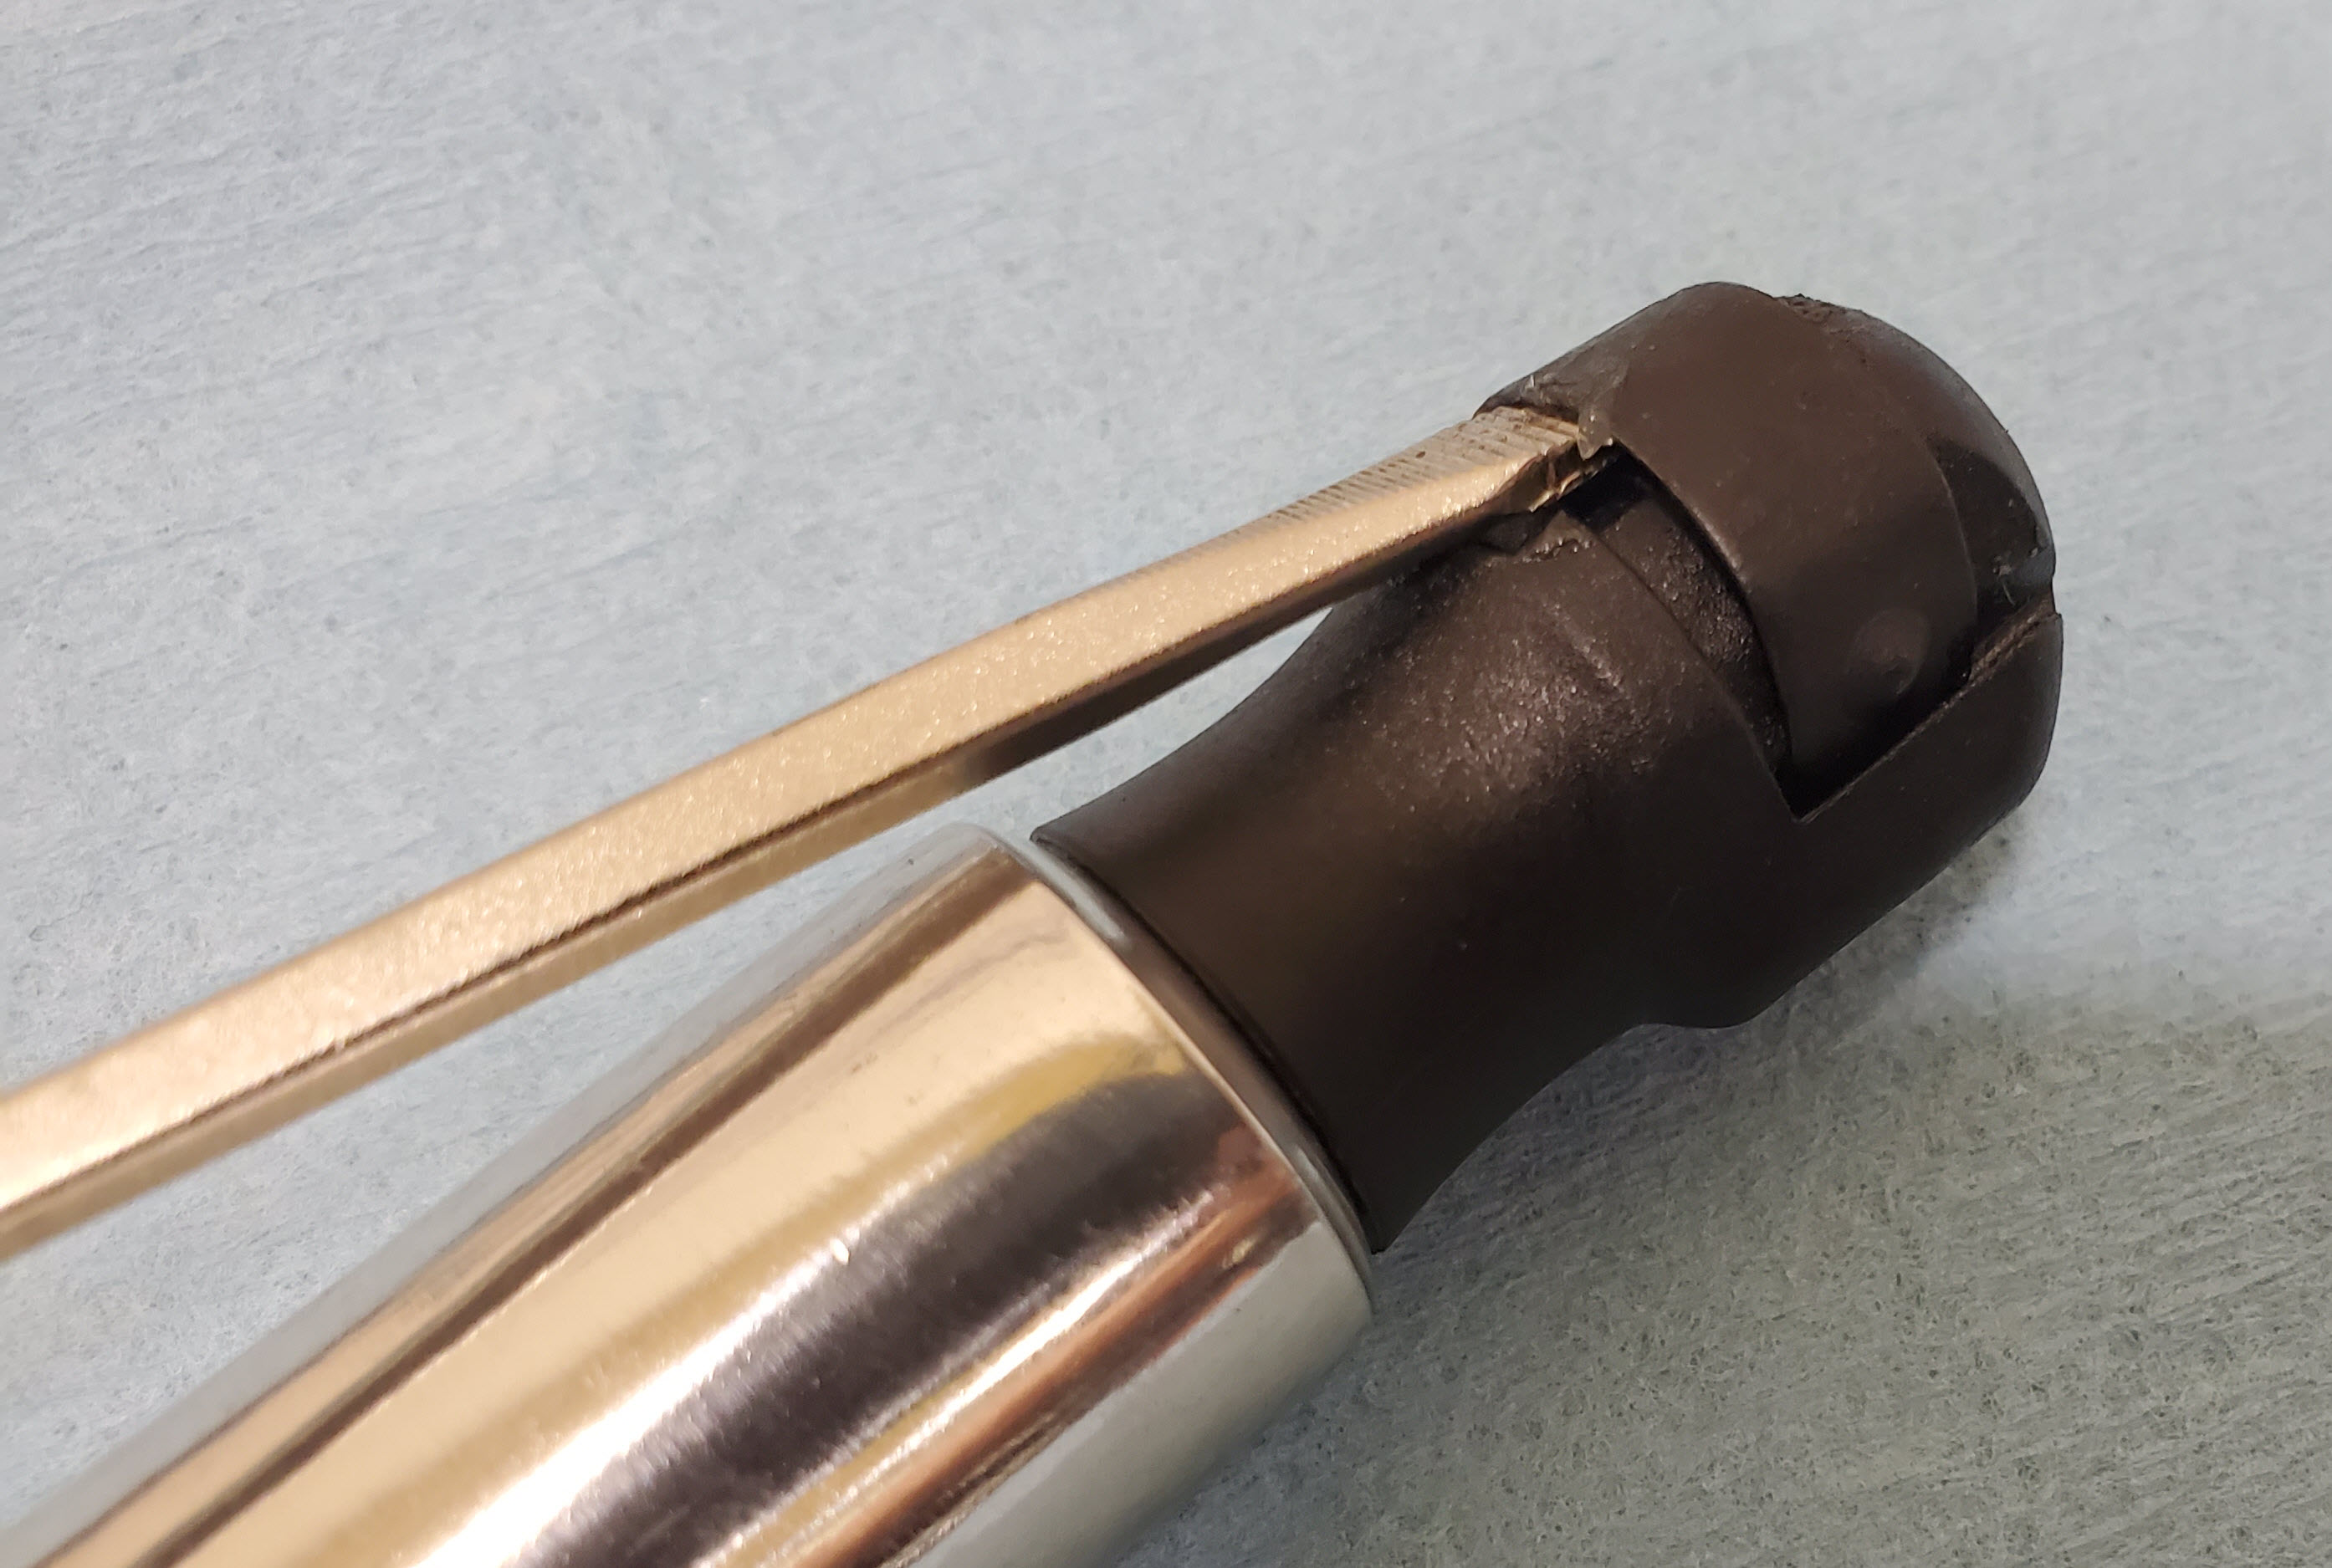


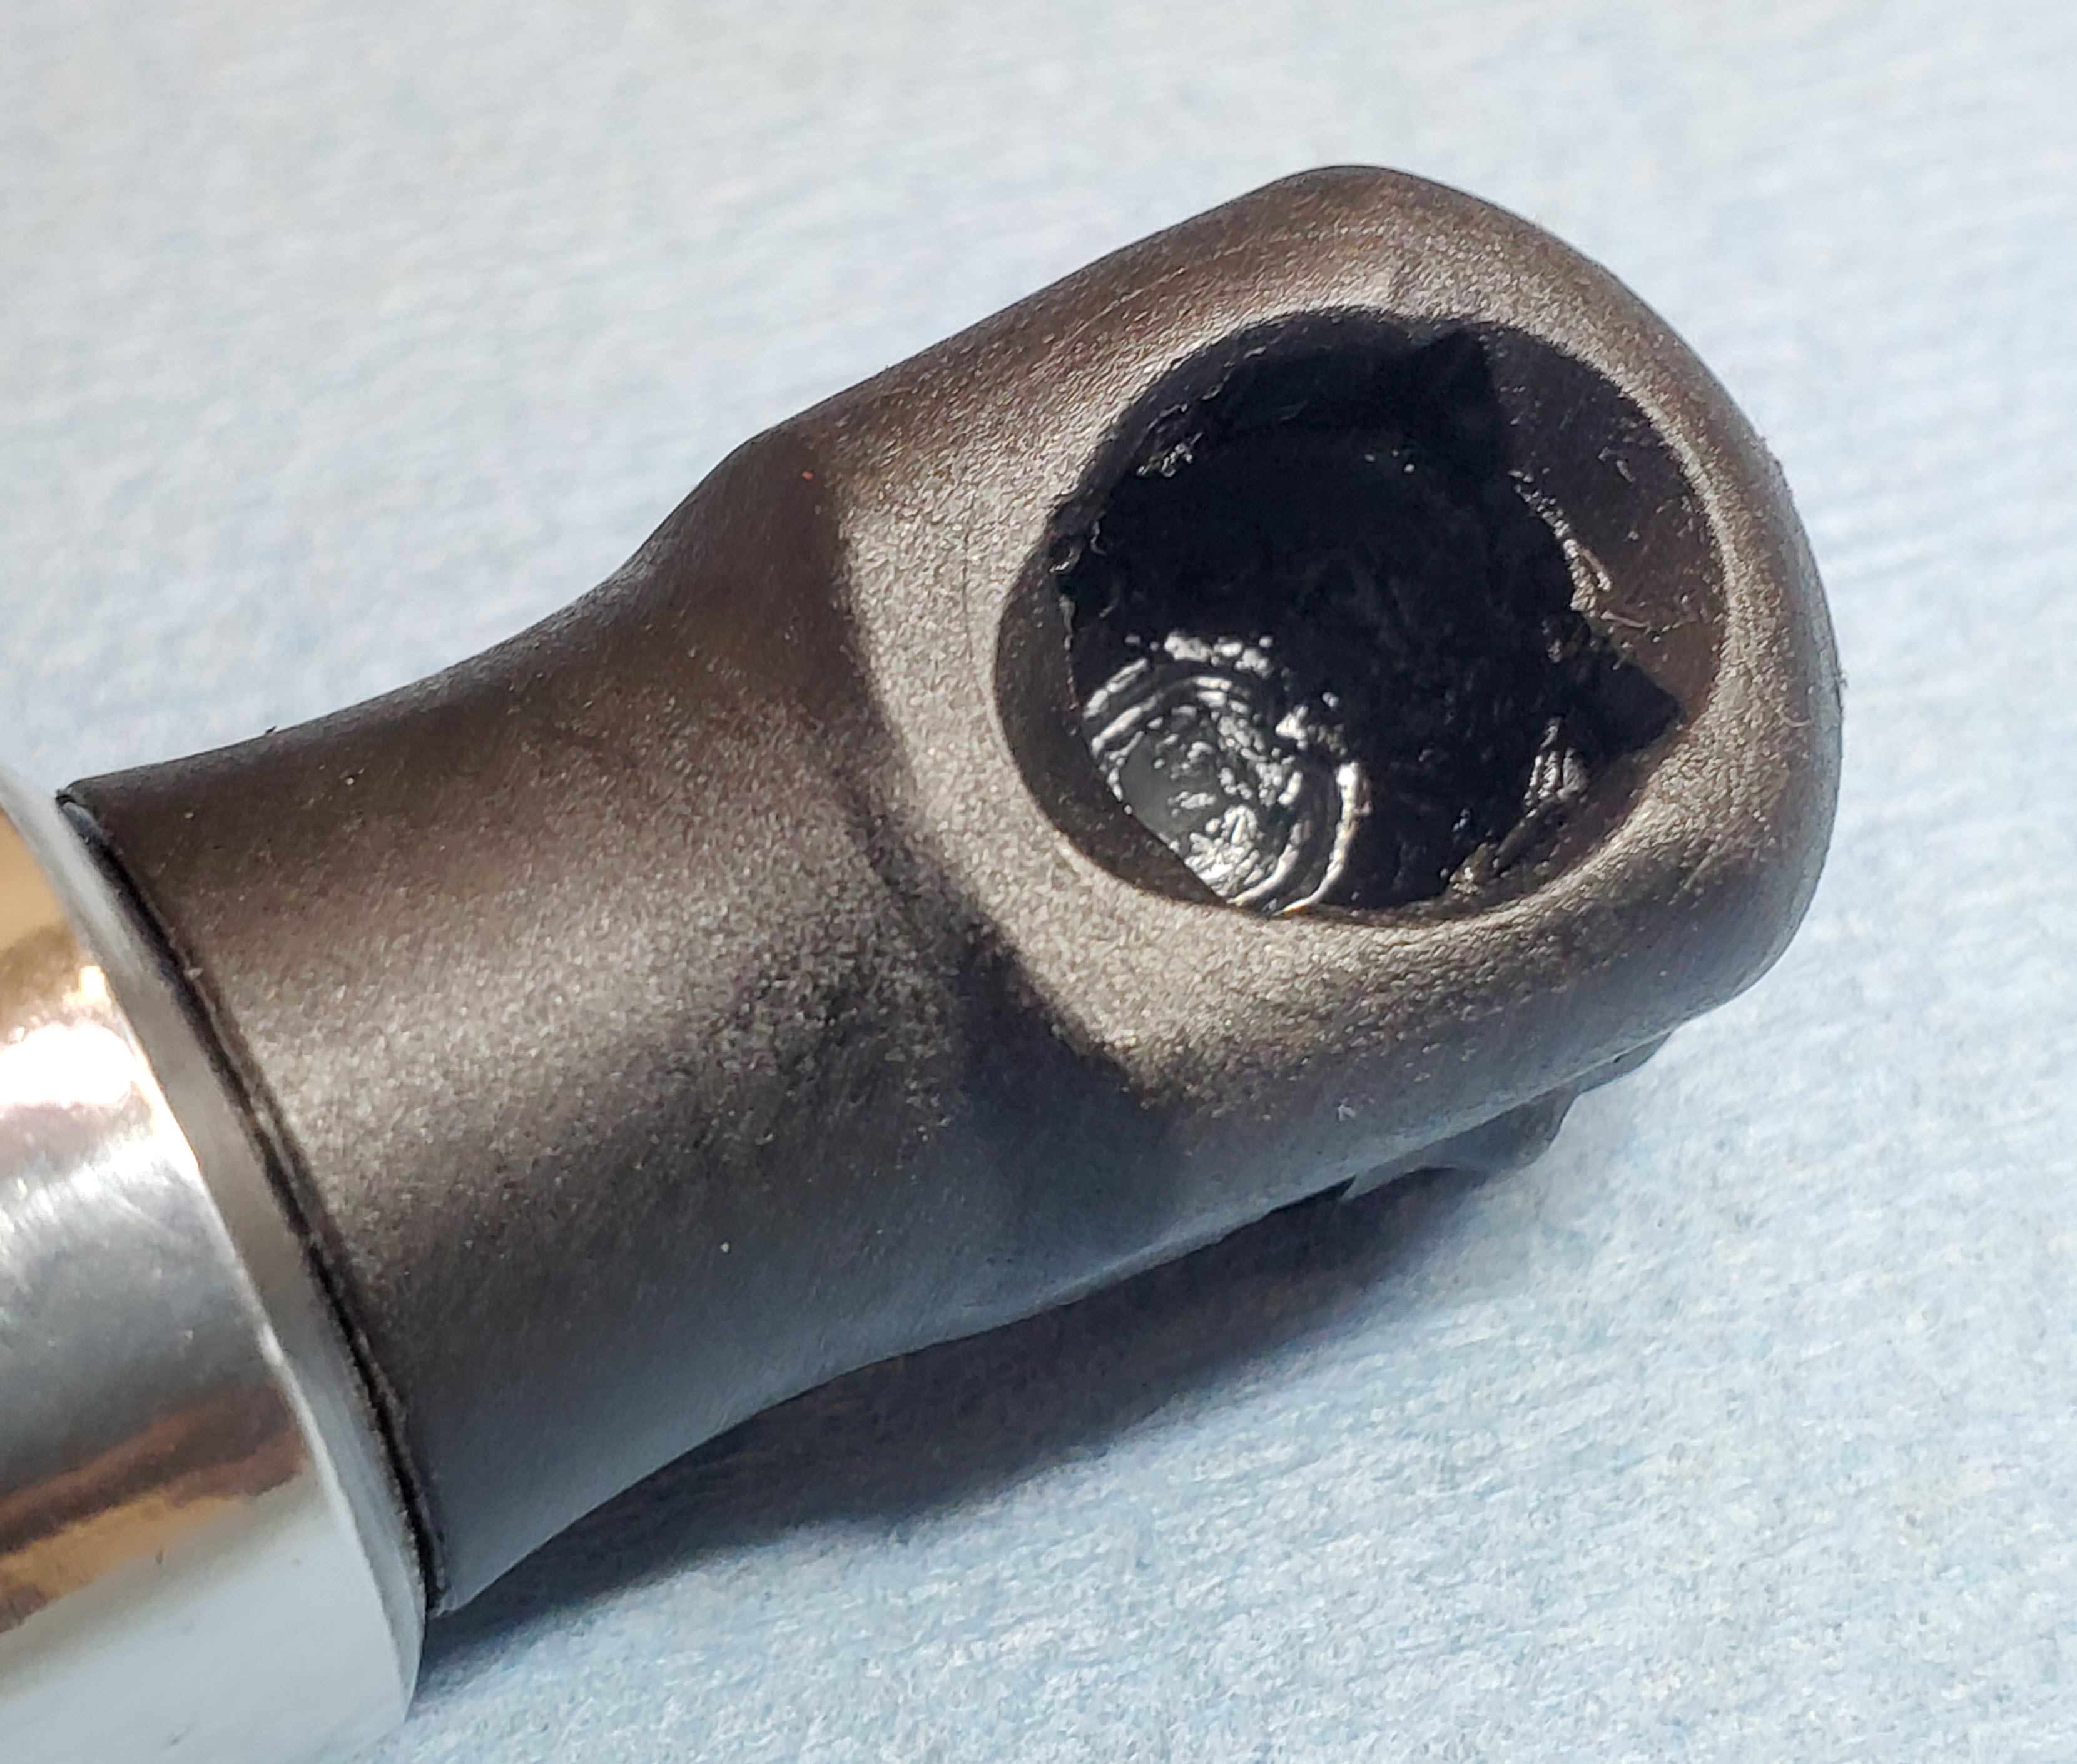
Just inserting it that far is enough to retract the clips far enough. Here are pictures of the socket with clips out and retracted.

Lube the Sockets
The socket mounts over a ball, and the two things pivot under load. Having some lubricant (grease) in the socket will help. Inspect your new struts to see if there is a ‘dab’ [official measure] of grease in the socket already. If not, I’d suggest you put a dab of White Lithium grease in the socket. No need to spread it around, it will distribute as the ball inserts.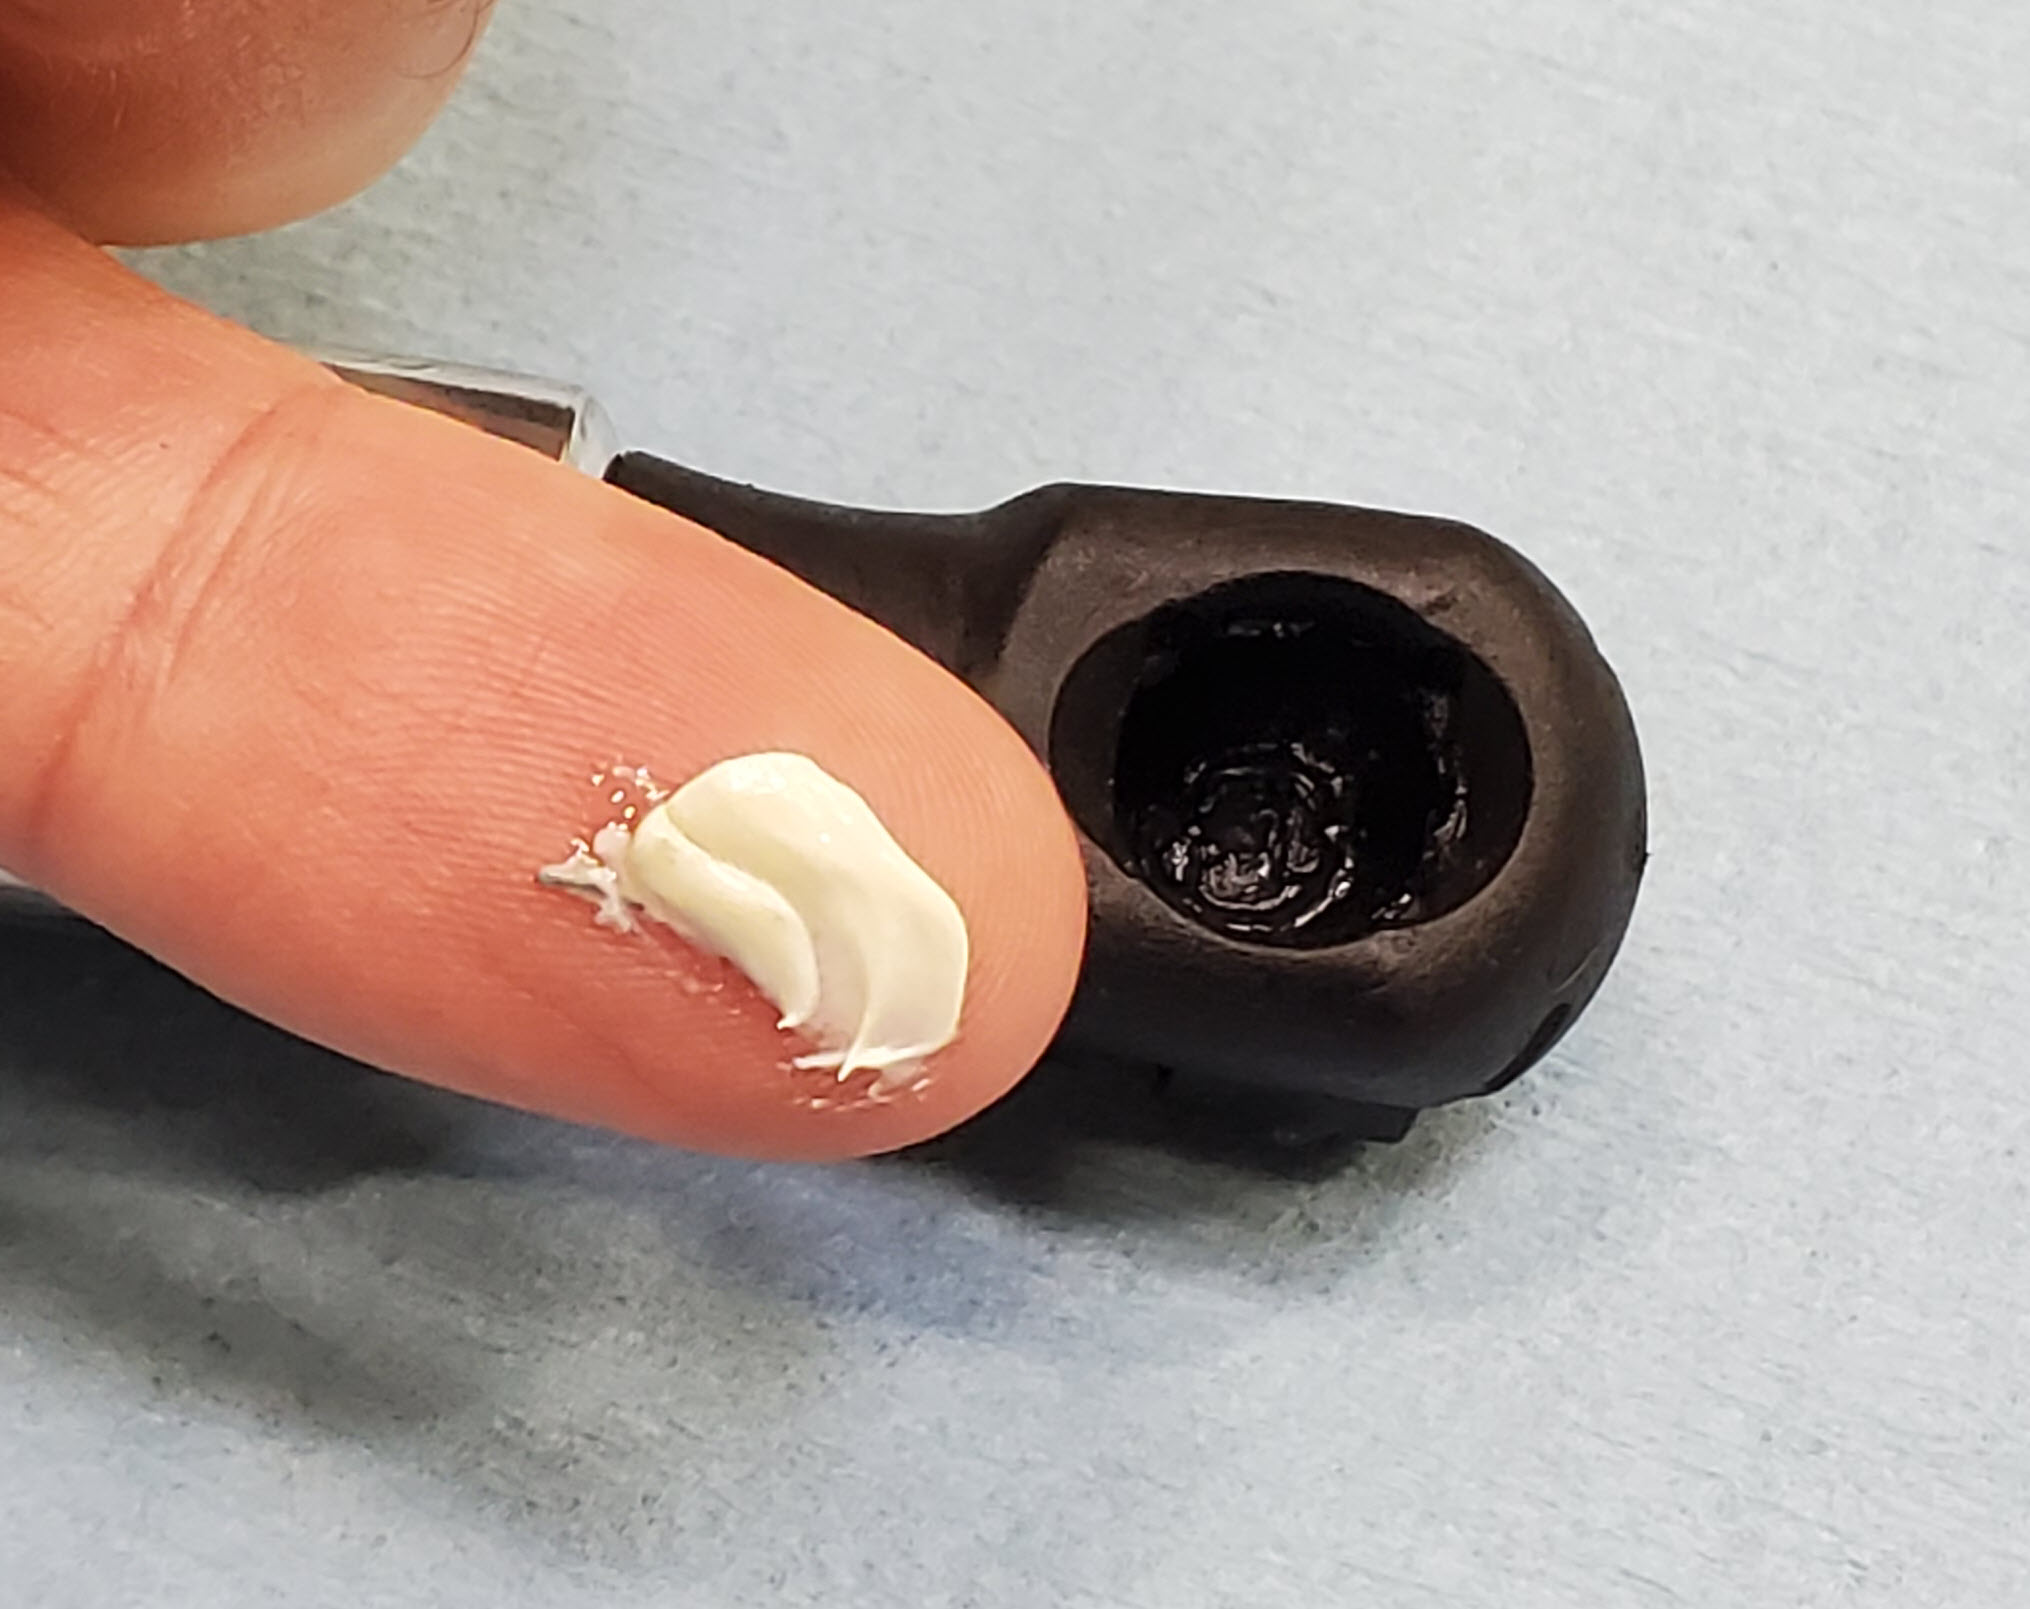

With the sockets lubed and tools in hand, lets get going:
- Do only one strut at a time.
- Makes life easier for the person holding.
- Support the hood.
- This is where your Sweetie or Friend comes in. They get to stand there holding up the hood while the blood drains out of their arms. It won’t take more than a couple of minutes so they will survive. Bribe them with a free lunch.
- In the video you’ll see me use an adjustable plastic camera tripod to act as an impromptu hood support rod. I set its feet on the slam panel, and then propped it up gently into the hood frame. Check out the video if you have to work solo.
- Use the Masking Tape and lay down a protective layer just in case your screw driver slips. Taking 30 seconds now might save you a load of heartache. Place it:
- Under the top connection under the hood.

- Near the lower connection and the adjacent fender
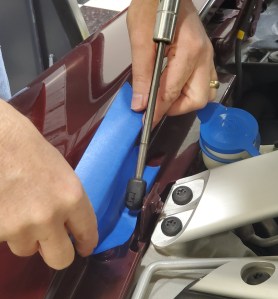
- Under the top connection under the hood.
- Tip: I always start with the easiest connection first since releasing it gives you more freedom to work on the harder connection.
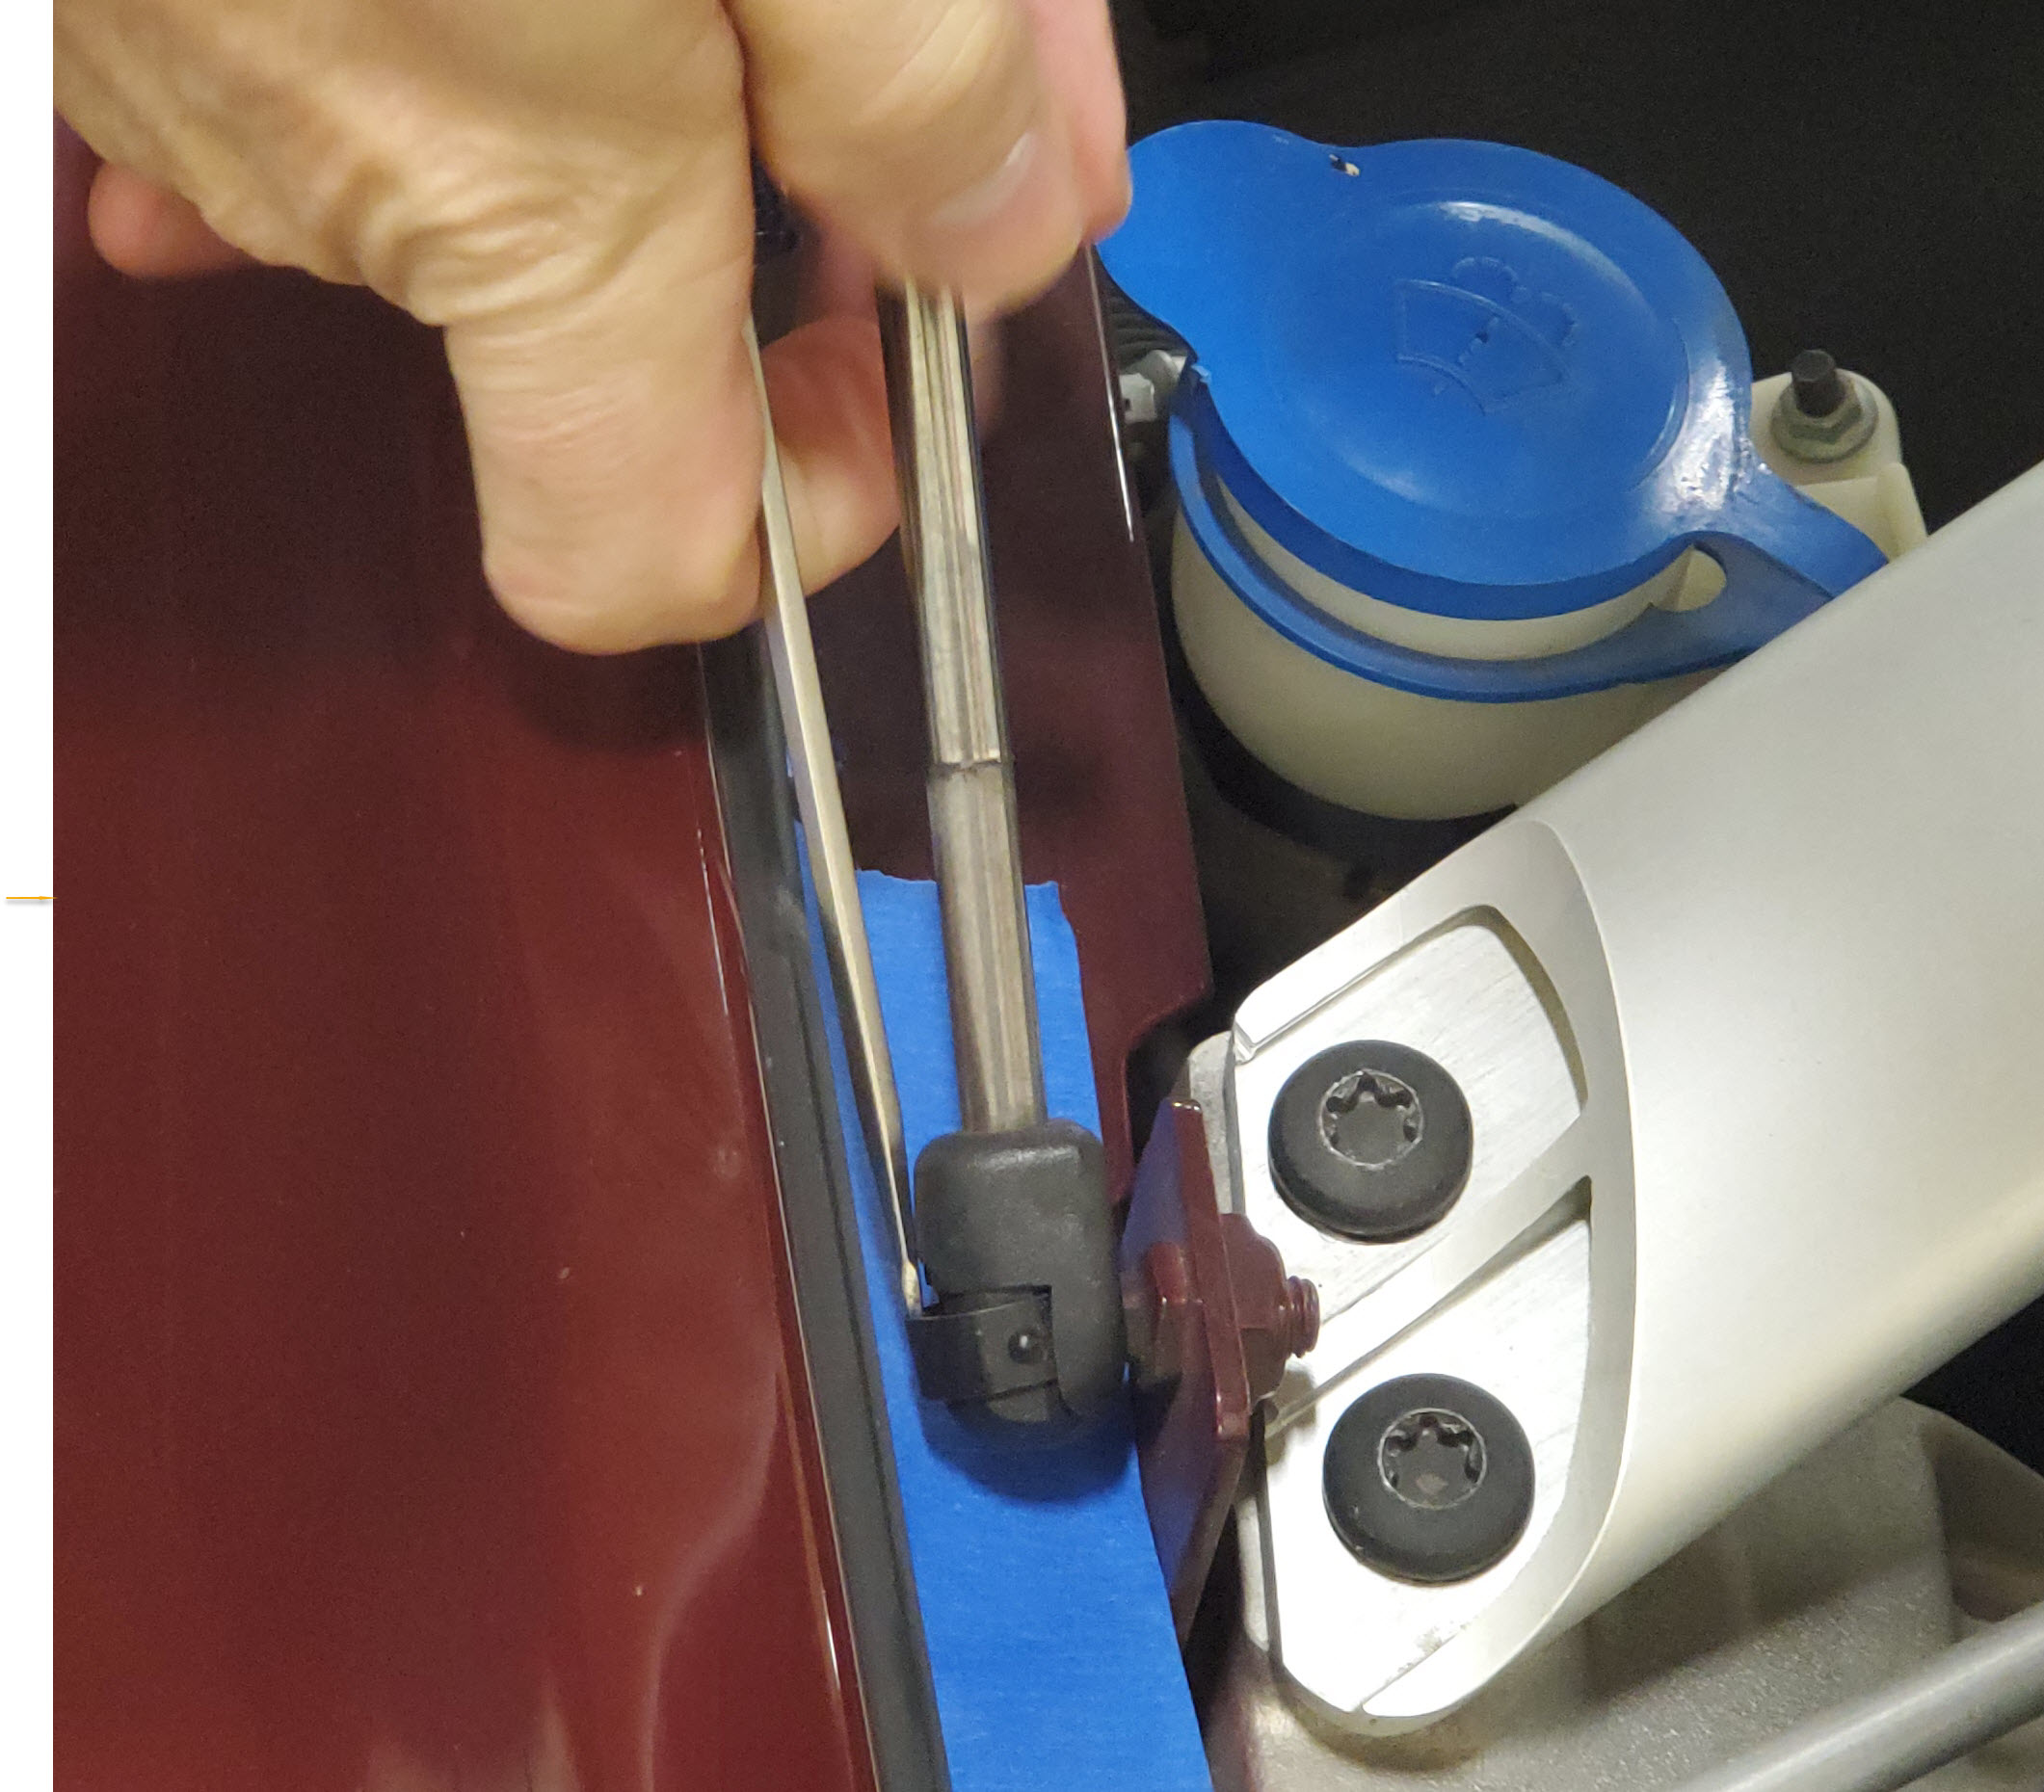
- Remove the upper connection
- Work your small flat blade screwdriver carefully under the spring clip just enough to release it.
- Apply some gentle pressure sideways to pop the socket off the ball. It should come off easily once the clips are released enough.

- Keep a hold of it so it doesn’t clack down onto the fender, etc.
- Work your small flat blade screwdriver carefully under the spring clip just enough to release it.
- Remove the lower connection
- Repeat the process, carefully using the screwdriver to release the clip and pop the socket off the ball.


- Repeat the process, carefully using the screwdriver to release the clip and pop the socket off the ball.
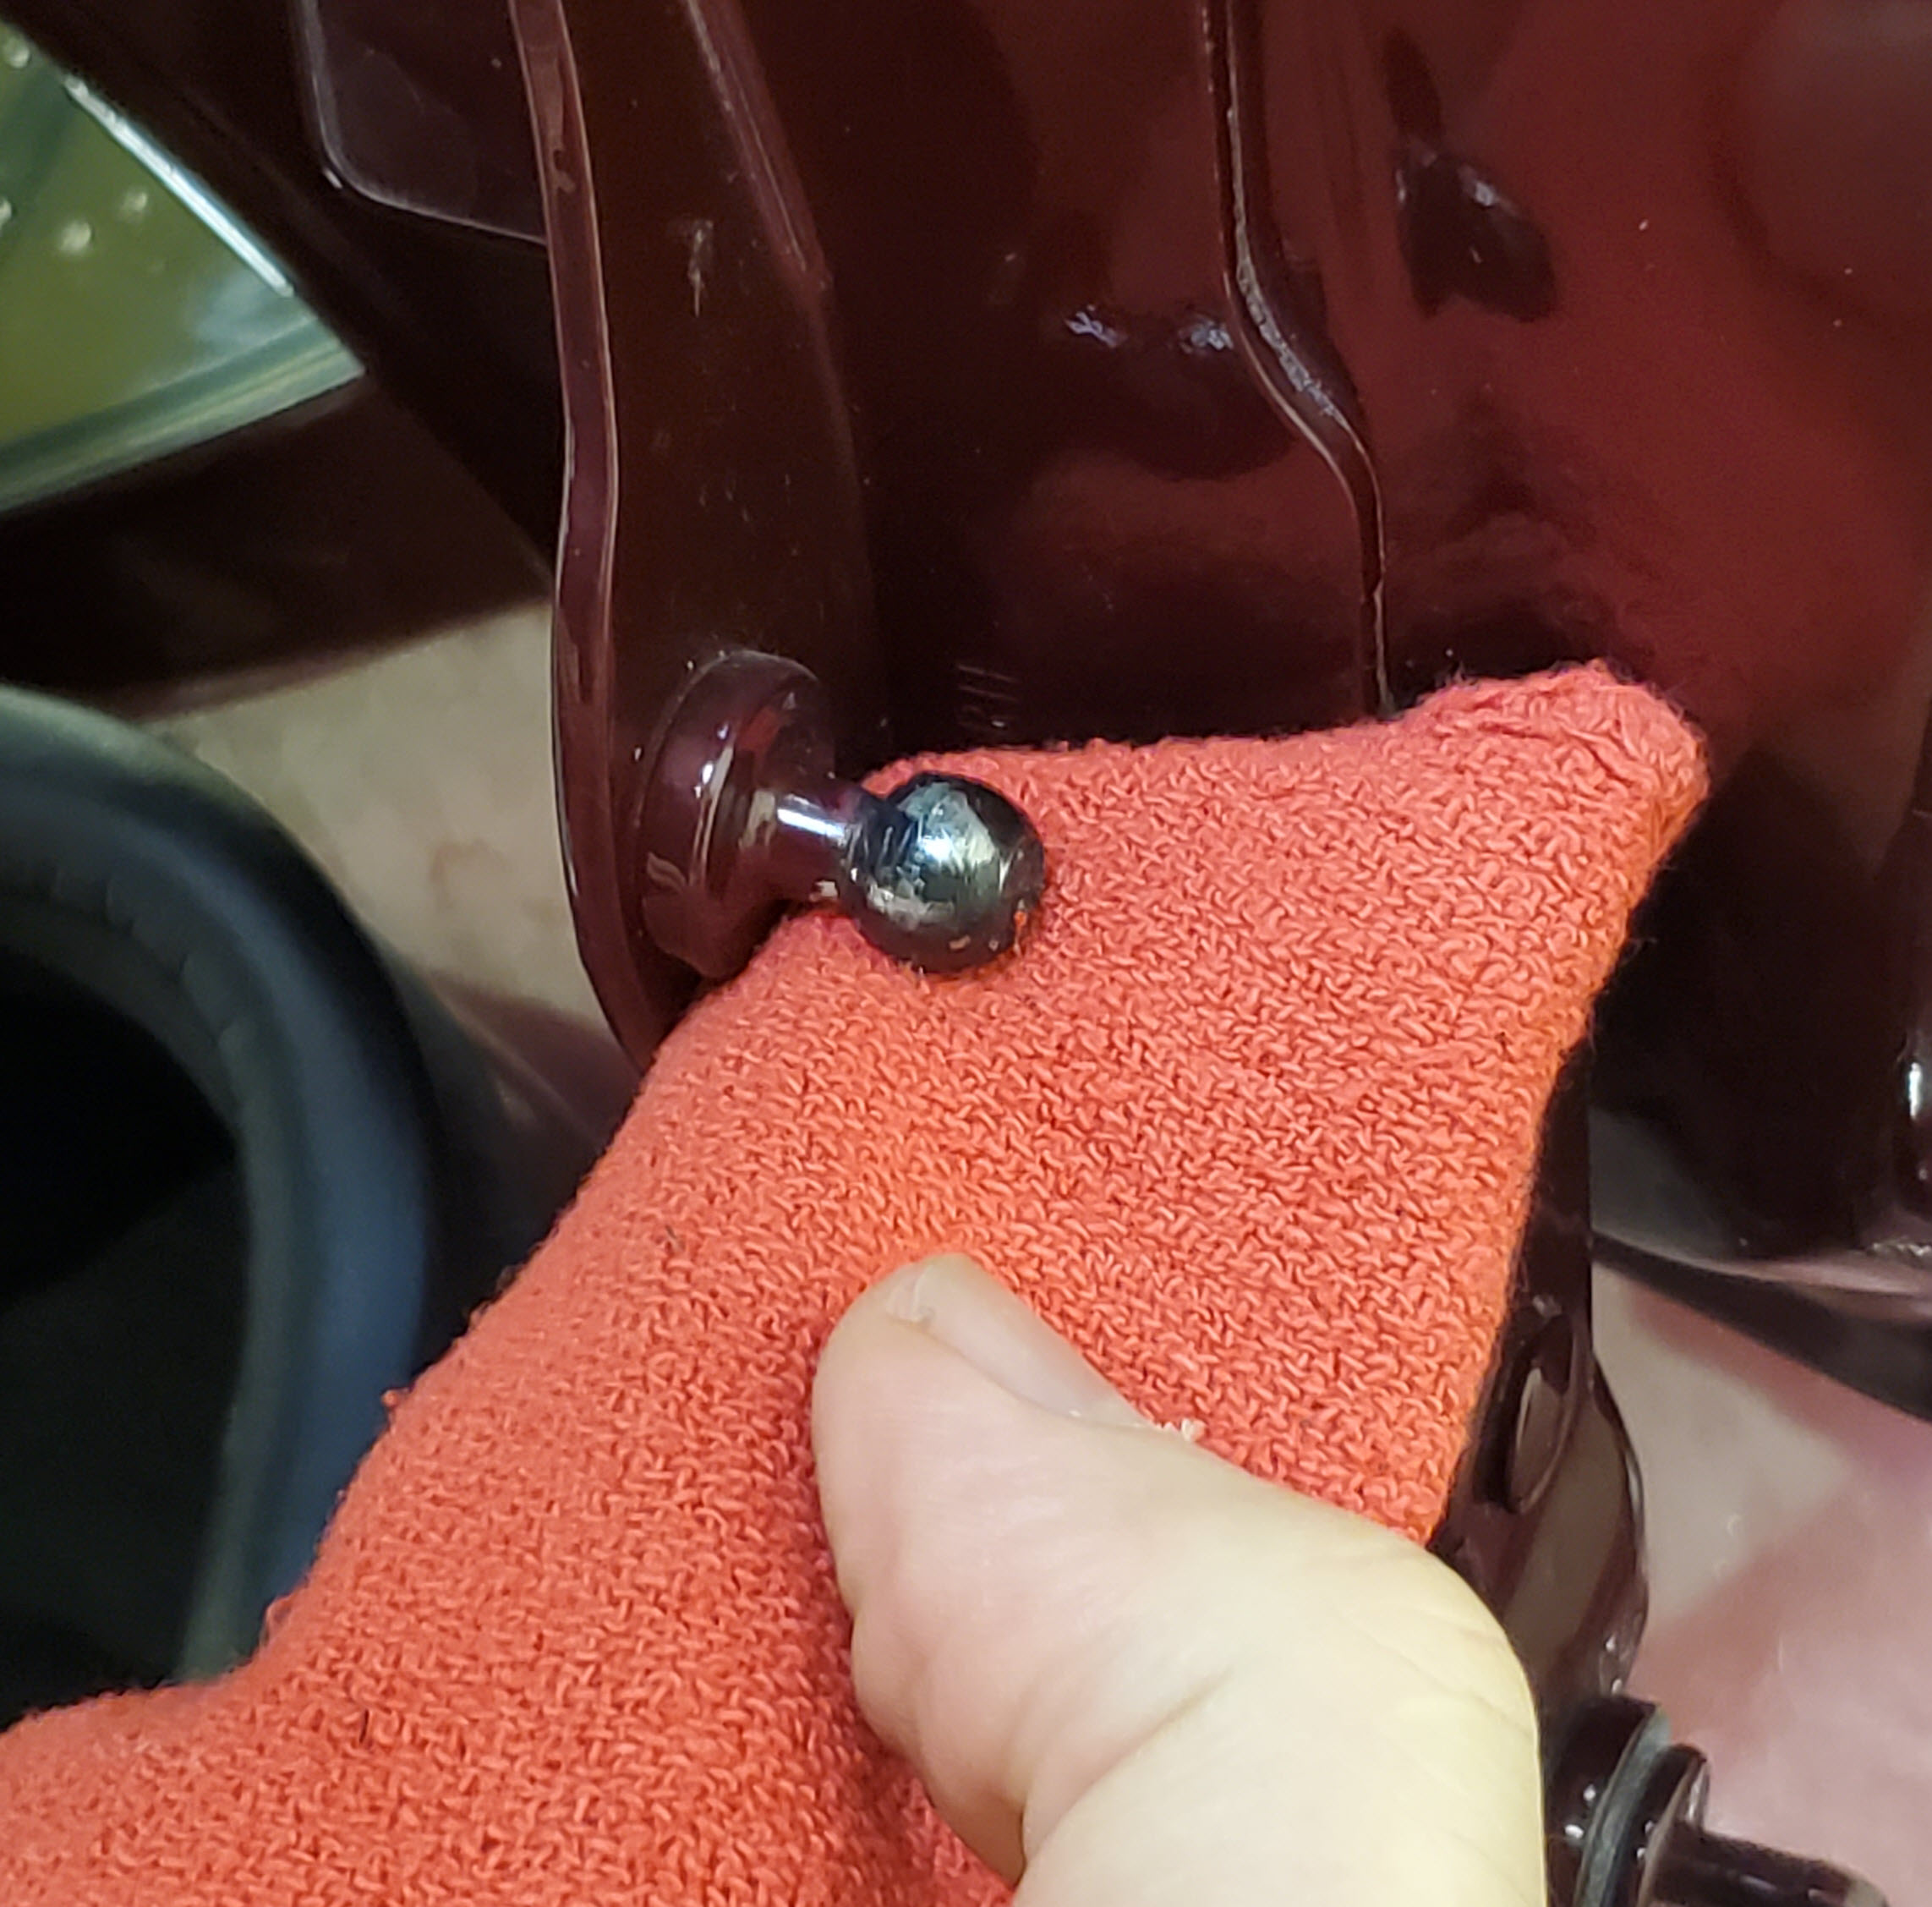
- Use a shop towel and clean up the balls.

- Apply a dab of grease to each ball just for insurance.

- When installing the new strut, just remember the cylinder portion mounts closest to the top connection.

- Connect the lower connection first
- Be sure you’ve already lubed the socket
- I worked the small screwdriver blade under the spring clip before I presented it to the car. Less risk of scratching something.
- Pop the socket over the ball and removed the screwdriver to allow the clips to engage.
- Make sure the spring clip fully snapped into place giving it a gentle push.
- Connect the upper connection
- Make sure the socket is lubed
- I found that I didn’t need to retract the spring clips for the top connection.
- Just push the socket over the ball with a small bit of force.
- Make sure the spring clip is fully seated afterwards by giving it a bit of a push.
- Remove the masking tape
- Give the shiny new strut a bit of a wipe down to get rid of any grease or finger prints.
- Repeat the process for the other side (always do them in pairs).


You’re done! For under $100 USD you’ve taken care of the issue in under 10 minutes.
Keep in mind you have two other sets of gas struts on the car. They may be just as as worn out and need replacing. There are a set for the Trunk (Boot) lid, and another set that help hold up those gorgeous Swan Wing doors. I have articles on how to change both of those as well here:
Video
I shot a quick video showing this process here. Check it out:

I have a 2008 Vantage and 2 years ago when I had my car in for service, my mechanic changed the shocks in both the “boot” and the “bonnet”. He told me they were still working but getting weak and one day they would just fail and could cause me injury. After reading some of these posts, I’m glad he was proactive.
LikeLiked by 1 person
Also, you can reuse your old gas struts to change the gas strut on your top tool chest hood. They fit perfecy on my Husky tool chest. Now i have Aston Martin gas strut pimping my tool chest. 🙂
LikeLike
Thank you for your detailed post, I just ordered some struts for my Dad’s DBS.
LikeLike
I just changed the hood struts on my ’06 Volante, and as was the case with the trunk and door struts before them, your detailed posting was very helpful. Even for a simple job like this, you had worthwhile tips to prevent potential catastrophe (viz., chipping paint); and thanks to you, I had all the necessary tools when I started.
My old struts measured 36 and 45 pounds on the “sweetie scale”; the new ones measured 80. And with the new ones, it requires a few pounds of pull to begin closing the hood. When it approaches zero, about 18 years from now, I’ll know to order replacement struts a bit earlier.
Thanks again for making DB9 ownership so manageable and enjoyable!
LikeLike