 Though my ‘new to me’ model year 2009 DB9 had only travelled 46,000km (~30k miles) from new, it was noted on the dealer PPI that there was “minor bearing noise” from one of the engines serpentine belt idler pulleys. While most cars have just one idler pulley, the DB9 has three (3) plus the tensioner pulley. I figured it was a good opportunity to replace all four as well as the serpentine belt. Let me show you how I tackled this task.

[Editors Note – this article was graciously submitted by Darren Crompton. Darren (who lives in Australia) is the proud owner of a beautiful 2009 DB9 Coupe (Aston10734). He’s been kind enough to prepare this article and take pictures while he was tackling a tricky job that I think most owners will need to address eventually. Thank you Darren!]
Background
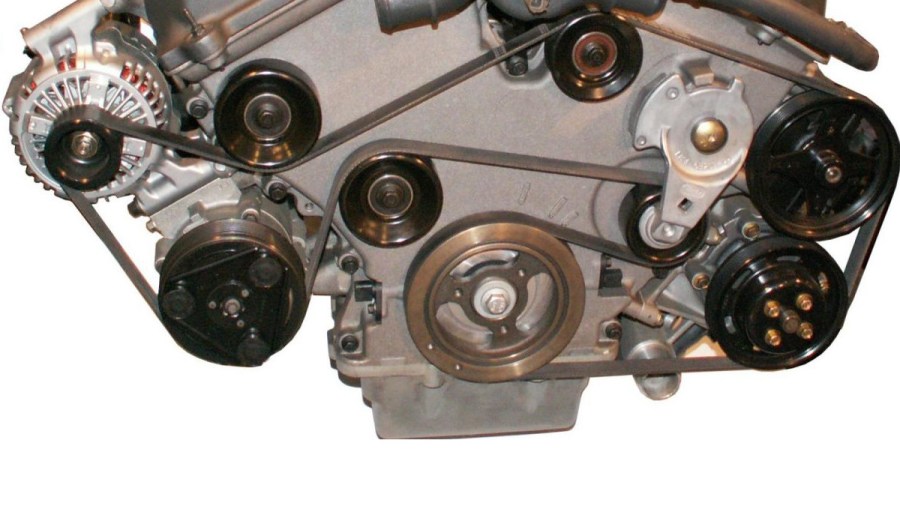
The accessory serpentine belt drives off the crankshaft pulley and routes its way around the front of the engine to drive the water pump, power steering pump, alternator and air conditioning compressor. The belt is guided by three (3) idler pulleys and kept taught by the tensioner pulley, each of which is held in place by a single bolt.
Tools Required
- 13mm socket
- T40 Torx Bit
- 3″ Extension
- Universal Joint
- Ratchet
- Torque Wrench (capable of 26Nm)
- Serpentine belt tool with 15mm crows foot adapter
- Pickup claw tool
- Homemade 3/8″ square fitting

Parts
All the parts were sourced from my local Aston Martin dealer (Aston Martin Melbourne) and whilst I didn’t think the price was outrageous at around $300 AUD, it was good to also introduce myself to a few people in spare parts who in turn showed me through their workshop.
- Qty 1 x Idler Pulley – Grooved
- Aston Martin p/n 1R12-05-10530
- Available online for about $33 USD here
- Qty 2 x Idler Pulleys – Flat
- Aston Martin p/n 1R12-05-10488
- Available online for about $27 each USD here
- Qty 1 x Tensioner
- Aston Martin p/n 05-85368
- Available online for about $108 USD here
- Qty 1 x Serpentine Belt
- Aston Martin p/n ED23-8620-AA
- Available online for about $76 USD here

 [Updated] – Another reader of this website Manuel Tollini undertook this task on his DBS, but with a twist. He decided to replace the bearings in the four pulleys rather than replace the entire pulleys. This takes some effort, but also saves about $144 USD for the effort. He also found a way to do all the work from above the car. After you finish reading the article below check out the separate article on How to Change the Idler Pulley Bearings for all the details.
Procedure
If you own a tool box and are keen to do some DIY on your Aston Martin then this is a job you can absolutely complete that will leave you with a sense of accomplishment.
At its core, you are undoing four (4) bolts and swapping out some old pulleys for new and then tightening up the bolts again. Follow the diagram to thread the belt and the job can be done on a Saturday morning leaving the rest of the weekend to enjoy some driving.
Before I started I took a look at the official Aston Martin Workshop Manual section 3.05 Accessory Drive System (check it out yourself here). It really only discusses replacing the belt and not a lot about technique. It was a starting place anyways for my process below.

Getting access to the pulleys and bolts is tricky as the area in front is quite confined. I began by raising the car on axle stands and then removing the forward undertray in anticipation that access would be easiest from below. As the pulleys are high on the timing cover I soon discovered it easier to access them from the top. Standing at the front of the car and looking into the engine bay I was able to slide my left arm between the right hand radiator hose and the timing cover and then in front of the pulleys to undo bolts with ratchets and extensions. Needed the undertray off anyway as I ending up dropping numerous items down the front of the engine that needed fetching from below.
If you have more muscular arms than me then there is always the option of removing one or both top radiator hoses for easier access.
These other Aston1936 articles might help you with these prerequisite steps:
Tensioner Release
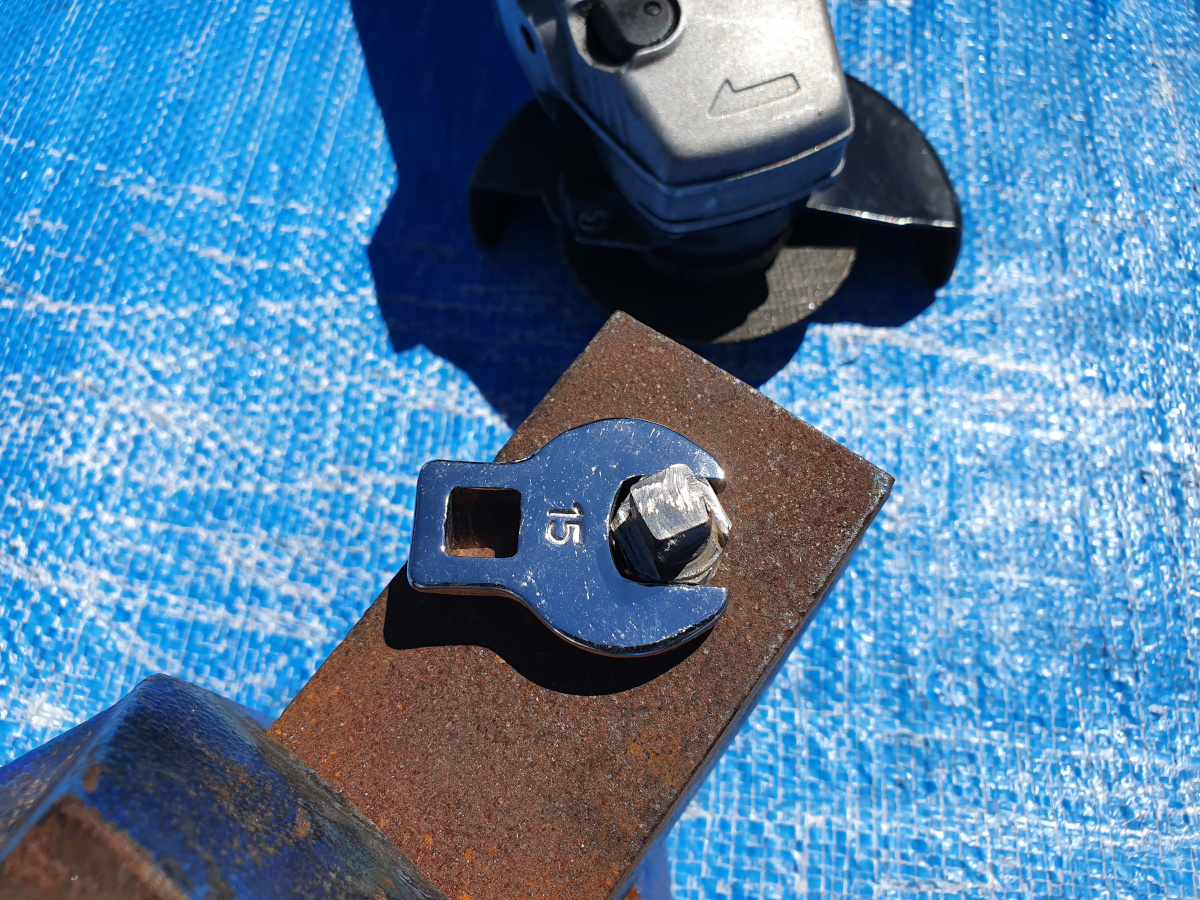
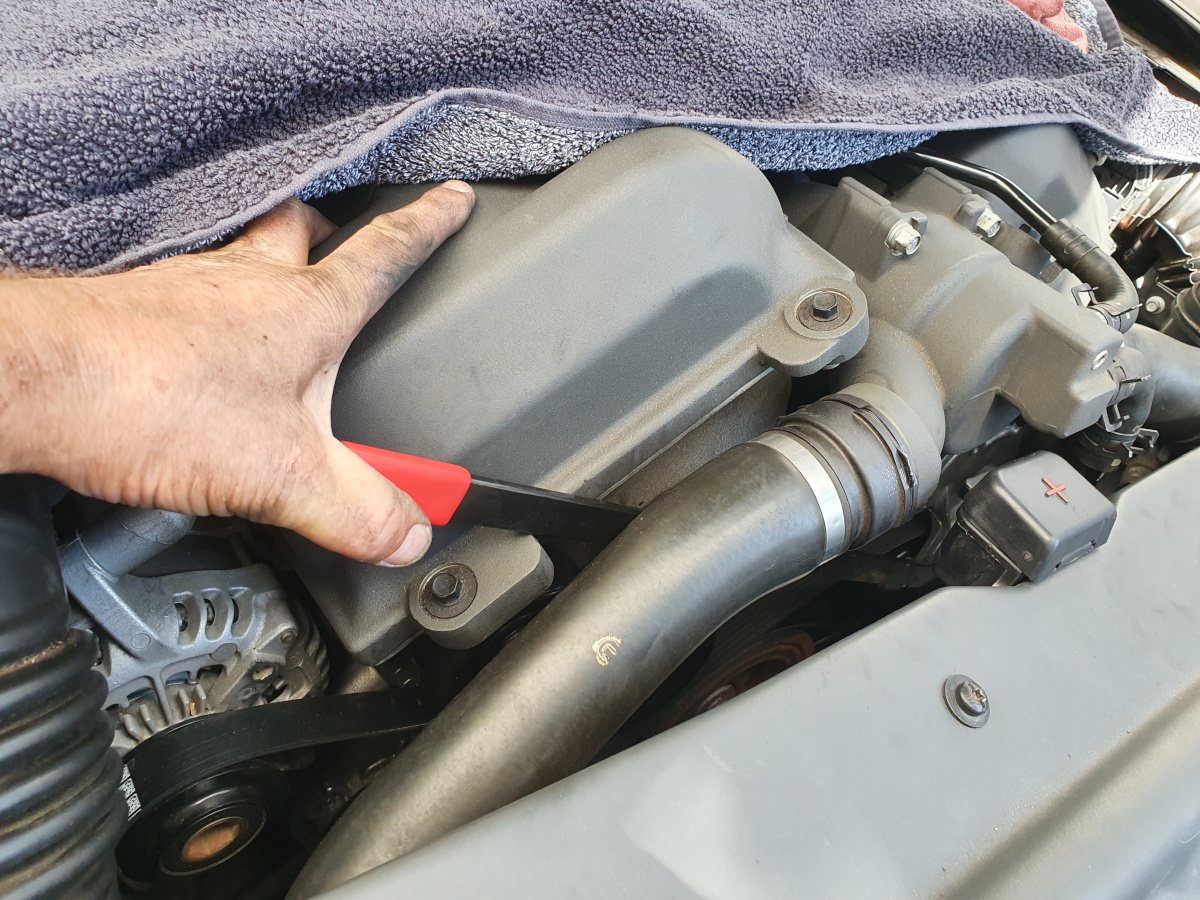
First job was to release the tension on the serpentine belt so it could be freed from the engine auxiliaries. On the front of the tensioner pulley is a 3/8” square hole into which a ratchet handle T bar is supposed to be inserted and then pressure applied to release the tension. With the limited access I was unable to get enough leverage. I chose to make a fitting to which I could then attach a long handled flat bar. I cut and hand ground a bolt to a 3/8” square with a 15mm head to accept the crow foot socket. It was agricultural but did the job well. 
Getting the fitting into the tensioner hole was tricky so I used a pickup claw tool.

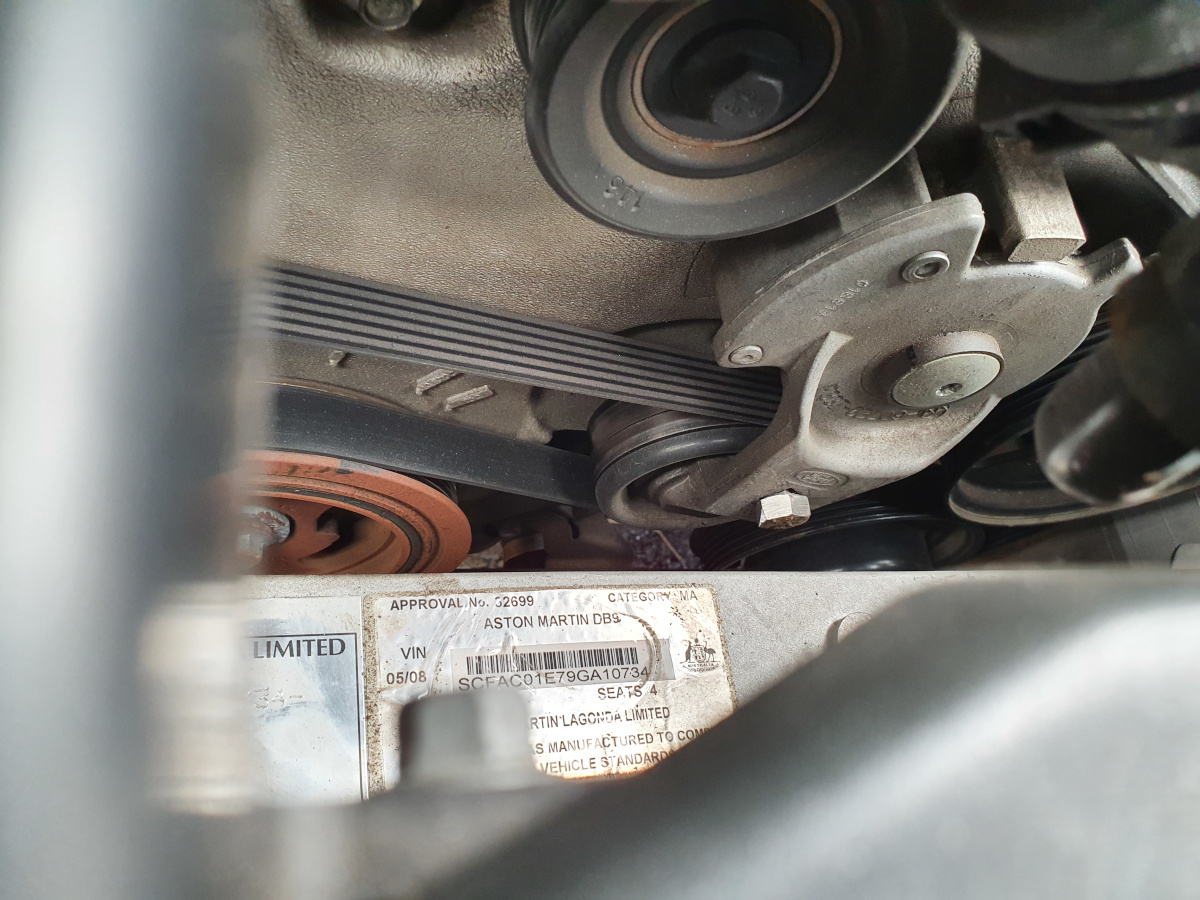
The crow foot socket on the flat bar reached the fitting and with some upward pressure the tension was eased enough that I was able to slide the belt off the first pulley and it then came off all the others easily except for the tensioner itself. There is little room between the tensioner and the timing case to slide the belt off so I left it there until after removing the tensioner pulley. 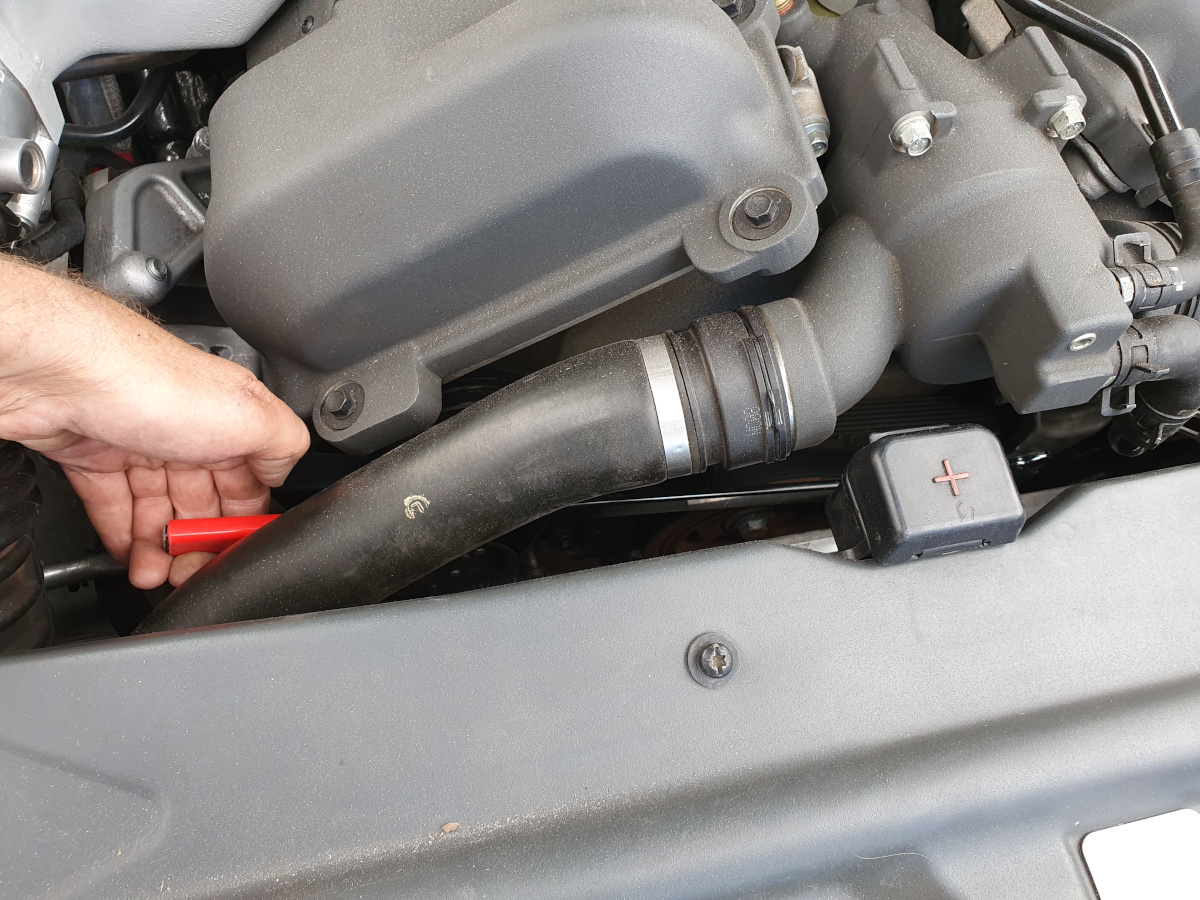
Tensioner Removal
With my left hand in place I passed the ratchet with T40 Torx socket attached in from above and was able to undo and then remove the fixing bolt with some delicate finger work. Unable to remove the tensioner from above, I lowered it directly down to find there was still no room and had to shimmy it across to the RHS where there was enough clearance to remove it from below.

Idler Pulley Removal
With the beast of the Tensioner Pulley finally removed, this left the three remaining simple idler pulleys. The method was the same. Left arm in and right hand passing the ratchet with 13mm socket attached. Sometimes a universal joint and/or a 3” extension was required to clear various structures.
Looking from the front of the car, the pulleys were removed from left to right. The very right hand one at the top of the timing case is the grooved pulley and the other two are smooth.
Installation
Installing the new parts was relatively easy. I started with the tensioner as it is the furthest away from where my left arm reaches in and without the pulleys in place, allowed me a little more wriggle room. I screwed in a couple of threads of the T40 Torx bolt to hold the tensioner in place but off the timing case enough so I was able to get the serpentine belt on the tensioner pulley from behind and then slid the tensioner itself all the way back.

The official Aston Martin workshop manual section 3-10 on Engine Sealing for the Front Timing Cover recommends 25Nm-27Nm, and their Engine Pulley diagram below says 23-27Nm. I went for 26Nm (19 ft-lbs).
Once the Tensioner was secured I worked my way backwards, fitting the other 3 idler pulleys. First the grooved one and then the 2 smooth pulleys, also torquing their 13mm bolts to 26Nm.


 Referencing the diagram in the workshop manual, I threaded the serpentine belt around the engine auxiliaries in the correct order but left it off the centre most idler pulley. My homemade 3/8” square fitting was placed and the flat bar tool used to apply enough pressure to slacken the tensioner and slide the belt over the remaining pulley. WARNING – That tensioner applies A LOT of pressure so at no time do you want your fingers between the belt and pulley when working the tensioner!

Startup
As the final step I completed a thorough check by feel and also visually from above and below to make sure the ribbed belt is running true on all auxiliaries and pulleys, and the car was ready for its first start.
On starting, I instantly had three (3) error messages! Cycled through them to quickly discover they were thankfully not significant:
- Bonnet Open (it was)
- Door Open (it was)
- 70km to Empty (I need to go get fuel)
All good and zero bearing noise made for a successful job!
Postmortem
Just for fun I disassembled the Tensioner Pulley (which was labelled as Ford part number F83E-6B209-AA) to take a closer look. The inside of the bearing which was hidden from view had expelled all of its grease and was running dry. This would have been the source of the noise that surprisingly was only very faint and was best heard at highway speeds as a slight high pitched whine. Here are some close up pictures if you are interested:


Here’s the parts I ordered for this job:
DAYCO 5061070 Belt
DAYCO 89006 Idler Pulley (2 off)
GATES 38250 Belt Tensioner
GATES 36326 idler pulley
These are mostly ford oem parts , total cost is under $150 usd.
LikeLike
Hi, thanks for this, the diagram was very useful.
I replaced the bearings in all three pulleys. Simply knocked out with a socket (30mm) and a hammer. The bearings are standard 12x40x17mm and cost me £2.50 each.
Saves on the pulley prices. Hope this helps others.
Steve Keeler (I own the 133000 mile db9)
LikeLike
Aston1936 is phenomenal resource. The right topics, at the right level are discussed and much appreciated!
I thought I’d add a couple of comments about installing the belt – although the ability to share a couple of photos would be useful, but I’ll try without.
I have a 2009 DB9, so maybe there are some differences, or maybe some things were obvious to others and not to me.
1. The first tricky part for me was to realize that the belt had to fit behind the tensioner pulley, and it can only do that sideways (the thin side). The pulley is not bolted to the engine – it is connected to the tensioner mount. This wasn’t previously clear to me.
2. Moving the + terminal at the front (removing the two bolts and placing the cable on the ‘shelf’ below) makes things much easier to reach. (Of course, it has to have the insulated cover if you don’t want to disconnect the battery – but still need to be careful.)
3. Positioning the tension bar is perhaps the most important part of the trick.
I started with the bar at 9 o’clock as in the article above and moved it as far clockwise as I could, but this only allows releasing the tension a little. Step 5 is the aha moment for me. Step 4 is also worth knowing…
4. With the tension release this much it’s pretty easy to put in the new belt (mine was broken – I checked all the pulleys for play and resistance, but they all seemed fine. I didn’t find any spikes that would rip the belt either). So, I put the belt in – the tension pulley first (the hardest) and it’s good to have the belt wrapped/folded in the rough shape needed before you do that, so that you don’t have to try to fold it when it’s inside. Then I went around all the pulleys (bottom to top) except the top left idler and alternator. There wasn’t enough tension release for the rest, yet…
5. Now the aha moment – I have a ‘square drive socket cap’ (Harbor Freight 67011) set. The 3/8″ one fits in the tension pully thing. Using a crow foot – like in the photos in the post above, BUT – rotated 90 degrees relative to the tension bar – so the tension bar came up almost vertically. (Note also that the socket cap allows 6 positions – not just 4.) This fits in nicely and with literally two fingers, I got enough tension release to put the belt on the alternator and top left idler pulley. There was still room left in the space between the stops on the tension pulley adjuster.
So, all of this was done by one person without removing the under shield (I was careful with the socket cap in the tension pulley adjuster). The only issue was my sweat dropping on the engine slam panel (I protected the fender, not the slam panel). Seems to be working now (fingers and toes still crossed).
LikeLike
Pingback: Changing the Loafer Pulley Bearings in an Aston Martin DB9 – Aston 1936 - newsautomations
Hi! First of all, I wanted to say THANK YOU for these excellent articles. As a non mechanic attempting to do repairs on my fleet of cars, these sorts of sites are invaluable! I recently did this service on my 2005. It was intimidating at first, but ultimately pretty basic. Removing the positive jump point was key. I had planned to replace the tensioner but wasn’t able to loosen the TORX bolt on it, so I ended up leaving the old tensioner in place. But for anyone newly reading this article, I will say that the part about fabricating a square bolt to move the tensioner was super intimidating… … And needless. There are many tensioner release tools available from auto parts stores. I bought one off of Amazon (bilitools 15 piece universal racheting serpentine belt tool set) for about $40 and it worked fantastically.Finally, on the reinstall prices, make sure that the serpentine belt is FULLY seated on all the pulleys. Apparently mine wasn’t, and about 2 miles into my first drive it worked itself onto one of the pulley lips and then explosively disintegrated. It wasn’t a big issue, I immediately turned around and went back to the house to quickly reinstall a new one, though it was alarming to see how incredibly FAST the engine heats up without a working water pump!Anyway, thanks again for these articles!
LikeLike