

In a recent article Darren Crompton showed you how to change the accessory drive serpentine belt and idler pulley’s in his 2009 DB9. Check out his article here. Darren sourced his parts from his local Aston dealer in Australia, and tackled the task from above and below the car.

Another reader of this site – Manuel Tollini – tackled the same task on his DBS – but with a twist. Manuel worked out how to keep the original idler pulleys and just replace (and upgrade) the worn bearings. This saves a considerable amount of money, and the only part you would need to buy from Aston is the serpentine belt.
I suspect this process is valid for all Gaydon era V12 cars like the DB9, DBS, V12 Vantage, Rapide, Virage and Vanquish. He shared with me how he did it for his DBS (and now I am going to share it with you!).
Background
To begin with, be sure to read Darren’s article so you can see the overall process. Required reading and will only take you five minutes.
This process would only make sense if the surfaces of the pulleys that make contact with the belt are still in excellent condition. These are either smooth or grooved. If they are worn, pitted, chipped, dinged or corroded in any way just punt and purchase entire new idler pulleys and don’t waste your time replacing just the bearings.
The same applies for the tensioner assembly. If there is any sign of deterioration you might was well replace the entire tensioner. The good news here is that the tensioner is actually a Ford part and you can source it for under $50 USD if you don’t want to get the exact same part from Aston for over $100 USD (Aston tax).
Note that I have not done this process to my 2005 DB9 (Princess Piddles) and am sharing what others have shared with me. I am just the editor at this point. I will be using these articles if and when I need to tackle this on my car.
Tools
Same as in Darren’s article with the as well:
- 8mm wrench
- Hammer
- Bench vice
- He uses the same serpentine belt tool as Darren’s article, but modifies it in a different way. Read on for details…
Parts and Supplies
As I noted Manuel did not replace his idler pulleys (two smooth, one grooved) or the Tensioner assembly. He replaced the bearings in the existing ones. He did replace the serpentine belt with the same one from Darren’s article. In addition to the belt, he purchased:
- Loctite 609 for bearings
- This is designed as extra insurance to lock the press fit of the new bearing into the pulley shell. Optional, but a good idea.
- You can get a small bottle on Amazon for about $10 USD
 Qty 4 – Nachi p/n 6203-2NSE9C3 replacement bearings
- You can buy them on Amazon for about $9 USD each.
- You’ll also definitely want to read the article below for details on how these bearings were selected.
Belt and Pulley Removal
Manuel did all the work from above which is a notable difference from Darren’s article. It presented its own challenges but here is how he did it.
- To make more space to work, start by removing the Positive battery jump terminal bolted on the front frame using the 8mm wrench. This give you access to slide your arm in order to access pulleys and belt.
- [NOTE – be careful here, that battery terminal post is live and if shorted to the frame would be a very, very bad thing. If you are worried about it, disconnect the battery first]
- Slide the battery terminal and its wiring harness under the cross member frame.
- Use the serpentine belt tool kit to release the tensioner and remove the belt.
- I had to bend the tool slightly so it would clear the front Thermostat housing. I put the tool into a bench vice and used a hammer to get the right angle. A bit of trial and error to get it just right.
- When you release the tensioner pressure with one hand, apply clockwise pressure to release the pressure on the belt, and then remove the belt from the two left idlers.
- The top idler pulley is grooved so it is more difficult to get belt out.
- Each idler has a 13 mm bolt no washer, it is easy to unscrew it. Idler are not pressed on a shaft, they come easy out.
- Remove the belt tensioner with the Torx T40 socket.
- The screw comes out with its plastic spacer.
- It comes all in one piece.

- With the belt, the three idlers and the Tensioner removed I set about inspecting and replacing the bearings.

Bearing Selection

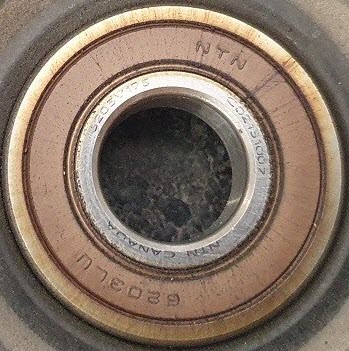
Upon inspection of the idler pulleys and tensioner Manuel discovered they were all NTN bearings of the same physical size, but the model of the bearing varied slightly from position to position:
- Idler 1 – NTN 6203LAX30
- Idler 2 – NTN 6203LU
- Idler 3 – NTN 6203LAX30
- Tensioner Idler – NTN 6203LU
I also contacted Darren Crompton and he looked at his old bearings and discovered:
- Idler 1/2/3 – NTN 6203LAX30
- Tensioner Idler – NTN 6203LU
They also both observed that the 6203LU was a red/orange color bearing seal, and in fact they could see some evidence of the seal leaking out the grease. After a little research into to what the suffix LU means I discovered it has just a single seal. No surprise then that these were the bearings that were perished on both of there cars.
Manuel shared with me that he had no real explanation why the Idler 2 bearing was the LU type. From looking at both cars it seems pretty clear that the LAX30 is the correct one for the Idler pulleys, and that the Tensioner Assembly was fitted with the LU.
If we are going to select a replacement bearing we can take two approaches. Find the exact same model NTN bearings (which you can do), or look for an equivalent or better bearing that might be easier/cheaper to source. To do that, you need to understand the specs of the original bearings. I asked Manuel for an explanation, and here is what he shared.
The 6203 is an industry standard for the overall dimensions of the bearing. This is a metric bearing. 40mm O.D. by 17 mm I.D. by 12mm Thick.
To replace them Manuel purchased Nachi brand bearings (part number 6203-2NSE9C3). You can buy them on Amazon for about $9 USD each. NACHI 6203-2NSE9-C3 Deep Groove Ball Bearings Metric 17x40x12 mm.
Let’s examine the specifics of the NACHI 6203-2NSE9C3:
- 2NSE relates to the type of seal on the side of the bearing. On this one double contact rubber seal
- 9 is the type of seal rubber, Viton , Buna N
- C3 is the quality of tolerance. In general a C3 bearing is a low tolerance bearing, which are best for high vibration like in this situation.
| Bearing Material | Steel |
| Cage Material | Stamped Steel |
| Closure Type | Double Seal |
| Maximum Speed | 12000 rpm Grease/21000 rpm Oil |
| Seal Material | Buna-N |
| Series | 6200 |
| Temperature Rating | 250 deg F |
| Bore Diameter | 17 mm |
| Outside Diameter | 40 mm |
| Number of Rows | 1 |
| Width | 12 mm |
| Load Capacity | 9550 N Dynamic/4800 N Static |
If we compare this to the spec’s available for the original NTN 6203LAX30:
- L is an internal design. They do not say, in practice it is how the rubber seal is attached to the cage.
- AX is the type of cage. This bearing is a pressed steel cage. Same as stamped steel
- 30 is again the tolerance. It is a 3 like on the NACHI.
Overall, when in general when choosing a bearing, you look at the dimension, then the type of seal , and then the tolerance. With this kind of low load bearing the key is the seal due to temperature/heat of Engine. You do not want the grease to get out and dust inside. A double seal is a better choice.
In this situation then the ideal bearing we are searching for a deep groove ball bearings metric size 6203 (17x40x12 mm) bearing with a Double Buna N seal and a C3 tolerance. The Nachi 6203-2NSE9C3 bearing chosen meets those specs. Another option would be an SKF brand 6203 2RSH/C3. And of course the original NTN 6203LAX30 would work.
These new bearings will be an upgrade in seal quality over the LU model originally fitted. Hopefully this will mean we never have to bother replacing them again.
OK, with our bearing selected, ordered and in hand, lets get on with the replacement.
Bearing Replacement
Manuel’s process of replacing the bearings was:
- Removing the old bearings
- Note the position of the bearing in the pulley so you remember how far it was inserted.
- The bearings are tight fit in the pulleys.
- You can easily remove them by hitting the bearing squarely with a hammer in the center. It pops out in one or two hits.
- Be careful to not damage the pulley body in the process.
- For the bearing on the tensioner, you will need to remove the retaining bolt and washer first.

- To install the new bearings:
- I put the new Nachi bearings in the freezer for a day. This helps shrink them ever so slightly.
- When it was time to assemble, I heated the pulley through a bearing Heater SKF TIH 030M/230V Induction Heater. You might be able to improvise with a heat gun or the kitchen oven (what would your Sweetie think about that!). Heating it to get it really hot – like 300°F or more. The idea is to heat the pulley (gently and evenly) so it expands slightly.
- Wear some leather gloves of course when handling the hot pulleys.
- We now have a slightly shrunk ice cold bearing and a slightly expanded hole in the very hot pulley.
- Apply Loctite 609 on the new bearing’s outer surface
- In a swift and decisive process I mated the the hot pulley and cold bearing:
- Using a piece of wood on one side of the pulley (to not damage anything) and one of the old bearings on the other (aligned up with the new bearing), I just put the assembly between the two jaws of a large vice and carefully closed the vice squeezing the new bearing into place. Very easy.
- Make sure it gets pressed all the way home like it was originally.
- Repeat the process for the other three bearings.


Reinstalling the Pulleys and Belt
With the bearings refreshed and new belt in hand, it’s time to reinstall. While the process is the same as in Darren’s article, Manuel continues to tackle it all from the top. Fitment of the belt is challenging.
- I installed each idler back and torqued the bolts to 26 Nm.

- I installed the new belt by hand.
- Working from above it is a little difficult to run the belt around water pump and the steering pump. There is a small cut in the frame to allow passage of belt to make this possible.
- I wished I had a serpentine belt grabber as sold on Amazon.
- After a couple tries I found out that it is best to install belt in this order (reference the figure below)
- Start from tensioner
- Then over the crankshaft
- Then on to Water pump and steering pump and upper idler
- Then install it on over the lower idler and the A/C unit
- Slip it over the Alternator.
- Use the Tensioner tool clockwise to provide a last bit of slack needed to slip the belt over the last idler.
- Release the tensioner tool and the belt should now be fully in place.
- Do a final inspection of the belts position on all nine (9) pulleys to make sure its perfect.
- Working from above it is a little difficult to run the belt around water pump and the steering pump. There is a small cut in the frame to allow passage of belt to make this possible.
- Reinstall the battery terminal and torque the bolt to 8Nm.


Conclusion
If you are willing to do the extra work to swap the bearings, you can tackle this belt and pulley service for as little as $112 USD in parts. I suspect that is a HUGE savings over doing it at the dealer. Plus you get the satisfaction of knowing you did it yourself.

Good work! I have to do this on my DBS as well and would like to use this approach vs. changing whole assembly.
LikeLike
Thanks! This is what I was looking for!
LikeLike