
Whether you are repainting, polishing or wrapping the finish of your Aston Martin Grill Bars, you’ll need to strip them of the original paint first. This article is one of a series where I am refinishing the tattered look of my entire grill, and I’ve elected to use vehicle wrap to apply a new finish to mine. Stripping the old paint without messing up the metal underneath took me a while to figure out a fool proof process, but I nailed it and will share that here.
I’ve done a bunch work already to get to this point, including:
At this point I am going to be talking about stripping the paint of each individual grill bar.
The grill bars are actually formed stainless steel sheet metal. I discovered during this process that some were really well painted, and others we’re properly painted (and thus the massive paint failing/peeling issues were plaguing certain bars of the grill). I found that properly prepared bars had four layers of finish applied to the smooth stainless material; 2 layers of a grey/silver sealer/primer, a black primer/base color layer, and a top coat of the platinum grey finish color. On the bars that had failing finishes, the first two coats of primer/sealer weren’t there. Crappy QC. I guess some of the bars were painted on a Monday. You’d think something like this couldn’t possibly happen on a bespoke Aston, but I guess you can’t beat the human factor.
Stripping Options
I considered three methods:
- Sanding – I thought about sanding the old paint off, but dismissed it for two main reasons:
- I didn’t want to scratch and scuff the raw metal stainless underneath, limiting my options to change to a ‘polished’ finish down the road. Sure, sanding scratches could be buffed out probably with enough effort, but seemed like a better way could be found.
- The inside of the bars are painted with the first three coats, finished in the black layer. This finish will eventually be failing too if it hasn’t already, so I wanted to remove it. Impossible to sand out.
- Heat – Another well known way to strip paint is to use a heat gun and heat the paint until it releases from the underlying material. This was the first technique I tried, and would be incredibly slow. I was also worried about warping the stainless sheet metal with the amount of heat that would be needed. I did an area about the size of a quarter, and it worked, but also left a little scorching on the stainless (which did polish out).
- Chemical Stripping – this was the method I chose. I’m not particularly fond of using hard chemicals (from an environmental standpoint), but I did find a technique that works perfectly and minimizes the amount of stripper needed.
You can’t be in a rush on this project. Each bar will need to soak in stripper for 24 hours to really work perfectly (the 20 minute claims are crap). One a day for a week.
It’s not very costly. All in I probably spent $100 USD total on supplies to do all seven (7) grill bars from my DB9.
Supplies Needed
Chemical stripping needed a few supplies and some personal protective gear. All readily available.
- Disposable Tools
- Small Paint Brush. You’ll need some cheap disposable paint brush you can use for the project and then toss. I picked up mine at the local home center for about $2 USD (or even on Amazon.com with Free Prime shipping).
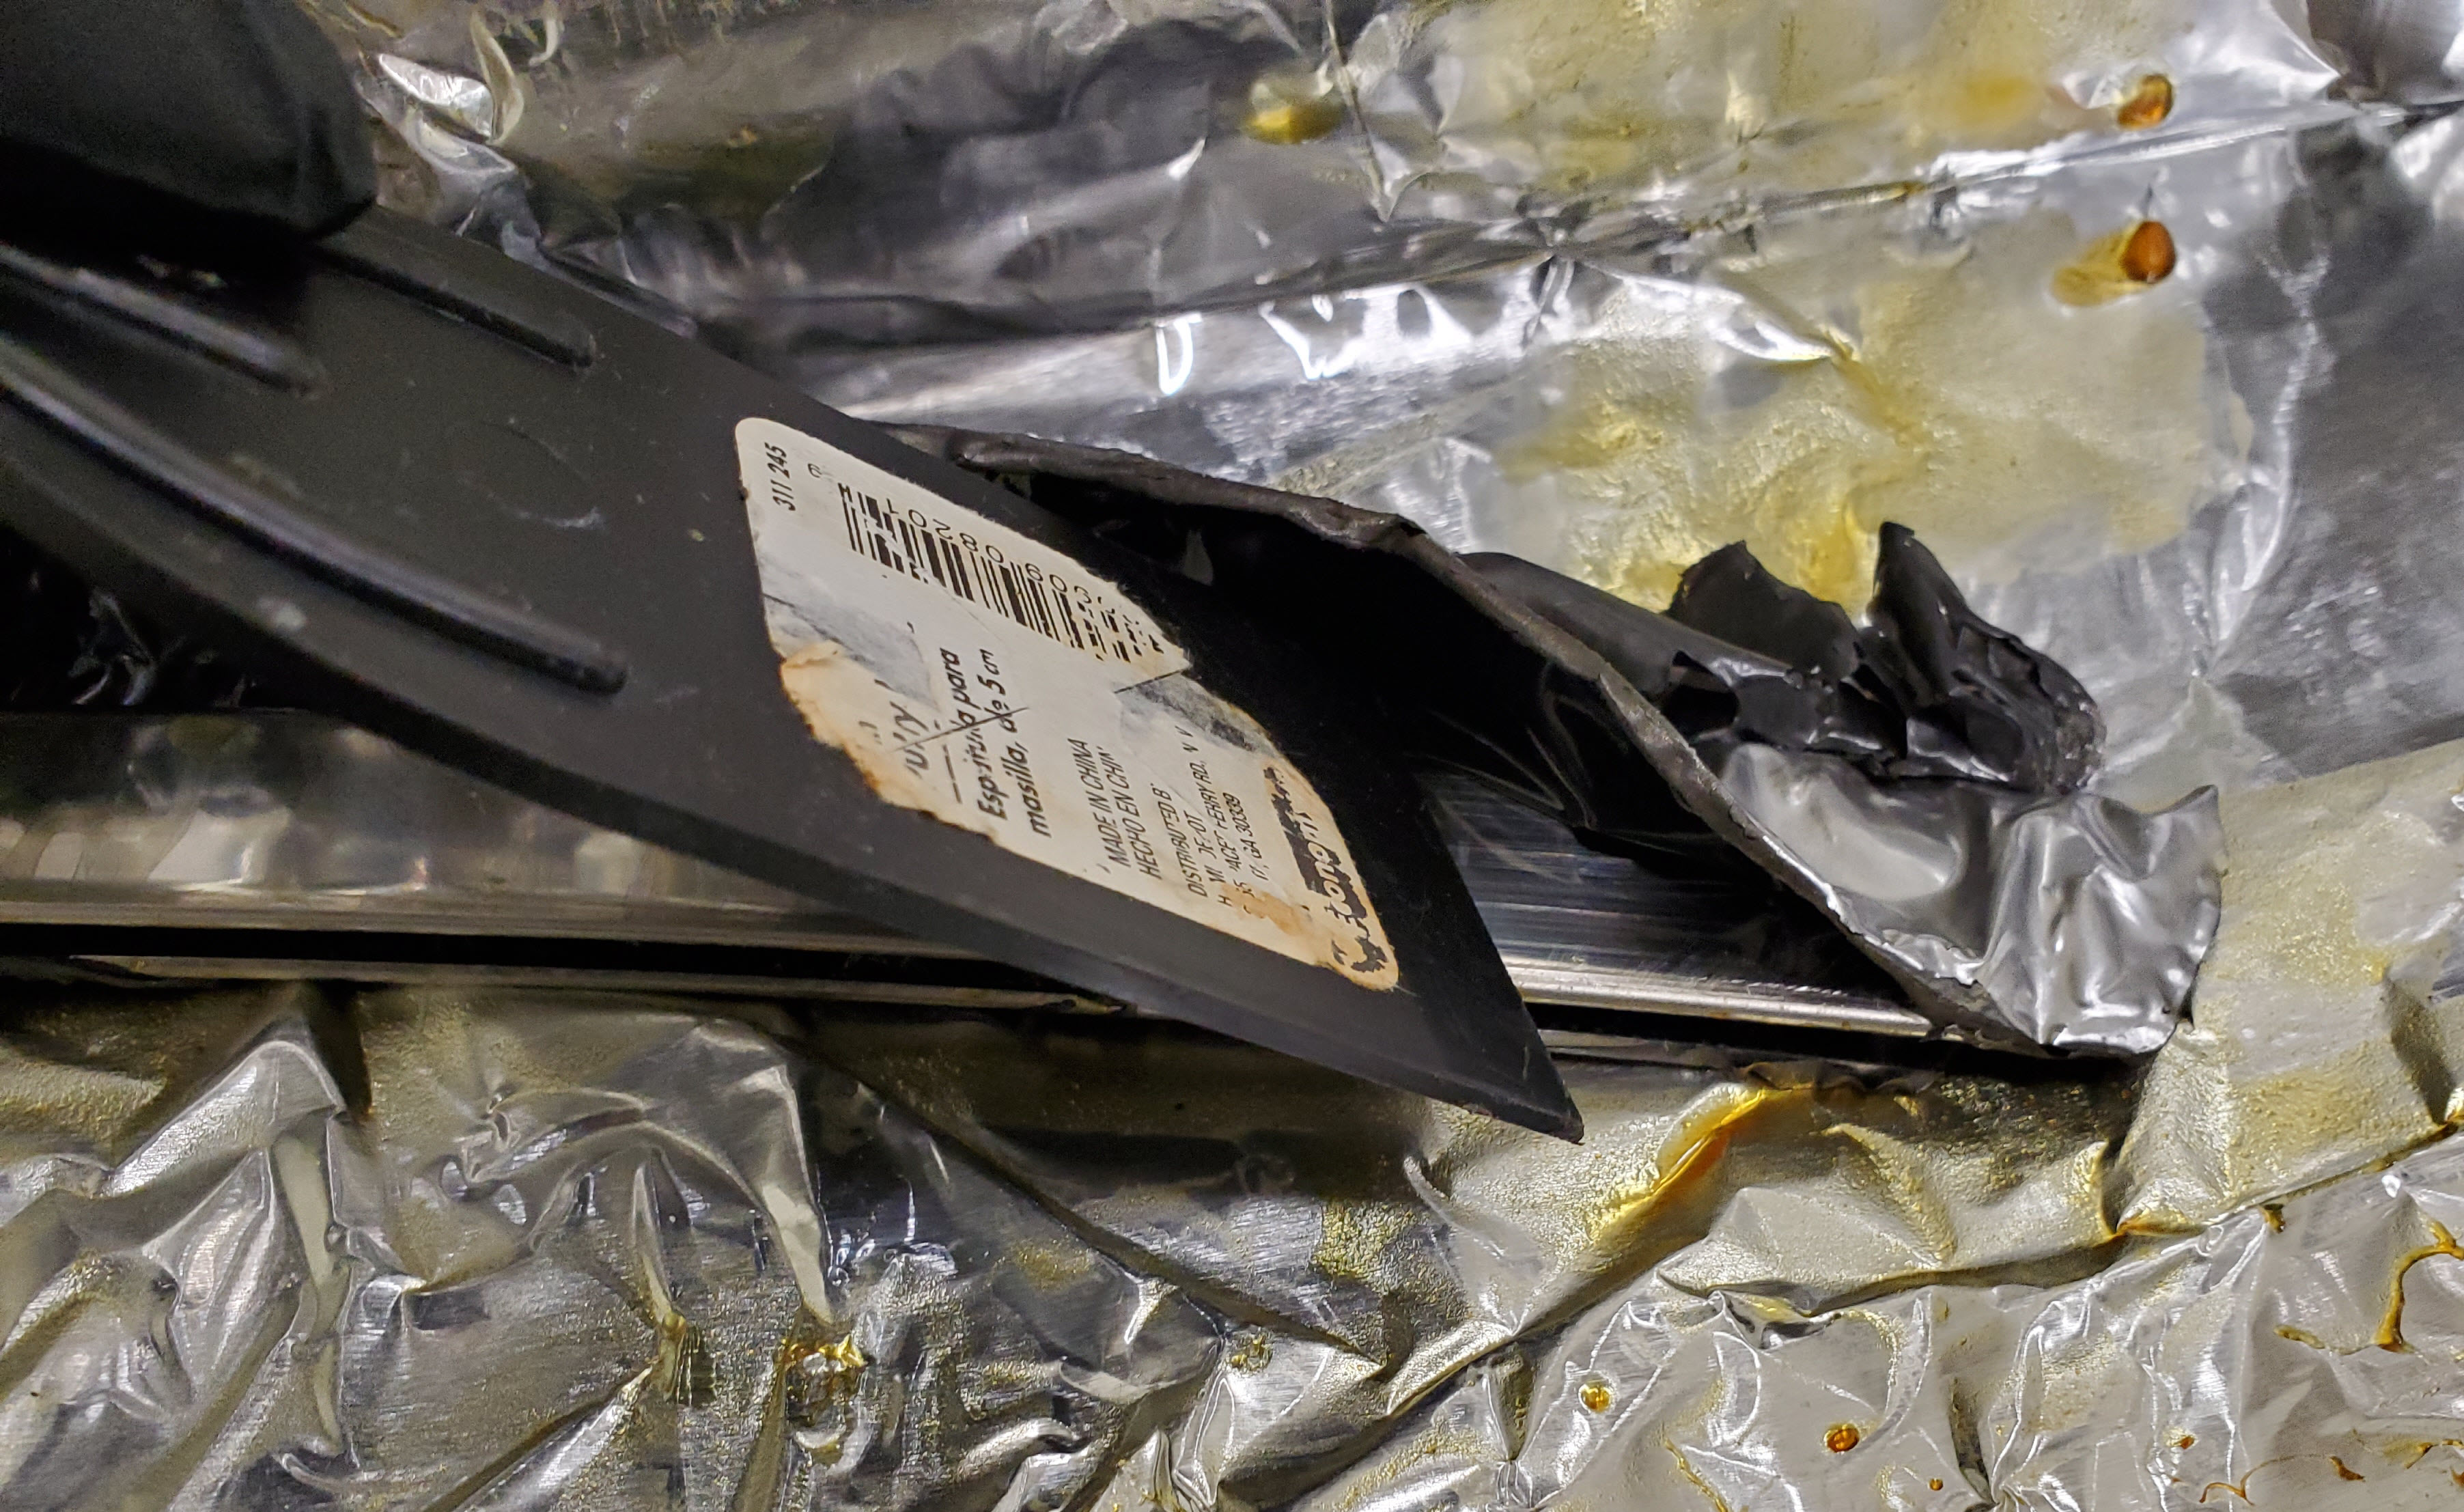
- Small Plastic Scraper. You’ll need this to scrape the old paint off after the dip process. One thin enough to fit into the gap at the back of the bar and slide along inside the V. I also picked this up in the paint supplies section of my local home center for about $2 USD (or about $5 if you buy it online from Amazon.com here).
- Tooth Brush. Grab that old toothbrush and use it on this project. We’ll use it to do a little scrubbing after the chemicals have done the big work.
- Test Tube Cleaning Brush. Not your everyday item, but a small test tube brush is the perfect tool for scrubbing out the slot afterwards. You can get a pack of them for about $9 USD from Amazon.com here.

- Supplies
- Paper Towels. You’ll want to have a roll of paper towels available to wipe off the bars, tools, etc.
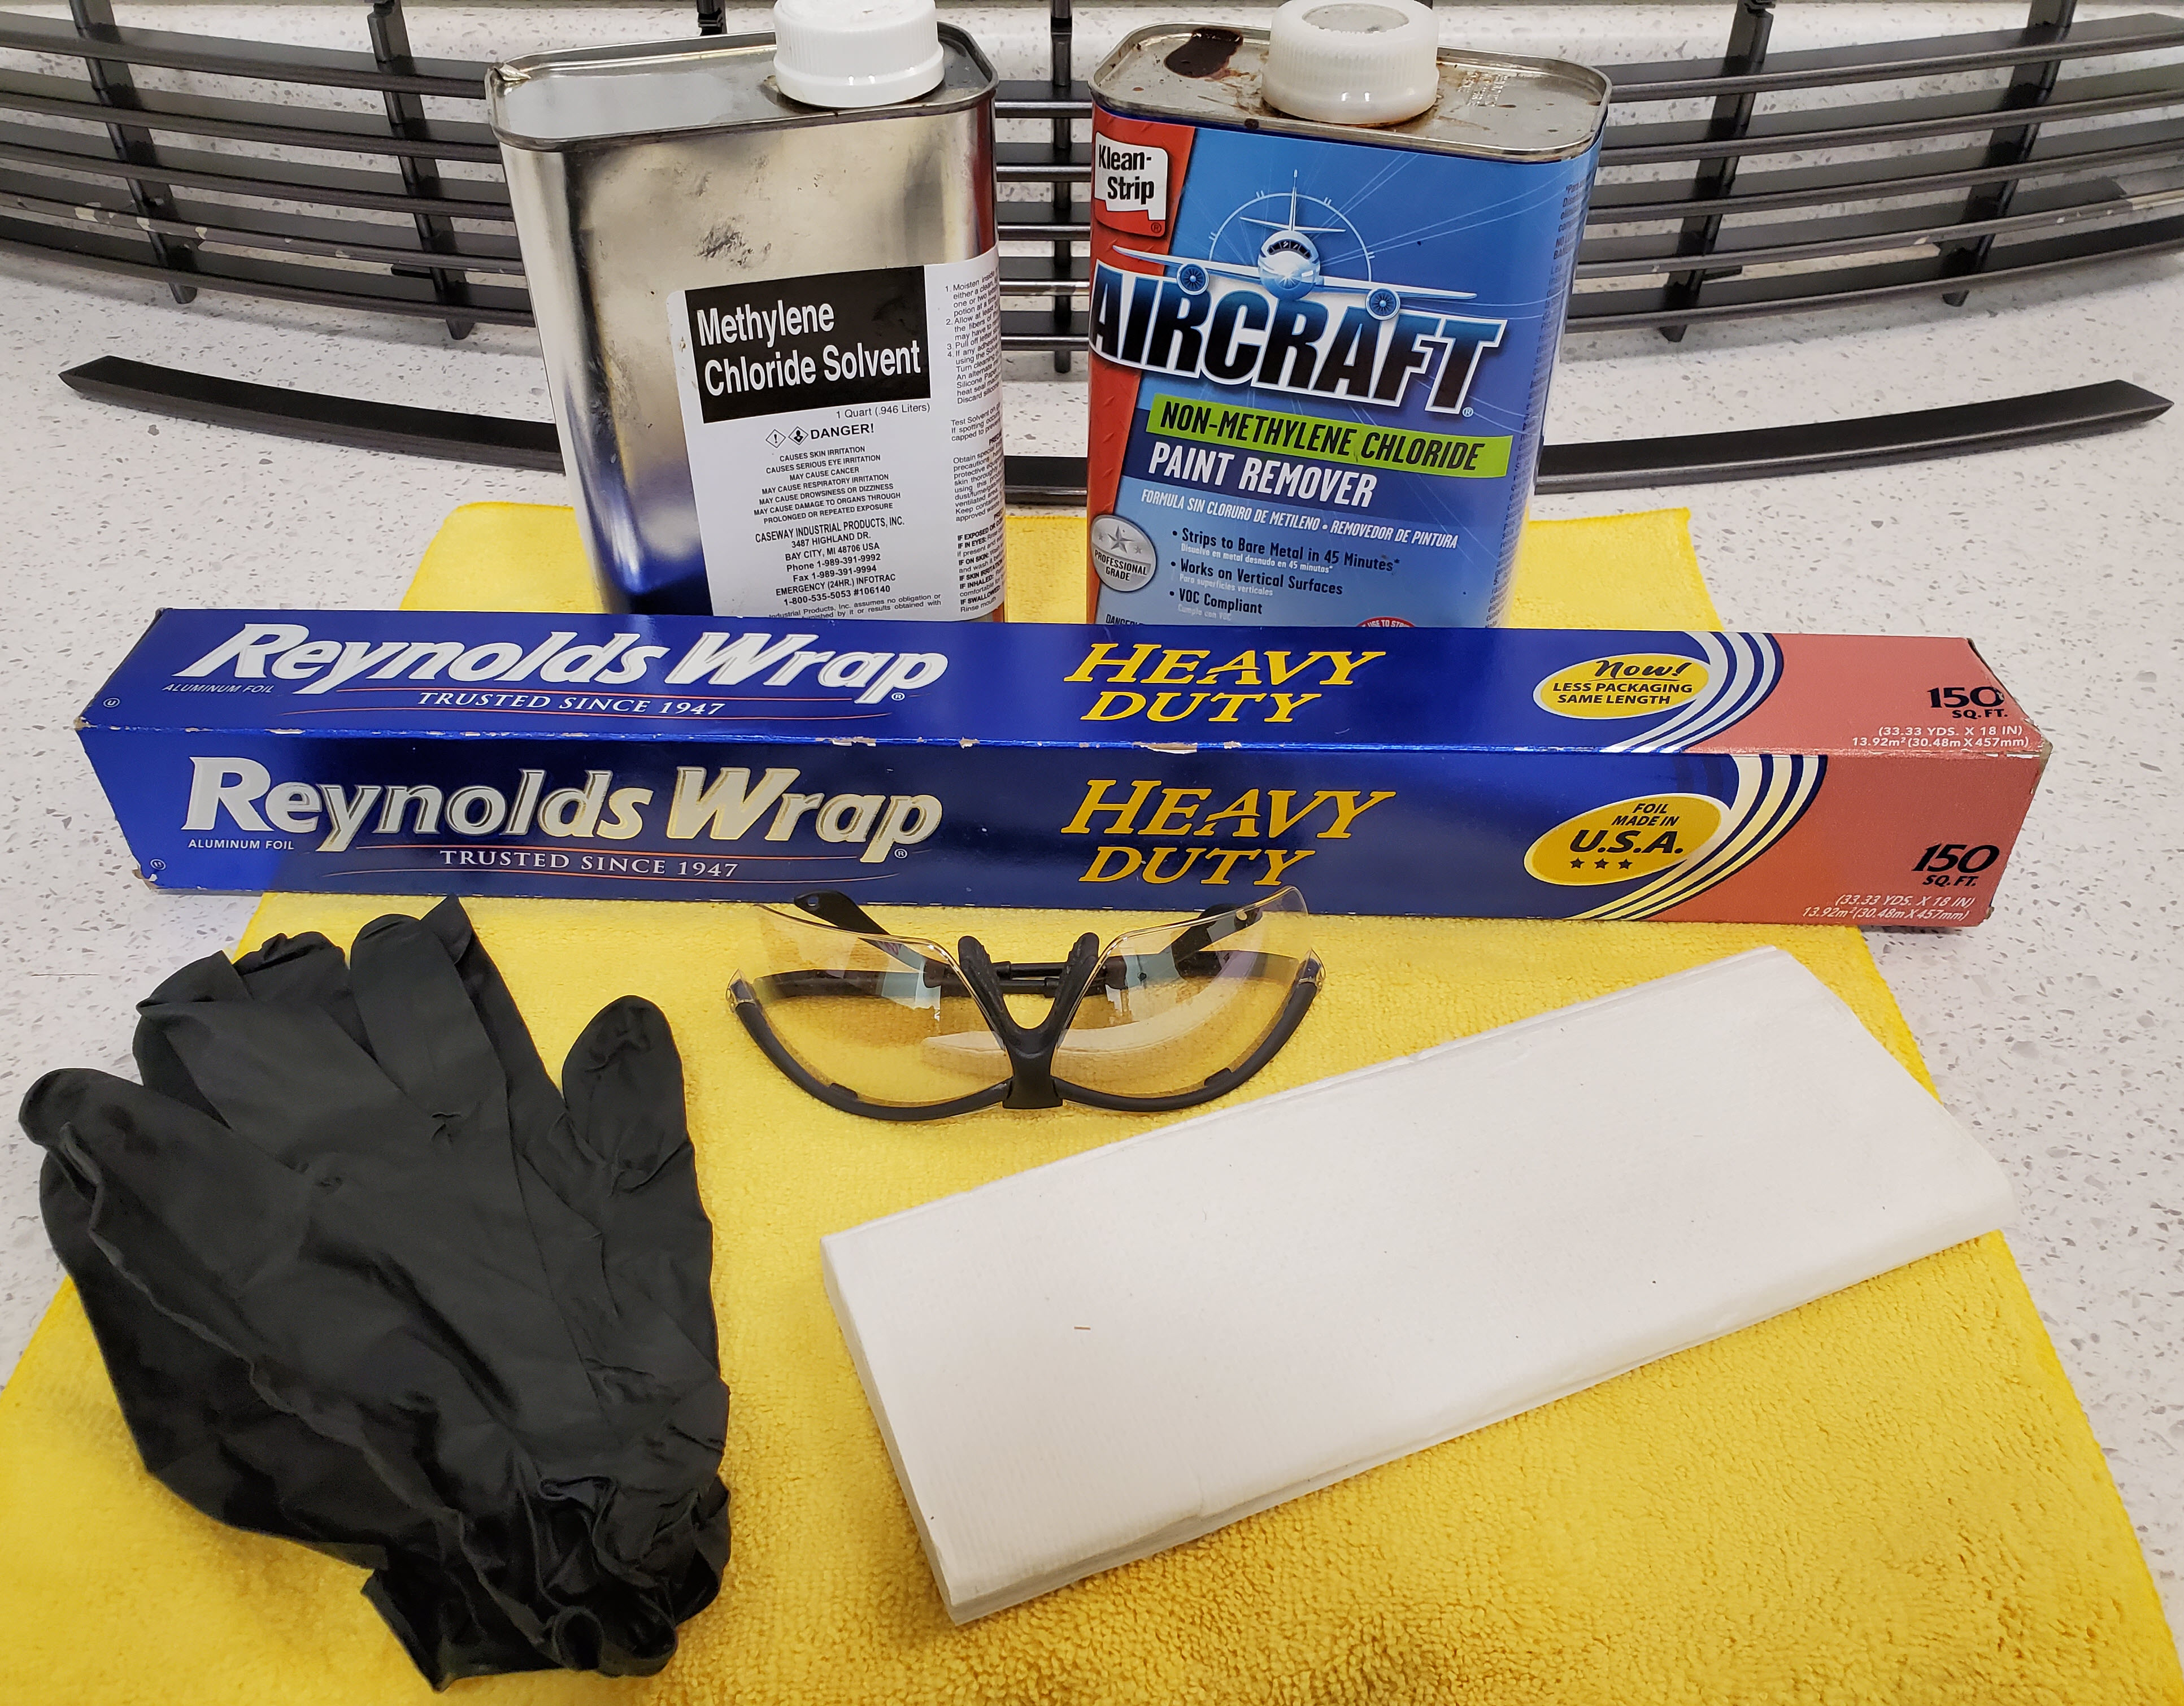
- Heavy Duty Roll of Aluminum Foil. As you’ll see below we make little chemical soaking pouches for each bar. These will keep the chemicals from evaporating quickly, and keep them in contact with the paint. This was the magic step. I stole my Sweeties roll of Reynolds Wrap from the kitchen. Be sure to get a strong heavy duty foil, it needs to stand up to some abuse. An 18″ wide roll can be found on Amazon.com for about $6 USD here. (or just raid your Sweetie’s pantry like I did)
- Chemical Paint Stripper. This may vary by country, but I looked online to find the best paint stripper I could. I checked reviews, etc. What I discovered in the USA that this summer in fact they just mandated the elimination of Methelyne Chloride from consumer paint stripping products, and this of course was the magic chemical that made it work. Many strippers advertise that they work in 20 minutes. My experience was that the ones without Methel Ethel Death work MUCH slower, and through experimentation it was necessary to let the bars soak 24 hours in the foil packet with the stripper to be 100% successful. I ended up buying a 1 quart can of Klean Strip Aircraft Paint Stripper. This cost about $17 USD and I got it at the local autoparts store. You may have to research a bit at your local autopart stores depending on what chemicals are allowed in your state or country. I used about ½ of the can overall, so this was the right amount.

- Protective Gear – you need to keep the stripper off your skin and out of your eyes
- Disposable gloves. Lots of them. Buy a box of 100 gloves, you’ll use at least half of them. You’ll de-glove and throw them out at least twice per bar.
- I use these Permatex gloves that you can get for about $21 USD per box on Amazon.com.
- Safety Glasses for splash protection. Always good to have a pair in the shop anyways.
- I use these inexpensive ones you can get from Amazon.com for $11 USD with free Prime shipping.
- Disposable gloves. Lots of them. Buy a box of 100 gloves, you’ll use at least half of them. You’ll de-glove and throw them out at least twice per bar.

Procedure
The good news is that most of the work is in gathering your tools and supplies. I spent a ton of time experimenting to find a fool proof method, so you’ll get the benefit of it.
As I mentioned, this takes time. You can’t strip and refinish all seven bars in a weekend unless you rip your entire grill apart at once. As I pointed out in the Disassembling your Grill article, my approach was to remove, strip, refinish one bar at a time so that the grill ‘structure’ stayed in-tact. I probably spent 2 days per bar, so 14 days in a row if you were dedicated. No worries, you can drive around without your grill installed for a couple of weeks.
You’ll only spend about 10 minutes putting a bar into ‘The Dip’, and another 10 minutes cleaning it up after.
- Step one is to protect yourself. Wear long sleeved shirt, put on a pair of the disposable gloves, and your safety glasses
- WORK IN A REALLY WELL VENTILATED AREA. Not sitting in a small closed garage with all the doors closed. Not in the house. I worked in the shop with the big door open.
- Work in moderate temperatures. Check the directions on the paint stripper to confirm this, but not freezing, not 100°F.
- READ AND FOLLOW THE INSTRUCTIONS of the paint stripper.

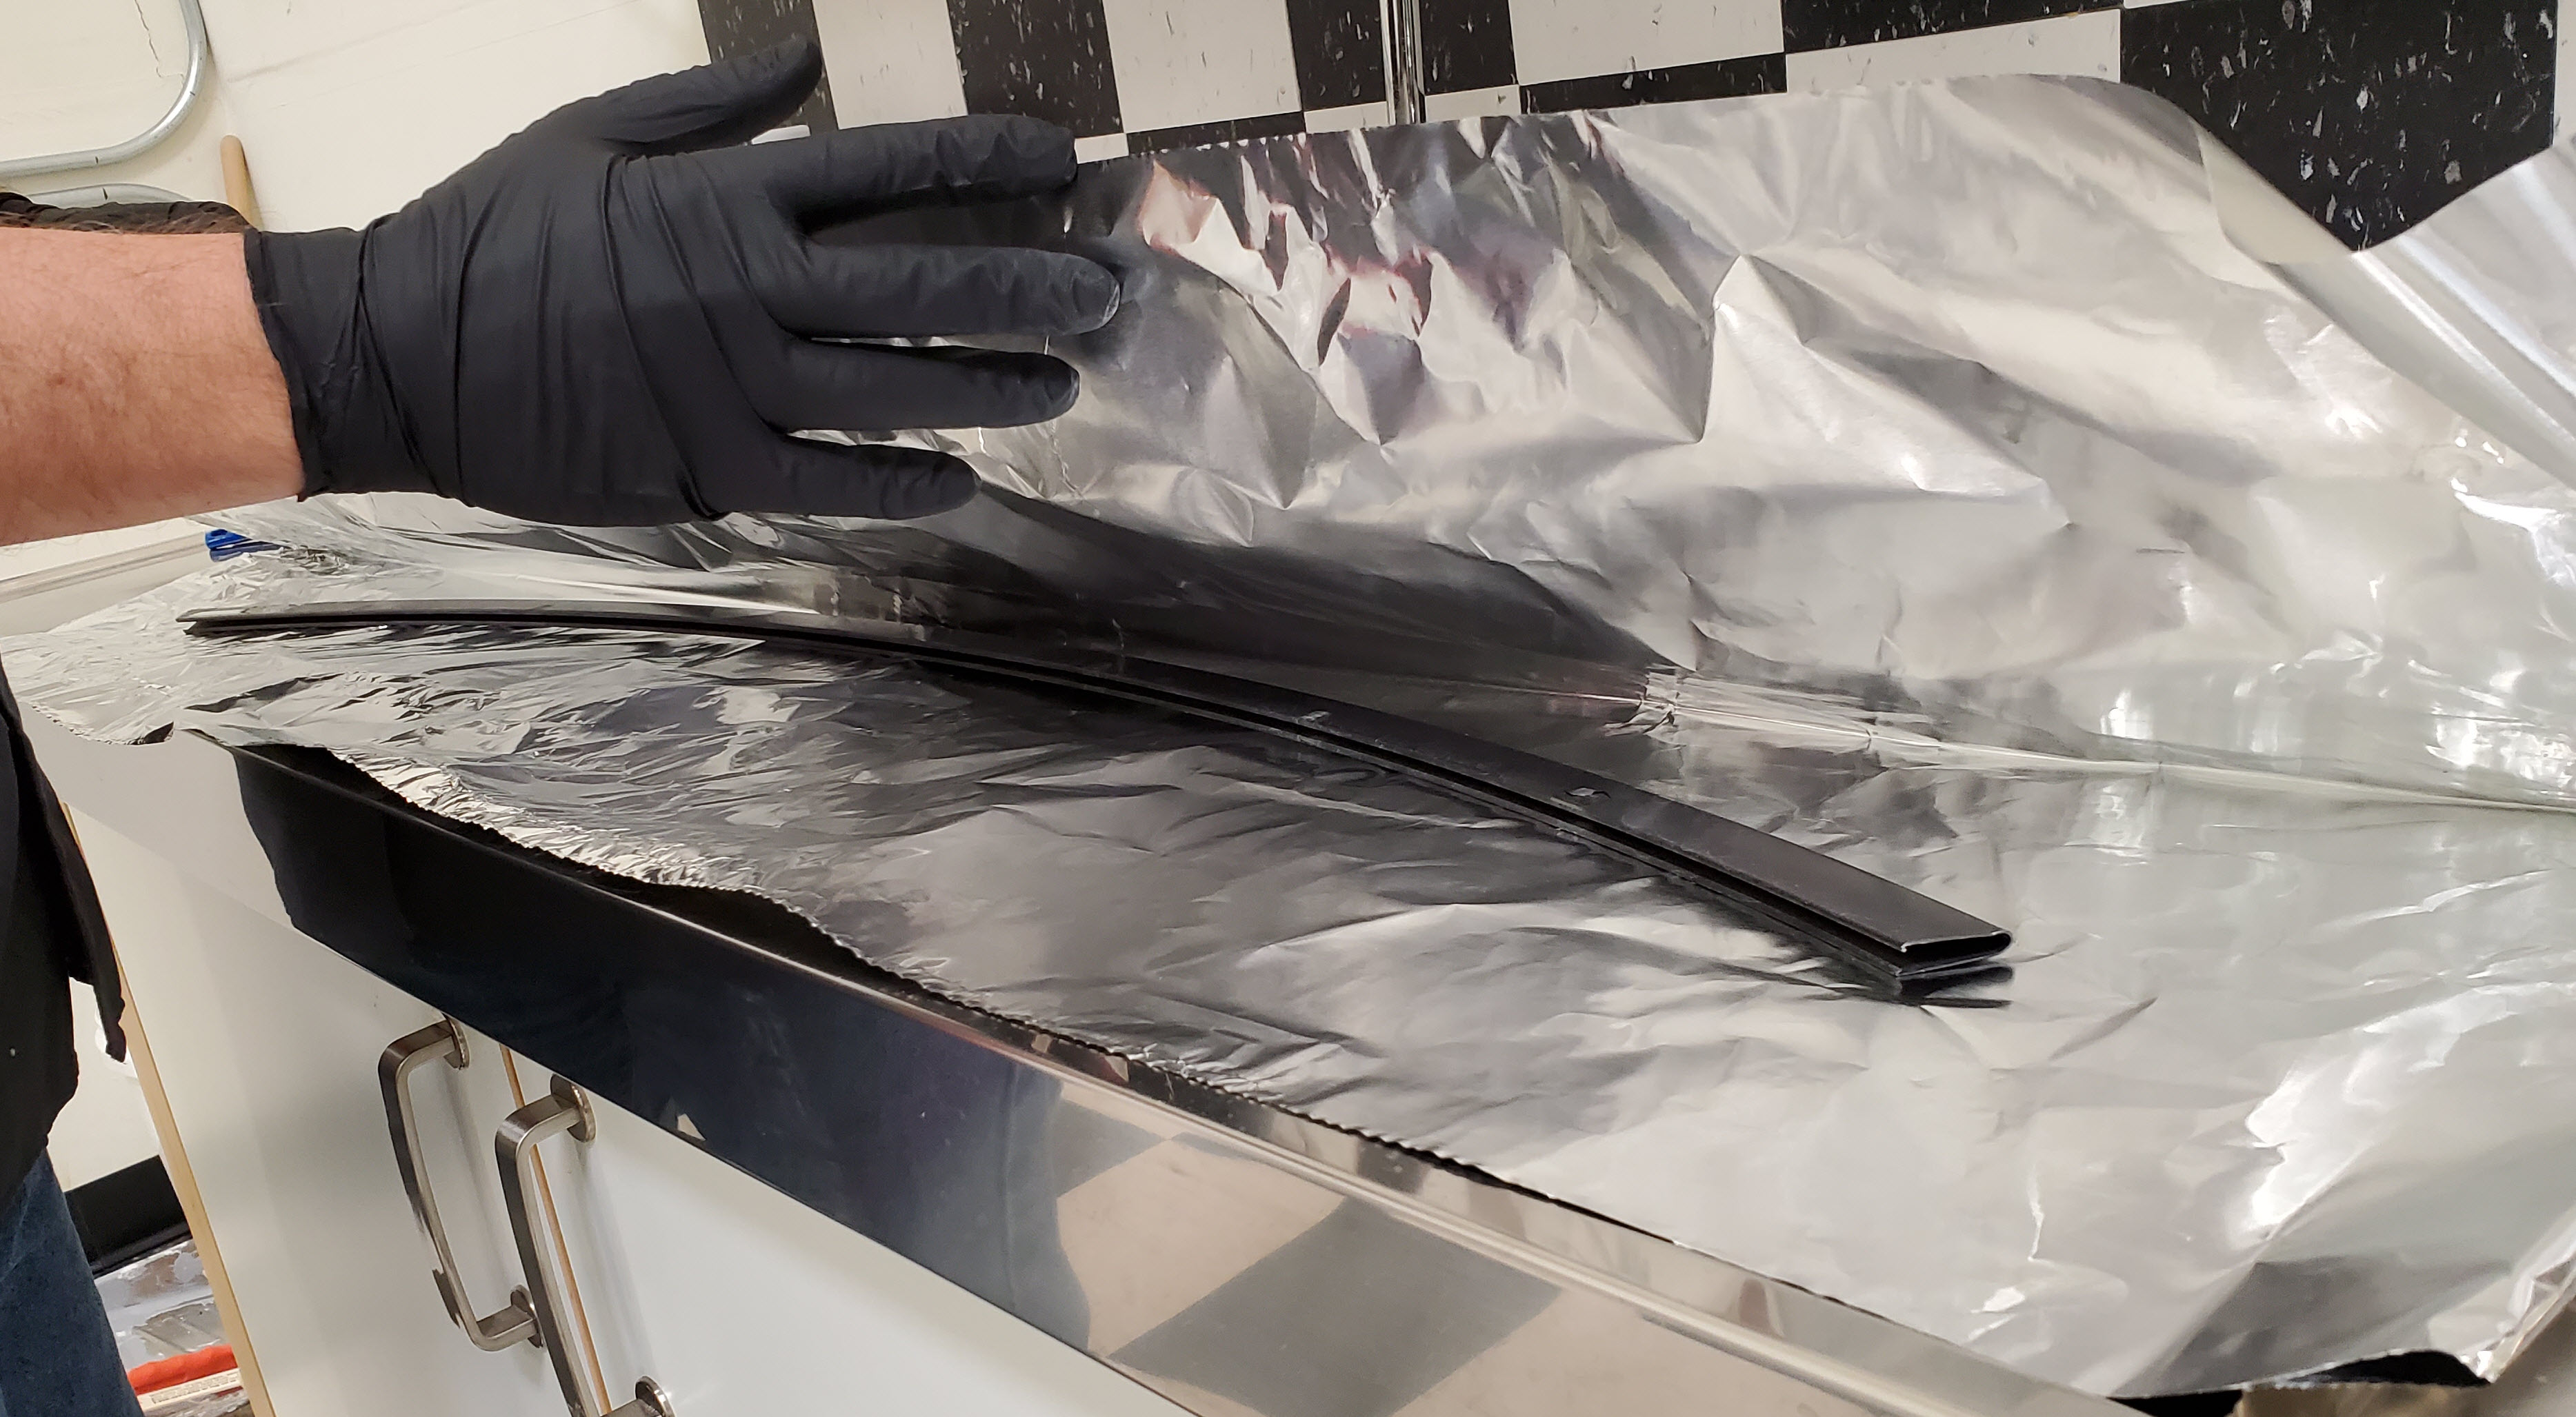
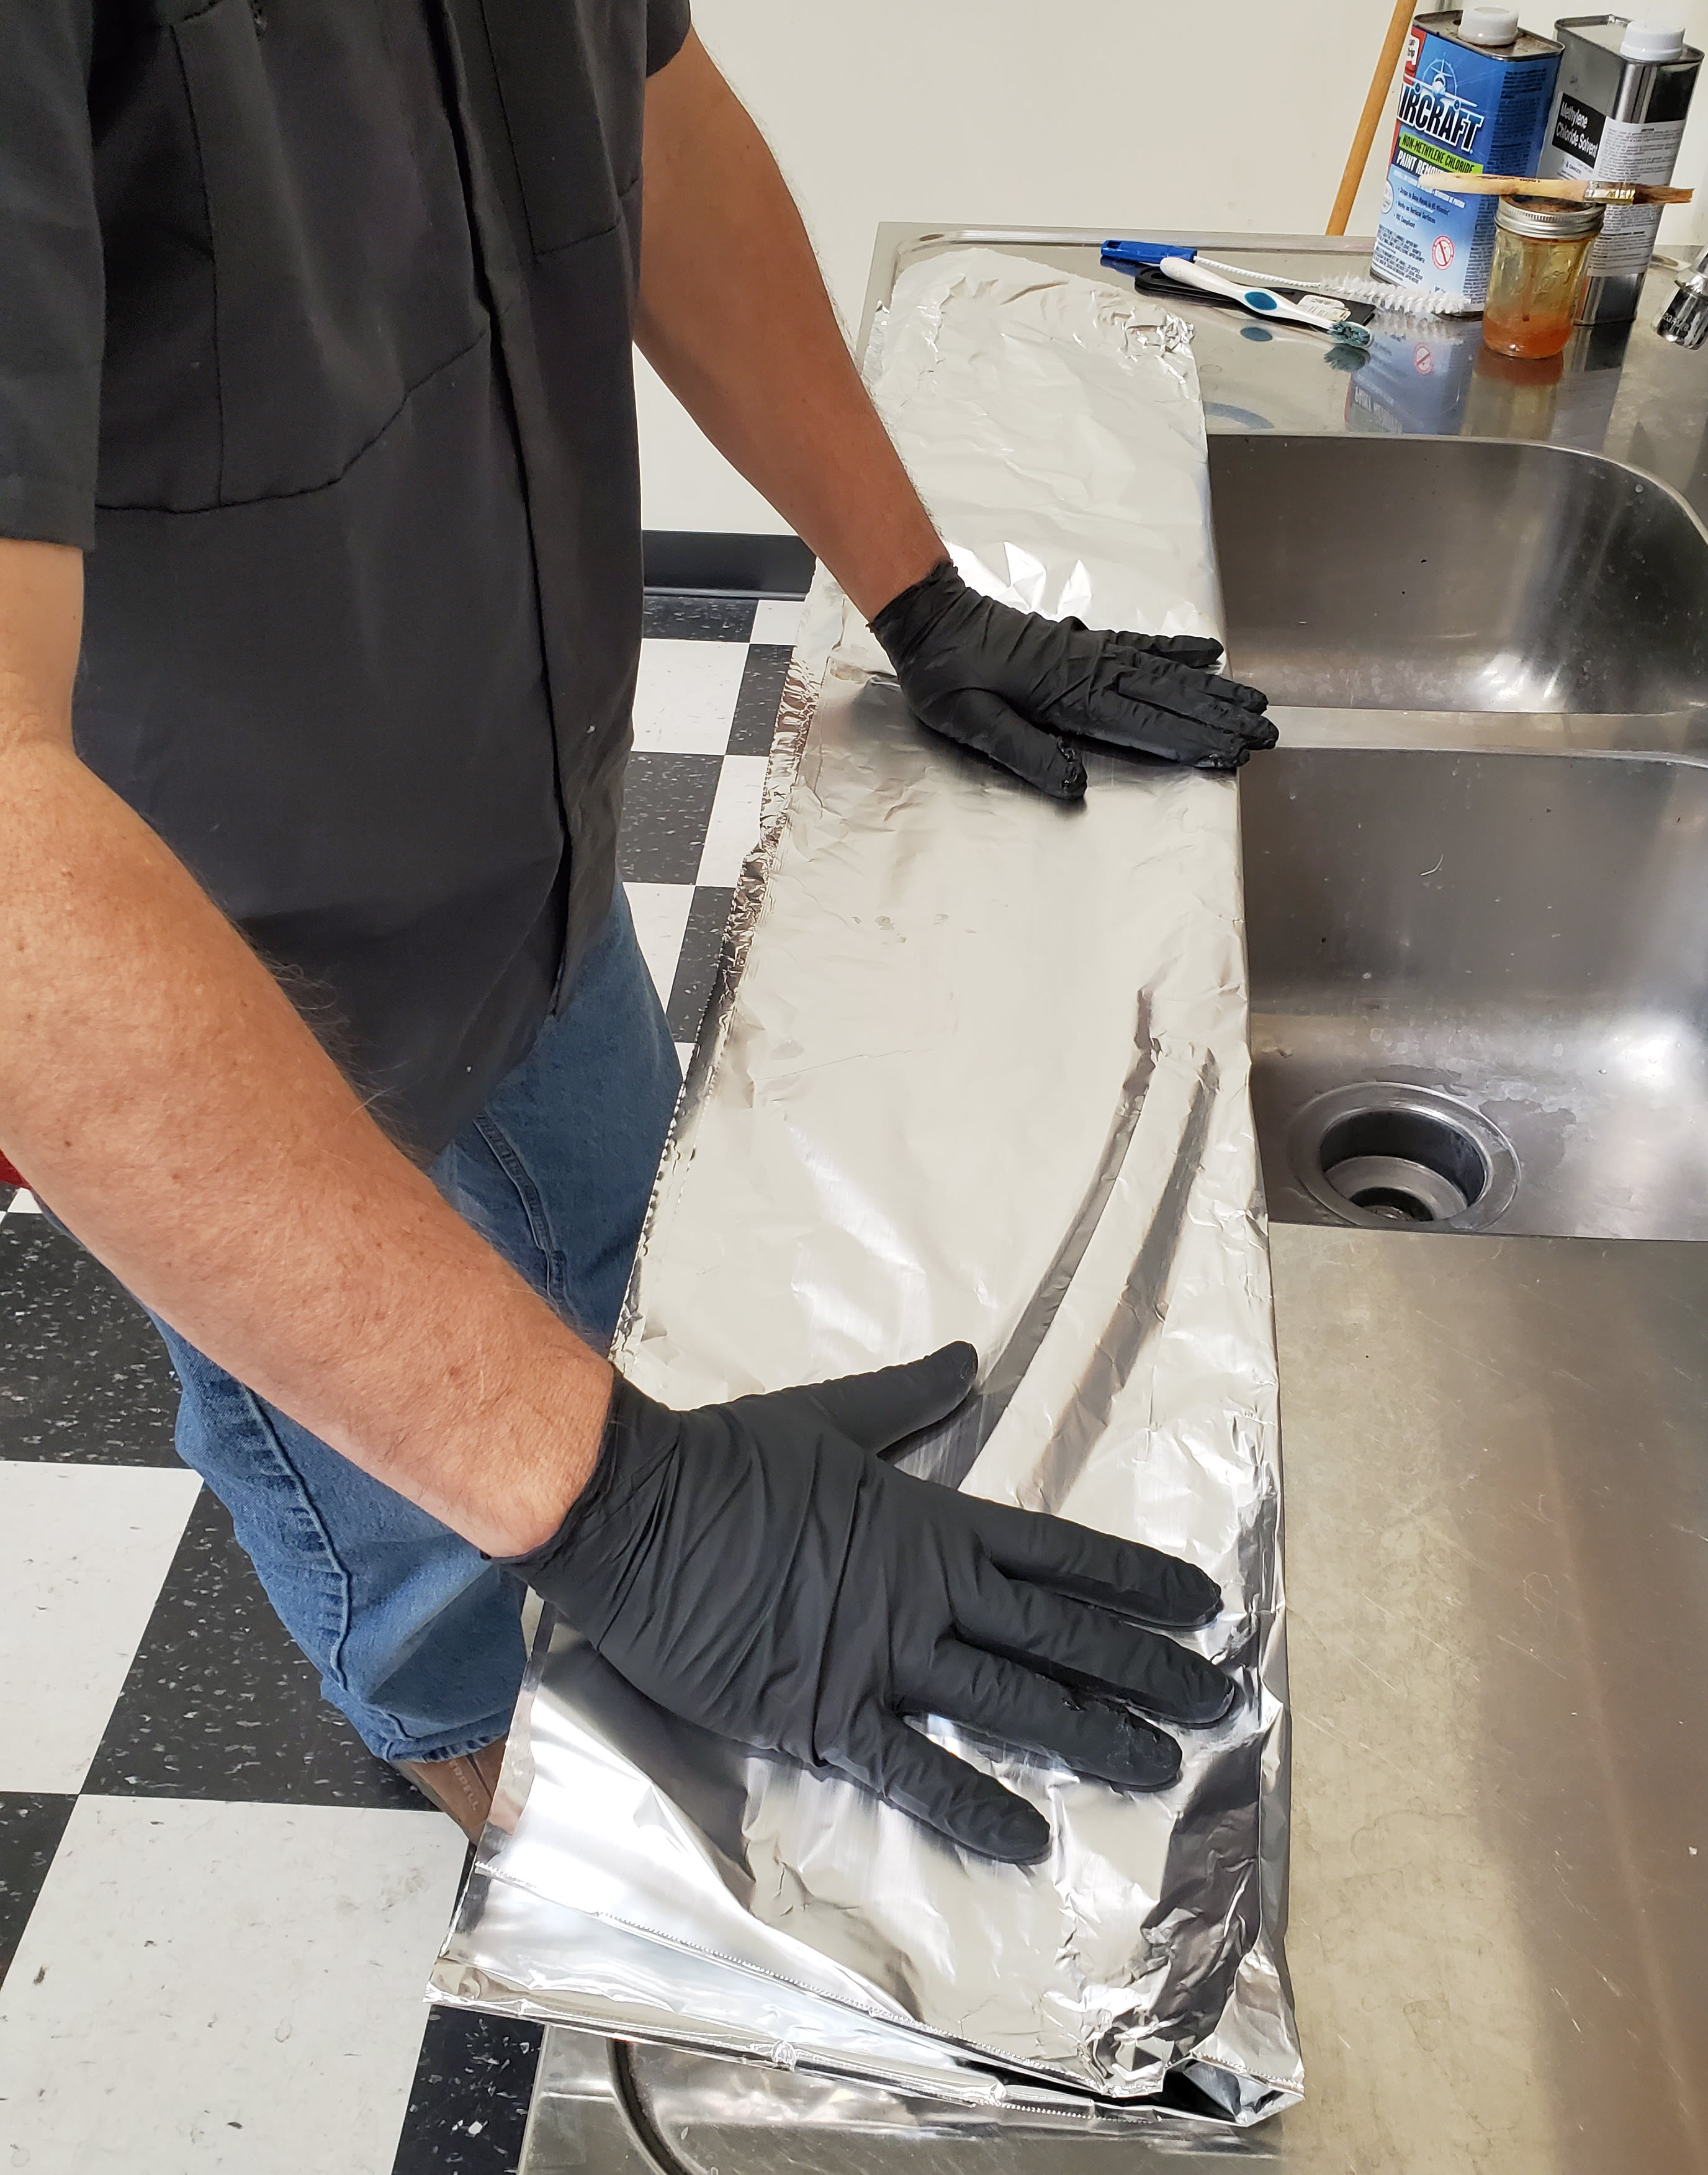
- I stretched out a long strip of Aluminum foil that I laid the grill bar onto. I made sure it was at least six inches longer at each end.

- Fold the foil in half on the narrow direction so that it will make a pouch to hold the grill bar.

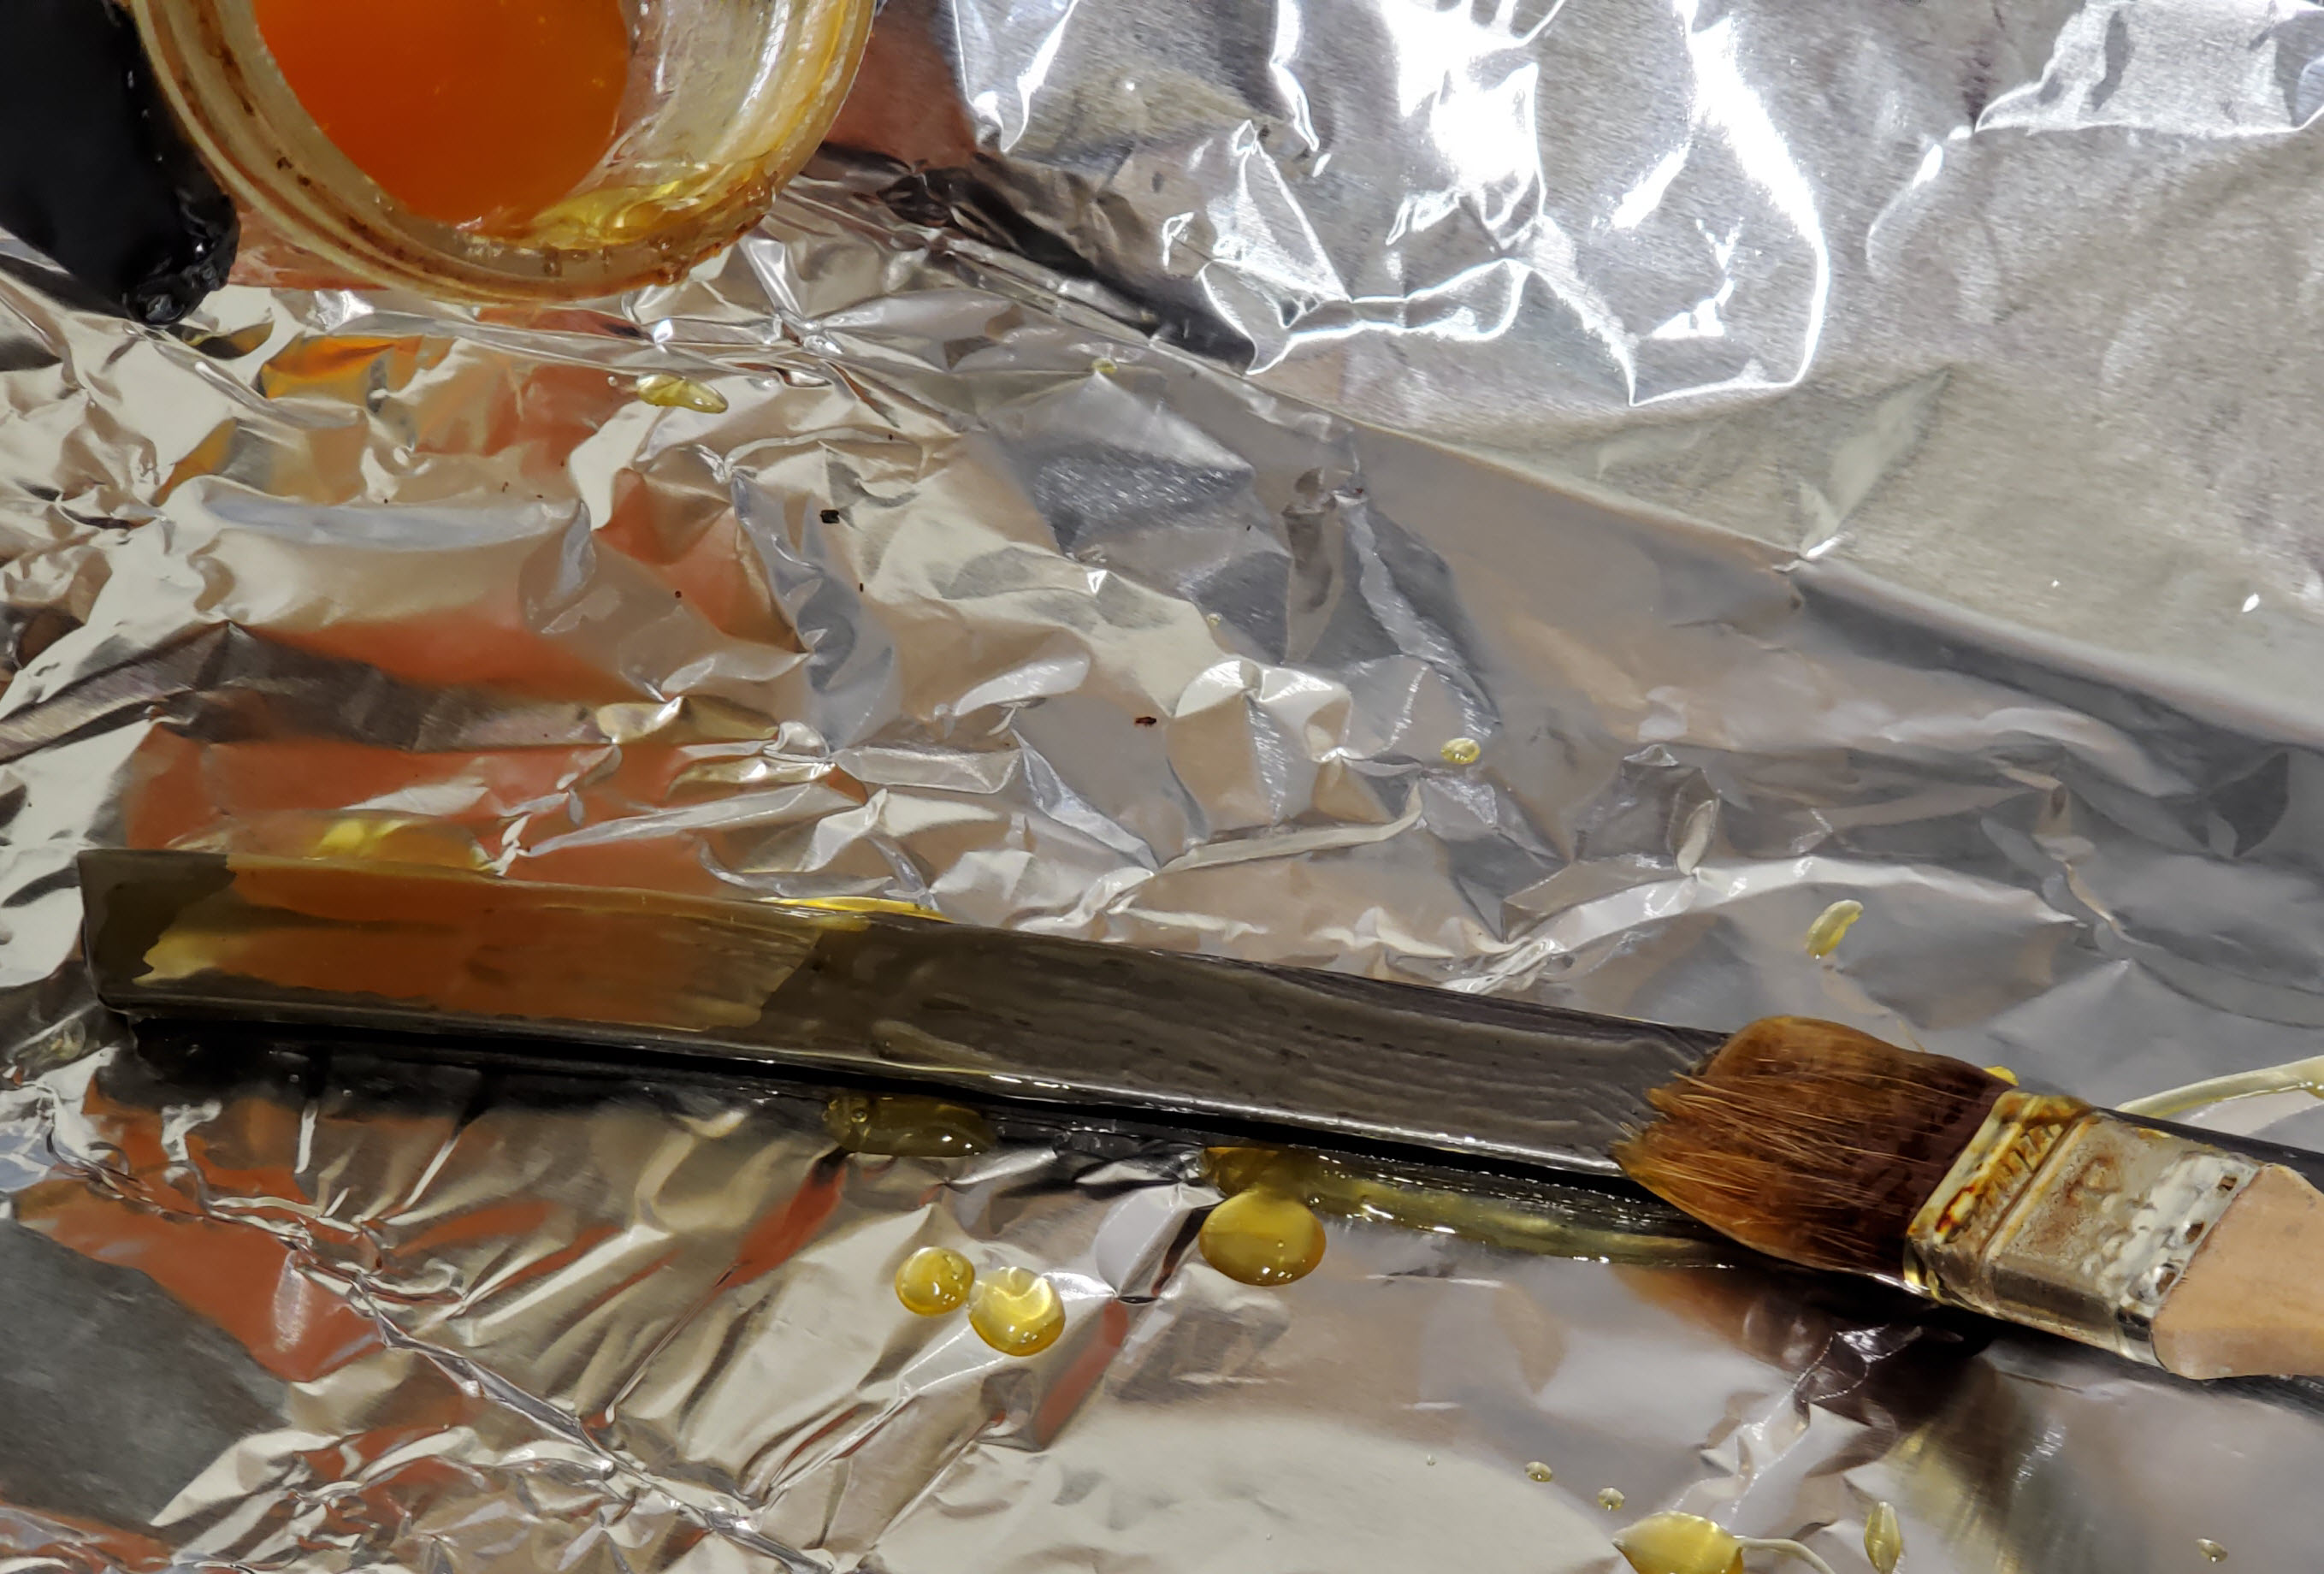
- I transferred a few ounces of the paint stripper solution into a small glass container with a resealable lid to make painting it on easier. I used a small jam jar left over from our kitchen.
- Minimize the time the solution is exposed to the air. The chemicals evaporate quickly, so keep the quart can closed, the jam jar sealed, etc. until you really need to use it.

- Minimize the time the solution is exposed to the air. The chemicals evaporate quickly, so keep the quart can closed, the jam jar sealed, etc. until you really need to use it.
- Use the small paint brush and paint a generous amount of the stripper onto the grill bar.
- Work overtop of the foil so the drippings stay on the foil. They’ll still be useful once you seal the foil up, so don’t worry about the drippings.
- Holding it up with one hand, paint the stripper directly into the V slot at the back. Apply it liberally, smooshing the brush around in the slot working from end to end making sure you coat 100% of the inside surface. Over-do it rather than under-do it.

- Lay it flat on the foil near the fold and paint one side of the exterior surface, again liberally, working from one end to the other.

- Flip it over laying the wet side down onto the foil in about the final position you’ll leave it when you seal the pouch.
- Liberally coat the other side now from one end to the other.
- Liberally paint it into the slot edge again for good measure.
- Make sure there is a liberal amount of loose drippings on and around the bar where it sits on the foil.

- Put your brush aside and seal your jam jar
- Fold the foil over long ways and gently press the foil down around the shape of the grill bar. Not super tight and squished, but enough so you see the outline clearly.

- Fold the long edge over to make it an air tight seal.

- Fold each end over a few times to make an air tight seal. Your foil pouch packet is now complete.


- Peel off your gloves and dispose of them.
- Wash your hands with soap and water immediately just in case.


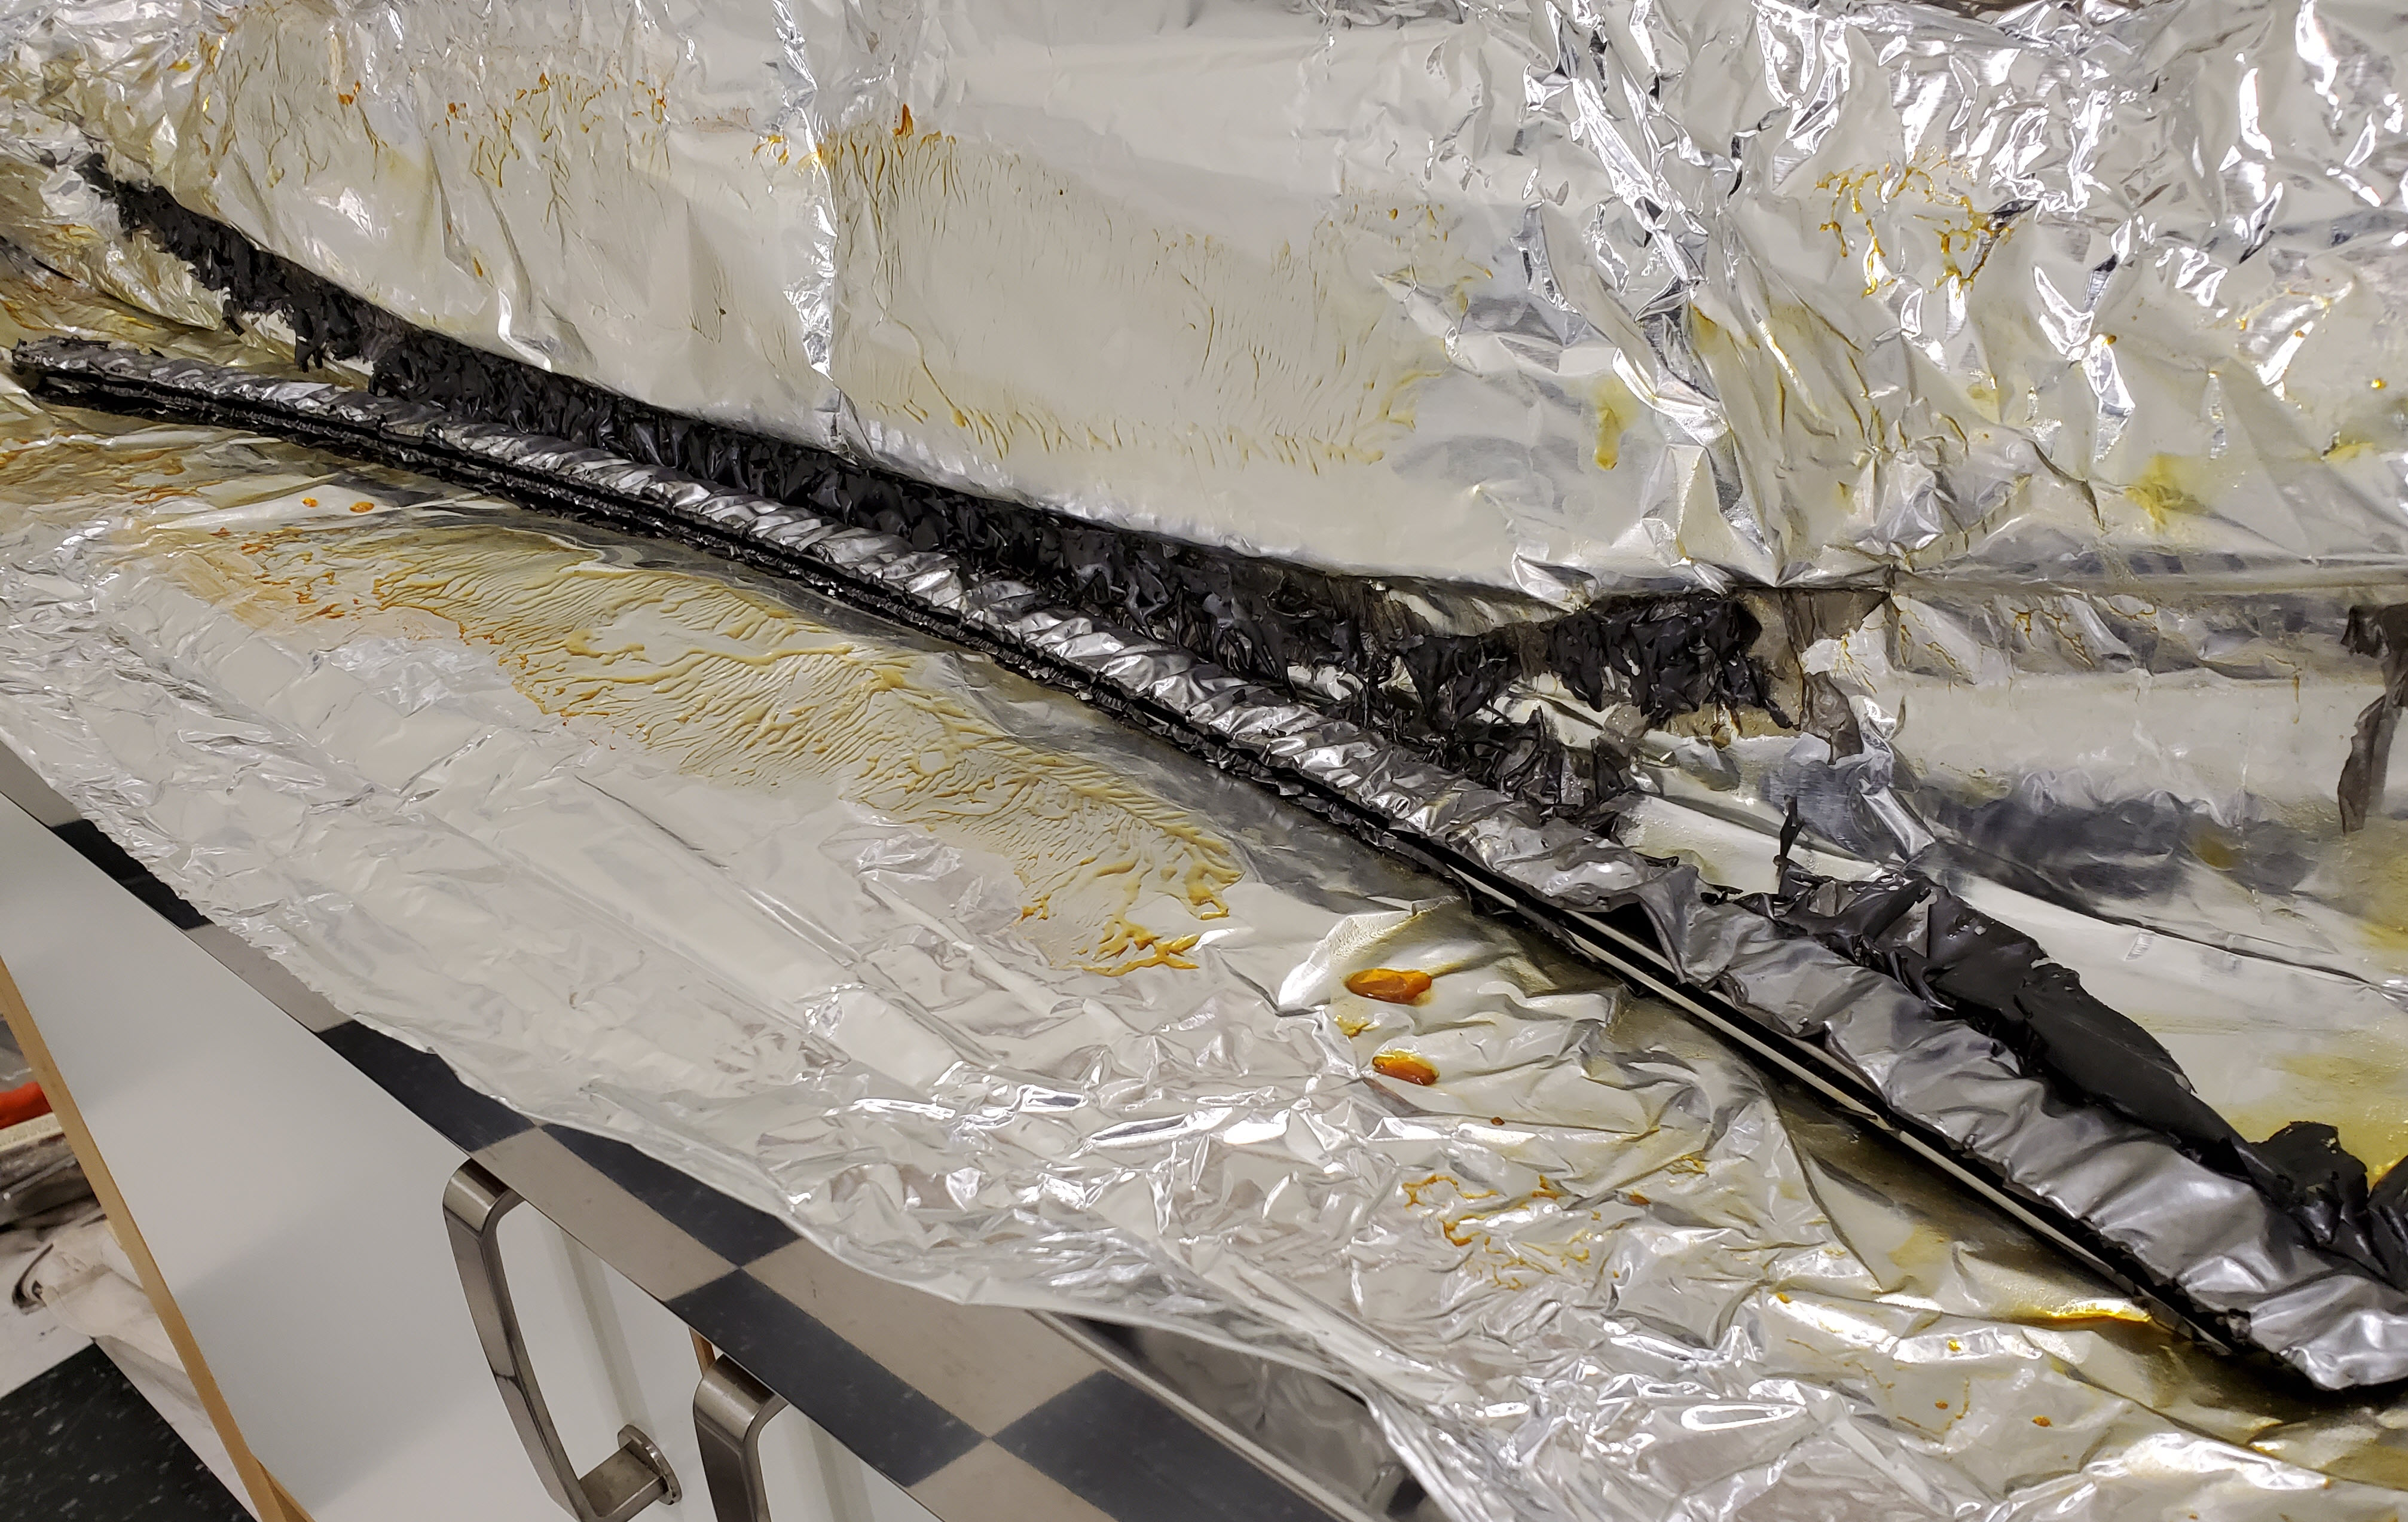
Let the bar sit in the dip inside the foil pouch for 24 hours. Don’t peek (the vapors in the pouch are part of the magic). Keep the pouch in a well ventilated area (like the garage) in moderate temperatures.
After 24 hours:
- Put on a fresh set of gloves and your safety glasses. This part gets a little messy so don’t wear your Sunday best.
- Make sure the space is well ventilated, open the garage door, etc.
- Open the foil packet.
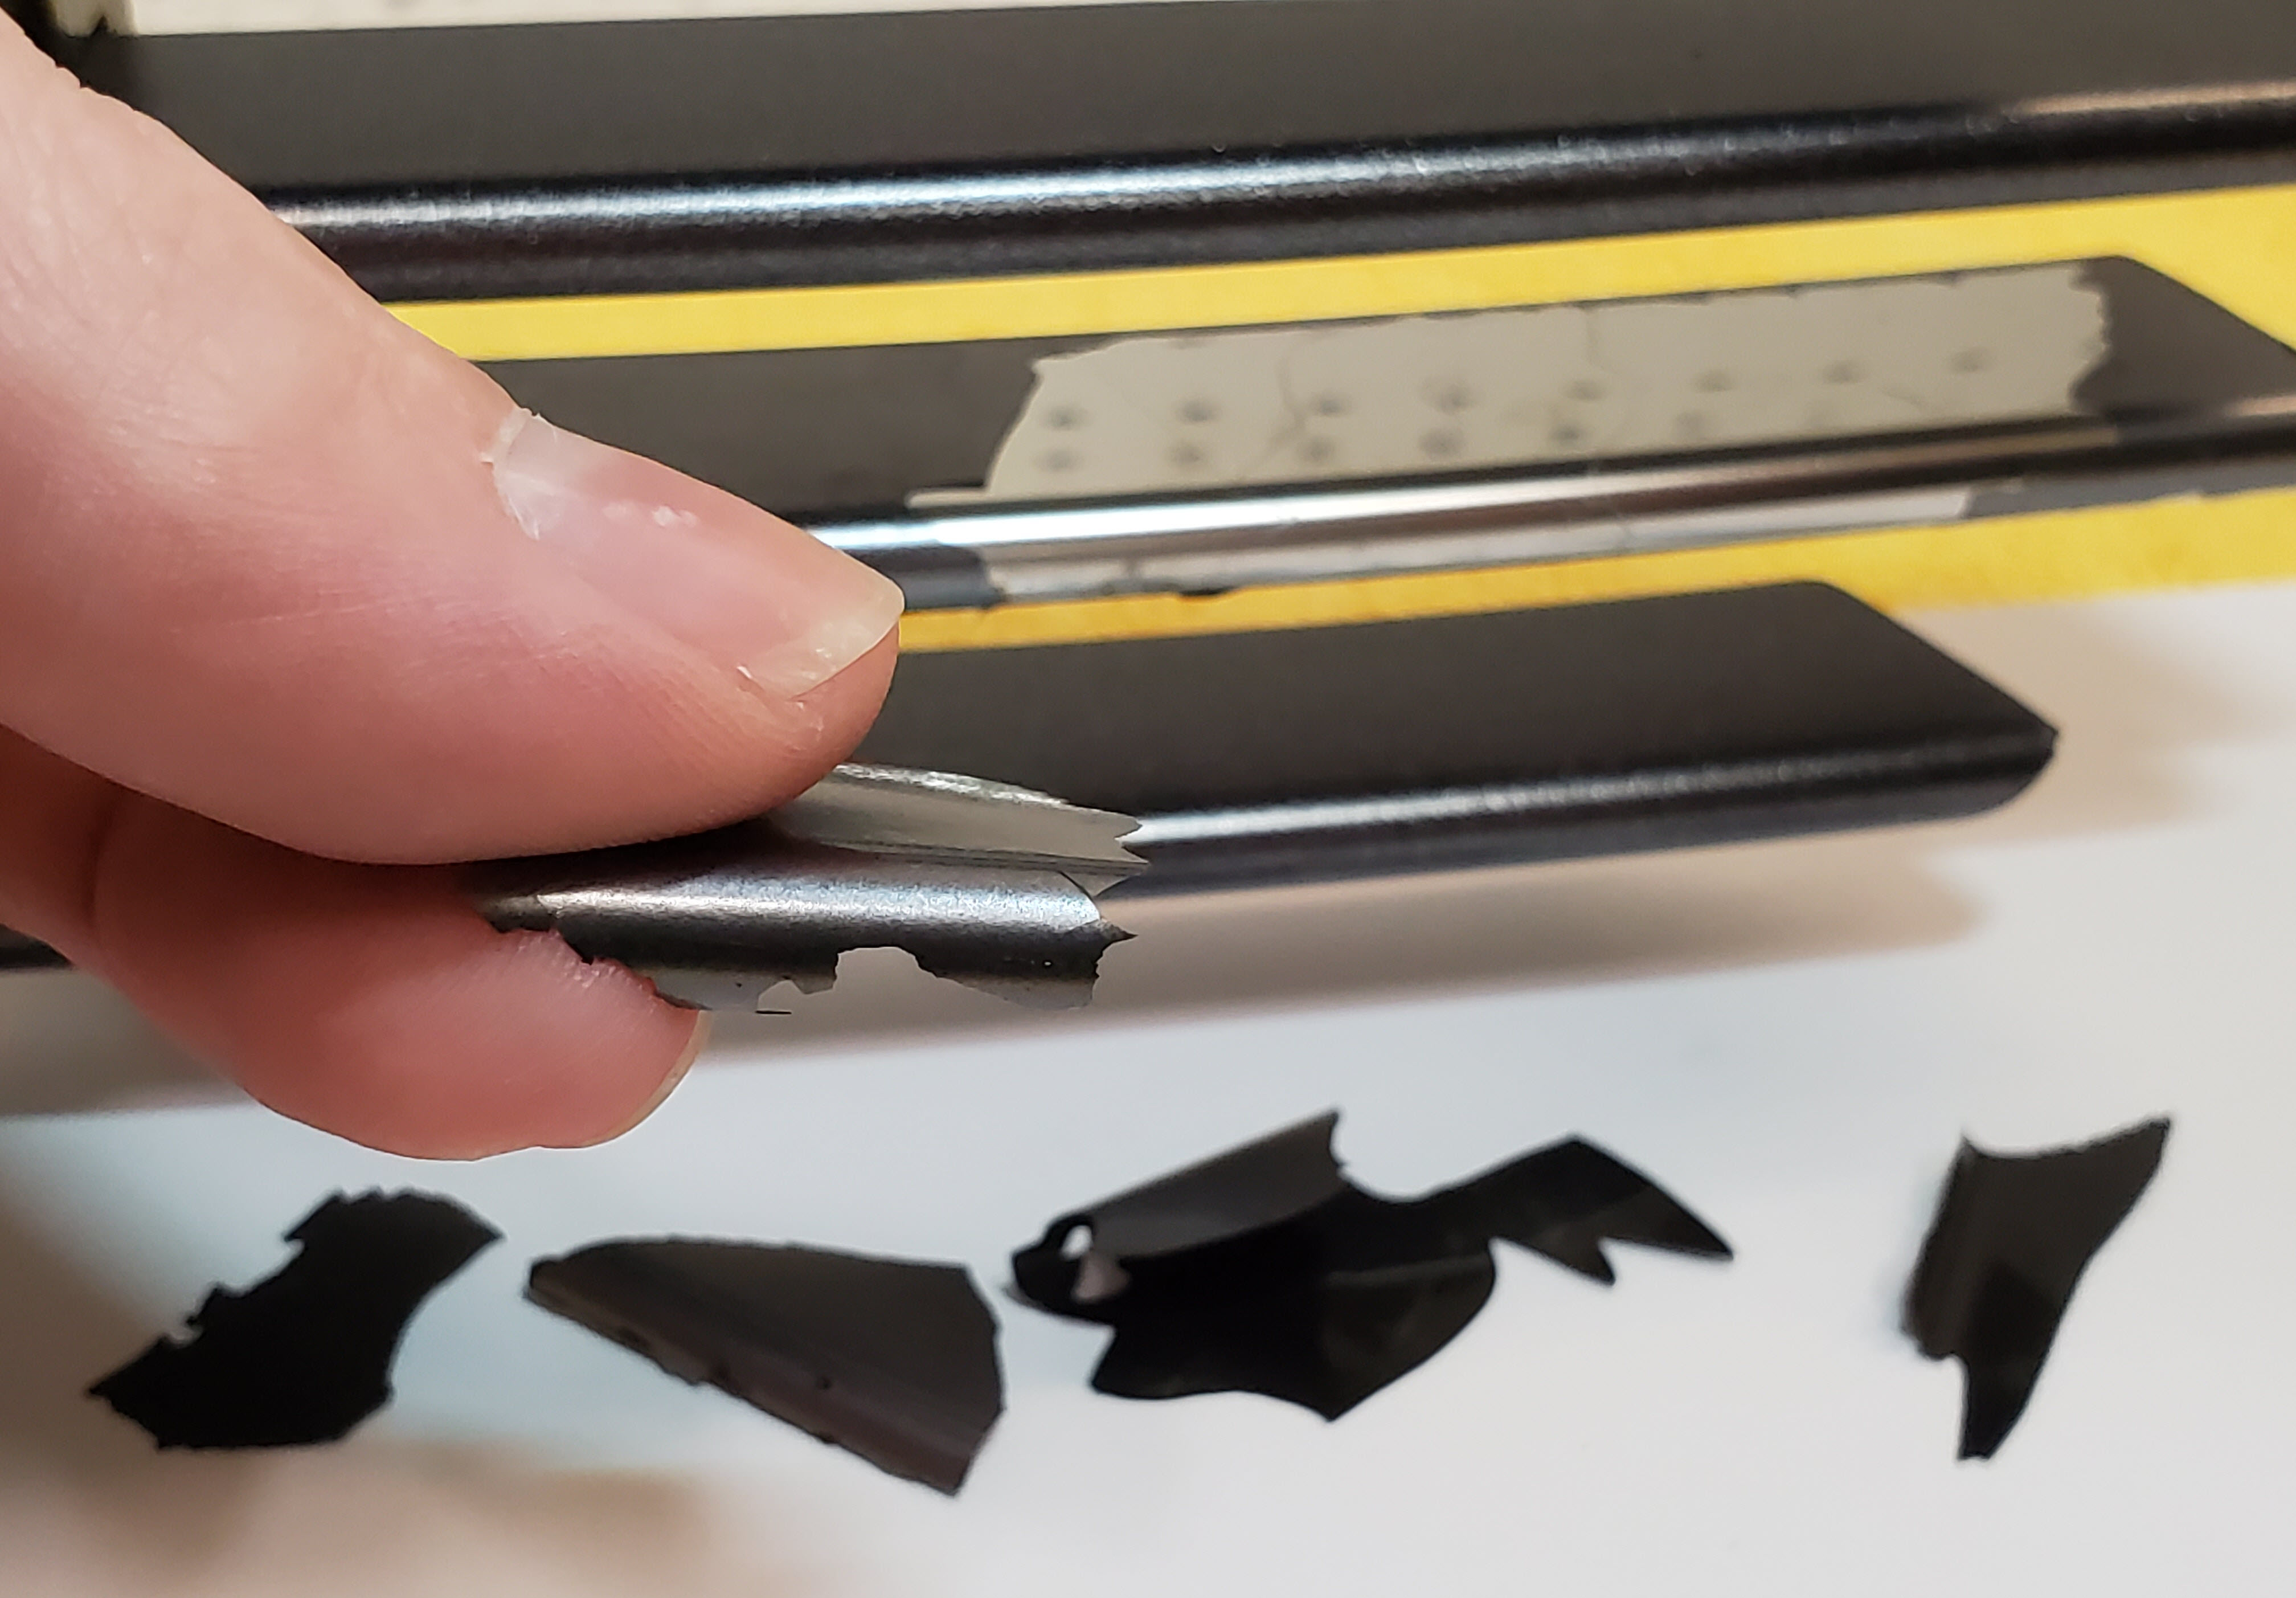
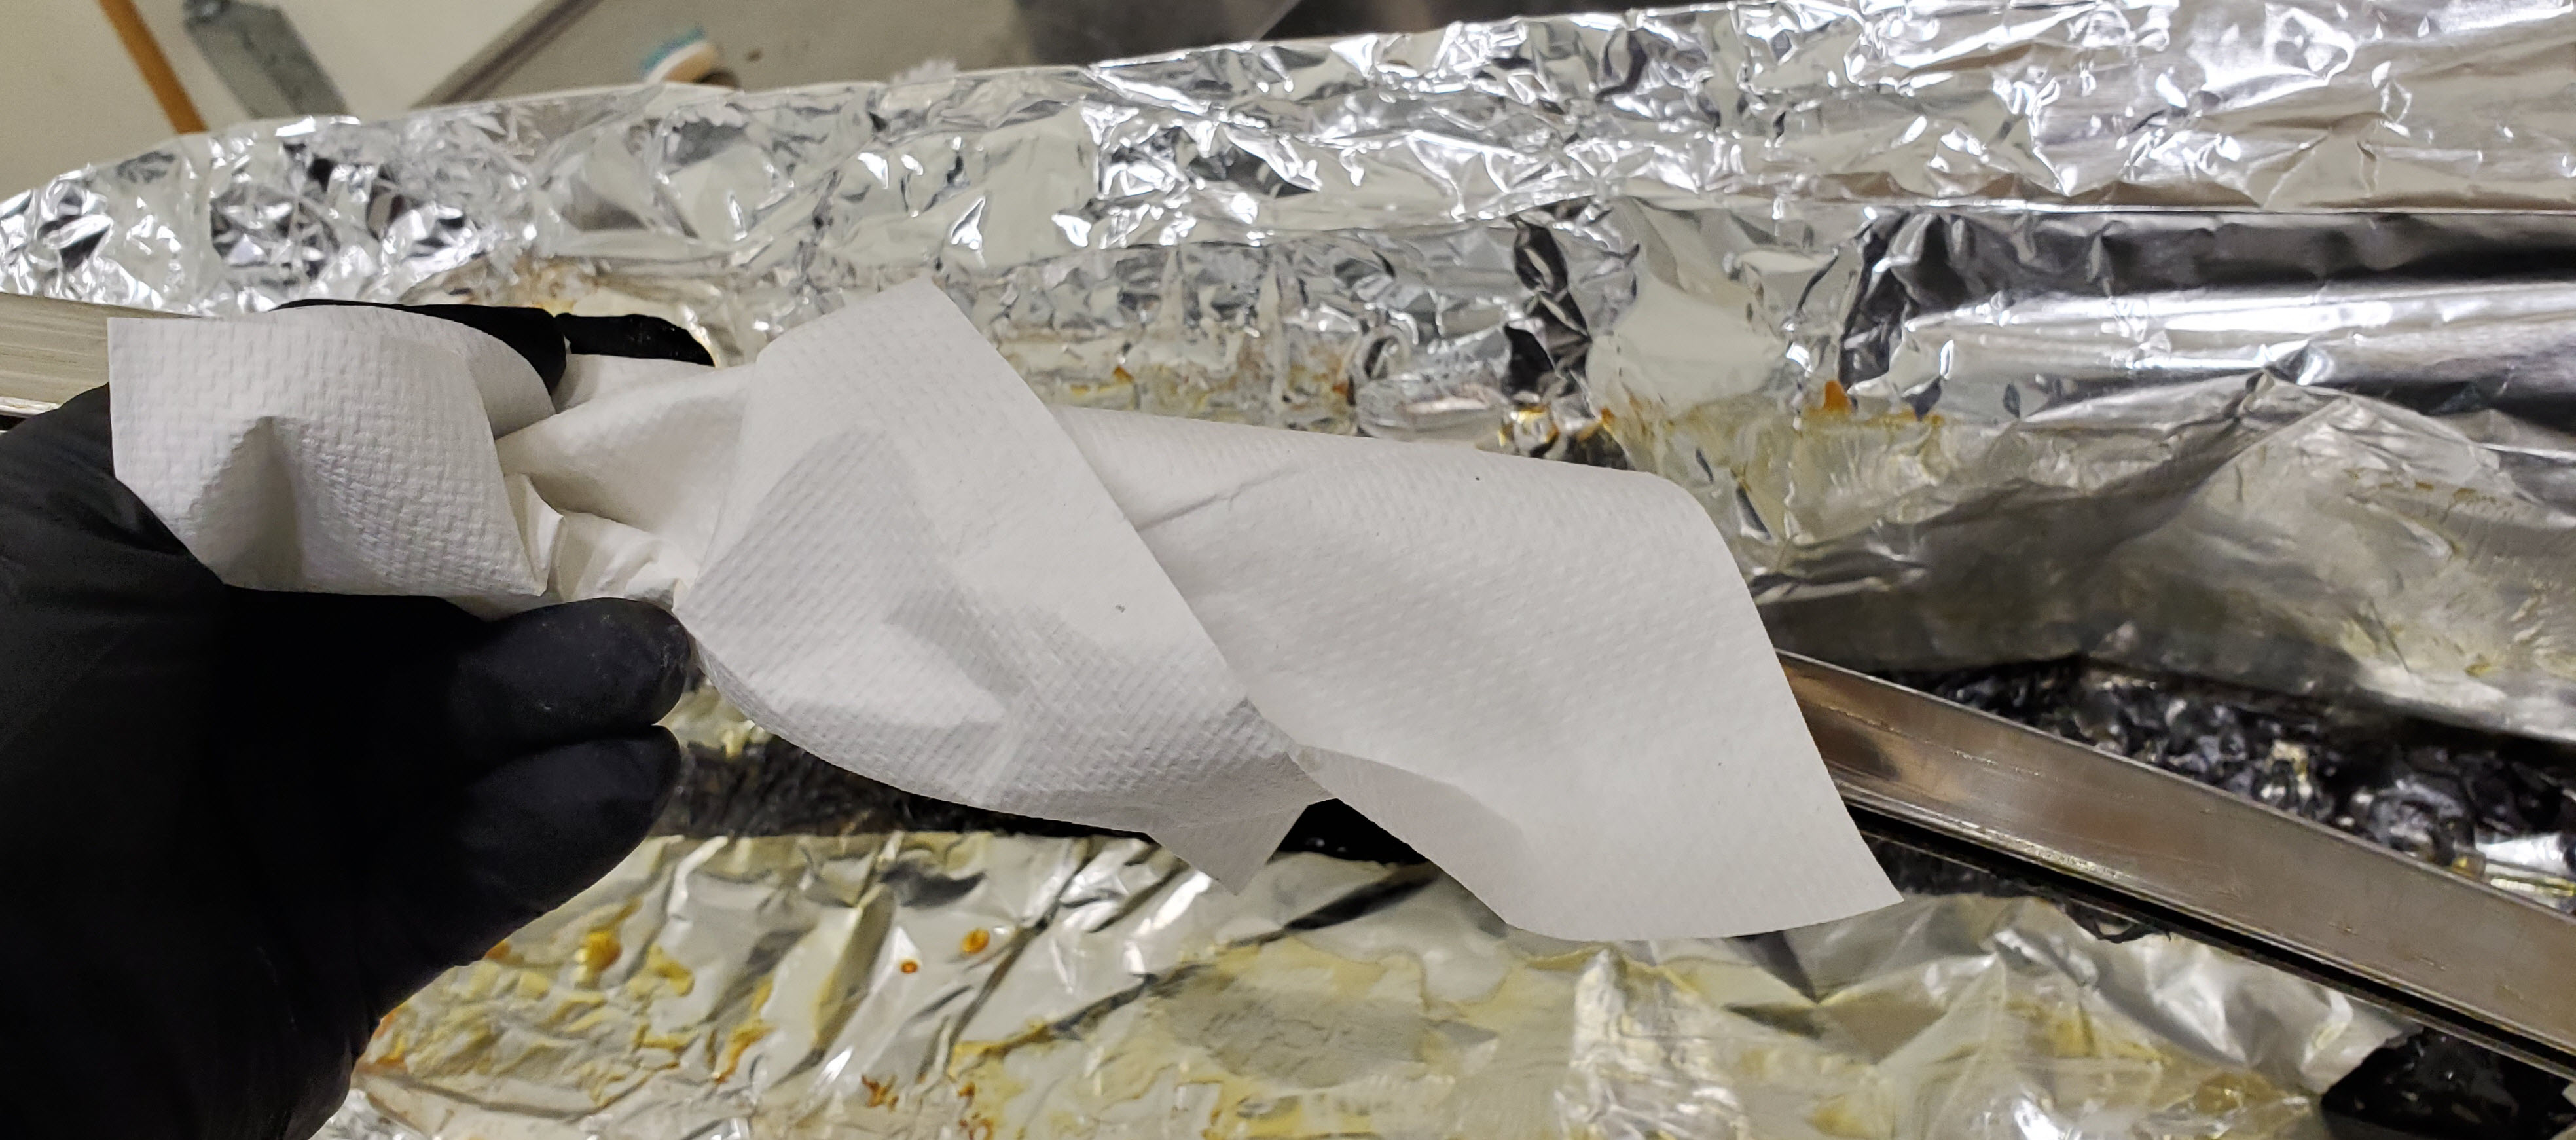
- You should find that the paint has sloughed entirely off the grill bar, and is just a long, wrinkled silver and black strip.

- Use your plastic scraper to scrape the blobs of exterior materials off onto the foil. Do one side then flip it over to get the other. It should be just falling off with no effort.

- Once the exterior is initially scraped clean, time to do the slot. Just put the scraper in at one end and slide it along all the way out the far end. For me it just piled up into one giant blog and came out completely in one simple pass. Run the scraper through again the other direction just to be sure you get it all out.

- Grab a few paper towels and wipe down the exterior surfaces to get the remaining chemical goo off as best you can. Pile the soiled towels onto the foil.

- Move the nearly clean grill bar over to your slop sink or somewhere with running water where you can safely rinse it off. Keep your gloves and glasses on still.
- Put the bar under running water, and use the tooth brush to scrub all the surfaces you can reach to make sure they are clean of any residual stripper.
- Use your test tube cleaning brush and slot it in at one end and run it along in the slot under running water to rinse out the inside.

- Use a few final paper towels to dry it off. Place the towels on the foil. Fold the foil up with all the grubby gross paint goo inside it with all the towels. Seal it up into a small closed packet and properly dispose of it. Peel off your gloves and dispose of them too.


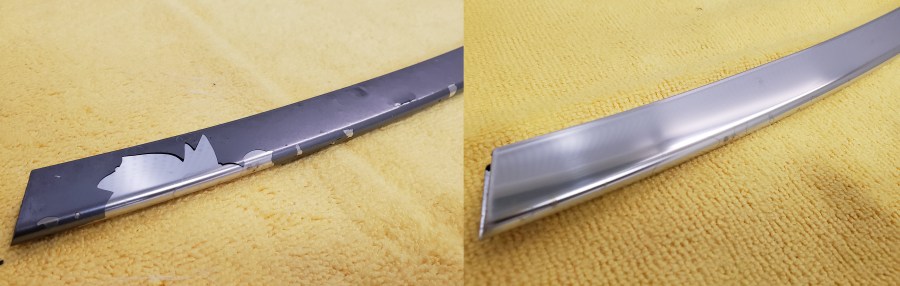
The result should be a gleaming shiny stainless steel grill bar free of any paint. Success!
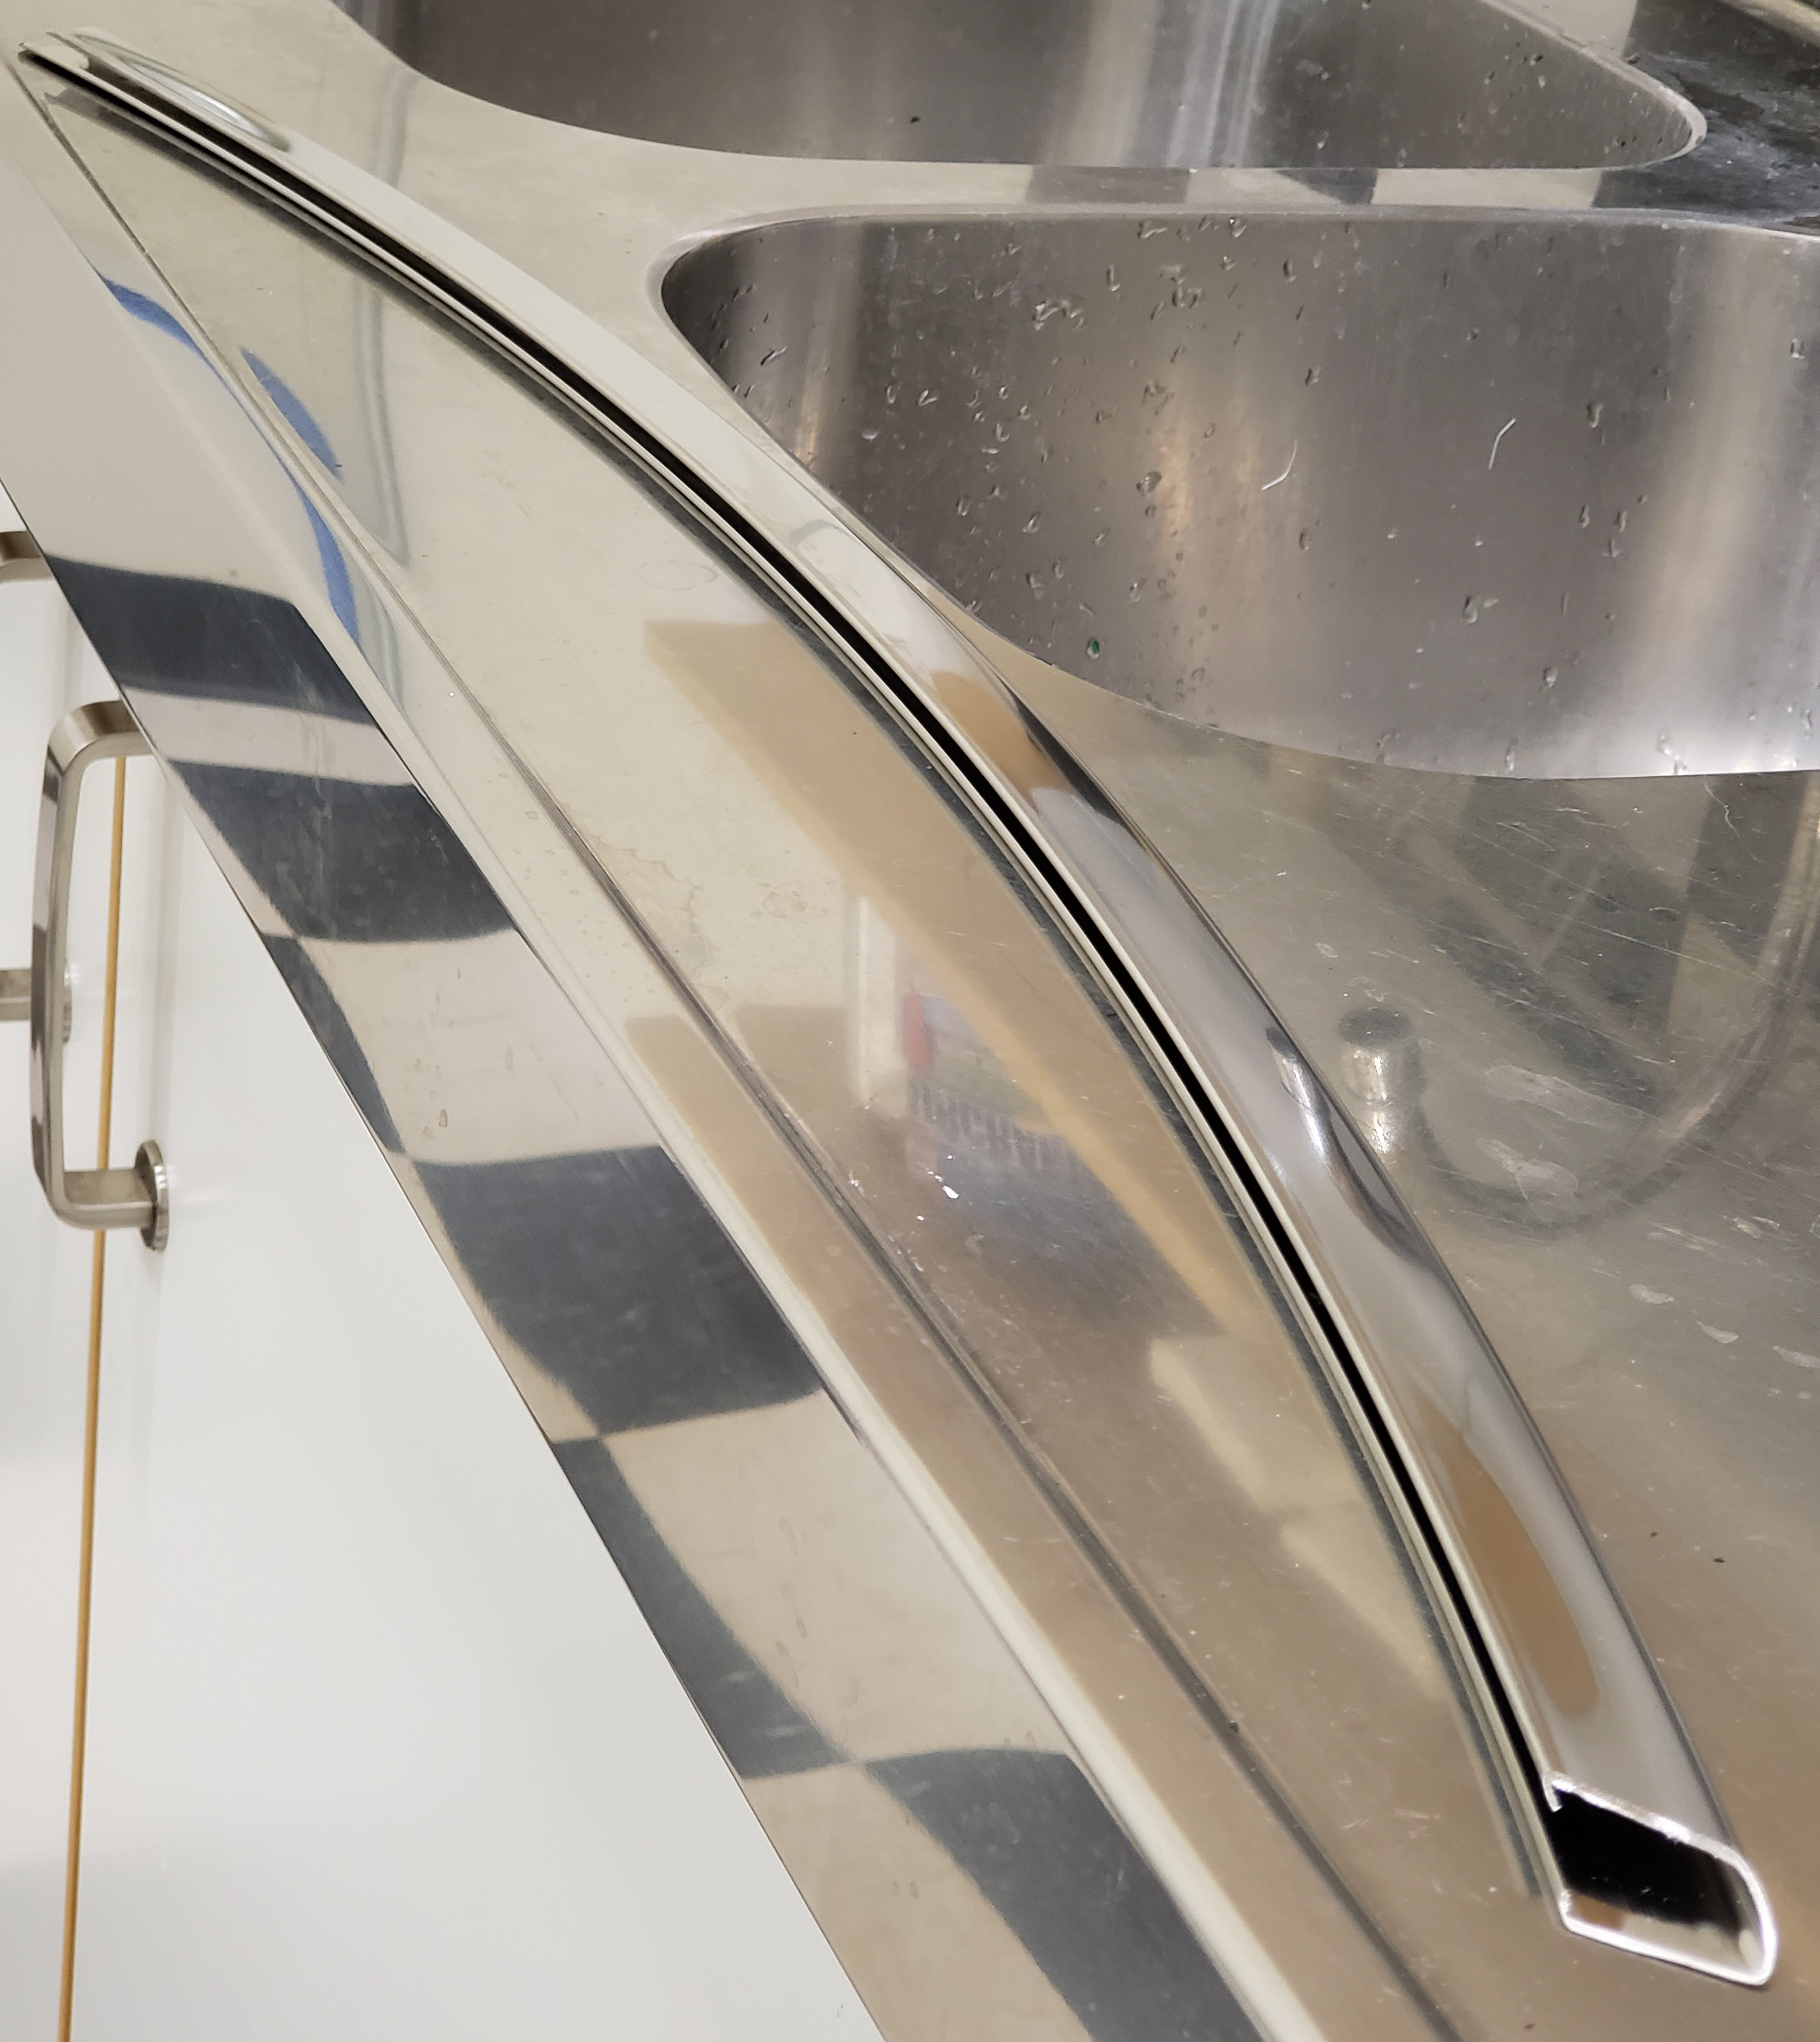

If the bar isn’t 100% perfectly clean of paint, repeat the process. I had to do this on 2 bars that were actually properly primed and sealed at the factory. ANY paint left on the surface will show through the vehicle wrap as an outline. Take the time to get this perfectly clean.
Now you can move onto polishing, painting or wrapping it whatever your plans are.
In my next article I will show you how I used Vehicle Wrap to refinish them [Coming Soon].
Video
This might be one of those processes that’s easier to understand by seeing it done. Check out this short video on how I tackled it.

Hi Steve,
I did the same 8 years ago. And a very beautiful bright finished grill appeared. There was no need to polish. I think this option cost list price €1600
I own a DB9 number 159.
My compliments for your website and efforts.
Regards,
Wiro
LikeLike
Hi Wiro. Wow, you have a very early car. Sounds like we shared the same paint failing issue. The polished grill was an expensive option, who knew if you’d just wait 10 years you’d get it for free!
LikeLike
Steve,
If it were my grille, I’d prefer a nicely polished stainless appearance to a painted one – just me. Over the past 65 years of my automotive interests, I’ve used lots of metal and chrome polishes, but about a year ago I found what to me is the holy grail. I had several chrome or raw aluminum items on a classic BMW 3.0 CS that needed restoration. The best (and easiest to use) product i tried was “Killer Chrome Polish by Surf City Garage. For sale on Amazon for $9-$20. it will only take a few drops on a microfiber rag to polish a bar of your grille. After 6 months exposure, the raw aluminum I polished was still bright. I highly recommend this polish for use
on any metal I’ve found on my various cars. No relationship other than pleased user.
Gary
LikeLike
Hi Steve,
Another great DIY article. I noticed you had methylene chloride on the bench. Did you add some to the paint stripper and if so how much?
Thanks,
Chuck
LikeLike