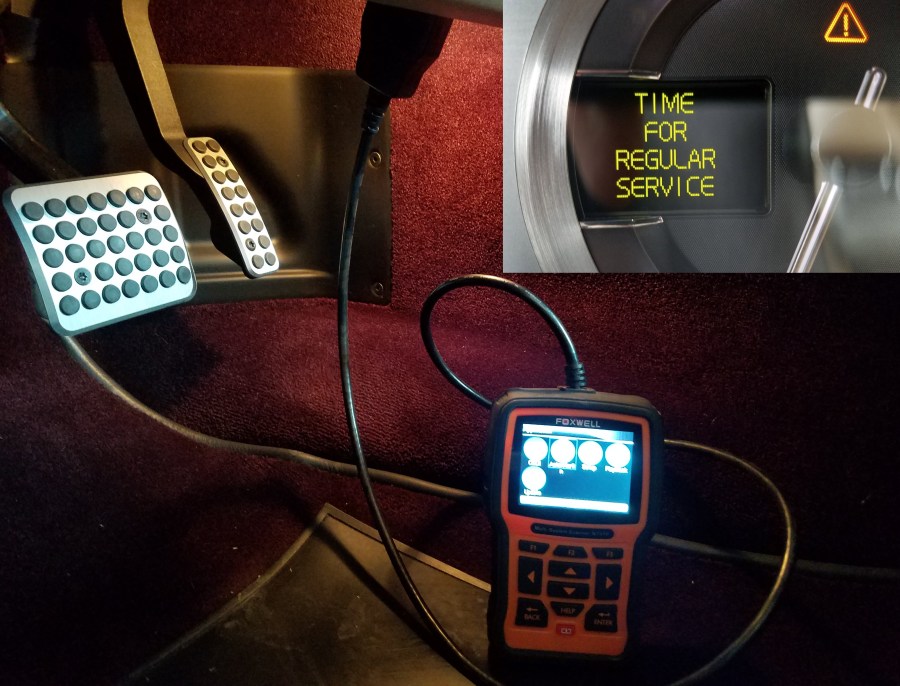
I’ve just changed the Automatic Transmission Fluid on my DB9 after 15 years and 45K miles. The process applies to other Aston’s like the DBS and Rapide fitted with the Touchtronic II 6-speed automatic transmission made by ZF. I’ve prepared an entire series describing the whole process, and you can find the index article for that here. As part of that process I spend sometime determining which tools would be needed to get the work done, PLUS I discovered a few tools and supplies that will make the process much easier. I wanted to share that with you in this article.
If you own an Aston Martin DB9, DBS, or Rapide from 2004 to about 2014 and it has an Touchtronic II 6-Speed automatic transmission, the official Aston Martin Service guide says the transmission is ‘Filled for Life’. In another article I debunked this idea (read the full article here), and uncovered the transmission manufacturer lists the service interval as a more realistic 80,000 to 120,000 kms (50,000 to 75,000 miles) or eight (8) years at the longest. If you have an Aston Martin made before 2011 you are likely due for an automatic transmission fluid change. If you are interested in doing it yourself (as I am) then you’ll need to know what very specific parts to track down. This article will point you at what you need and give you some options on where to get them.
Hello readers. I’ve just released the epic 7 part video series (epic to me at least) on how to change the transmission fluid in a DB9 fitted with a 6-speed automatic Touchtronic II transmission. Most DB9, DBS and Rapide’s from 2004 to 2014 were fitted with this transmission.
It was about a year ago that my Sweetie and I drove our DB9 from California up to Victoria BC to join the AMOC Canada West group for their annual get together (check out that trip here). While the event was mostly scuttled by Covid this year they managed to pull together a nice grouping of cars for a photo shoot. Wyman Lee was kind enough to send along this information I could share with you. Continue reading “AMOC Canada West Aston Martin August 2020 Photo Shoot”→
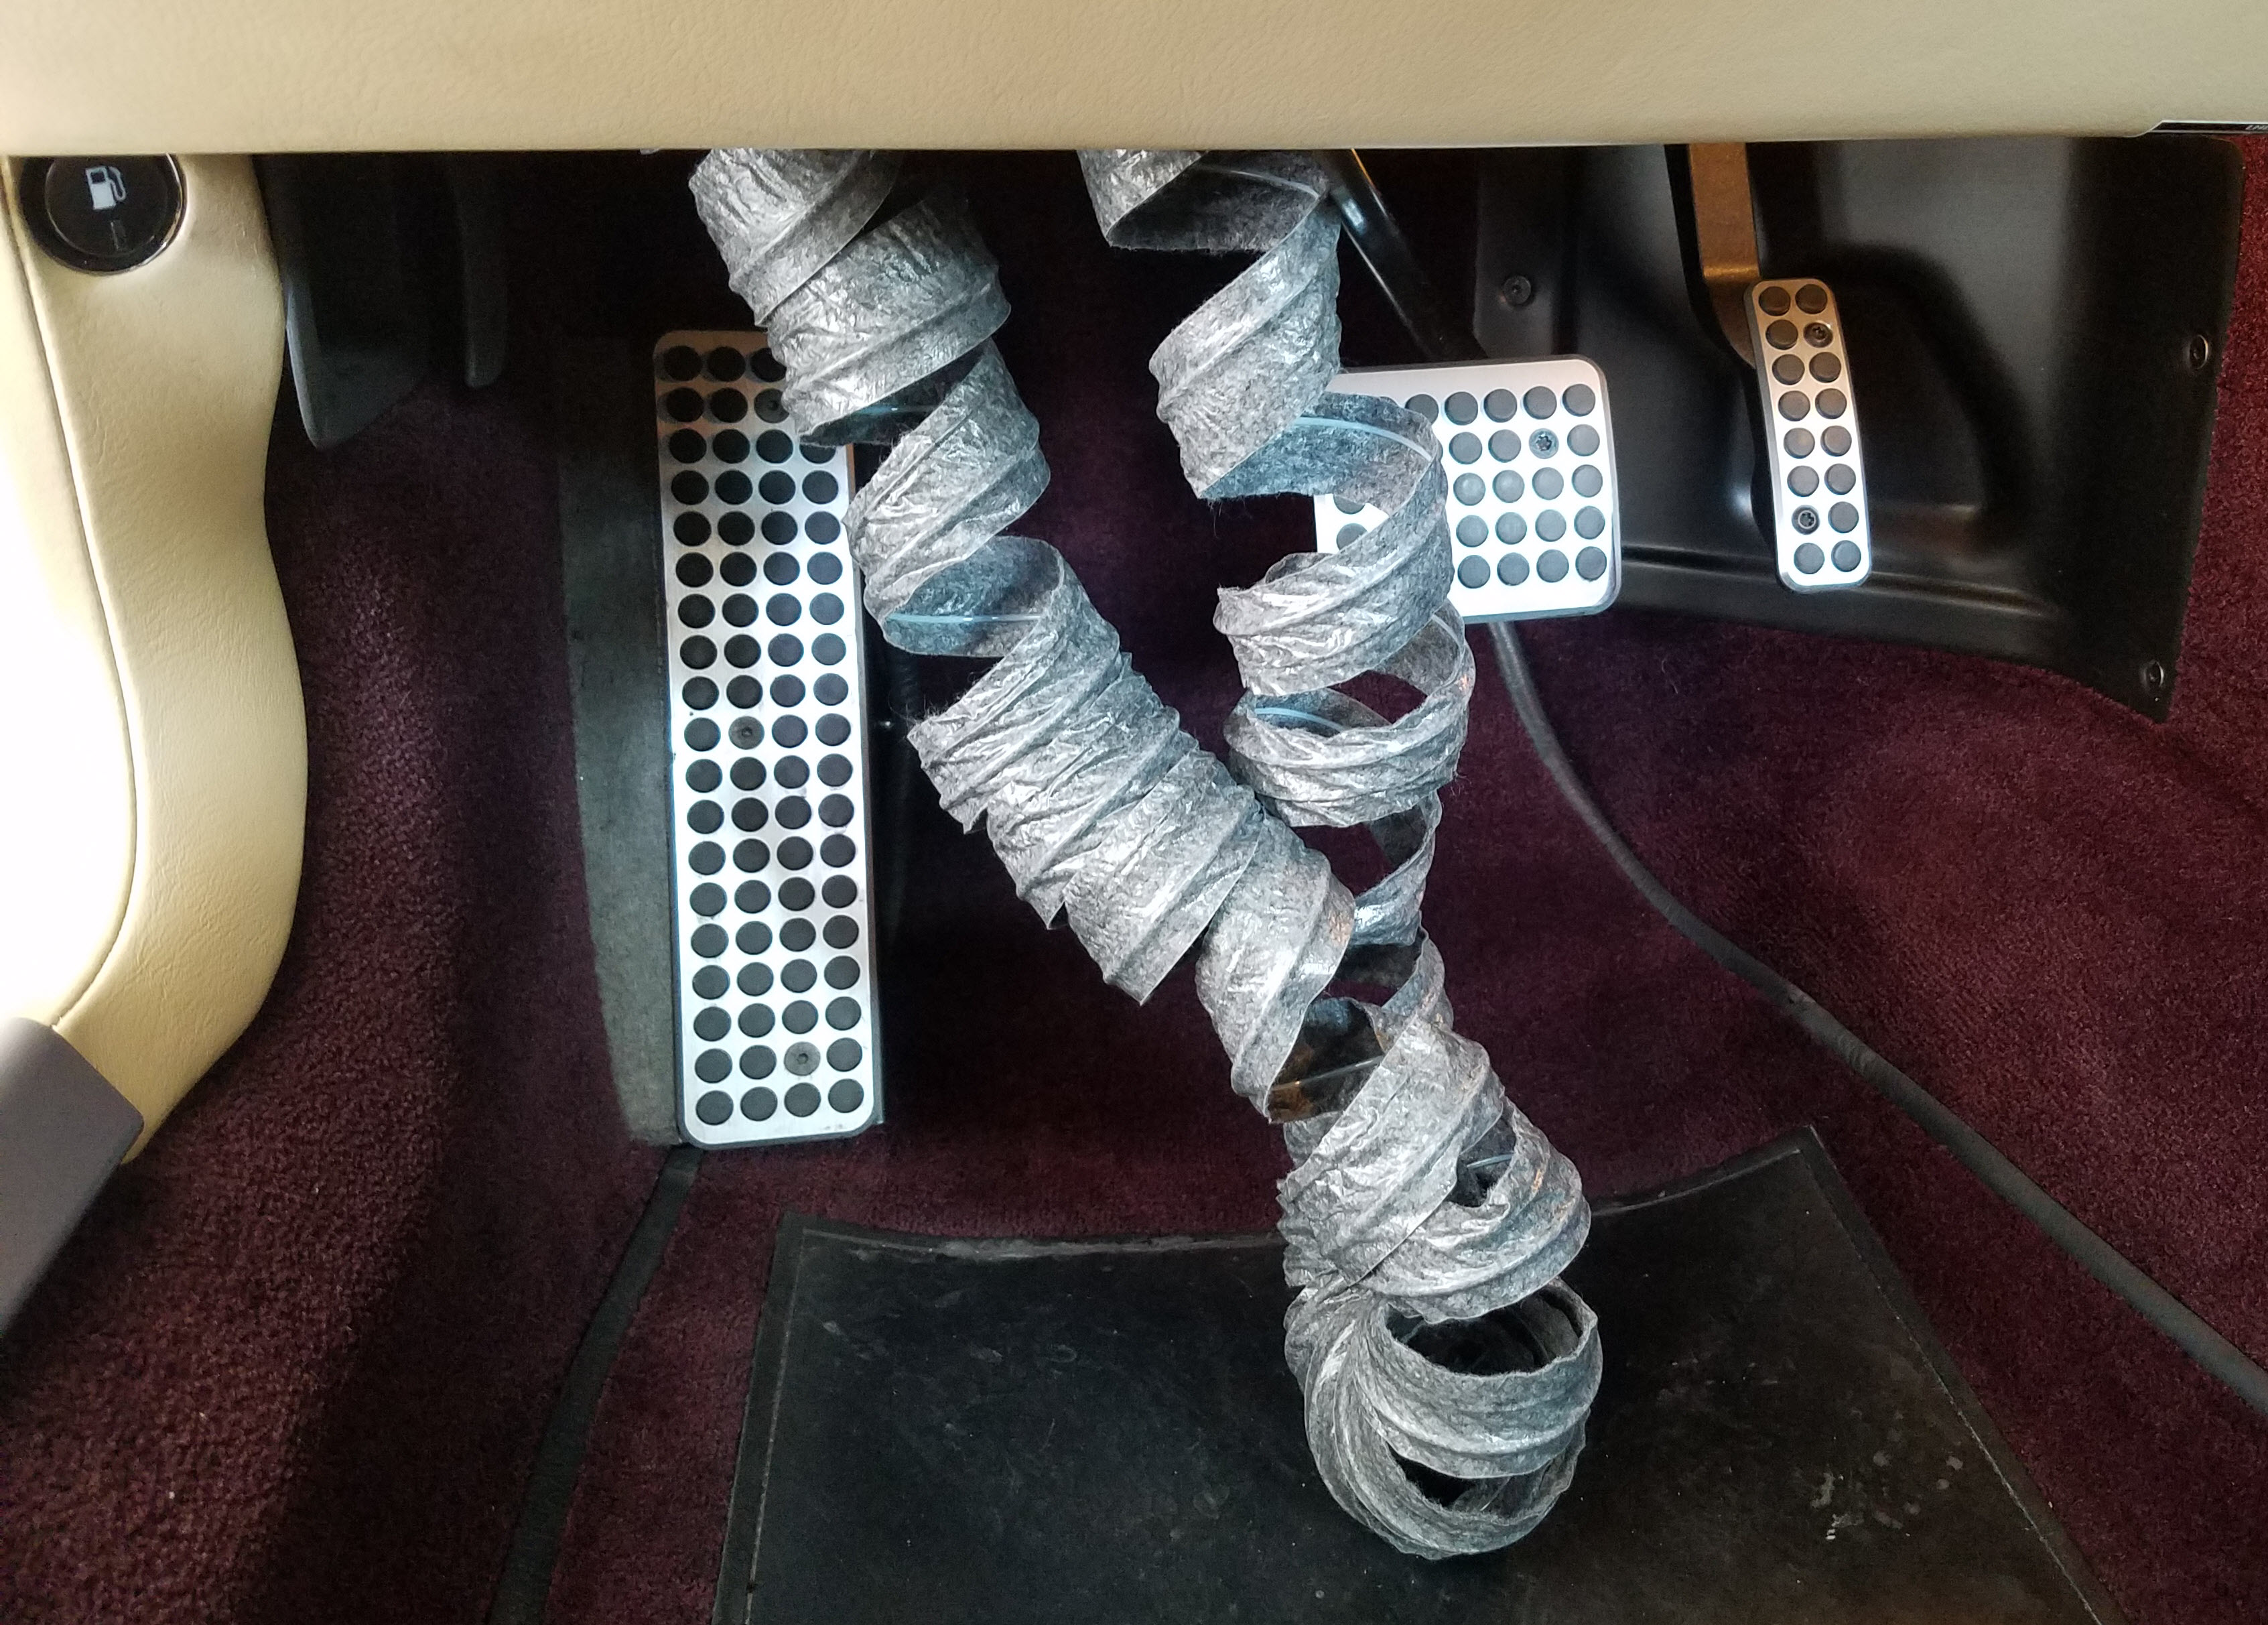
Heat destroys cars. I live in the central valley of California, and where the summertime average temp is 92°F or more. The sun & heat attacks the paint, the plastics, the wood, the leather and in particular kills the adhesives used to glue the parts together. One day when I was washing my baby I opened the drivers door only to see what looked like her intestines hanging down in the foot well. Ugh. Upon closer inspection I found this was the remnants of Air Conditioning side window demister hose. The spiral wound hose had completely delaminated and was now dangling like an old slinky from under the dash. Fortunately it wasn’t very expensive to repair, and you can easily tackle it yourself. Let me share a few tips on how. Continue reading “Replacing the A/C Side Window Demister Hose in an Aston Martin DB9”→
Cars develop a personality with age. The early model Aston Martin DB9 and Vantages are reaching 10-15 years old now. For many the new car smell has begun to fade away. A ‘fresh’ DB9 is a terrific smell of leather. But what happens to the smell with age? Humans get into the space and mess it up. Masking the odor with air fresheners is a shame and compounds one problem with another. I learned how to get rid of the actual issue, and will share that with you here. Continue reading “How to Deodorize the Interior of an Aston Martin DB9”→
I wanted to take a moment to thank all of you out there, the readers of this website. There is an overwhelming positive feedback that comes from you in comments on articles, YouTube videos and via the Contact page. I try to respond when I can. I always love to see pics of your cars and hear about your own repair adventures.
I’d like to send out a special thanks to Michael Crowther that was kind enough to buy me a Whiskey. Mike used the ‘Donate’ page on the site and got me a bottle of MacAllan 18. Yum! Although Mike wasn’t here to share a dram with me, it was a good chance for me to also thank my cameraman Rob. Continue reading “Thank You!”→
Oil in the Throttle Body Area is a Sign of PCV Failure
Last November I was replacing the coil packs and spark plugs on my 2011 Rapide and the oil in the inlet manifolds and throttle bodies made it pretty clear that my PCV valves were past their best.
I decided to replace the PCV valves with these £15.98 metal ones from i6 Automotive (check it out here) in Sheffield, England. But since it would take them a few weeks to get to me here in Adelaide, South Australia I set to thinking. On my diesel 4wd one of the first modifications you do is to fit a catch can into the PCV system. Good ones are incredibly effective at removing the oil mist and preventing it being recycled through your engine.
Every now and then you will come across an existing sheared bolt or you will shear one yourself, either way they have to be repaired. Sometimes (rarely) there might be a length of bolt or stud proud enough to be able to get a grip of it with mole grips or self tightening pipe wrench. If you try to get a stud out this way be sure to soak it thoroughly with a good penetrating oil for as long as you can first and work the bolt backwards and forwards to loosen it don’t try to undo it in one direction straight away you have to “persuade” it out.
The sheared bolt on my Aston’s slam panel was where it bolts to the bonnet release catch. The shear is about 3mm below the top of the steel of the catch and is quite a common failure. It’s quite easy to over tighten and shear smaller sized bolts particularly when using ratchets or spanners with handles/lengths that are up to 200-250mm (8-10″) long. One trick is to hold the spanner in the middle of its length to reduce the lever arm if tightening up smaller bolts. On more critical bolts use a torque wrench, most torque figures are given in manuals so use them. The overriding requirement is common sense, are you bolting up a bit of light weight “slam panel” as in the case above or a major suspension part !!!
The worse situation is the sheared stud or bolt that shears below the surface of the steel and it’s the most common. There is a reason why car manufacturers say you should use new bolts in critical areas and it’s not just to make money out of us. Bolts that are located in areas of high stress, high temperatures or exposed to potentially rusty locations will experience changes to their mechanical properties over time. Corrosion can reduce the surface condition of bolts not to mention the “eating away” and “pitting” of the threaded area. The pitting can eat into the steel causing areas of potential weakness that will fail under the load of tightening. Bolts that are exposed to the effects of heat (heating up then cooling down) such as engine/cylinder head bolts or exhaust bolts and that are under load for a long period will not exhibit the same mechanical properties once removed and then reused. Hence manufacturers recommend replacing all the cylinder head bolts once they have been removed which often seems a little extravagant as they always look fine but as I’ve explained it’s not done without good reason.
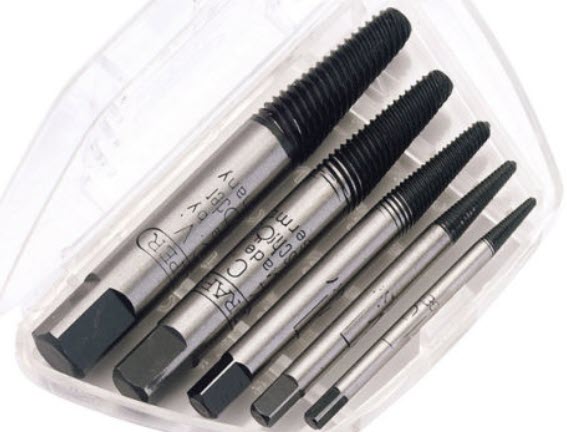
There are two options to repair a sheared bolt. If possible it may be extracted by drilling a hole down through the centre of the bolt and using a stud extractor. These extractors are readily available but I have to say I haven’t had much success with them. The extractors have a left hand thread so as they are screwed into a drilled hole in the sheared bolt or stud they tighten in the direction that will unscrew the sheared bolt.
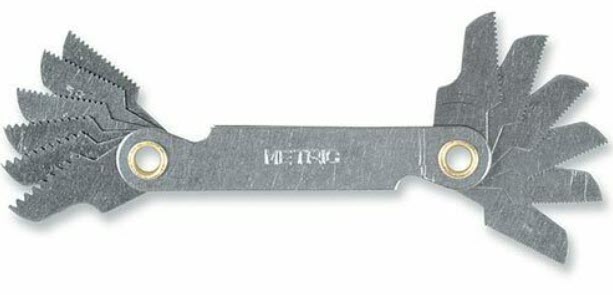
Stud Extractors
I always try to extract a bolt but usually end up drilling it out and re-tapping the hole. The size of the sheared bolt or stud determines the size of the hole to be drilled and tapped here are some common drilling sizes for tapped holes that you might come across when working on your Aston.
As you will see there are a number of different Pitches for “Fine” bolts so it is important to select the correct drilling size particularly if you are having to drill out a cylinder head bolt for example, you only get one chance at it. To ensure you are using the correct size drill you can measure the size of the replacement bolt you are going to fit using a thread gauge.
Available in the UK from as little as £5.00
When you drill out the sheared bolt consider where the swarf (waste) will fall. If there are critical items around such as say the alternator it will not react nicely to having small metal pieces dropped into it so protect vulnerable areas with cloth covers etc..
Swarf from drilling the hole ready for tapping
If the swarf can be easily vacuumed up then covering everything up is not an issue.
Once the old bolt has been drilled out you can now start to tap a new thread for your replacement bolt. When tapping out a hole it is important not to try to rush the job by driving the tap down into the hole. You will almost certainly shear the tap in the hole then you really do have a problem as the tap is made of extremely hard steel that you will find impossible to drill out. Since taps are made from particularly hard steel that brings with it an inherent brittleness so don’t go mad trying to cut the new thread in one go.
The technique is to apply downward pressure to get the tap started whilst turning the tap half a rotation (180deg) clockwise then reversing the tap direction for a quarter of a turn (90deg). This is repeated for the whole of the tapping process until the full depth of the hole has been tapped. The small rotation backwards allows cut material to release into the grooves of the tap so that the tap does not bind in the hole and potentially break. Once the tap has cut a thread of a few millimetres you will no longer require to apply downward pressure as the tap will use the thread it as cut to provide the downward force into the hole. During the cutting you should use a light oil or grease to aid the cutting process, WD40 is a good lubricant for this. It is also advisable to remove the tap completely periodically to clean away swarf.
Use a lubricant and stop periodically to remove swarf
The key is to take your time, you’re not on the production line at Ford, if you are doing this job it’s probably a one off, so there’s no need to rush.
Check the bolt in the new tapped hole when finished
When you have finished tapping the hole and have cleared away all the swarf check that the replacement bolt will run down nicely into the new tapped hole. You don’t want to get into the assembly of everything to find for some reason the replacement bolt you are going to use is too tight or too slack in the hole.
Remember the key is take your time and start off by marking the centre of the broken bolt with a good centre punch mark so your drill will not wander off the centre of the bolt and drill squarely down the bolt. You don’t have to drill out the hole to the final tapping size in one go, it’s often better to drill out in say up to three stages to arrive at the final size. If you follow these instructions you should be able to replace a sheared bolt on your Aston with no problem.
There is a short video here showing the drilling out and tapping of the sheared bolt on my Aston’s bonnet catch.