![]() Most of the Aston Martin DB9’s, DBS and Rapides built between 2004 and 2014 were fitted with a ZF model 6HP26 6-speed automatic transmission. Within the transmission there is a device called the Mechatronic Unit which is responsible for shifting the transmission through its gears. The transmission has a pump that creates hydraulic pressure, and the mechatronics unit uses a series of electronic solenoids to control the flow of the fluids to operate the various clutches.
Most of the Aston Martin DB9’s, DBS and Rapides built between 2004 and 2014 were fitted with a ZF model 6HP26 6-speed automatic transmission. Within the transmission there is a device called the Mechatronic Unit which is responsible for shifting the transmission through its gears. The transmission has a pump that creates hydraulic pressure, and the mechatronics unit uses a series of electronic solenoids to control the flow of the fluids to operate the various clutches.
Like most Hydraulic systems there are seals that keep the high pressure fluids contained. If these seals begin to leak (from aging or other deterioration), the fluid pressure begins to leak out, the pressures are reduced, and the transmission doesn’t operate as well. The seals can deteriorate slowly over the years, and you may not notice that your Aston isn’t shifting like it used to since the change is so gradual. Or a seal can completely fail and bad things can happen.
I’m in the process of doing a complete transmission fluid and filter change (I’ve done a full series of articles and videos on this entire process and you can check out the main article here to learn more) If you are going to all the trouble for the fluid and filter, it’s just a small amount more work to change the four Mechatronic Valve Seals and the very important Mechatronics Bridge Seal.
Of all the tasks in that process so far, this is probably the easiest. Let me show you how.
Parts Required
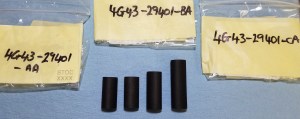
I’ve created an entire other article about all the parts for servicing the entire transmission (check it out here). It will have all the details you are looking for including the official Aston Martin part numbers, aftermarket alternatives and where to buy them all. You officially need:
- Qty 2 – Mechatronic Valve Seals – Short Length
- Qty 1 – Mechatronics Valve Seal – Medium Length
- Qty 1 – Mechatronics Valve Seal – Long Length
- Qty 1 – Mechatronics Bridge Seal
They aren’t expensive, you’re going to spend less than $20 USD. Check out that article here.
Tools Required
You only need a few tools and supplies. I’ve covered them in detail (along with where to purchase them) in another article for the overall transmission service process (find it here), but here is the subset needed for this step.
- Small flat blade screw driver
- Small pair of needle nose pliers
 Drip Tray
- Working under the transmission with the oil/pan sump removed is drippy and messy. Rather than fluid splashing and dripping all over your garage floor or onto cardboard that’s going to get soggy, I sought out a better solution
- I purchased a dog kennel plastic tray/liner that was perfect for the task. One that was 35″ x 22″ was only $16 USD on Amazon with free shipping.
 Pig Mat absorbent towels
- When the mess happens you are going to need to be able to soak up the spills. Pig Mat isn’t just ordinary paper towel, it can absorb a ton of fluid and just one or two sheets is all I needed.
- You can pickup a 50 ft roll on Amazon for $24 USD.
- Alternately you can just use a ton of regular paper towels.
 Shop Rags
- Your hands and tools are going to get oily. Have a good supply of lint free shop towels on hand.
- I get a bag of 100 for about $25 USD from Amazon.
 Disposable gloves
- You’re hands are going to get covered in fluid, so a few pairs of disposable gloves would be handy to have.


It’s going to be messy, so don’t wear your Sunday best to do the work. Time to put on your ‘garage clothes’.
Preparation
You need to do a bunch of preparation work to get to this point, and I’ve created articles on how to tackle each of these steps:
- Get your car up level on Jack Stands (as high as possible)
- Remove the rear undertray
- Remove the rear subframe crossmember
- Remove the right rear exhaust heat shield
- Draining the Fluid from the Sump
- Remove the Thermostatic Control Valve
- Remove the Oil Pan/Sump
- Remove the Electronics Sleeve
- Remove the Mechatronics Unit
With those steps out of the way we can get on with it.
Procedure
The process will take about 10 minutes once you have all the preparation steps done.
 Aston Martin actually have included a section on this in the official Aston Martin Workshop Manual. Section 7.01 Automatic Transmission covers this. What’s amusing is that they didn’t bother to make one unique to Aston, they just pilfered content from ZF and actually just show pictures of a transmission removed from the car flipped over on the bench (if only it was that easy). Here’s my version:
- Remove the old Mechatronics Valve Seals
- There are four cylindrical rubber valve seals all in a row.

- Two are short, one is medium, one is longer
- These seals were supple and squishy when new, but tend to get squashed and stiff after years submerged in a very hot place.
- The seals just ‘pull’ straight down and out, there are no retainers, etc.
- You need to be SUPER CAREFUL to NOT SCRATCH the machined metal surfaces surrounding the valve seals. Seriously, scratching that will be bad.
- I used my small flat blade screwdriver and put the blade partway up the center of the first small seal, the one towards the centerline of the transmission.
- I then cocked it over to bite into the seal some, and gently pulled the screwdriver down trying to slip the seal down with it. It may take a couple of attempts, the seals can be seriously wedged in place. (Check out my video below to see how I did this)
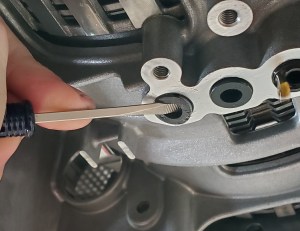
- All I was trying to do was to get the seal to slip down a couple of millimeters so that I can grab the newly protruding end of the seal with the pliers
- Carefully grip the lip of the seal with your pliers (without scratching that machined metal surface next to it).
- Pull the seal out with the pliers.
- Don’t be surprised if some addition fluid drips out.

- Don’t be surprised if some addition fluid drips out.
- Proceed and do the same process with the next seal (also short), then the medium, and finally the long one. They may get a little harder as they get longer, but no big deal.
- Inspect up into the bores the seals came out of and make sure nothing got left behind (it didn’t break off, etc).
- There are four cylindrical rubber valve seals all in a row.
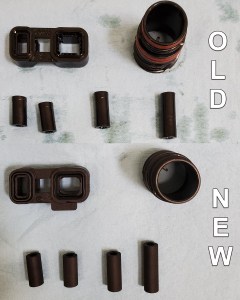
- Inspect your old and new seals
- If you compare your old seals and your new ones side by side you’ll probably see that the new ones are 2-3mm longer looking. If they are, its proof you’re old ones are squashed and no longer resilient.
- If you compare your old seals and your new ones side by side you’ll probably see that the new ones are 2-3mm longer looking. If they are, its proof you’re old ones are squashed and no longer resilient.
- Install the new Mechatronic Valve Seals
- Installation is pretty easy
- The order doesn’t matter, but I started with the short closest to the centerline of the transmission again.
- Lubricate the outside of the seal using a drip or two of the transmission fluid that’s probably dripping down around you.

- Align it and press it up into the correct bore just with finger pressure.

- It should sit about 1-2 mm proud of the machined surface.
- Do the same process for the other three seals
- At the end, all four should be in place and be equally protruding those 1-2mm. If its uneven you need to investigate why.
- When we reinstall the mechatronic unit these will get squashed the rest of the way up into the bore.
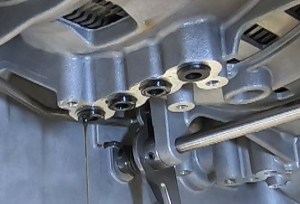
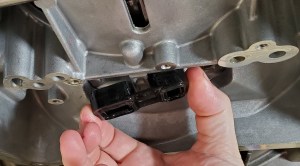
- Remove the Mechatronics Bridge Seal
- This is a larger seal at the other end of the transmission towards the front of the car.
- It seals two chambers of fluid, essentially the flow into and out of the pump.
- It’s known to crack and allow high pressure fluid to leak away, lowering the pressure and causing issues.
- It’s very easy to change
- Find the seal and grip it gently and tug it down. It should come away easily.
- Install the new Mechatronic Bridge Seal
- Replacing it is just as easy.
- Lubricate the seal surfaces with some of the transmission fluid dripping down.
- Orient the new seal in the same way as the old one came out.
- Align it carefully and press it gently up into place.
- There is no satisfying click or anything like that to confirm its home, it merely slip fits into place and will just stay there.

- There is no satisfying click or anything like that to confirm its home, it merely slip fits into place and will just stay there.


That’s it. Your seals are swapped and you can get on with starting to button the whole thing back up again and refilling the fluid properly. Check out how to do all those steps here. Next up if you are following along is to reinstall the Mechatronics Unit (check out my article here).
Video
You can see me tackle this in my video series on draining the transmission fluid. You can see me removing the seals starting at the 31:21 mark.
You’ll see me re-install the seals starting at the me positioning the park override lever at the 0:59 mark of the refilling the fluid video.
