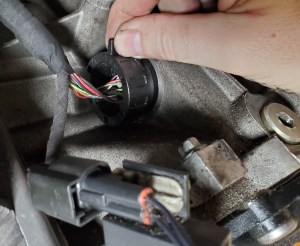
![]() Most Aston Martin DB9s, DBS and Rapides from 2004 to 2014 were fitted with a Shift By Wire magic ZF 6HP26 6-speed Automatic Transmission. I’ve written about this great transmission in detail here. As ‘Shift by Wire’ suggests, there is a substantial number of wires that interconnect with the the Transmissions Mechatronics unit. These need to pass through the transmission housing somehow, and this happens through the ‘Electronics Sleeve’. As I discussed in the article on removing the Electronics Sleeve (read that here) the O-rings that seal it to the housing tend to degrade and begin to weep fluid. I was doing a full fluid, filter and seal service to my transmission and as part of that I’ve elected to replace my Electronics Sleeve. Getting it installed was a bit tricky, let me share those tricks with you here.
Most Aston Martin DB9s, DBS and Rapides from 2004 to 2014 were fitted with a Shift By Wire magic ZF 6HP26 6-speed Automatic Transmission. I’ve written about this great transmission in detail here. As ‘Shift by Wire’ suggests, there is a substantial number of wires that interconnect with the the Transmissions Mechatronics unit. These need to pass through the transmission housing somehow, and this happens through the ‘Electronics Sleeve’. As I discussed in the article on removing the Electronics Sleeve (read that here) the O-rings that seal it to the housing tend to degrade and begin to weep fluid. I was doing a full fluid, filter and seal service to my transmission and as part of that I’ve elected to replace my Electronics Sleeve. Getting it installed was a bit tricky, let me share those tricks with you here.
Parts Required
![]() I’ve created an entire other article about all the parts for servicing the entire transmission (check it out here). It will have all the details you are looking for including the official Aston Martin part numbers, aftermarket alternatives and where to buy them all.
I’ve created an entire other article about all the parts for servicing the entire transmission (check it out here). It will have all the details you are looking for including the official Aston Martin part numbers, aftermarket alternatives and where to buy them all.
Officially all you need is the Electronics Sleeve. They aren’t expensive, you’re going to spend less than $20 USD. Check out that article here.
Tools Required
You only need a few tools and supplies. I’ve covered them in detail (along with where to purchase them) in another article for the overall transmission service process (find it here), but here is the subset needed for this step.
- Large Screwdriver or Pry Bar
- 1″x3″x5″ wood block (you can scrounge something equivalent up). You can see how I used it in the video here.
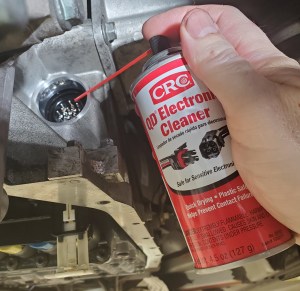
- Electrical Contact Cleaner
 It’s very likely you will get some transmission fluid on the the electrical connections while you have it apart. You’ll see me use some generic Electrical Contact Cleaner to rinse off the connections prior to connecting them. You can get a small 4.5 oz can for about $12 USD on Amazon, or from your local auto parts store.
- Drip Tray
- Worki
 ng under the transmission with the oil/pan sump removed is drippy and messy. Rather than fluid splashing and dripping all over your garage floor or onto cardboard that’s going to get soggy, I sought out a better solution
 - I purchased a dog kennel plastic tray/liner that was perfect for the task. One that was 35″ x 22″ was only $16 USD on Amazon with free shipping.
- Worki
 Pig Mat absorbent towels
- When the mess happens you are going to need to be able to soak up the spills. Pig Mat isn’t just ordinary paper towel, it can absorb a ton of fluid and just one or two sheets is all I needed.
- You can pickup a 50 ft roll on Amazon for $24 USD.
- Alternately you can just use a ton of regular paper towels.
 Shop Rags
- Your hands and tools are going to get oily. Have a good supply of lint free shop towels on hand.
- I get a bag of 100 for about $25 USD from Amazon.
 Disposable gloves
- You’re hands are going to get covered in fluid, so a few pairs of disposable gloves would be handy to have.


It’s going to be messy, so don’t wear your Sunday best to do the work. Time to put on your ‘garage clothes’.
Preparation
Presumably you’ve had the sleeve removed since you were working deeper in the transmission servicing the valve and bridge seals, and I’ve created articles on how to tackle each of these steps to get to this point where we are putting it back together:
- Get your car up level on Jack Stands (as high as possible)
- Remove the rear undertray
- Remove the rear subframe crossmember
- Remove the right rear exhaust heat shield
- Draining the Fluid from the Sump
- Remove the Thermostatic Control Valve
- Remove the Oil Pan/Sump
- Remove the Electronics Sleeve
- Remove the Mechatronics Unit
- Changing the Mechatronic Valve and Bridge Seals
- Installing the Mechatronics Unit
With those steps out of the way we can get on with it.
Procedure
The process will take about just 5 minutes once you have all the preparation steps done.
 Aston Martin actually have included a section on this in the official Aston Martin Workshop Manual. Section 7.01 Automatic Transmission covers this. What’s amusing is that they didn’t bother to make one unique to Aston, they just pilfered content from ZF and actually just show pictures of a transmission removed from the car flipped over on the bench (if only it was that easy).
![]() I managed to track down a ZF service technician training presentation that looks like something a trainer would be using to train new ZF service technicians (just like me – and you!). You can find a copy of that here. It covers some details of installing the Electronics Sleeve. Here’s my version combining all the tidbits together:
I managed to track down a ZF service technician training presentation that looks like something a trainer would be using to train new ZF service technicians (just like me – and you!). You can find a copy of that here. It covers some details of installing the Electronics Sleeve. Here’s my version combining all the tidbits together:
- Use a lint free rag and wipe out the passage in the transmission housing that the sleeve fits into. Just ensure its clean and no grit is present.
- Use some transmission fluid and lubricate the O-rings on the new Electronics Sleeve. This will help it slip in.
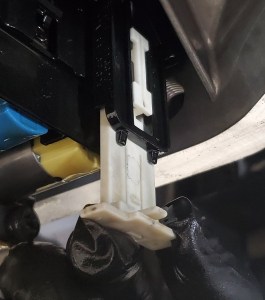
- Ensure that the Electronics Sleeve lock lever on the Mechatronics Unit is still pulled all the way down. It should be.
- Before reconnecting the electronics Plug I used my spray can of electrical contact cleaner to spritz the array of metal pins visible through the electronics sleeve.
- I was worried that transmission fluid may have coated the pins while I had the Mechatronics removed and I was getting it all refitted.
- I put a rag up near the sleeve while I was doing this to catch the drizzle that sheds off.
- Give it a minute or so to dry off prior to making the electrical connections.
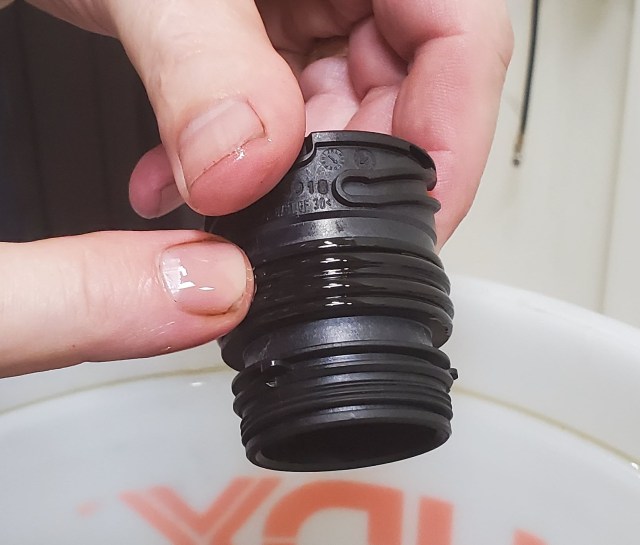
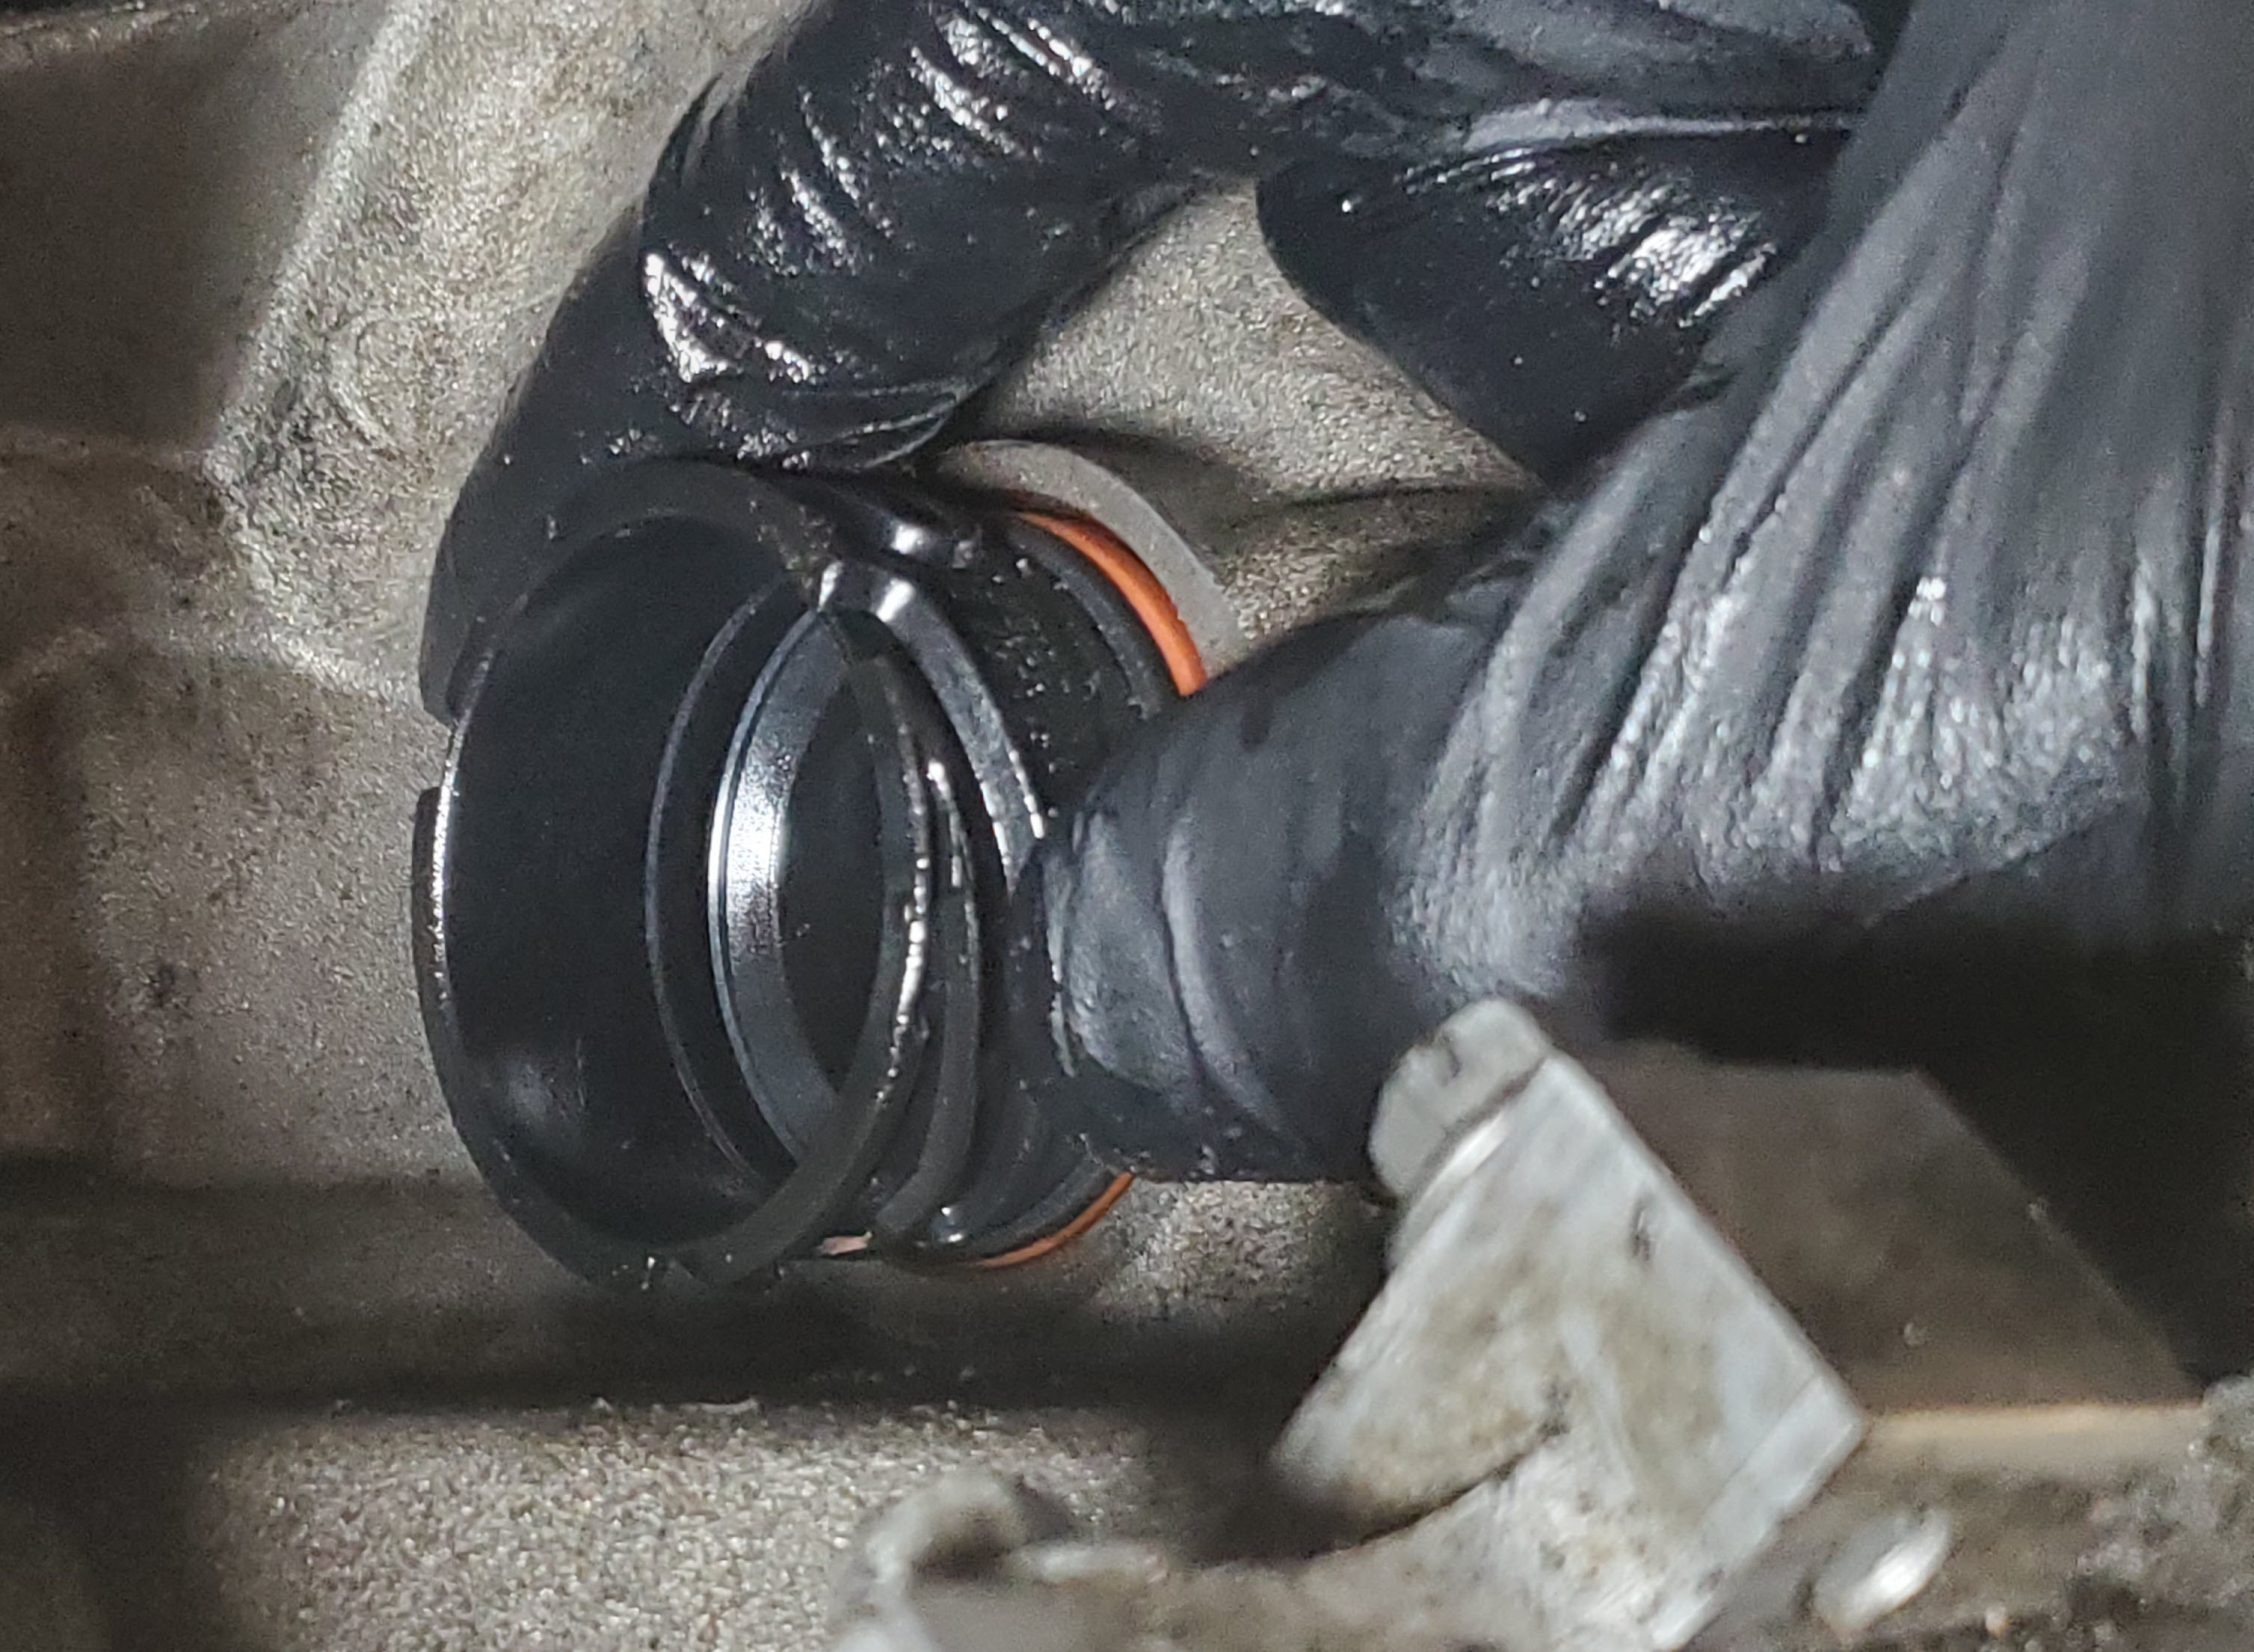
- Looking into the end of the Electronics Sleeve you will see a keying tab. I’m not sure exactly on the orientation of where this need to be aligned, but I think it was roughly the 4 o’clock position to start with.
- Initially push the Electronics Sleeve into the opening, and rotate it until it properly aligns and slips home.
- This gets harder as the O-rings start to engage.

- This gets harder as the O-rings start to engage.
- Push the Electronics Sleeve in until the Mechatronics Lock Lever will push up easily and lock into place.
- This turned out to be difficult to do. The new O-rings seating have to squish into place I guess. In the video you’ll see me struggle for about 5 mins trying to press the sleeve in the last 1 or 2 mm to become fully seated so the Lock Lever will slide up easily.
- DON’T force the Lock Lever up. It does NOT require you to press the small lock tab to get it to move. When the sleeve is push in far enough it will just easily slide up.
- Pushing on the end of the Electronics Sleeve is tricky since its in a tough spot. I just couldn’t push in hard enough with my hands.
- I found a small piece of 1″ x 3″ about 5″ long kicking around the shop. I wanted something wide enough to span the face of the Electronics Sleeve and give me something to lever against. You can improvise something similar.
- I used a small pry bar and got some purchase and levered against the block of wood, pushing the Electronics Sleeve home the final few millimeters. You could use a large screwdriver too.

- In the ZF guide they show the ideal gap between the sleeve and transmission casing as about 2.5-3 mm. I just push it in until the lock lever would move easily.

- Push the white Lock Lever on the Mechatronics Unit straight up (it should move easily now) until it locks into place and clicks.
- Give it a light tug straight down to confirm the lock has clicked properly into place. It should NOT slip back down.
- Give it a light tug straight down to confirm the lock has clicked properly into place. It should NOT slip back down.
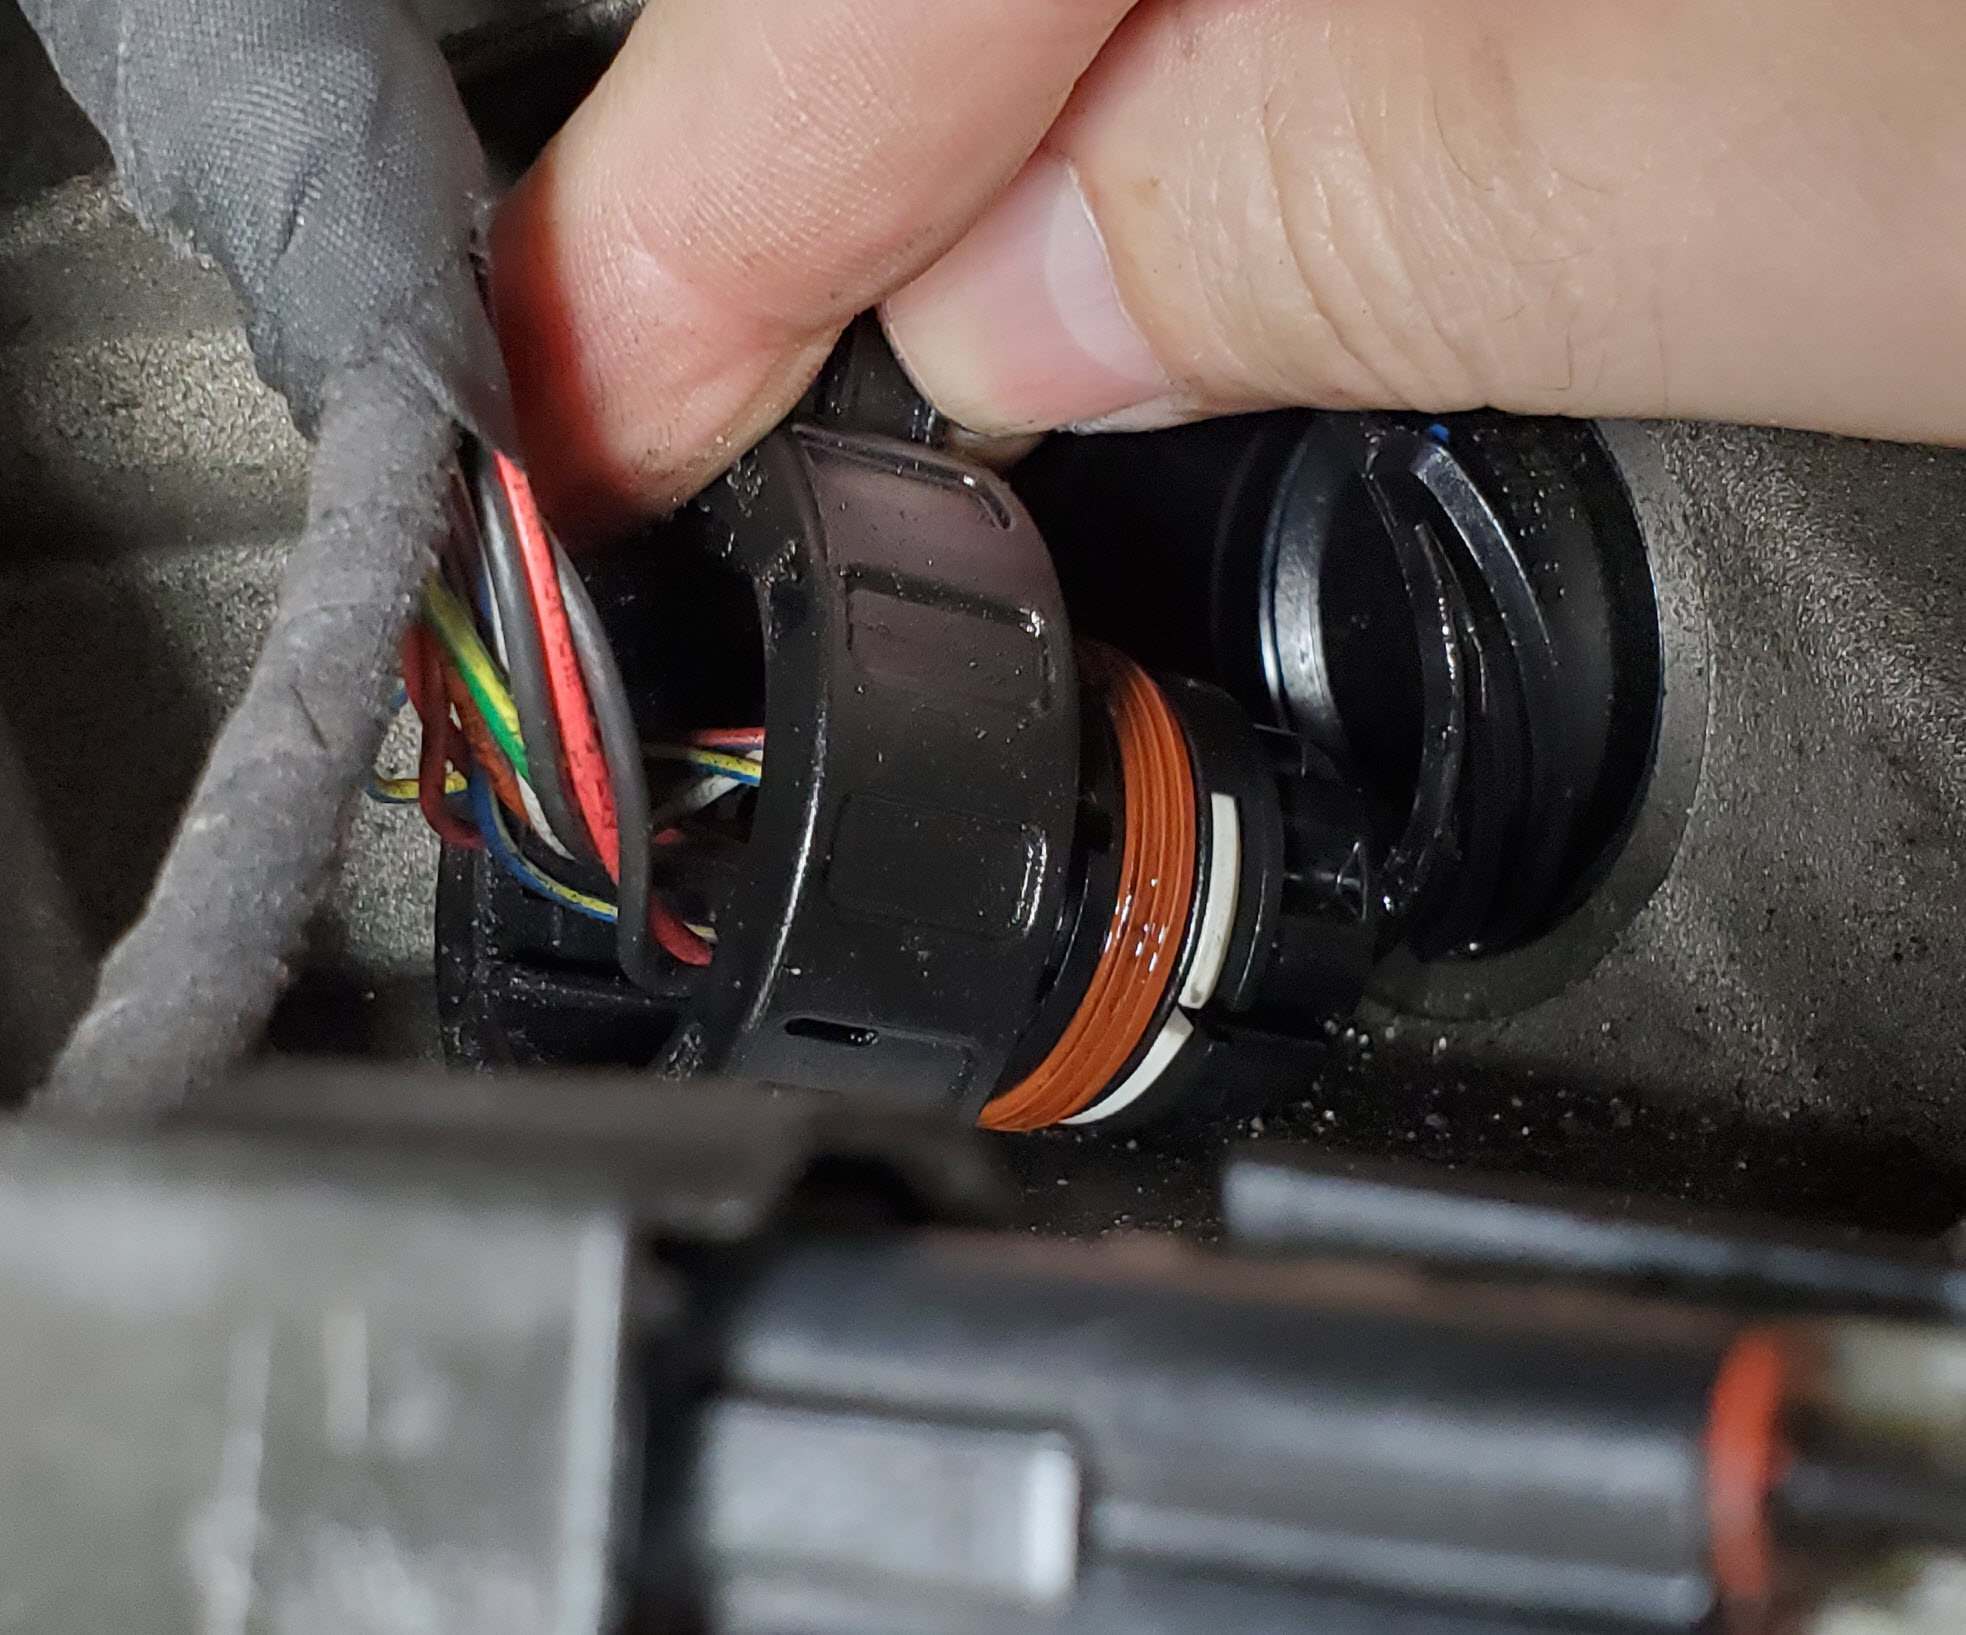
- Reconnect the Electronics Plug
- Notice that the Electronics Sleeve and Electrical Connector have tabs and slots to align as you mate them up. It’s easy.
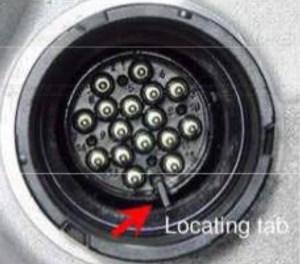
- Push the Electrical Connector into the Sleeve.
- It should slip in easily

- It should slip in easily
- Rotate the Electrical Connector Clockwise until it engages with the slots in the sleeve.
- Rotate the Electrical Connector about 1/4″ turn further clockwise until you feel it click into place locked.
- Notice that the Electronics Sleeve and Electrical Connector have tabs and slots to align as you mate them up. It’s easy.


That’s it! With the electrical connections made up, you can get on with the next step of reinstalling the Oil Pan/Sump (check out my article on that step here). You can find all my articles for the entire transmission service here.
Video
You can see me working out how to reinstall the Electronics Sleeve in this video at the 7:07 mark:
And you can see me making up the Electrical Connector in this video at the 23:31 mark:
