![]() Most Aston Martin DB9’s, DBS and Rapides between 2004 and 2014 were fitted with an excellent Touchtronics II 6-speed automatic gearbox made for Aston Martin by German company ZF (I’ve written about this elsewhere if you are interested). While Aston Martin claims the transmission is ‘sealed for life’, ZF actually recommends that it be services every 8 years. My 2005 car is now 15 years old and long overdue for this. I set about changing the fluid, filter and seals and have put together a series of articles on the process (which you can find here). During the service I was able to drain 9.5 liters of fluid out. After putting it all back together the last major step is to properly refill the transmission fluid and set the final fluid level. Since Aston never intended to make this serviceable, its trickier than you might think. I this article I will show you how to tackle the next step which is to bulk refill the fluid. Let me share some tips with you.
Most Aston Martin DB9’s, DBS and Rapides between 2004 and 2014 were fitted with an excellent Touchtronics II 6-speed automatic gearbox made for Aston Martin by German company ZF (I’ve written about this elsewhere if you are interested). While Aston Martin claims the transmission is ‘sealed for life’, ZF actually recommends that it be services every 8 years. My 2005 car is now 15 years old and long overdue for this. I set about changing the fluid, filter and seals and have put together a series of articles on the process (which you can find here). During the service I was able to drain 9.5 liters of fluid out. After putting it all back together the last major step is to properly refill the transmission fluid and set the final fluid level. Since Aston never intended to make this serviceable, its trickier than you might think. I this article I will show you how to tackle the next step which is to bulk refill the fluid. Let me share some tips with you.
If you haven’t just serviced your transmission like me (where the transmission is bone dry empty), and all you want to do is check your mostly full transmission to ensure the level is properly set, and perhaps top up a tiny bit, you should be checking out my next article on doing the final level setting procedure [Coming Soon].
If your transmission had a leak, and you suspect its just down perhaps a liter or two, you can skip the first step below and jump down to the Bulk Refilling with the Engine Idling step since you already have enough fluid in the sump to at least run the engine.
Tools
You don’t need hardly any tools, but one of them is super helpful. I’ve covered them in detail (along with where to purchase them) in another article for the overall transmission service process (find it here), but here is the subset needed for this step:![]()
- 8mm Hex Wrench – STUBBY. This has to work in a very tight space, so it needs to be a stubby something like this one on Amazon.
- Transmission Fluid Pump
 You’re going to have to pump some fluid. There are lots of ways to do this, from using a small $10 pump top you screw onto the fluid bottle, to the larger and easier transmission fluid pump I chose (Werkzeug model WKZ-VAS572001). It holds up to 8 liters and works very easily to pump the fluid.
- Drip Tray
 Part of the procedure is includes filling until its dripping out, so rather than fluid dripping all over your garage floor or onto cardboard that’s going to get soggy, I sought out a better solution.
- I purchased a dog kennel plastic tray/liner that was perfect for the task. One that was 35″ x 22″ was only $16 USD on Amazon with free shipping.

 Pig Mat absorbent towels
- If a mess happens you are going to need to be able to soak up the spills. Pig Mat isn’t just ordinary paper towel, it can absorb a ton of fluid and just one or two sheets is all I needed.
- You can pickup a 50 ft roll on Amazon for $24 USD.
- Alternately you can just use a ton of regular paper towels.
 Shop Rags
- Your hands and tools are going to get oily. Have a good supply of lint free shop towels on hand.
- I get a bag of 100 for about $25 USD from Amazon.
 Disposable gloves
- Pumping in the fluid can be a messy business, so having a couple of pairs of disposable gloves would be handy to have.


It might get messy, so don’t wear your Sunday best to do the work. Time to put on your ‘garage clothes’.
Parts
 I’ve covered all the parts you might need for the full service in another article (check it out here). It includes the part numbers and where to purchase them. In this step we are really just talking about getting the correct Automatic Transmission Fluid.
The ZP HP626 requires very specific transmission fluid, not the off the shelf stuff at the local parts store or gas station. The fluid must been Shell standard M1375.4.
The best quality option is to stick to the official ZF recommended ZF Lifeguard 6 fluid.
You will need a total of ten (10) liters to refill the transmission if you are doing the full service as I describe.
Preparation
Assuming you’ve gone down the route of a transmission fluid, filter and seals service you need to do a number of steps to get to the point where you are ready to refill the fluid. I’ve already prepared articles on these steps:
- Get your car up level on Jack Stands (as high as possible)
- Remove the rear undertray
- Remove the rear subframe crossmember
- Remove the right rear exhaust heat shield
- Draining the Fluid from the Sump
- Remove the Thermostatic Control Valve
- Remove the Oil Pan/Sump
- Remove the Electronics Sleeve
- Remove the Mechatronics Unit
- Changing the Mechatronic Valve and Bridge Seals
- Installing the Mechatronics Unit
- Installing the Electronics Sleeve
- Installing the Oil Pan/Sump
- Installing the Thermostatic Control Valve
With those steps out of the way we can get on with it.
Procedure
These steps should take you about 30 minutes once you have all the preparation work done.
![]() I really dug into the official guides to learn what the proper process should be. The Official Aston Martin Workshop Manual Section 7.01 on the Automatic Transmission describes the process (find the section here).
I really dug into the official guides to learn what the proper process should be. The Official Aston Martin Workshop Manual Section 7.01 on the Automatic Transmission describes the process (find the section here).
I was more interested in how ZF recommends it be done since they actually make the transmission, and they’ve been able to revise their process over the intervening 15 years.

I downloaded a copy of their official service guide (find it here), and there is a terrific ‘flow chart’ that outlines the steps clearly. This was the process I followed, along with some of my own experience thrown in below.
If you are at the same point in the Service process as me, my transmission is currently BONE DRY internally, and I’ve just finished bolting back up the oil sump and cooling lines. It has NO FLUID in it yet and the car should NOT be started at this point. Let’s get started on the process of getting that 9.5 liters of fluid I drained out back into the car.
Bulk Refilling Before First Startup
Before we restart the engine we need to get at least some fluid back into the automatic transmission sump.
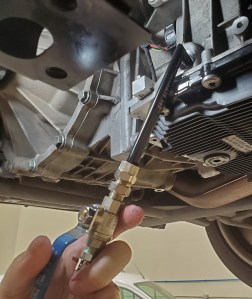
- Be sure your drip pan is located under the transmission fill plug. It will be needed.
- Remove the transmission fluid ‘fill’ plug (if you had temporarily reinstalled it previously).
- This is done with an 8mm stubby hex wrench since the clearance to the right hand exhaust pipe is so tight.

- This is done with an 8mm stubby hex wrench since the clearance to the right hand exhaust pipe is so tight.
- Decide how you are going to pump transmission fluid. In the video I mention three possible options:
- A hand operated transmission fluid pump that fits directly onto each 1 liter bottle. A small hose is included. Inexpensive, but slow and tedious.
- A more effective transmission fluid pump that has its own fluid reservoir, pump handle, etc. Knowing I had nearly 10 liters to pump in, and space was tight, this was the path I chose.
- I am going to continue writing the article based on this approach. If you do the smaller hand pump, it will still make sense.
- Fill the reservoir in your Transmission Fluid Pump with clean, new transmission fluid. I added 7 liters to my pump to start with.
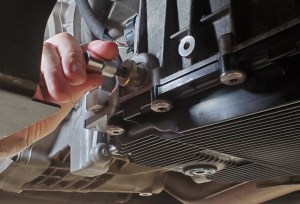
- Fit the line from the fluid pump into the fill hole of the transmission.
- Just stick it in, it doesn’t need to seal. In fact, air must be allowed to come back out, and you need to be able to see fluid dribbling back out later.
- The fluid pump system I used had a nice little fill nozzle on the end, so I was able to just hook it into the fill hole.
- Start pumping fluid into the transmission until you see a small stream of fluid start dribbling back out of the fill port.
- For my car, this was about 3 liters of fluid, and took just a few minutes to pump it in.


- For my car, this was about 3 liters of fluid, and took just a few minutes to pump it in.
- Once the fluid is dribbling slowly out, remove the hose from your pump and temporarily install the fill plug just snug (you’ll be removing it again soon, so no need to torque it).
- Wipe up the dribbles that are running over the transmission case just so you know its not a new leak.
OK, with that step done we now have as much fluid as we can back in, refilling the sump, so we can at least start the engine without damaging the transmission. We still have about 7 liters to go, so don’t think you are done yet and go for a drive.
Bulk Refilling with the Engine Idling
The next step is to continue refilling the transmission with the engine IDLING. As soon as you start the engine the fluids start to get pumped around inside the transmission, and back into the Mechatronics unit and cooling lines. All of those are bone dry, so that initial 3 liters you pumped in during the previous steps is going to be instantly sucked up and the sump will be empty again. This is actually a good thing since we will be relying on the pumping around of fluid to keep sucking in the additional fluid we are about to add.
This process is going to be done with you UNDERNEATH A RUNNING CAR. Be careful. At no time should the wheels be turning, but you want to be sure your car is level, the jacks stands are solid, etc. Keep in mind the exhaust pipes will be slowly warming up. Since the engine is running, there will be exhaust fumes. Carbon Monoxide is deadly and will kill you. It ‘sinks’ to the floor level, right where you may be laying under the car. You MUST do this in a well ventilated space, the garage door wide open regardless of the weather, etc.
- Set the park brake fully. At no time should the rear wheels be turning.
- Set the climate control to Off. We don’t want the A/C system running as it will raise the idle speed.
- Set the headlights to Off. ZF wants the electrical load minimized (probably since the car will be idling)
- Make sure your transmission fluid pump reservoir is topped up with the rest of the fluid you are likely to use. I poured the last three liters into the reservoir.
- Have your tools and fluids properly placed so they are ready to use immediately when you jump out of the car and start working underneath.
- Start the car and let it warm up just enough for it to drop back from fast idle (about 1100 rpm) back down to the normal idle speed of 750 rpm.
- Leave the car idling and head under the car.
- Remove the transmission fill plug again using the 8mm stubby hex.
- Mind the exhaust piper 1 inch from the back of your hand, pay attention to how warm it is becoming. This wasn’t a problem for me, it was just mildly warm at this point.
- There should be NO fluid dribbling out since all the fluid in the sump was sucked up by the pump and sent to all the parts of the transmission that are dry.
- Hook your transmission fluid pump hose/nozzle back into the fill hole.
- Start pumping in fluid as fast as you can.
- Watch for it to start dribbling back out the fill hole again.
- My car took in about 6 more liters of fluid until it began to dribble.
- Remove your fluid pump hose/nozzle and reinstall the fill plug again. Just snug it up, no need to torque it since there is still one more step to set the final fluid level coming up.
- Wipe up any fluid that is dripping off the transmission housing or sump so you can tell if you have any actual leaks.
- Shut off the car.
At this point I now have about 9 of the ~9.5 liters of fluid reinstalled in the transmission. It’s now MOSTLY refilled, and we’ll be able to move on to the final step of setting the exact final fluid level. This is a bit more involved process that has to be done with the fluid at a very specific temperature with the engine running (not too hot, not too cold). I will be covering that process in my next article (Check it out here). She’s still not ready to drive, but you’re almost there.
Video
You can see me do the initial dry bulk refill here at the 25:08 mark of the refilling the fluid video I made on the entire service process. You’ll see the fluid pump I used.
You can see me do the next phase of the refill done with the engine running in the video I made on checking the transmission fluid level at the 15:49 minute mark.

I completed the full flush of my transmission fluid system, along with replacing the mechatronix items, filter/pan, etc (OE supplier). about 3 months ago. For a variety of reasons, last weekend was the first time I’ve really driven the car since – 200 miles with a variety of terrain and speeds up to 100 mph. The transmission performs perfectly.
There had not been any issues previously (’09 model with 33k miles), but it was the last original fluid in the car, and for peace of mind, I wanted it renewed. I used the Mercon fluid for replacement (bought 15 liters), and am very pleased with the results.
Steve’s procedure and videos were a huge help in the project, but I highly recommend doing (or having it done) if your fluid has been in use more than about 8-10 years
LikeLike
Hi Gary. Pleased to see it helped you out with your car and you gave the Mercon a try.
LikeLike
Steve: I tackled this project recently. ’08 w/33k; Shift quality was a little harsh, but I did it mostly for peace of mind. Would not have attempted without your articles, from ordering the parts to the procedure itself. Anyways, my fill plug was literally right on the heat shield mount, so I had to remove the three right heat shields and disconnect the rear of the rear exhaust pipe from the muffler to simply move it enough for access. From there, the draining, disassembly, using compressed air to remove fluid from the lines was all smooth. New seals, retorquing mechatronic and new pan/filter, and refilling procedure was quite simple, if not involved. On my ’08, the body OBD is under the passenger side, but leaving the passenger door open and watching the trans temp on my Foxwell made the job a one man job. Oh, and shift quality, especially downshifts, is nicer, too. Thanks again!
LikeLike