![]() A majority of Aston Martin DB9’s, DBS and Rapides between 2004 and 2014 were fitted with an excellent Touchtronics II 6-speed automatic gearbox made for Aston Martin by German company ZF (I’ve written about this elsewhere if you are interested).
A majority of Aston Martin DB9’s, DBS and Rapides between 2004 and 2014 were fitted with an excellent Touchtronics II 6-speed automatic gearbox made for Aston Martin by German company ZF (I’ve written about this elsewhere if you are interested).
Aston Martin claims the transmission is ‘sealed for life’. I think its foolish to just have blind faith and hope that the fluid level is correct. How would you know until the transmission begins to misbehave after an undetected leak, and at that point is there damage being done? Do I think you need to check the Automatic Transmission Fluid every year? No. Would it be a good idea perhaps every 4 years? Probably. Should you check it if you see any signs of a weep or leak? Absolutely (and fix the leaks)!
For me, I am just finishing off a full service of the transmission including changing the fluid, filter and seals. I have put together a series of articles on the process (which you can find here). During the service I was able to drain 9.5 liters of fluid out. After putting it all back together the last major step is to properly refill the transmission fluid and set the final fluid level. I’ve already done the initial bulk refilling of the fluid where I got about 9 liters back in (check out that process here), and now its time to do the final detailed level set.
Since Aston never intended to make this serviceable, its trickier than you might think. I this article I will show you how to tackle the steps and share some tips and tricks along the way.
If you have just serviced your transmission like me (where the transmission is bone dry empty), be sure you start with the procedures in my other article “Refilling the Automatic Transmission Fluid“. You do NOT want to skip that step and run the vehicle (even at idle) with no fluid.
If your transmission had a leak, and you suspect its just down perhaps a liter or two (you have most of the fluid in your transmission), you should start by performing a Bulk Refill with the Engine Idling that I describe in my previous article (find it here). Once that’s done return to this process.
Tools
You don’t need hardly any hand tools, but one of them is super helpful. I’ve covered them in detail (along with where to purchase them) in another article for the overall transmission service process (find it here), but here is the subset needed for this step:![]()
 8mm Hex Wrench – STUBBY. This has to work in a very tight space, so it needs to be a stubby something like these 1/4″ drive sockets or like this hex wrench style on Amazon.
- A small torque wrench that can fit in the space and reach 35 Nm.
- My 1/4″ torque wrench maxed out at 23Nm, and my 3/8″ torque wrench couldn’t fit the space available.
- Transmission Fluid Pump
 You’re likely going to have to pump some fluid. There are lots of ways to do this, from using a small $10 pump top you screw onto the fluid bottle, to the larger and easier transmission fluid pump I chose (Werkzeug model WKZ-VAS572001). It holds up to 8 liters and works very easily to pump the fluid.
- Drip Tray
 Part of the procedure is includes filling until its dripping out, so rather than fluid dripping all over your garage floor or onto cardboard that’s going to get soggy, I sought out a better solution.
 - I purchased a dog kennel plastic tray/liner that was perfect for the task. One that was 35″ x 22″ was only $16 USD on Amazon with free shipping.
- You can also get away with a simple oil drain pan in this process if you have one handy, all the fluid should be dripping out of one place.


 Pig Mat absorbent towels
- If a mess happens you are going to need to be able to soak up the spills. Pig Mat isn’t just ordinary paper towel, it can absorb a ton of fluid and just one or two sheets is all I needed.
- You can pickup a 50 ft roll on Amazon for $24 USD.
- Alternately you can just use a ton of regular paper towels.
 Shop Rags
- Your hands and tools are going to get oily. Have a good supply of lint free shop towels on hand.
- I get a bag of 100 for about $25 USD from Amazon.
 Disposable gloves
- Pumping in the fluid can be a messy business, so having a couple of pairs of disposable gloves would be handy to have.


It might get messy, so don’t wear your Sunday best to do the work. Time to put on your ‘garage clothes’.
Special Tools
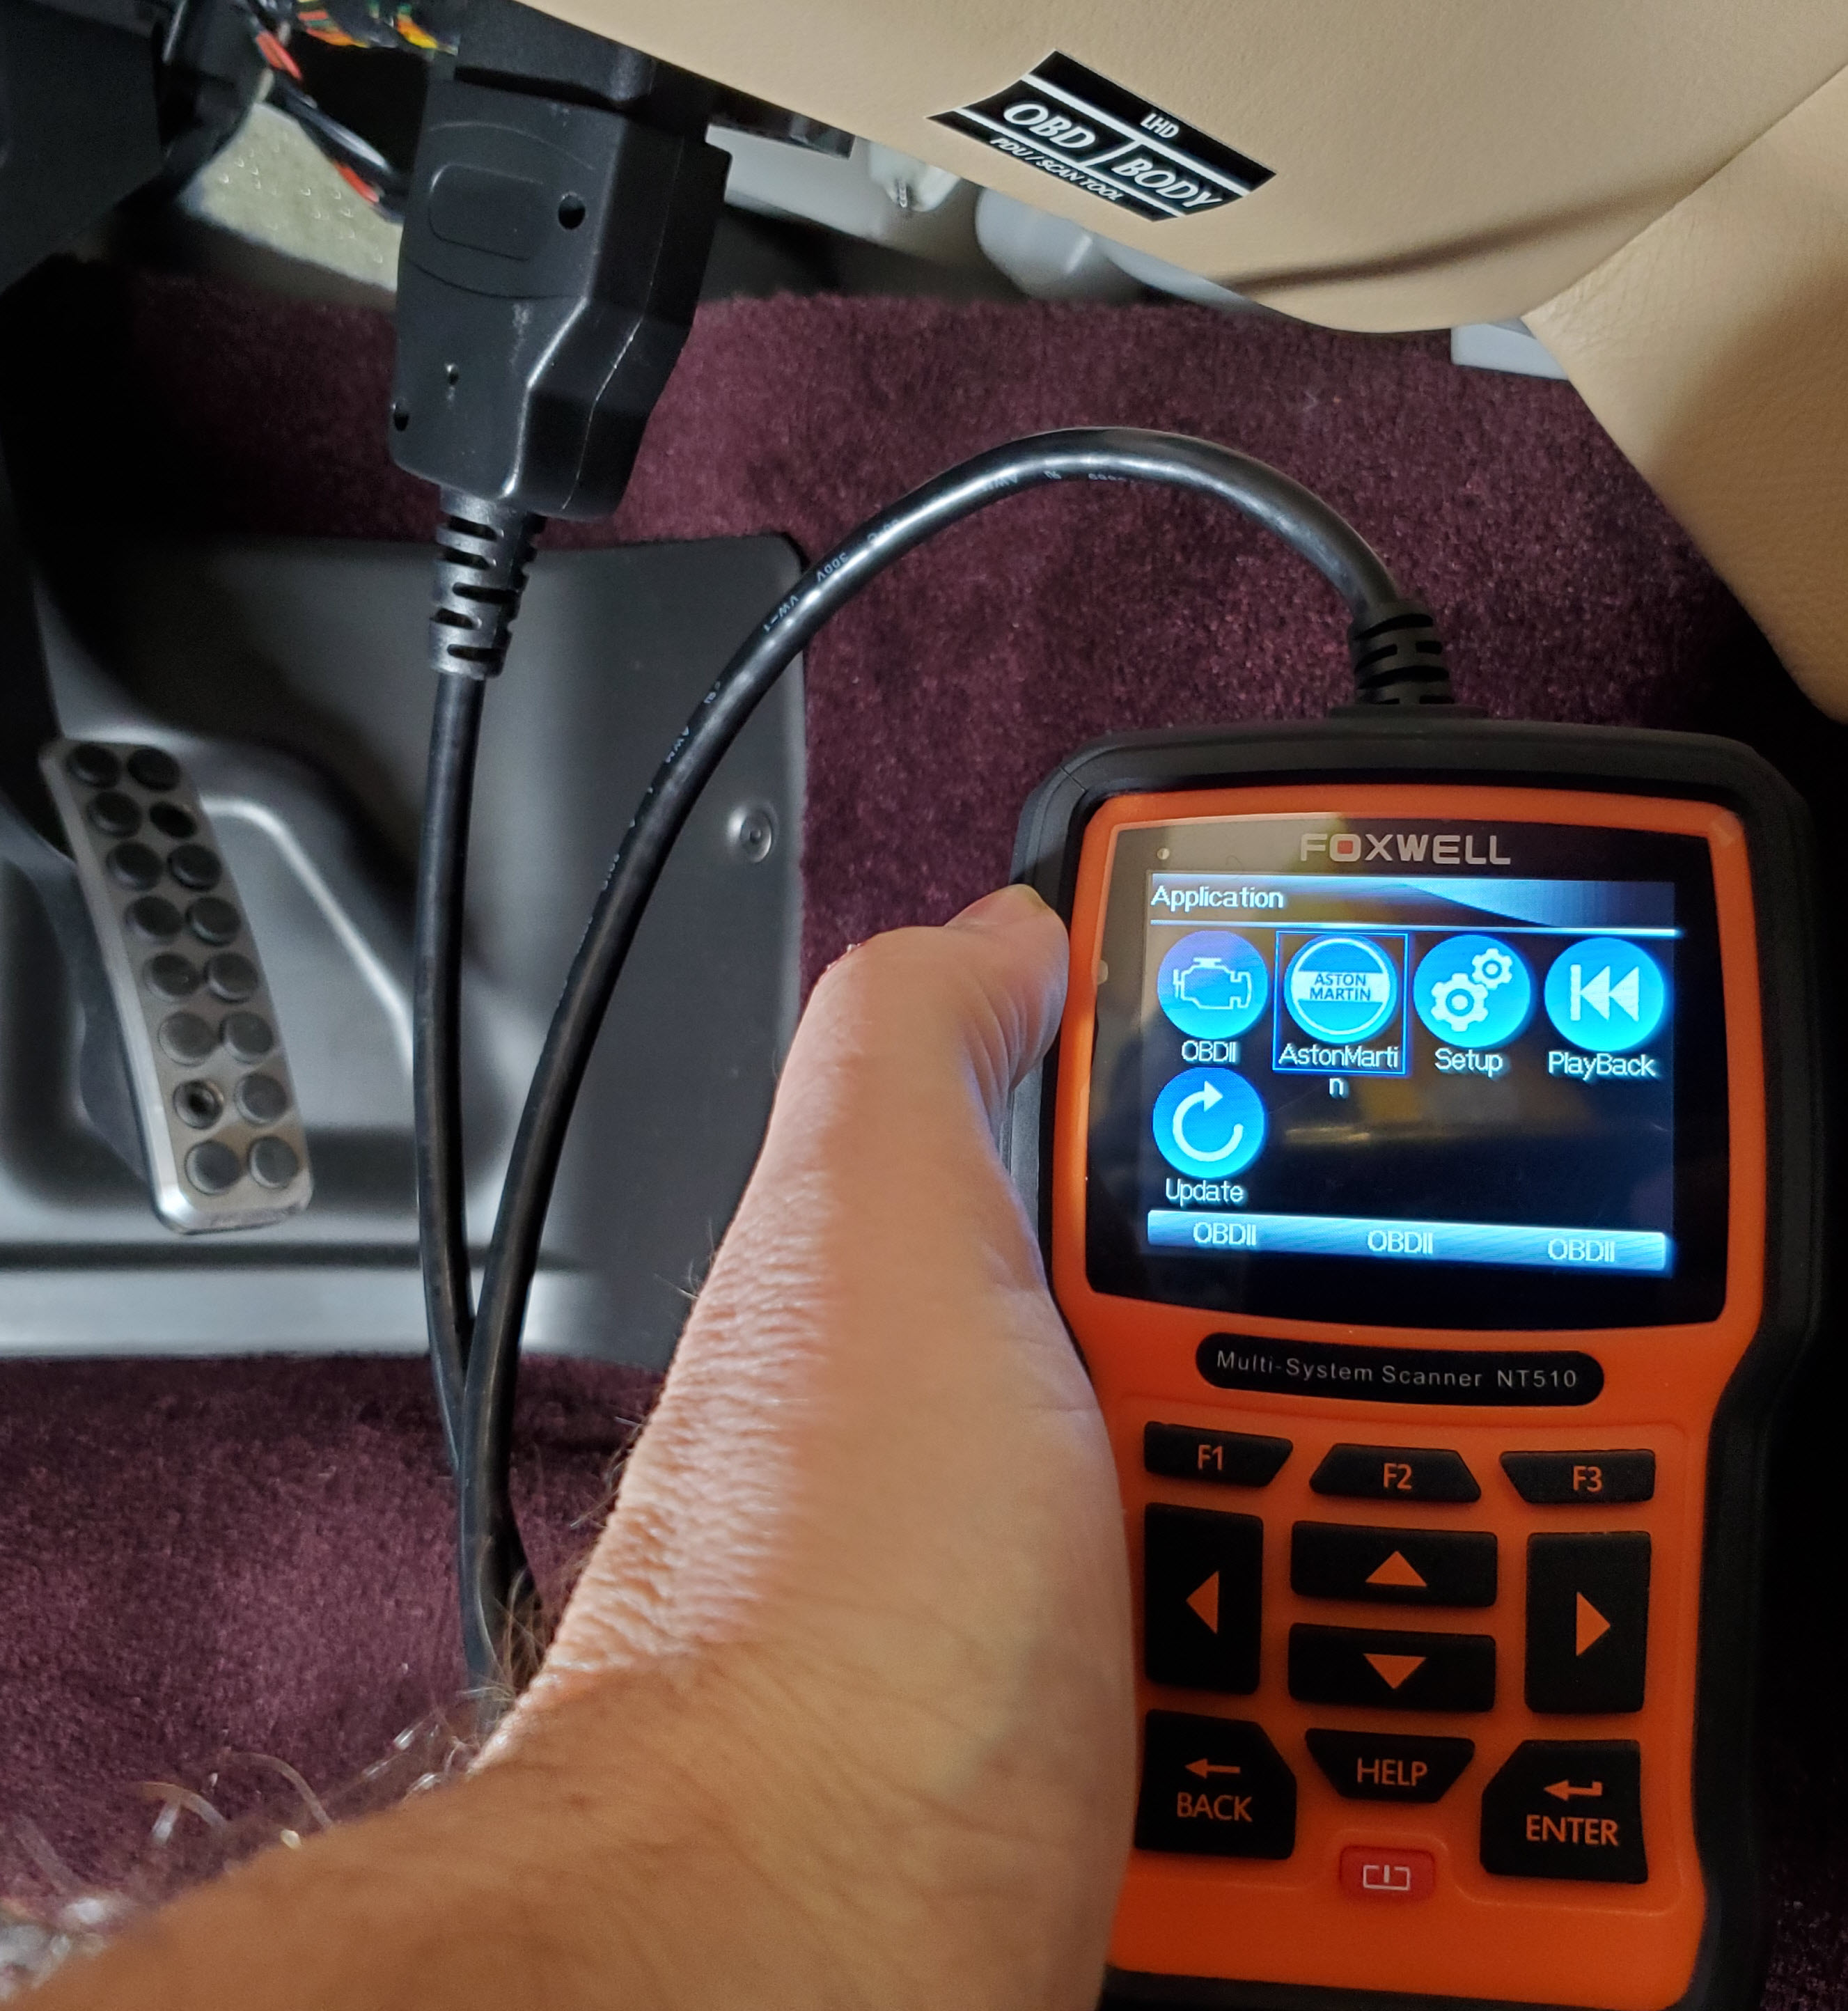
 Unlike most of my articles, this is one where you will need a specialty tool to do the job properly. You need an OBDII Diagnostic Tool that is smart enough to talk to the Transmission Control Module and retrieve the real time transmission fluid temperature. In other articles I’ve written about these extensively, and the one that I recommend you have in your toolkit is the very affordable Foxwell Technologies unit like this model NT510. It has the smarts to talk to most all of the computer control modules in the Aston, and this is exactly what we need during this process. You can find out more about the Foxwell (including costs and where to purchase) here in this article.
 You also ideally need a helper. Their job will be to sit comfortably in the car and watch the transmission temperature on the OBDII display, and call out the temperature to you as it slowly rises. You can try and do this without a helper, but its more fun to have the company. I enlisted the help of my Sweetie [with only a little groveling and bribery on my part].
Parts
 I’ve covered all the parts you might need for the full service in another article (check it out here). It includes the part numbers and where to purchase them. In this step we are really just talking about getting the correct Automatic Transmission Fluid.
The ZP HP626 transmission requires very specific transmission fluid, not the off the shelf stuff at the local parts store or gas station. The fluid must meet Shell standard M1375.4.
The best quality option is to stick to the official ZF recommended ZF Lifeguard 6 fluid.
To just finish topping up the transmission fluid level you should have one or two liters on hand.
Preparation
Assuming you’ve gone down the route of a transmission fluid, filter and seals service you need to do a number of steps to get to the point where you are ready to perform the final level check and set. I’ve already prepared articles on these steps:
- Get your car up level on Jack Stands (as high as possible)
- Remove the rear undertray
- Remove the rear subframe crossmember
- Remove the right rear exhaust heat shield
- Draining the Fluid from the Sump
- Remove the Thermostatic Control Valve
- Remove the Oil Pan/Sump
- Remove the Electronics Sleeve
- Remove the Mechatronics Unit
- Changing the Mechatronic Valve and Bridge Seals
- Installing the Mechatronics Unit
- Installing the Electronics Sleeve
- Installing the Oil Pan/Sump
- Installing the Thermostatic Control Valve
- Initial Bulk Refilling of the Transmission Fluid
If you are just checking the existing fluid level on your car and not performing a full service, the subset of steps reduces substantially to:
- Get your car up level on Jack Stands (as high as possible)
- Remove the rear undertray
- Remove the rear subframe crossmember
- Remove the right rear exhaust heat shield
With those steps out of the way we can get on with it.
Procedure
These steps should take you about 30 minutes once you have all the preparation work done.
![]() I really dug into the official guides to learn what the proper process should be. The Official Aston Martin Workshop Manual Section 7.01 on the Automatic Transmission describes the process (find the section here).
I really dug into the official guides to learn what the proper process should be. The Official Aston Martin Workshop Manual Section 7.01 on the Automatic Transmission describes the process (find the section here).
I was more interested in how ZF recommends it be done since they actually make the transmission, and they’ve been able to revise their process over the intervening 15 years (whereas the Aston manual is from 2007).

I downloaded a copy of their official service guide (find it here), and there is a terrific ‘flow chart’ that outlines the steps clearly. This was the process I followed, along with some of my own experience thrown in below.
Here is my distillation of the two documented processes along with my experience and tips thrown in.
There is a real ‘process’ to this procedure. Things done in the right order, so please pay attention to the details, read each step carefully, don’t skip any, etc.
Checking and setting the final fluid level is done with the car idling and the transmission fluid in a specific temperature range. This process is going to be done with you UNDERNEATH A RUNNING CAR. Be careful. At no time should the wheels be turning, and you want to be sure your car is level, the jacks stands are solid, etc. Keep in mind the exhaust pipes will be slowly warming up. Since the engine is running, there will be exhaust fumes. Carbon Monoxide is deadly and will kill you. It ‘sinks’ to the floor level, right where you may be laying under the car. You MUST do this in a well ventilated space, the garage door wide open regardless of the weather, etc. Don’t get dead over this. Now lets get on with it….
- Set the park brake fully.
- At no time should the rear wheels be turning.
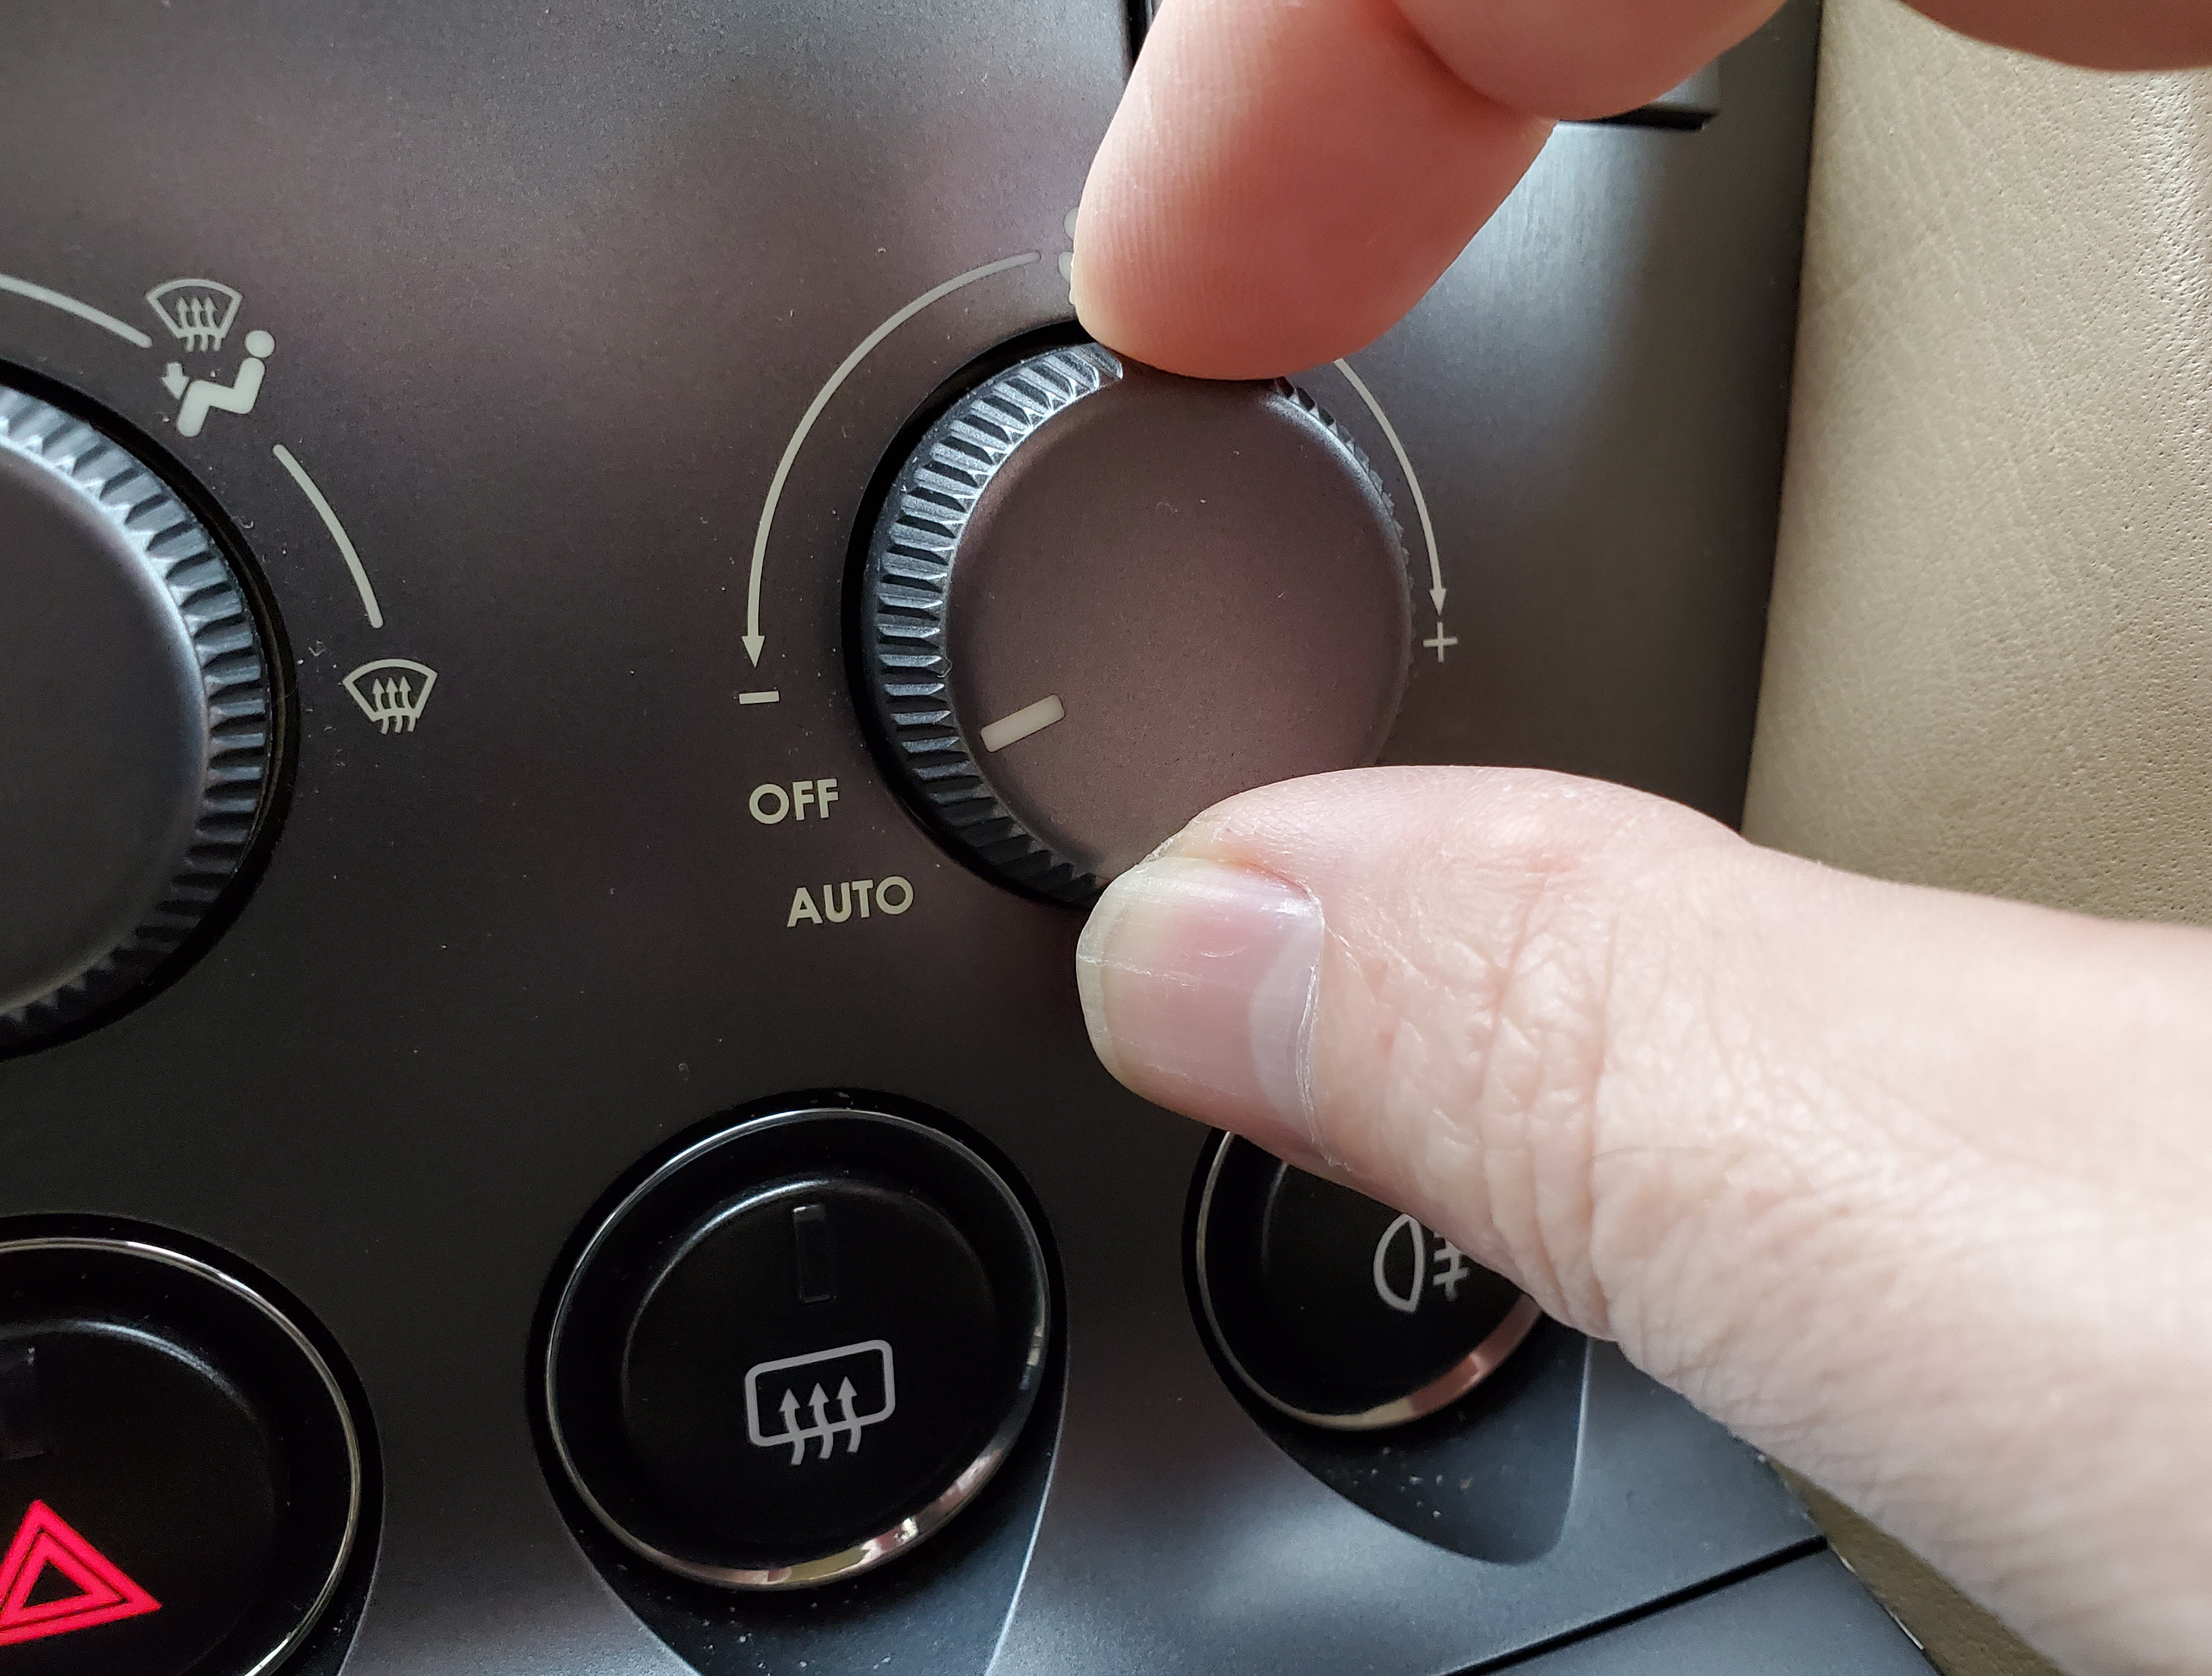
- Set the climate control to Off.
- We don’t want the A/C system running as it will raise the idle speed.

- We don’t want the A/C system running as it will raise the idle speed.
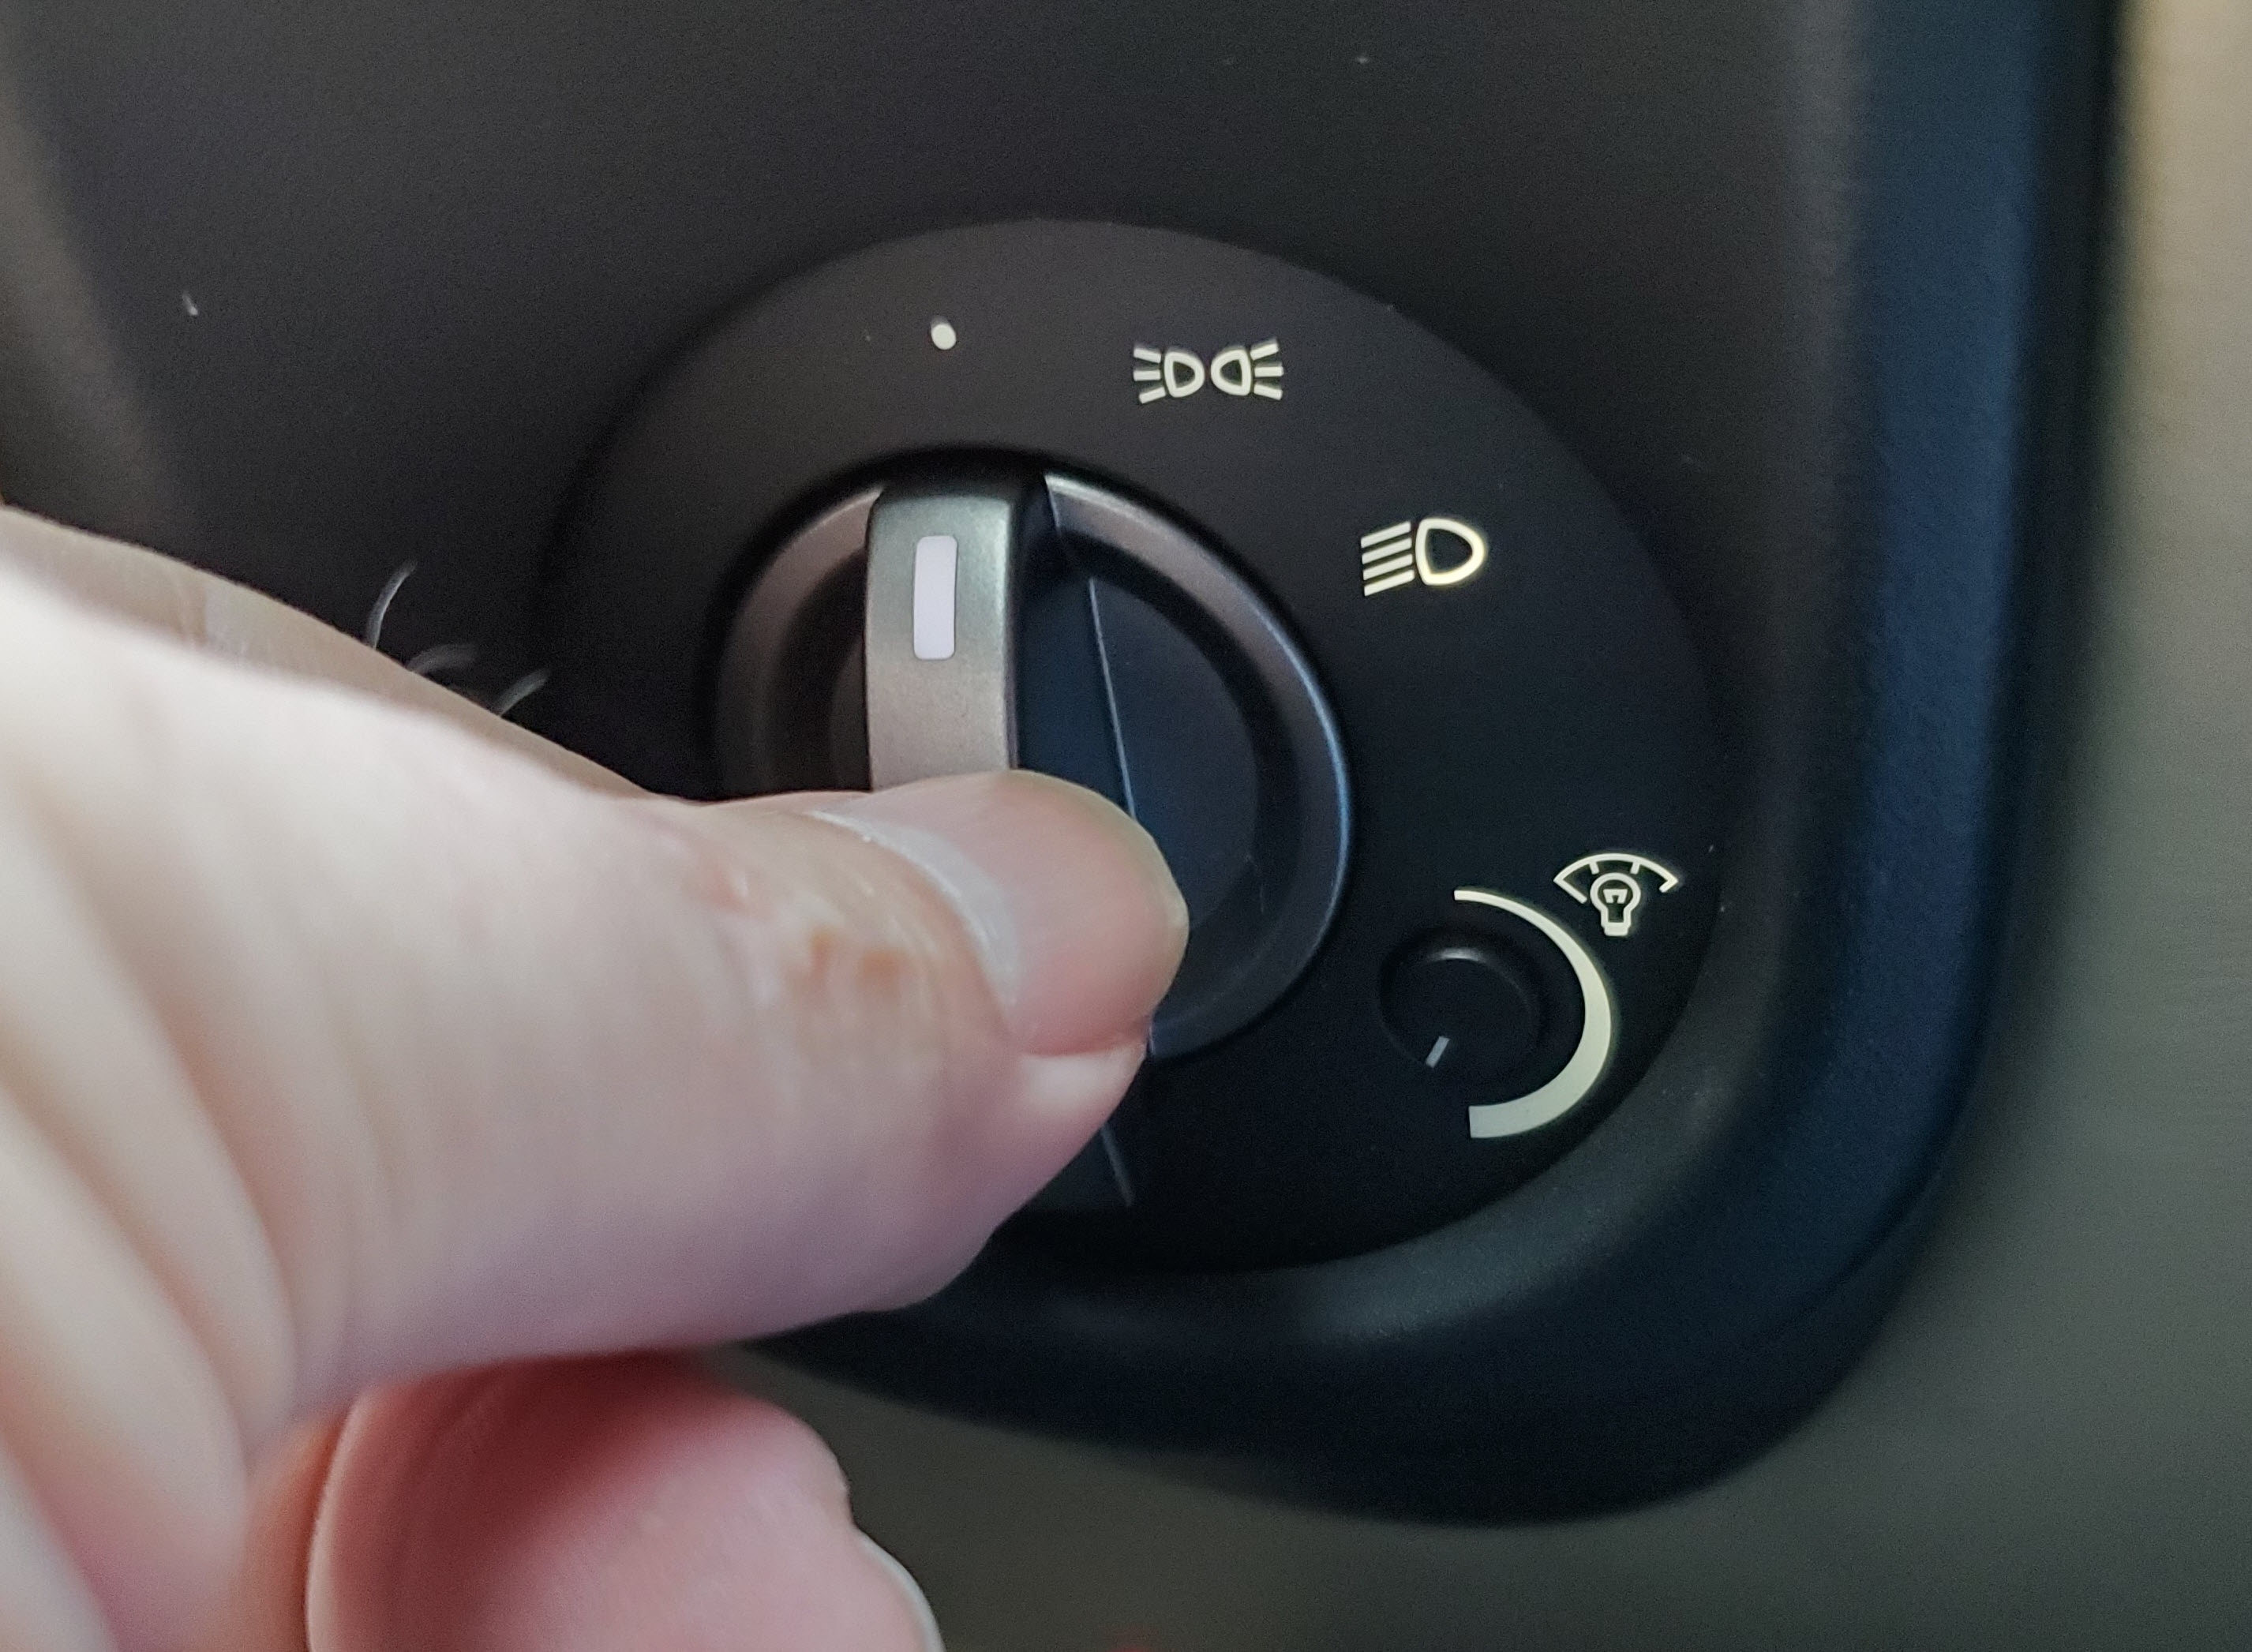
- Set the headlights to Off.
- ZF wants the electrical load minimized (probably since the car will be idling)

- ZF wants the electrical load minimized (probably since the car will be idling)
- Make sure your transmission fluid pump reservoir is topped up with the rest of the fluid you are likely to use. I had about 1 liter left in the reservoir.
- If you are just checking the fluid and haven’t done a full drain and service, it would just fine to use the $10 hand pump screwed onto the bottle top. No need for a big pump if you are just topping off a small amount.
- Have your tools and fluids properly placed so they are ready to use immediately when you jump out of the car and start working underneath.
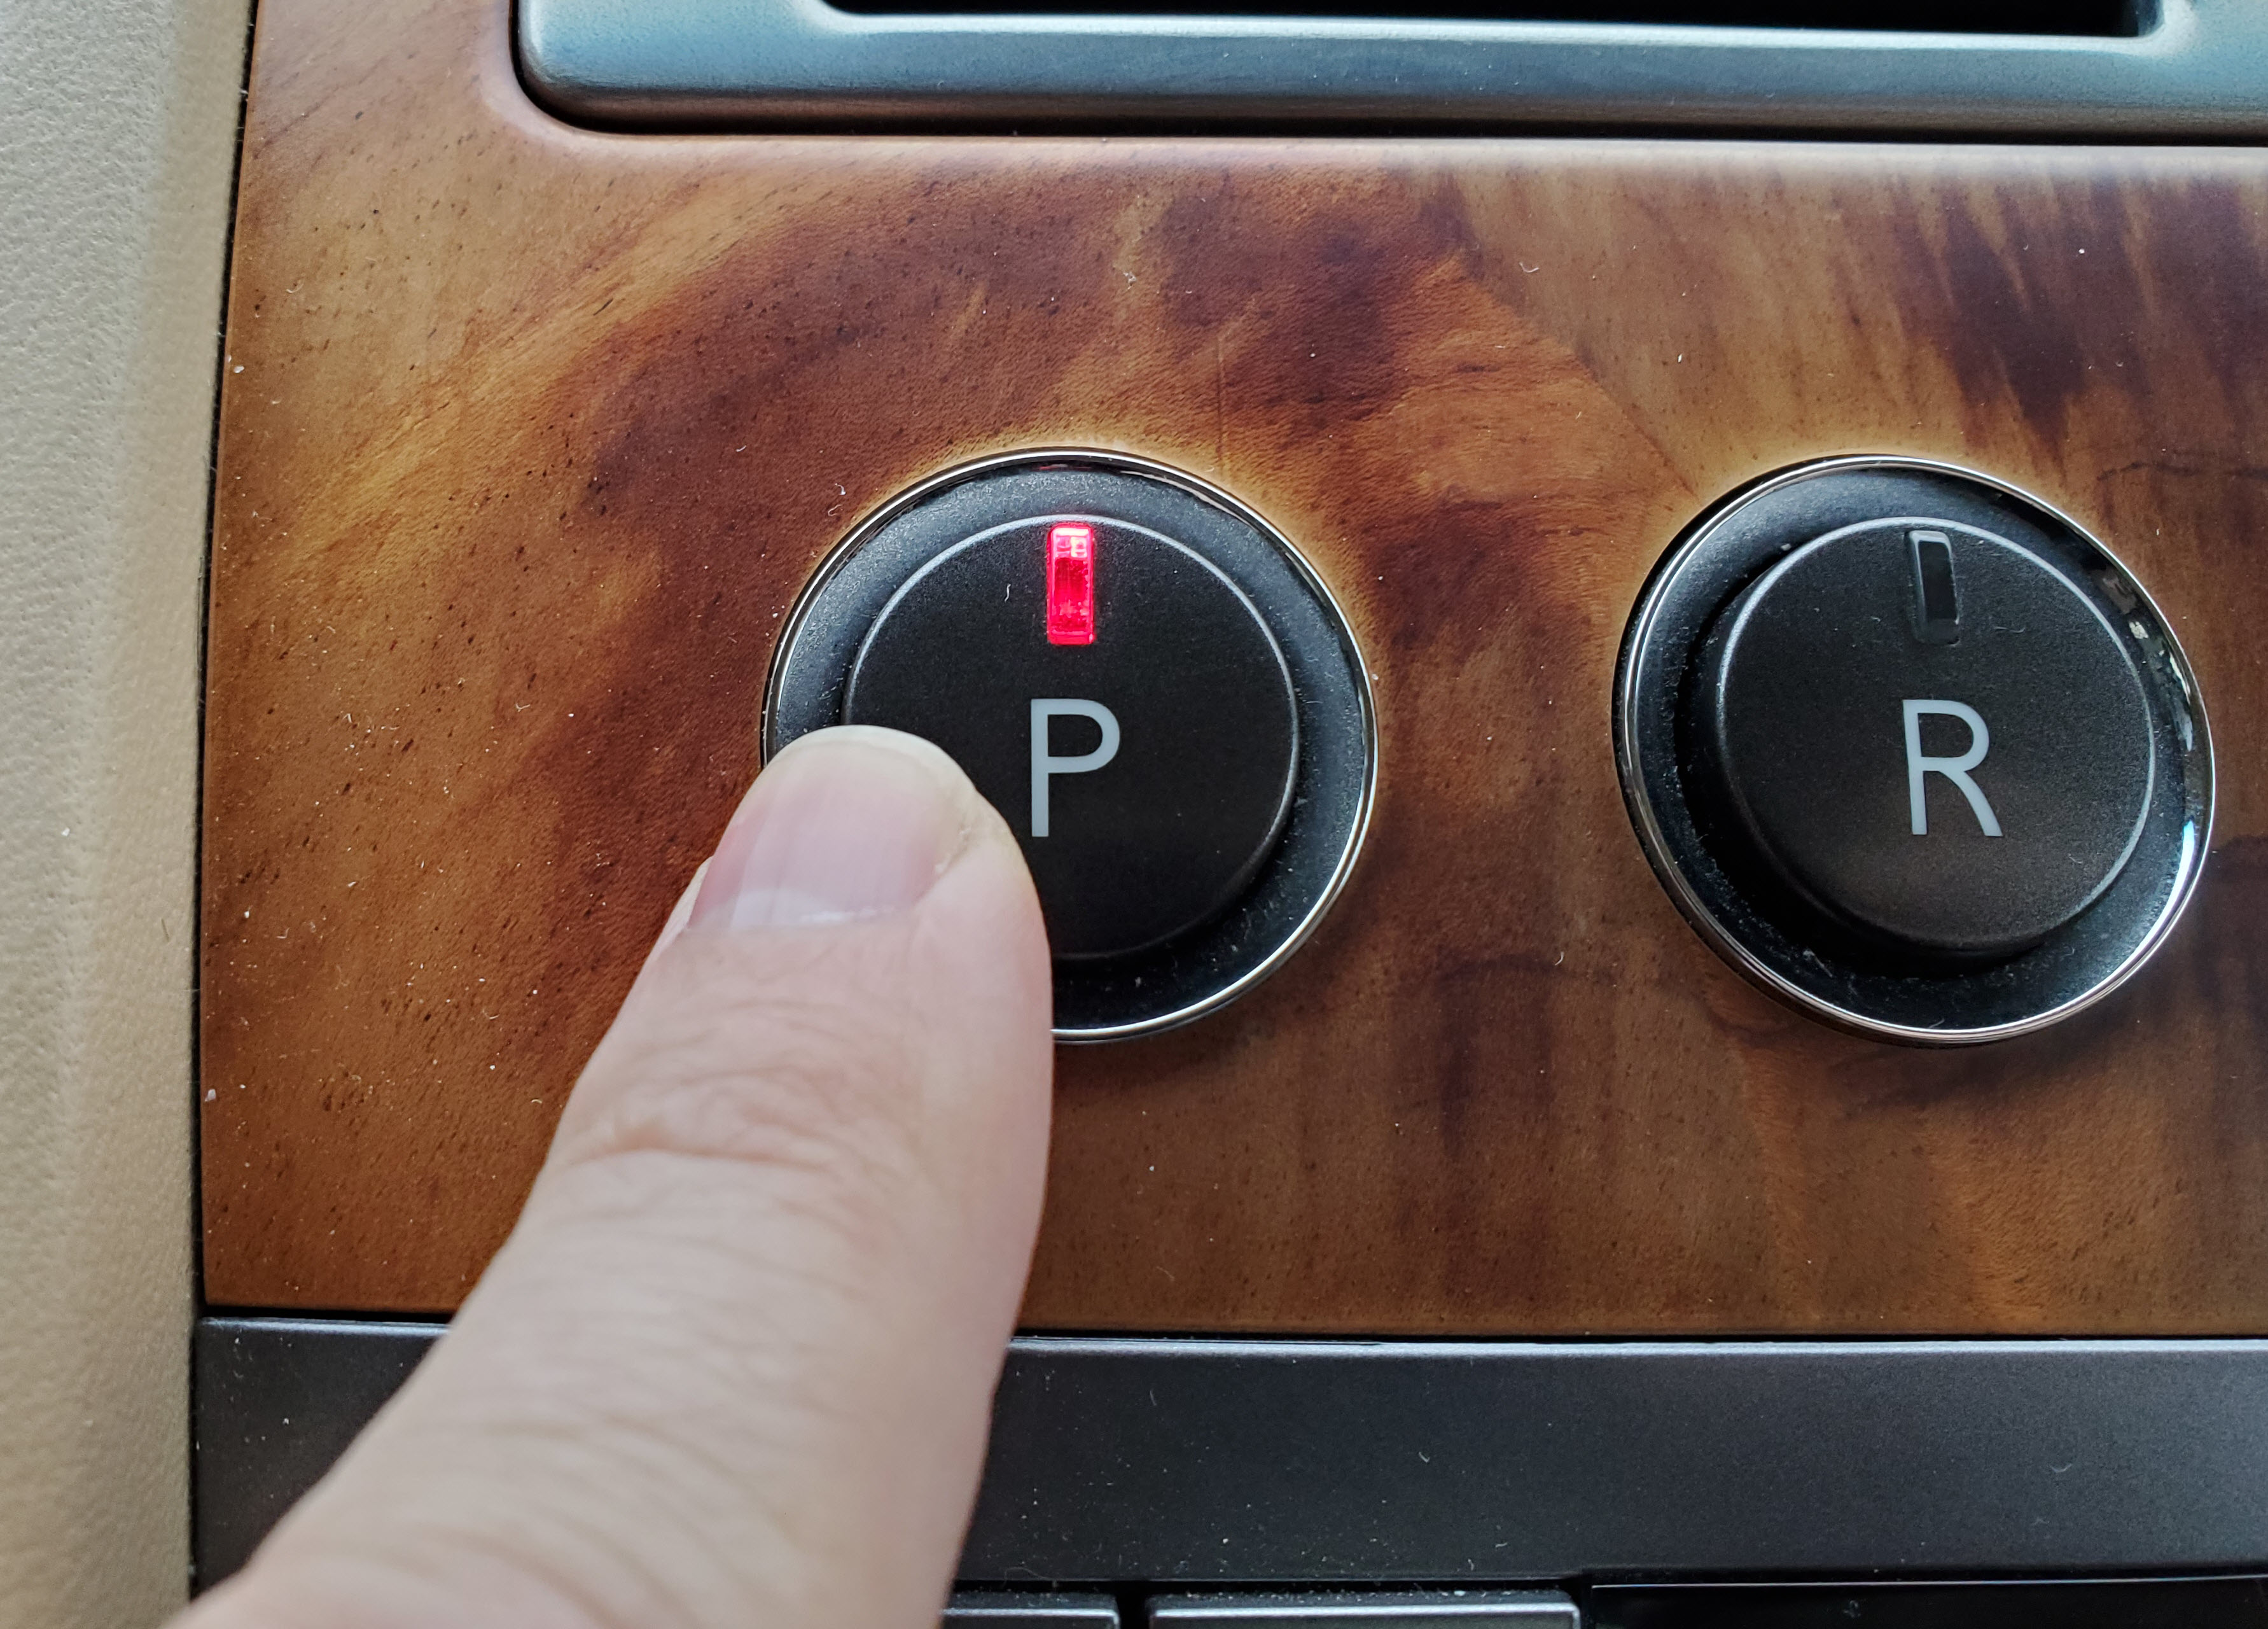
- Insert your key and turn the ignition to the ‘On’ position, but DON’T start the car yet. We need to do this step to power up the control module in the transmission so it can talk to the OBDII tool.
 Connect your OBDII tool to the ‘body’ OBDII port in the drivers side footwell. Check out my Video on how to do this properly.
- Don’t start this process if the transmission fluid temperature is above 30°C (86°F).
- If you’ve been driving the car and the fluid is warmer than this, you need to let it cool back off until its at least below 35°C.
- In the video below my transmission fluid was at ambient temperature (79°F) as I started.
- Start the car and let it warm up just enough for it to drop back from fast idle (about 1100 rpm) back down to the normal idle speed of 750 rpm.
- We are going to shift the transmission through its gears for a few seconds each to allow fluid to flow into all the passages and valves.
- Keep your foot firmly on the brakes at all times in the following steps. At no time should the wheels be spinning.
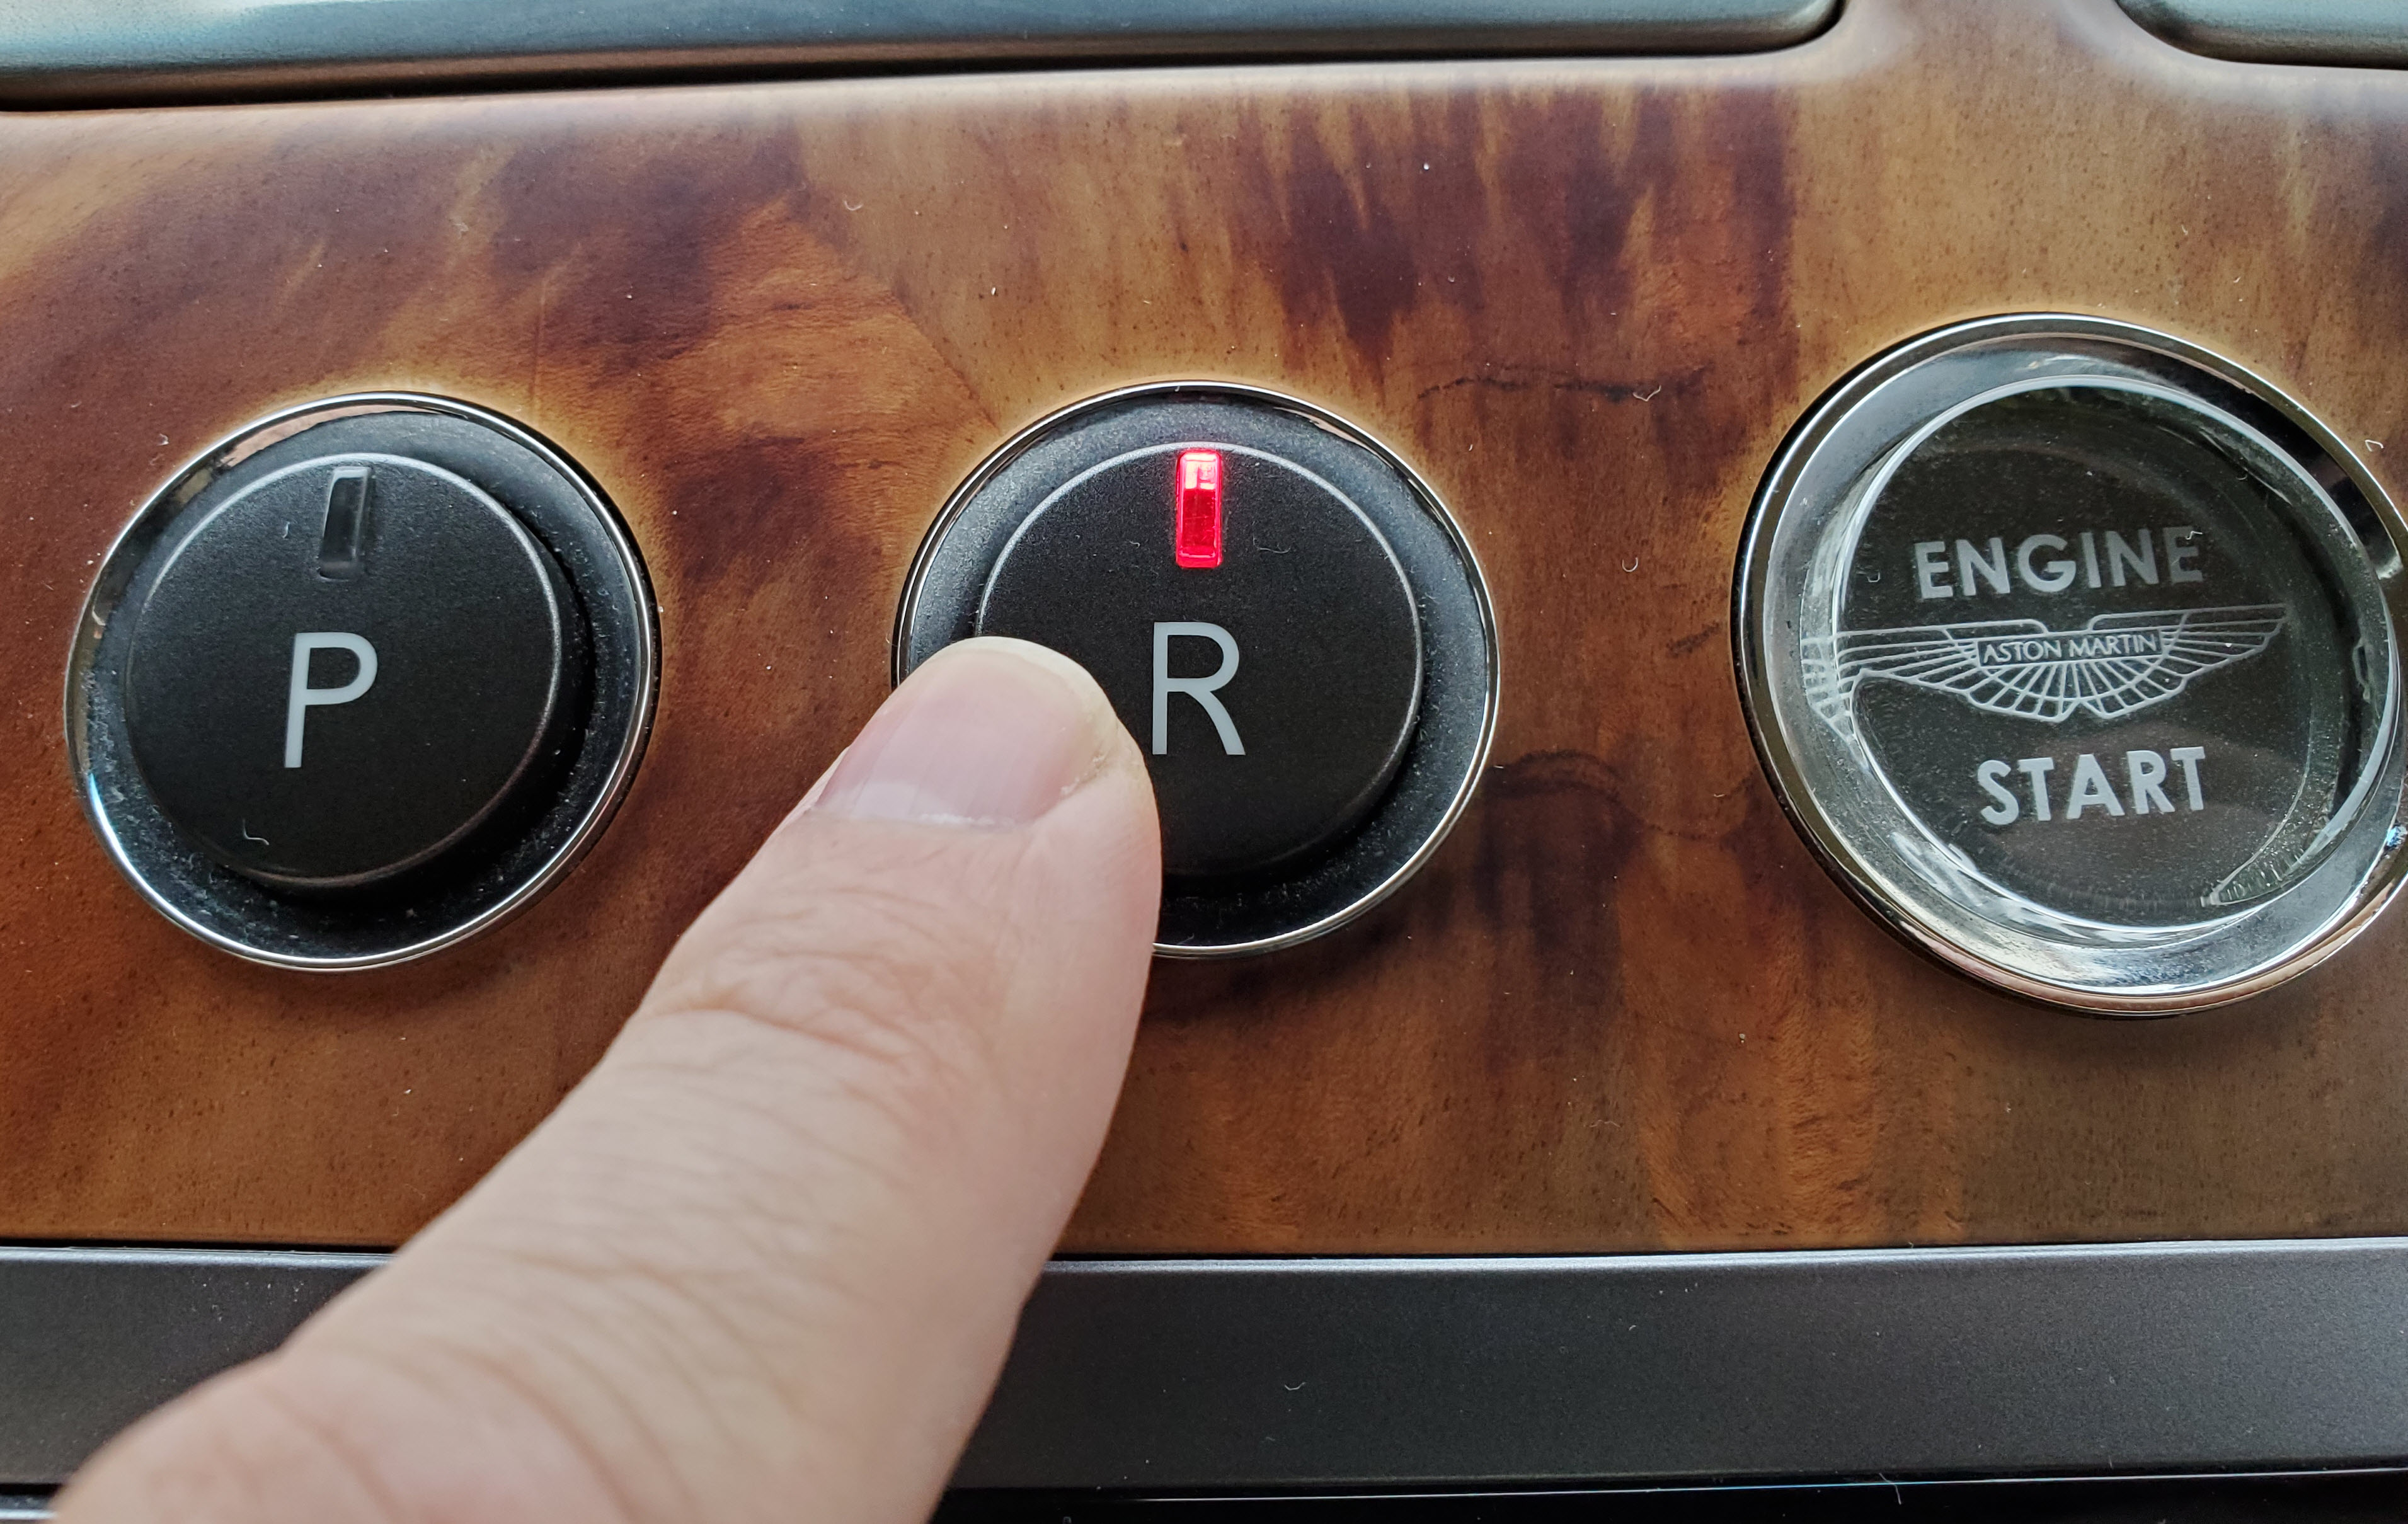
- Shift into Reverse for at least 3 seconds. I did it for 5 seconds. No less, no more.

- Shift into Neutral for a few seconds.

- Shift into Drive for at least 3 seconds. I did it for 5 seconds. The transmission is in First Gear at this point.
- Paddle shift into Second gear for at least 3 seconds. I did it for 5 seconds.

- Paddle shift into Third gear for at least 3 seconds. I did it for 5 seconds.
- Shift back into Park

- Have your helper hop in to start calling out the transmission fluid temperature.
- In my video below, the short period of operation and shifting the gears had already raised the fluid temperature a few degrees to 84°F (29°C).
- Leave the car idling and head under the car.
- In the next phase we are going to pull the ‘Fill’ plug between 30°C and 35°C (86°F to 95°F) to find out if the transmission is low on fluid or overfilled.
- Wait for the temperature to reach 30°C (86°F) before proceeding.
- Ask your helper to call out each degree of temperature rise.
- Don’t panic in the next steps, you have enough time to get the work done. In my experience the temperature went up about 1 degree every minute or two. Work safely.
- Once the temperature reaches 30°C (86°F) remove the transmission fill plug again using the 8mm stubby hex.
- Mind the exhaust pipe 1 inch from the back of your hand, pay attention to how warm it is becoming. This wasn’t a problem for me at the start, it was just mildly warm at this point.

- Mind the exhaust pipe 1 inch from the back of your hand, pay attention to how warm it is becoming. This wasn’t a problem for me at the start, it was just mildly warm at this point.
- Does Fluid start to dribble out of the fill hole with the plug removed?
- If Yes, it is overfull and then just let it keep dribbling out and skip the next step.
- If No, the fluid level is LOW and you need to top up the fluid level.
- Hook your transmission fluid pump hose/nozzle into the fill hole.
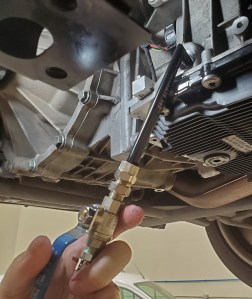
- Start pumping in fluid.

- Watch for it to start dribbling back out the fill hole again.

- My car took in about 0.5 liters of fluid until it began to dribble.
- You need to get the level topped up BEFORE the fluid temperature reaches 35°C (96°F)
- Remove your hose but now leave the fill plug out and allow it to continue to dribble out as the temperature slowly rises.
- Hook your transmission fluid pump hose/nozzle into the fill hole.
- Wait for the temperature to reach 30°C (86°F) before proceeding.
- In this phase we are going to standby between 35°C and 40°C (96°F to 104°F) and let the fluid continue to dribble out as the fluid heats up.
- This temperature increase took about 5+ minutes on my car.
- Ideally the dribble should be starting to slow down as the fluid levels off with the bottom of the fill hole opening.
- Once the fluid temperature reaches 40°C (104°F) we are now looking for the continuous dribble to slow to a mere drip-drip-drip.
- If it is still dribbling let it keep going as the temperature continues to rise some.
- Once it’s a mere drip-drip and at least 40°C (104°F) reinstall the fill plug and snug it up by hand.
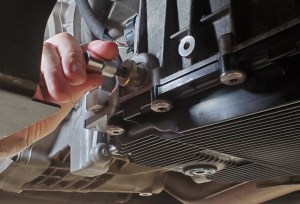
- NOTE – It must slow down to a mere drip-drip before the fluid temperature reaches 50°C (122°F).
- If it doesn’t, the fluid level must have been significantly overfull. Replace the fill plug. Stop the car and let it all cool off again to 30°C (86°F) and then start again. This cooling off may take several hours. When you start again, don’t add any fluid after you remove the fill plug, just let it return to dribbling out and wait for the temperature to reach 40°C again and hopefully you are down to a drip-drip by that point.
- Have your helper turn off the car.
- Their part is done (and they’ll be happy).
- There is an official Torque spec for the Fill Plug of 35Nm (25 ft-lbs).
- I found that I couldn’t get my 3/8″ Torque Wrench into the limited space available. In the video below you’ll see me use my small 1/4″ Torque wrench set to its maximum of 23 Nm, and then I gave it a bit more of a tug.
- If you are doing it with a simple stubby Hex wrench, just make it as snug as you can manage without stripping out the hex socket.
- Wipe up any fluid that is dripping off the transmission housing or sump where it dribbled down so you can tell if you have any actual leaks.
- Be sure to wipe up in the small groove that exists horizontally around the perimeter of the oil pan/sump and the transmission body. I got fooled into thinking I had a leak on one of the bolt heads, but it was really dribbled fluid that seemed around this groove to the lowest point on the oil pan before dripping off. I used a spritz of compressed air to blow the residual dribble fluid out of this gap.
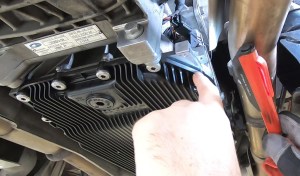
- Be sure to wipe up in the small groove that exists horizontally around the perimeter of the oil pan/sump and the transmission body. I got fooled into thinking I had a leak on one of the bolt heads, but it was really dribbled fluid that seemed around this groove to the lowest point on the oil pan before dripping off. I used a spritz of compressed air to blow the residual dribble fluid out of this gap.
- If you’ve just completed your transmission service, now is the perfect time to give a close visual inspection of all the parts you fiddled with for any leaks. Better to find out now. They should all be bone dry. Closely inspect:
- The perimeter of the the sump/pan gasket including each bolt head of the 21 bolts.
- The drain plug in the oil pan/sump.
- The connections to the Thermostatic Valve
- The Electronics Sleeve connector


Yowza! You finally have all the fluid back in the transmission. Home stretch now, all that’s left is to reinstall the exhaust heat shield, rear subframe cross brace and the rear under tray. Each has a tip or trick to it, so check out my article with links to do those tasks here.
Video
You can see me tackle this whole process in this video on Checking the Fluid levels. Pickup the action at the 21:20 mark if you want to skip the dialogue about the tools and fluid.
Here is my video on how to use the Foxwell NT510 OBDII tool to monitor the live transmission fluid temperature.

Hi Steve,
I really enjoy your videos and presentations. You have helped me so much in fixing my 2008 DB9 volante. Your Transmission library has motivated me to change my transmission fluid as well, also I received P0736 code Reverse Gear Incorrect Ratio requiring to check transmission fluid and top it up. Since it is a hassle to do it and also based on the age of my car I opted to change the Fluid. Now as I am gathering Parts for this change the dilemma is that the filter sump ZF 0501-216-243 comes three versions that I have found “b”, “c”, and in the UK “d” version which is located after the 243c for example. I noticed you used the “c” but mine had the “b” and I could not find an answer to the difference in these models. Hoping you may shed some light on this or that it does not matter which version you use.
I Thank You and my DB9 thanks you Keep Up the Great Work.
Sincerely, Pat McD
LikeLike
Hi Pat. Glad you are going to give it a go changing your own fluid. I’m not sure what the last letter difference is, likely a ‘revision’ of the part. Over on Scuderia Parts it list the Aston part number but not the ZF that it really is. https://www.scuderiacarparts.com/part/183577/astonmartin/4g434210273/oil-sump.html If the price is comparable, then order the Aston Part to be sure. If its considerably different, then keep digging I guess, or ask ZF. Let me know what you learn. Good luck!
LikeLike
Having replaced two oil pans on the MY08 DB9 and another MY09 with both the suffix b&c. they are the same pan for the ZF 6HP26 gearbox and I believe these letters only refer to a particular make e.g. BMW, Audi, Bentley etc. The important thing is the ZF part number ZF 0501-216-243 and that you double check it has 21 Hex bolts. My advice is try and get the bolts included as well as purchasing the seals and sleeve.
Thanks to Steve’s brilliant videos I undertook this job first on my own car and then it was relatively straight forwards on the next, monkey see, monkey learn, monkey do provided monkey has good teaching material.
LikeLike
after removing the Mechatronic to change the tube seals and solenoids, you must carry out a re-learning procedure for the Zf6hp26.
like at BMW or Jaguar…
I can’t find this function on my Foxwell NT530 Aston Martin, although it is there on the Foxwell Jaguar and Bmw modules
help please
LikeLike